check engine BUICK LACROSSE 2010 Owner's Guide
[x] Cancel search | Manufacturer: BUICK, Model Year: 2010, Model line: LACROSSE, Model: BUICK LACROSSE 2010Pages: 414
Page 293 of 414
Vehicle Care 9-11
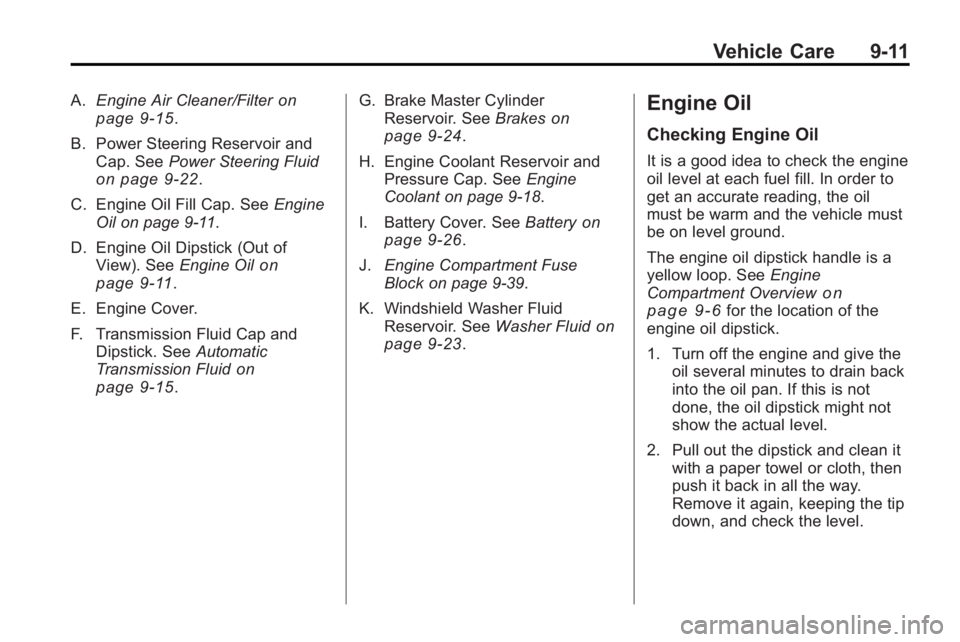
A.Engine Air Cleaner/Filteron
page 9‑15.
B. Power Steering Reservoir and Cap. See Power Steering Fluid
on page 9‑22.
C. Engine Oil Fill Cap. See Engine
Oil on page 9‑11.
D. Engine Oil Dipstick (Out of View). See Engine Oil
on
page 9‑11.
E. Engine Cover.
F. Transmission Fluid Cap and Dipstick. See Automatic
Transmission Fluid
on
page 9‑15. G. Brake Master Cylinder
Reservoir. See Brakes
on
page 9‑24.
H. Engine Coolant Reservoir and Pressure Cap. See Engine
Coolant on page 9‑18.
I. Battery Cover. See Battery
on
page 9‑26.
J. Engine Compartment Fuse
Block on page 9‑39.
K. Windshield Washer Fluid Reservoir. See Washer Fluid
on
page 9‑23.
Engine Oil
Checking Engine Oil
It is a good idea to check the engine
oil level at each fuel fill. In order to
get an accurate reading, the oil
must be warm and the vehicle must
be on level ground.
The engine oil dipstick handle is a
yellow loop. See Engine
Compartment Overview
on
page 9‑6for the location of the
engine oil dipstick.
1. Turn off the engine and give the oil several minutes to drain back
into the oil pan. If this is not
done, the oil dipstick might not
show the actual level.
2. Pull out the dipstick and clean it with a paper towel or cloth, then
push it back in all the way.
Remove it again, keeping the tip
down, and check the level.
Page 296 of 414
9-14 Vehicle Care
When the system has calculated
that oil life has been diminished, it
indicates that an oil change is
necessary. A Change Engine Oil
Soon message comes on. See
Engine Oil Messages
on
page 4‑35. Change the oil as soon
as possible within the next 1 000 km
(600 miles). It is possible that,
if driving under the best conditions,
the oil life system might not indicate
that an oil change is necessary for
over a year. However, the engine oil
and filter must be changed at least
once a year and at this time the
system must be reset. Your dealer/
retailer has trained service people
who will perform this work using
genuine parts and reset the system.
It is also important to check the oil
regularly and keep it at the proper
level.
If the system is ever reset
accidentally, the oil must be
changed at 5 000 km (3,000 miles)
since the last oil change.
Remember to reset the oil life
system whenever the oil is changed.
How to Reset the Engine Oil
Life System
Reset the system whenever the
engine oil is changed so that the
system can calculate the next
engine oil change. To reset the
system:
1. Turn the key to ON/RUN with the engine off.
2. Press the DIC menu button on the turn signal lever to scroll
through the menu items on the
DIC screen.
3. Press the set button to clear the Change Engine Oil Soon
message and/or restore the
Remaining Oil Life 100%
message.
4. Turn the key to LOCK/OFF.
The system is reset when the
Change Engine Oil Soon message
is off and the Remaining Oil Life
100% message is is displayed.
What to Do with Used Oil
Used engine oil contains certain
elements that can be unhealthy for
your skin and could even cause
cancer. Do not let used oil stay on
your skin for very long. Clean your
skin and nails with soap and water,
or a good hand cleaner. Wash or
properly dispose of clothing or rags
containing used engine oil. See the
manufacturer's warnings about the
use and disposal of oil products.
Used oil can be a threat to the
environment. If you change your
own oil, be sure to drain all the oil
from the filter before disposal. Never
dispose of oil by putting it in the
trash, pouring it on the ground, into
sewers, or into streams or bodies of
water. Recycle it by taking it to a
place that collects used oil.
Page 297 of 414
Vehicle Care 9-15
Automatic Transmission
Fluid
How to Check Automatic
Transmission Fluid
It is not necessary to check the
transmission fluid level.
A transmission fluid leak is the only
reason for fluid loss. If a leak
occurs, take the vehicle to your
dealer/retailer service department
and have it repaired as soon as
possible.
There is a special procedure for
checking and changing the
transmission fluid. Because this
procedure is difficult, you should
have this done at your dealer/
retailer service department. Contact
your dealer/retailer for additional
information or the procedure can be
found in the service manual. To
purchase a service manual, see
Service Publications Ordering
Information on page 12‑12.Change the fluid and filter at the
intervals listed in
Scheduled
Maintenance
on page 10‑2, and be
sure to use the fluid listed in
Recommended Fluids and
Lubricants on page 10‑7.
Engine Air Cleaner/Filter
The engine air cleaner/filter is
located in the engine compartment
on the driver's side of the vehicle.
See Engine Compartment Overview
on page 9‑6for more information
on location.
When to Inspect the Engine Air
Cleaner/Filter
Inspect the air cleaner/filter at the
Maintenance IIintervals and replace
it at the first oil change after each
80 000 km (50,000 mile) interval.
See Scheduled Maintenance
on
page 10‑2for more information.
If you are driving in dusty/dirty
conditions, inspect the filter at each
engine oil change.
How to Inspect the Engine Air
Cleaner/Filter
To inspect the air cleaner/filter,
remove the filter from the vehicle
and lightly shake the filter to release
loose dust and dirt. If the filter
remains caked with dirt, a new filter
is required.
To inspect or replace the engine air
cleaner/filter do the following:
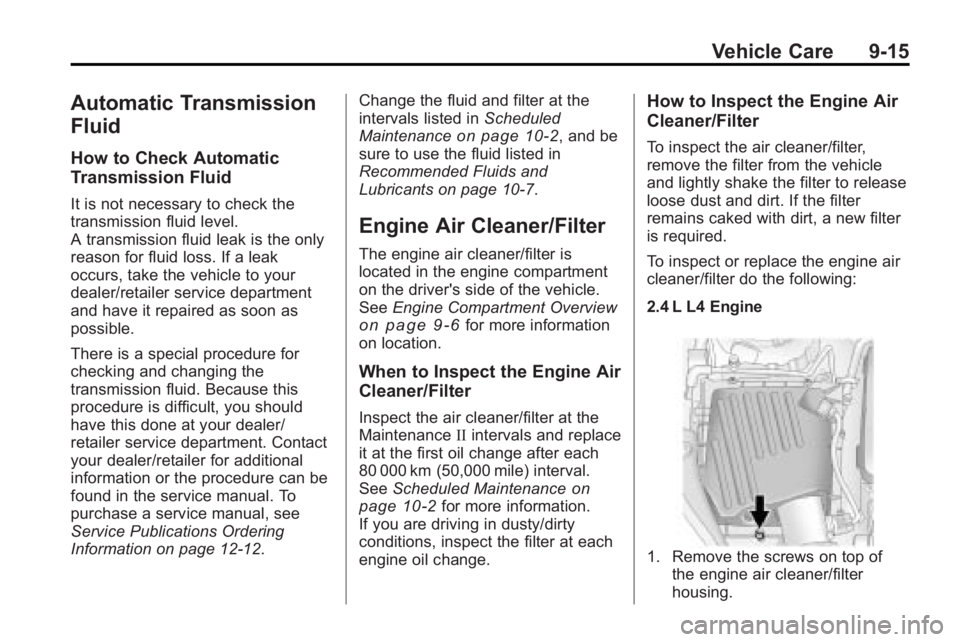
2.4 L L4 Engine
1. Remove the screws on top of the engine air cleaner/filter
housing.
Page 300 of 414
9-18 Vehicle Care
Engine Coolant
The cooling system in the vehicle is
filled with DEX-COOL®engine
coolant. This coolant is designed to
remain in the vehicle for five years
or 240 000 km (150,000 miles),
whichever occurs first.
The following explains the cooling
system and how to check and add
coolant when it is low. If there is a
problem with engine overheating,
see Engine Overheating
on
page 9‑20.
What to Use
{WARNING
Adding only plain water to the
cooling system can be
dangerous. Plain water, or some
other liquid such as alcohol, can
boil before the proper coolant
mixture will. The vehicle's coolant
warning system is set for the
proper coolant mixture. With plain
(Continued)
WARNING (Continued)
water or the wrong mixture, the
engine could get too hot but you
would not get the overheat
warning. The engine could catch
fire and you or others could be
burned. Use a 50/50 mixture of
clean, drinkable water and
DEX-COOL
®coolant.
Use a 50/50 mixture of clean,
drinkable water and DEX-COOL
®
coolant. If using this mixture,
nothing else needs to be added.
This mixture:
.Gives freezing protection down
to −37°C (−34°F), outside
temperature.
.Gives boiling protection up to
129°C (265°F), engine
temperature.
.Protects against rust and
corrosion.
.Will not damage aluminum parts.
.Helps keep the proper engine
temperature.
Notice: If an improper coolant
mixture is used, the engine could
overheat and be badly damaged.
The repair cost would not be
covered by the vehicle warranty.
Too much water in the mixture
can freeze and crack the engine,
radiator, heater core, and other
parts.
Checking Coolant
The vehicle must be on a level
surface when checking the coolant
level.
Check to see if coolant is visible in
the coolant recovery tank. If the
coolant inside the coolant recovery
tank is boiling, do not do anything
else until it cools down. If coolant is
visible but the coolant level is not at
or above the mark pointed to, add a
50/50 mixture of clean, drinkable
water and DEX-COOL
®coolant at
Page 302 of 414
9-20 Vehicle Care
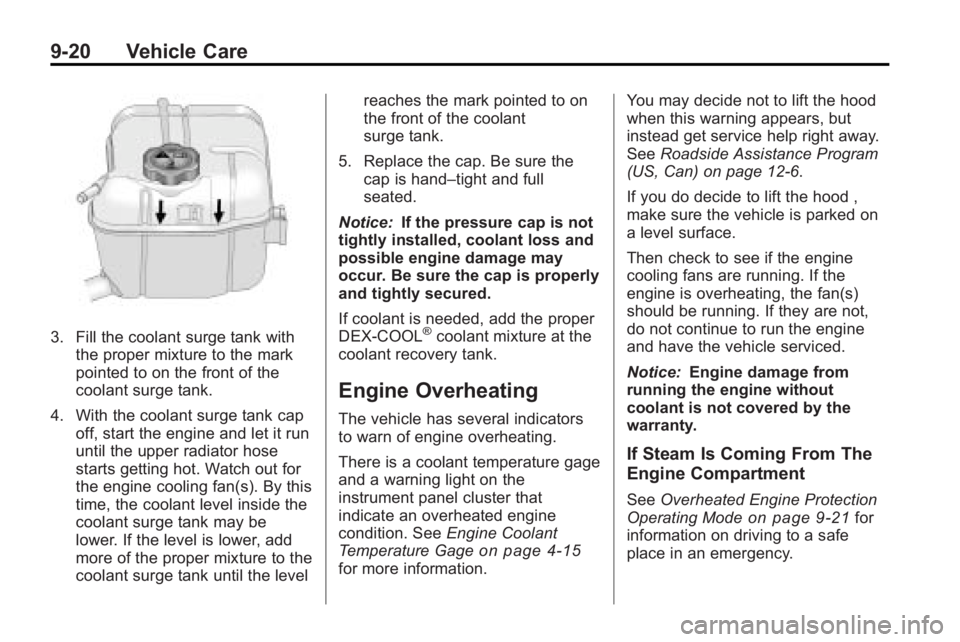
3. Fill the coolant surge tank withthe proper mixture to the mark
pointed to on the front of the
coolant surge tank.
4. With the coolant surge tank cap off, start the engine and let it run
until the upper radiator hose
starts getting hot. Watch out for
the engine cooling fan(s). By this
time, the coolant level inside the
coolant surge tank may be
lower. If the level is lower, add
more of the proper mixture to the
coolant surge tank until the level reaches the mark pointed to on
the front of the coolant
surge tank.
5. Replace the cap. Be sure the cap is hand–tight and full
seated.
Notice: If the pressure cap is not
tightly installed, coolant loss and
possible engine damage may
occur. Be sure the cap is properly
and tightly secured.
If coolant is needed, add the proper
DEX-COOL®coolant mixture at the
coolant recovery tank.
Engine Overheating
The vehicle has several indicators
to warn of engine overheating.
There is a coolant temperature gage
and a warning light on the
instrument panel cluster that
indicate an overheated engine
condition. See Engine Coolant
Temperature Gage
on page 4‑15for more information. You may decide not to lift the hood
when this warning appears, but
instead get service help right away.
See
Roadside Assistance Program
(US, Can) on page 12‑6.
If you do decide to lift the hood ,
make sure the vehicle is parked on
a level surface.
Then check to see if the engine
cooling fans are running. If the
engine is overheating, the fan(s)
should be running. If they are not,
do not continue to run the engine
and have the vehicle serviced.
Notice: Engine damage from
running the engine without
coolant is not covered by the
warranty.
If Steam Is Coming From The
Engine Compartment
See Overheated Engine Protection
Operating Modeon page 9‑21for
information on driving to a safe
place in an emergency.
Page 304 of 414
9-22 Vehicle Care
Power Steering Fluid
SeeEngine Compartment Overviewon page 9‑6for information on the
location of the power steering fluid
reservoir.
When to Check Power Steering
Fluid
It is not necessary to regularly
check power steering fluid unless a
leak is suspected in the system or
an unusual noise is heard. A fluid
loss in this system could indicate a
problem. Have the system inspected
and repaired.
How to Check Power Steering
Fluid
Check the level after the vehicle has
been driven for at least
twenty minutes so the fluid is warm.
To check the power steering fluid:
1. Turn the ignition key to LOCK/ OFF and let the engine
compartment cool down.
2. Wipe the cap and the top of the reservoir clean.
3. Unscrew the cap and pull it straight up.
4. Wipe the dipstick with a clean rag.
5. Replace the cap and completely tighten it.
6. Remove the cap again and look at the fluid level on the dipstick.
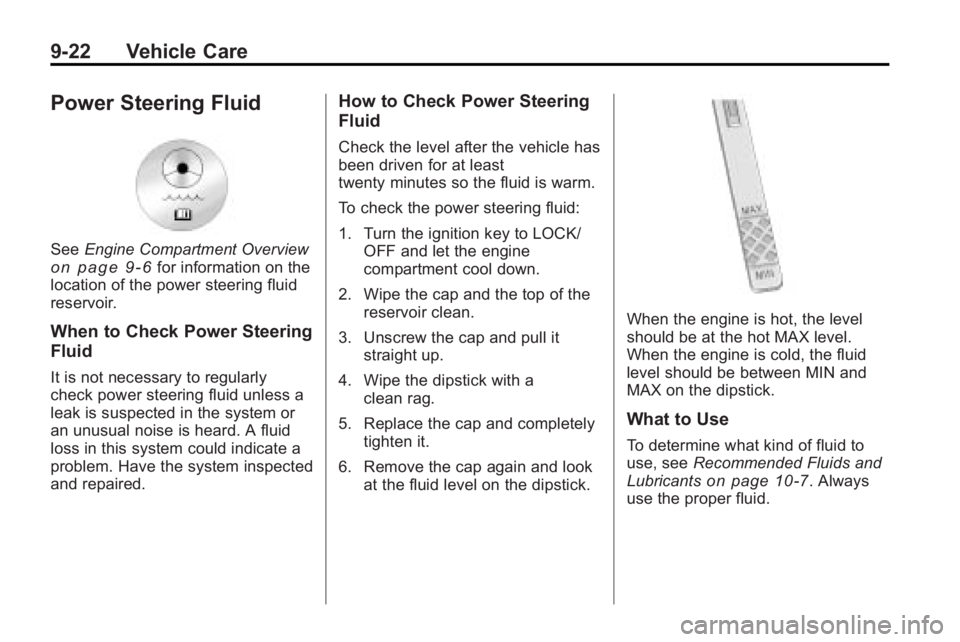
When the engine is hot, the level
should be at the hot MAX level.
When the engine is cold, the fluid
level should be between MIN and
MAX on the dipstick.
What to Use
To determine what kind of fluid to
use, see Recommended Fluids and
Lubricants
on page 10‑7. Always
use the proper fluid.
Page 309 of 414
Vehicle Care 9-27
Vehicle Storage
{WARNING
Batteries have acid that can burn
you and gas that can explode.
You can be badly hurt if you are
not careful. SeeJump Starting
on
page 9‑75
for tips on working
around a battery without
getting hurt.
Infrequent Usage: Remove the
black, negative (−) cable from the
battery to keep the battery from
running down.
Extended Storage: Remove the
black, negative (−) cable from the
battery or use a battery trickle
charger.
Starter Switch Check
{WARNING
When you are doing this
inspection, the vehicle could
move suddenly. If the vehicle
moves, you or others could be
injured.
1. Before starting this check, be sure there is enough room
around the vehicle.
2. Firmly apply both the parking brake and the regular brake.
See Parking Brake
on
page 8‑32.
Do not use the accelerator
pedal, and be ready to turn off
the engine immediately if it
starts.
3. Try to start the engine in each gear. The vehicle should start
only in P (Park) or N (Neutral).
If the vehicle starts in any other
position, contact your dealer/
retailer for service.
Automatic Transmission
Shift Lock Control
System Check
{WARNING
When you are doing this
inspection, the vehicle could
move suddenly. If the vehicle
moves, you or others could be
injured.
1. Before starting this check, be sure there is enough room
around the vehicle. It should be
parked on a level surface.
2. Firmly apply the parking brake. See Parking Brake
on
page 8‑32.
Be ready to apply the regular
brake immediately if the vehicle
begins to move.
Page 310 of 414
9-28 Vehicle Care
3. With the engine off, turn theignition to ON/RUN, but do not
start the engine. Without
applying the regular brake, try to
move the shift lever out of
P (Park) with normal effort. If the
shift lever moves out of P (Park),
contact your dealer/retailer for
service.
Ignition Transmission
Lock Check
While parked, and with the parking
brake set, try to turn the ignition to
LOCK/OFF in each shift lever
position.
.The ignition should turn to
LOCK/OFF only when the shift
lever is in P (Park).
.The ignition key should come
out only in LOCK/OFF.
Contact your dealer/retailer if
service is required.
Park Brake and P (Park)
Mechanism Check
{WARNING
When you are doing this check,
the vehicle could begin to move.
You or others could be injured
and property could be damaged.
Make sure there is room in front
of the vehicle in case it begins to
roll. Be ready to apply the regular
brake at once should the vehicle
begin to move. Park on a fairly steep hill, with the
vehicle facing downhill. Keeping
your foot on the regular brake, set
the parking brake.
.To check the parking brake's
holding ability: With the engine
running and the transmission in
N (Neutral), slowly remove foot
pressure from the regular brake
pedal. Do this until the vehicle is
held by the parking brake only.
.To check the P (Park)
mechanism's holding ability:
With the engine running, shift to
P (Park). Then release the
parking brake followed by the
regular brake.
Contact your dealer/retailer if
service is required.
Page 320 of 414
9-38 Vehicle Care
Electrical System
Electrical System
Overload
The vehicle has fuses and circuit
breakers to protect against an
electrical system overload.
When the current electrical load is
too heavy, the circuit breaker opens
and closes, protecting the circuit
until the current load returns to
normal or the problem is fixed. This
greatly reduces the chance of circuit
overload and fire caused by
electrical problems.
Fuses and circuit breakers protect
the following in the vehicle:
.Headlamp Wiring
.Windshield Wiper Motor
.Power Windows and other
Power Accessories
Headlamp Wiring
An electrical overload may cause
the lamps to go on and off, or in
some cases to remain off. Have the
headlamp wiring checked right away
if the lamps go on and off or
remain off.
Windshield Wipers
If the wiper motor overheats due to
heavy snow or ice, the windshield
wipers will stop until the motor cools
and will then restart.
Although the circuit is protected
from electrical overload, overload
due to heavy snow or ice, may
cause wiper linkage damage.
Always clear ice and heavy snow
from the windshield before using the
windshield wipers.
If the overload is caused by an
electrical problem and not snow or
ice, be sure to get it fixed.
Fuses and Circuit
Breakers
The wiring circuits in the vehicle are
protected from short circuits by a
combination of fuses and circuit
breakers. This greatly reduces the
chance of damage caused by
electrical problems.
To check a fuse, look at the
silver-colored band inside the fuse.
If the band is broken or melted,
replace the fuse. Be sure to replace
a bad fuse with a new one of the
identical size and rating.
Fuses of the same amperage can
be temporarily borrowed from
another fuse location, if a fuse goes
out. Replace the fuse as soon as
possible.
To identify and check fuses, circuit
breakers, and relays, seeEngine
Compartment Fuse Block
on
page 9‑39, Instrument Panel Fuse
Blockon page 9‑41, and Rear
Compartment Fuse Blockon
page 9‑43.
Page 358 of 414
9-76 Vehicle Care
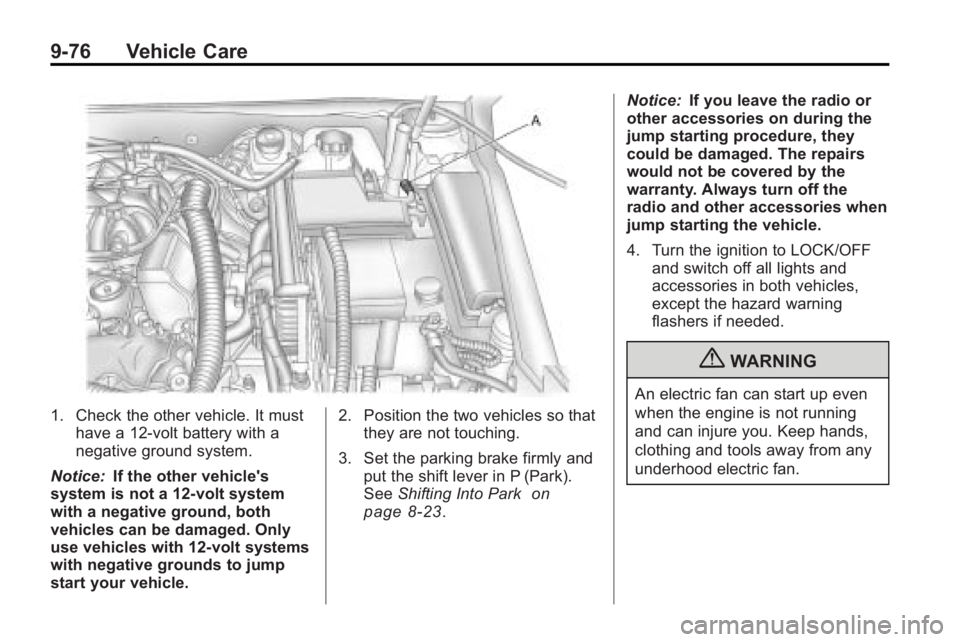
1. Check the other vehicle. It musthave a 12-volt battery with a
negative ground system.
Notice: If the other vehicle's
system is not a 12-volt system
with a negative ground, both
vehicles can be damaged. Only
use vehicles with 12-volt systems
with negative grounds to jump
start your vehicle. 2. Position the two vehicles so that
they are not touching.
3. Set the parking brake firmly and put the shift lever in P (Park).
See Shifting Into Park
on
page 8‑23. Notice:
If you leave the radio or
other accessories on during the
jump starting procedure, they
could be damaged. The repairs
would not be covered by the
warranty. Always turn off the
radio and other accessories when
jump starting the vehicle.
4. Turn the ignition to LOCK/OFF
and switch off all lights and
accessories in both vehicles,
except the hazard warning
flashers if needed.
{WARNING
An electric fan can start up even
when the engine is not running
and can injure you. Keep hands,
clothing and tools away from any
underhood electric fan.