display BUICK LESABRE 2003 User Guide
[x] Cancel search | Manufacturer: BUICK, Model Year: 2003, Model line: LESABRE, Model: BUICK LESABRE 2003Pages: 380, PDF Size: 2.75 MB
Page 129 of 380

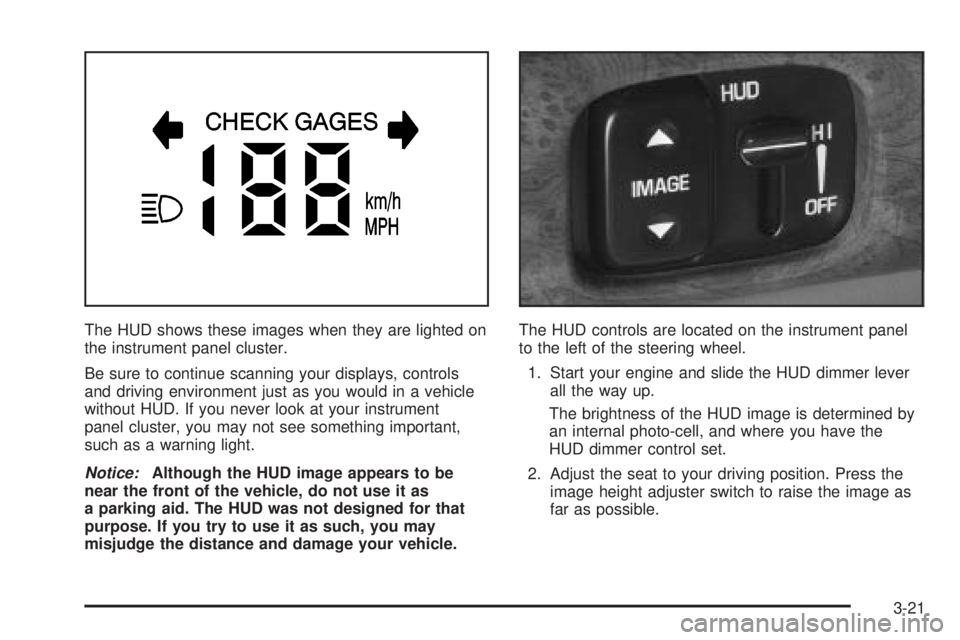
The HUD shows these images when they are lighted on
the instrument panel cluster.
Be sure to continue scanning your displays, controls
and driving environment just as you would in a vehicle
without HUD. If you never look at your instrument
panel cluster, you may not see something important,
such as a warning light.
Notice:Although the HUD image appears to be
near the front of the vehicle, do not use it as
a parking aid. The HUD was not designed for that
purpose. If you try to use it as such, you may
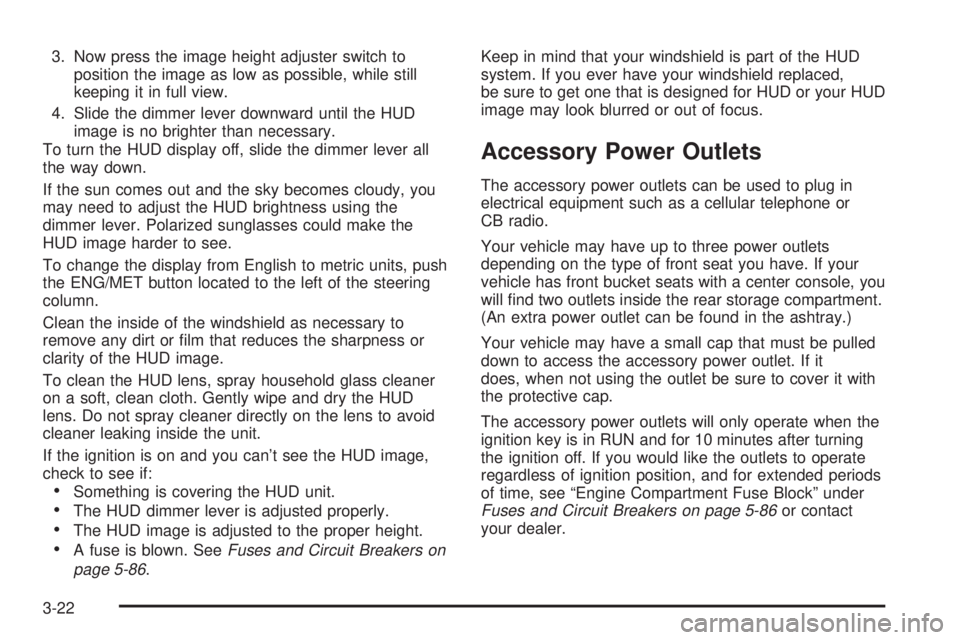
misjudge the distance and damage your vehicle.The HUD controls are located on the instrument panel
to the left of the steering wheel.
1. Start your engine and slide the HUD dimmer lever
all the way up.
The brightness of the HUD image is determined by
an internal photo-cell, and where you have the
HUD dimmer control set.
2. Adjust the seat to your driving position. Press the
image height adjuster switch to raise the image as
far as possible.
3-21
Page 130 of 380

3. Now press the image height adjuster switch to
position the image as low as possible, while still
keeping it in full view.
4. Slide the dimmer lever downward until the HUD
image is no brighter than necessary.
To turn the HUD display off, slide the dimmer lever all
the way down.
If the sun comes out and the sky becomes cloudy, you
may need to adjust the HUD brightness using the
dimmer lever. Polarized sunglasses could make the
HUD image harder to see.
To change the display from English to metric units, push
the ENG/MET button located to the left of the steering
column.
Clean the inside of the windshield as necessary to
remove any dirt or ®lm that reduces the sharpness or
clarity of the HUD image.
To clean the HUD lens, spray household glass cleaner
on a soft, clean cloth. Gently wipe and dry the HUD
lens. Do not spray cleaner directly on the lens to avoid
cleaner leaking inside the unit.
If the ignition is on and you can't see the HUD image,
check to see if:
·Something is covering the HUD unit.
·The HUD dimmer lever is adjusted properly.
·The HUD image is adjusted to the proper height.
·A fuse is blown. SeeFuses and Circuit Breakers on
page 5-86
.Keep in mind that your windshield is part of the HUD
system. If you ever have your windshield replaced,
be sure to get one that is designed for HUD or your HUD
image may look blurred or out of focus.
Accessory Power Outlets
The accessory power outlets can be used to plug in
electrical equipment such as a cellular telephone or
CB radio.
Your vehicle may have up to three power outlets
depending on the type of front seat you have. If your
vehicle has front bucket seats with a center console, you
will ®nd two outlets inside the rear storage compartment.
(An extra power outlet can be found in the ashtray.)
Your vehicle may have a small cap that must be pulled
down to access the accessory power outlet. If it
does, when not using the outlet be sure to cover it with
the protective cap.
The accessory power outlets will only operate when the
ignition key is in RUN and for 10 minutes after turning
the ignition off. If you would like the outlets to operate
regardless of ignition position, and for extended periods
of time, see ªEngine Compartment Fuse Blockº under
Fuses and Circuit Breakers on page 5-86or contact
your dealer.
3-22
Page 135 of 380

Automatic Operation
AUTO (Automatic):Press the AUTO button for
automatic control of the inside temperature, the air
delivery mode and the fan speed.
1. Press the AUTO button.
2. Adjust the temperature to 75É F (24É C).
Choosing the coldest or warmest temperature
setting will not cause the system to heat or cool any
faster. If you set the system at the warmest
temperature setting, the system will remain in
manual mode at that temperature and it will not go
into automatic mode.
In cold weather, the system will start at reduced fan
speeds to avoid blowing cold air into your vehicle
until warmer air is available. The system will
start out blowing air at the ¯oor but may change
modes automatically as the vehicle warms up
to maintain the chosen temperature setting. The
length of time needed for warm up will depend on
the outside temperature and the length of time
that has elapsed since your vehicle was last driven.
3. Wait for the system to regulate. This may take from
10 to 30 minutes. Then adjust the temperature, if
necessary.
Do not cover the solar sensor located in the center of
the instrument panel, near the windshield. For more
information on the solar sensor, see ªSensorsº later in
this section.
Manual Operation
Pressing the FAN or AIR FLOW buttons cancels
automatic operation and places the system in manual
mode. Press the AUTO button to return to automatic
operation.
TEMP (Temperature):To manually adjust the
temperature inside the vehicle, push the TEMP arrow.
Push the TEMP up arrow for warmer temperature
settings and the TEMP down arrow for cooler
temperature settings. The setting will be shown on the
display. The display will return to the outside
temperature after a few seconds.
9FAN:Pressing the FAN button will display and hold
the current fan speed while in manual mode. If you
want the fan to run at a lower speed, push the down
arrow on the FAN button. If you want to increase the fan
speed, push the up arrow on the FAN button.
AIR FLOW:Pressing the AIR FLOW button will display
and hold the current setting while in manual mode.
Use the up and down arrows on the AIR FLOW button
to cycle through the available modes.
WINDSHIELD-FLOOR:This mode directs most of the
air¯ow to the windshield with some air¯ow to the
outboard outlets (for the side windows) and the ¯oor
outlets.
3-27
Page 136 of 380

MID:This mode directs air¯ow through the instrument
panel outlets.
MID-FLOOR:This mode directs air¯ow through both
the ¯oor and the instrument panel outlets. There is also
a small amount of air directed to the windshield and
the outboard outlets (for the side windows).
FLOOR:This mode directs most of the air¯ow to the
¯oor outlets with some directed to the outboard
outlets (for the side windows) and the windshield.
OFF:Press the OFF button once to turn off the
passenger climate control, if it has been activated.
Pressing the OFF button a second time will turn off the
main system. The outside temperature will be shown
on the display when the system is off.
VENT (Flow-Through Ventilation):Pressing the VENT
button allows outside air to ¯ow through your vehicle
without the air conditioning compressor working. To turn
off the VENT selection, push the VENT button again.
Selecting the VENT and AUTO buttons at the same time
allows the system to control the air¯ow automatically
without using the air conditioning compressor or
the recirculation mode.RECIRC (Recirculation):Press this button to limit the
amount of outside air coming into the vehicle. It can
be used to prevent outside air and odors from entering
your vehicle or to help heat or cool the air inside
your vehicle more quickly. Press this button to turn the
recirculation mode on or off. When the button is
pressed, an indicator light will come on. The recirculation
mode cannot be used with the FRONT defrost or
VENT mode.
On hot days, open the windows to let hot air escape;
then close them. This helps to reduce the time it takes
for your vehicle to cool down. It also helps the system
to operate more efficiently.
For quick cool down on hot days, press the AUTO
button and the system will automatically enter
recirculation mode and the temperature will be at the full
cold position for maximum cooling.
Using these settings together for long periods of time
may cause the air inside of your vehicle to become too
dry. To prevent this from happening, after the air in
your vehicle has cooled, turn the recirculation mode off.
The air conditioning system removes moisture from
the air, so you may sometimes notice a small amount of
water dripping underneath your vehicle while idling or
after turning off the engine. This is normal.
3-28
Page 143 of 380

Speedometer and Odometer
Your speedometer lets you see your speed in both
miles per hour (mph) and kilometers per hour (km/h).
Your odometer shows how far your vehicle has
been driven, in either miles or kilometers. Press The
ENG/MET button which is located to the left of the
speedometer to change from mph to km/h.
Your vehicle has a tamper resistant odometer.
You may wonder what happens if your vehicle needs a
new odometer installed. If the new one can be set to
the mileage total of the old odometer, then it must
be. But if it can't, then it's set at zero and a label must
be put on the driver's door to show the old mileage
reading when the new odometer was installed.
Trip Odometer
A trip odometer can tell you how far you have driven
since you last set it to zero. To reset it, push the TRIP
RESET button. If your vehicle is equipped with a
DIC, see
Driver Information Center (DIC) on page 3-45for information on resetting the trip odometer.
Tachometer
If your vehicle has this
feature, the tachometer
tells you how fast the
engine is running.
It displays engine speed in
thousands of revolutions
per minute (rpm).
Notice:Do not operate the engine with the
tachometer in the shaded warning area, or engine
damage may occur.
3-35
Page 151 of 380

Your vehicle will not pass this inspection if the OBD
(on-board diagnostic) system determines that critical
emission control systems have not been completely
diagnosed by the system. The vehicle would be
considered not ready for inspection. This can happen if
you have recently replaced your battery or if your
battery has run down. The diagnostic system is
designed to evaluate critical emission control systems
during normal driving. This may take several days
of routine driving. If you have done this and your vehicle
still does not pass the inspection for lack of OBD
system readiness, your GM dealer can prepare the
vehicle for inspection.
Oil Pressure Light
If your vehicle has the
standard instrument panel
cluster, this light will
come on if there is a
problem with your vehicle's
engine oil pressure.
If your vehicle has the optional gage cluster, you can
read your oil pressure directly from the Driver
Information Center (DIC). See
DIC Controls and
Displays on page 3-46.The oil pressure light will come on brie¯y when you turn
your key to RUN. That's just a check to be sure the
light works. This is normal and doesn't show a problem.
If it doesn't come on and then go off, be sure to have
it ®xed so it will be there to warn you if there is a
problem.
When this light
comeson andstayson, and a chime
sounds, it means oil isn't going through the engine
properly. The oil could be low, or there might be some
other oil problem. See your dealer for service.
{CAUTION:
Don't keep driving if the oil pressure is low. If
you do, your engine can become so hot that it
catches ®re. You or others could be burned.
Check your oil as soon as possible and have
your vehicle serviced.
Notice:Damage to your engine from neglected oil
problems can be costly and is not covered by
your warranty.
3-43
Page 153 of 380

Fuel Gage
The fuel gage shows about how much fuel is in your
tank. It works only when the ignition is on. When
the indicator moves to the edge of the low fuel warning
band, the low fuel warning light will come on and a
chime will sound. You still have a little fuel left, but you
need to get more fuel right away.Here are some things that some owners ask about.
None of these show a problem with your fuel gage:
·At the service station, the gas pump shuts off before
the gage reads full.
·It takes more (or less) fuel to ®ll up than the gage
indicated. For example, the gage may have
indicated half full, but it took more (or less) than
half the tank's capacity to ®ll it.
·The gage moves up a little when you turn a corner,
speed up or make a hard stop.
·The gage doesn't go back to empty when you turn
off the ignition.
Driver Information Center (DIC)
Your vehicle may be equipped with a Driver Information
Center (DIC). The DIC will display information about
how your vehicle is functioning, as well as warning
messages if a system problem is detected. This feature
also allows two different drivers to store and recall
their own personal choice settings. See ªDIC Controls
and Displaysº following for more information. United States
Canada
3-45
Page 154 of 380

DIC Controls and Displays
When you turn the ignition on, the DIC will display your
DRIVER NUMBER. You can have your dealer
program your name to appear on this display line. See
your dealer for more information.
The system will then perform a status check and display
any messages if a problem is detected. If there are
no problems detected, the display will return to the mode
selected by that driver the last time the ignition was
turned off.
If a problem is detected, a diagnostic message will
appear in the display. The following pages will show the
messages you may see on the DIC display.
The message center is continuously updated with the
vehicle's performance status.The following buttons are
on the DIC control panel
which is located to
the left of the steering
column:
ODO/TRIP (Odometer/Trip):When this button is
pressed, the display will show the total mileage, and
Trip 1 or Trip 2 miles. Trip 1 and Trip 2 will display the
miles traveled since the last reset. To reset the trip
odometer, press the ODO/TRIP button until the preferred
trip number (1 or 2) is shown in the DIC display, then
press the RESET button. The trip odometer will
now accumulate miles until the next reset.
3-46
Page 155 of 380

FUEL INFO (Information):Press this button to display
fuel information.
Press the FUEL INFO button until the display shows
FUEL ECONOMY AVERAGE. Average fuel economy is
viewed as a long term approximation of your overall
driving conditions. To learn the average fuel economy
from a new starting point, press the RESET button while
the average fuel economy is displayed in the DIC.
Press the FUEL INFO button until the display shows
FUEL ECONOMY INST. Instantaneous fuel economy
varies with your driving conditions, such as acceleration,
braking and the grade of the road being traveled. The
RESET button does not function in this mode.
Press the FUEL INFO button until the display shows
FUEL RANGE. The fuel range will calculate the
remaining distance you can drive without refueling. This
calculation is based on the average fuel economy for
the last 25 miles (40.25 km) driven, and the fuel
remaining in the fuel tank. The RESET button does not
function in this mode.
GAGE INFO (Information):Use this button to display
oil pressure, oil life, coolant temperature, tire pressure
and battery information.Press the GAGE INFO button until OIL PRESSURE
appears in the display. If there are no problems detected
with the oil pressure, the display will show OIL
PRESSURE NORMAL. If a low oil pressure condition is
detected, the display will show OIL PRESSURE
LOW. If you see the OIL PRESSURE LOW message,
your vehicle could be low on oil or the oil is not
going through the engine properly. See your dealer for
service.
Press the GAGE INFO button until COOLANT TEMP
appears in the display. If there are no problems detected
with the temperature, COOLANT TEMP NORMAL will
appear in the display. If the temperature is too high,
COOLANT TEMP HOT will appear in the display. If you
see the COOLANT TEMP HOT message, the engine
is overheated. You should pull off the road, stop
your vehicle and turn off your engine as soon as
possible. This manual explains what to do. See
Engine
Overheating on page 5-26.
Press the GAGE INFO button until the display shows
BATTERY STATE. If the voltage is normal the display
will show BATTERY STATE NORMAL. If the voltage
drops below 10.5 volts, the display will show BATTERY
STATE LOW. If the voltage is above 16.2 volts, the
display will show BATTERY STATE HIGH. If the display
shows the high or low message, you need to have
your battery and charging system checked.
3-47
Page 156 of 380

Press the GAGE INFO button until OIL LIFE INDEX
appears in the display. The OIL LIFE INDEX NORMAL
display will show an estimate of the oil's remaining
useful life. When the oil life index is less than 10 percent,
the display will show OIL LIFE INDEX CHANGE OIL.
When you have the oil changed according to the
maintenance schedule (see
Part A: Scheduled
Maintenance Services on page 6-4), you will have to
reset the oil life monitor. To reset the Oil Life System,
see
Engine Oil on page 5-13.
Press the GAGE INFO button until TIRE PRESSURE
appears in the display. TIRE PRESSURE NORMAL
is displayed when the check tire pressure system
believes your vehicle's tire pressures are normal. If a
potential tire pressure problem is detected, the display
will show CHECK TIRE PRESSURE.
If you see the CHECK TIRE PRESSURE message, you
should stop as soon as you can and check all your
tires for damage. If a tire is ¯at, see
If a Tire Goes Flat
on page 5-66. Also check the tire pressure in all four
tires as soon as you can. SeeIn¯ation -- Tire Pressure
on page 5-58andCheck Tire Pressure System on
page 5-59. There are times when you will have to reset
(calibrate) the Check Tire Pressure System. See
Check Tire Pressure System on page 5-59.RESET:This button, used along with other buttons, will
reset system functions.
ENG/MET (English/Metric):Use this button to change
the display between English and metric units.
DIC messages can be displayed in one of three
languages: English, French or Spanish. The language
of the display is set by pressing both the FUEL
INFO and RESET buttons for ®ve seconds. As the
buttons are held, each language will be displayed for
three seconds. Release the FUEL INFO and RESET
buttons when the desired language is displayed. All DIC
messages will now be in the selected language.
Language selection can also be done through the DIC
Personal Choice Programming. See ªLanguage
Selectionº later in this section.
3-48