page 3 BUICK LUCERNE 2009 Owner's Manual
[x] Cancel search | Manufacturer: BUICK, Model Year: 2009, Model line: LUCERNE, Model: BUICK LUCERNE 2009Pages: 436
Page 367 of 436

4. Insert the jack container (E) into the spare tire (F).
5. Insert the wheel wrench (G) and jack (H) into
the center of the compact spare tire making sure to
line up the wheel nut hole with the bolt (I) on the
compartment �oor.
6. Secure the compact spare tire and the jack
container (E) with the washer (D) and the
retainer (C).
7. Reinstall the compact spare tire cover (B).
8. Secure with the center retainer (A).
The compact spare tire is for temporary use only.
Replace the compact spare tire with a full-size tire
as soon as you can. SeeCompact Spare Tire on
page 5-91.
Compact Spare Tire
Although the compact spare tire was fully in�ated
when the vehicle was new, it can lose air after a time.
Check the in�ation pressure regularly. It should be
60 psi (420 kPa).After installing the compact spare on the vehicle, stop as
soon as possible and make sure the spare tire is correctly
in�ated. The compact spare is made to perform well at
speeds up to 65 mph (105 km/h) for distances up to
3,000 miles (5 000 km), so you can �nish your trip and
have the full-size tire repaired or replaced at your
convenience. Of course, it is best to replace the spare
with a full-size tire as soon as possible. The spare tire
will last longer and be in good shape in case it is needed
again.
Notice:When the compact spare is installed, do not
take the vehicle through an automatic car wash with
guide rails. The compact spare can get caught on the
rails which can damage the tire, wheel and other
parts of the vehicle.
Do not use the compact spare on other vehicles.
And do not mix the compact spare tire or wheel with other
wheels or tires. They will not �t. Keep the spare tire and
its wheel together.
Notice:Tire chains will not �t the compact spare.
Using them can damage the vehicle and can damage
the chains too. Do not use tire chains on the compact
spare.
5-91
Page 371 of 436

Instrument Panel, Vinyl, and Other
Plastic Surfaces
A soft cloth dampened with water may be used to
remove dust. If a more thorough cleaning is necessary,
a clean soft cloth dampened with a mild soap solution can
be used to gently remove dust and dirt. Never use spot
lifters or removers on plastic surfaces. Many commercial
cleaners and coatings that are sold to preserve and
protect soft plastic surfaces may permanently change
the appearance and feel of the interior and are not
recommended. Do not use silicone or wax-based
products, or those containing organic solvents to
clean the vehicle’s interior because they can alter the
appearance by increasing the gloss in a non-uniform
manner.
Some commercial products may increase gloss on the
instrument panel. The increase in gloss may cause
annoying re�ections in the windshield and even make
it difficult to see through the windshield under certain
conditions.
Care of Safety Belts
Keep belts clean and dry.
{CAUTION:
Do not bleach or dye safety belts. It may severely
weaken them. In a crash, they might not be able
to provide adequate protection. Clean safety belts
only with mild soap and lukewarm water.
Weatherstrips
Silicone grease on weatherstrips will make them last
longer, seal better, and not stick or squeak. Apply
silicone grease with a clean cloth. During very cold,
damp weather frequent application may be required.
SeeRecommended Fluids and Lubricants on page 6-12.
5-95
Page 372 of 436

Washing Your Vehicle
The best way to preserve the vehicle’s �nish is to keep
it clean by washing it often.
Notice:Certain cleaners contain chemicals that can
damage the emblems or nameplates on the vehicle.
Check the cleaning product label. If it states that it
should not be used on plastic parts, do not use it on
the vehicle or damage may occur and it would not be
covered by the warranty.
Do not wash the vehicle in direct sunlight. Use a car
washing soap. Do not use cleaning agents that are
petroleum based or that contain acid or abrasives, as
they can damage the paint, metal or plastic on the
vehicle. Approved cleaning products can be obtained
from your dealer/retailer. Follow all manufacturers’
directions regarding correct product usage, necessary
safety precautions and appropriate disposal of any
vehicle care product.
Rinse the vehicle well, before washing and after to
remove all cleaning agents completely. If they are
allowed to dry on the surface, they could stain.
Dry the �nish with a soft, clean chamois or an all-cotton
towel to avoid surface scratches and water spotting.High pressure car washes may cause water to enter the
vehicle. Avoid using high pressure washes closer than
12 inches (30 cm) to the surface of the vehicle. Use of
power washers exceeding 1,200 psi (8 274 kPa) can
result in damage or removal of paint and decals.
Cleaning Exterior Lamps/Lenses
Use only lukewarm or cold water, a soft cloth and a car
washing soap to clean exterior lamps and lenses. Follow
instructions underWashing Your Vehicle on page 5-96.
Finish Care
Occasional waxing or mild polishing of the vehicle by
hand may be necessary to remove residue from the paint
�nish. Approved cleaning products can be obtained from
your dealer/retailer.
If the vehicle has a basecoat/clearcoat paint �nish, the
clearcoat gives more depth and gloss to the colored
basecoat. Always use waxes and polishes that are
non-abrasive and made for a basecoat/clearcoat paint
�nish.
Notice:Machine compounding or aggressive
polishing on a basecoat/clearcoat paint �nish
may damage it. Use only non-abrasive waxes and
polishes that are made for a basecoat/clearcoat
paint �nish on the vehicle.
5-96
Page 376 of 436

Vehicle Identi�cation
Vehicle Identi�cation Number (VIN)
This is the legal identi�er for your vehicle. It appears on
a plate in the front corner of the instrument panel, on
the driver side. It can be seen through the windshield
from outside the vehicle. The VIN also appears on
the Vehicle Certi�cation and Service Parts labels and
the certi�cates of title and registration.
Engine Identi�cation
The eighth character in the VIN is the engine code. This
code helps identify the vehicle’s engine, speci�cations,
and replacement parts. See “Engine Speci�cations”
underCapacities and Specifications on page 5-109for
your vehicle’s engine code.
Service Parts Identi�cation Label
This label is on the spare tire cover. It is very helpful if
you ever need to order parts. The label has the
following information:
Vehicle Identi�cation Number (VIN)
Model designation
Paint information
Production options and special equipment
Do not remove this label from the vehicle.
Electrical System
Add-On Electrical Equipment
Notice:Do not add anything electrical to the vehicle
unless you check with your dealer/retailer �rst. Some
electrical equipment can damage the vehicle and the
damage would not be covered by the vehicle’s
warranty. Some add-on electrical equipment can
keep other components from working as they should.
Add-on equipment can drain the vehicle battery, even if
the vehicle is not operating.
The vehicle has an airbag system. Before attempting to
add anything electrical to the vehicle, seeServicing
Your Airbag-Equipped Vehicle on page 1-72.
5-100
Page 385 of 436
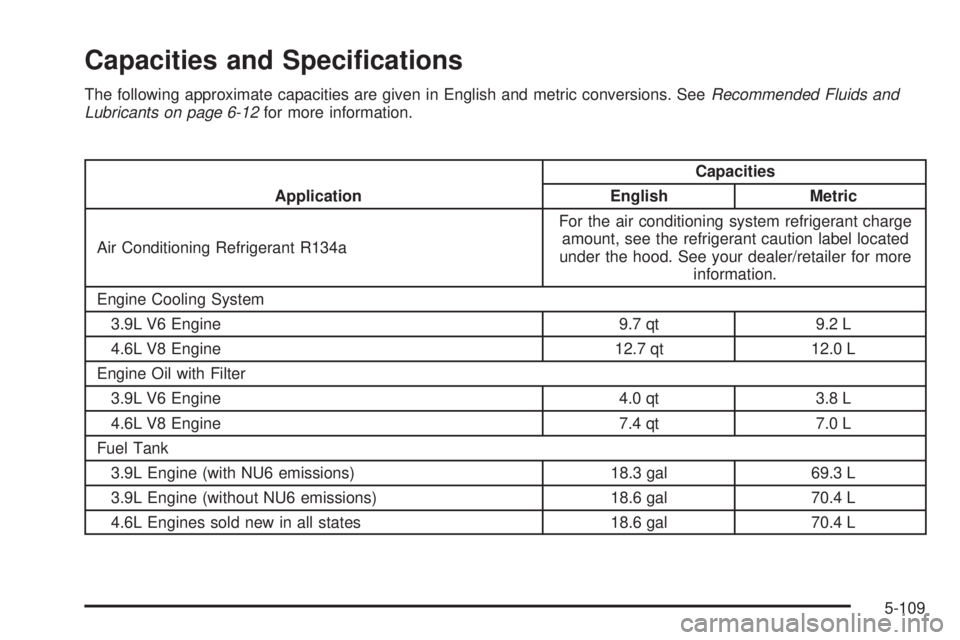
Capacities and Speci�cations
The following approximate capacities are given in English and metric conversions. SeeRecommended Fluids and
Lubricants on page 6-12for more information.
ApplicationCapacities
English Metric
Air Conditioning Refrigerant R134aFor the air conditioning system refrigerant charge
amount, see the refrigerant caution label located
under the hood. See your dealer/retailer for more
information.
Engine Cooling System
3.9L V6 Engine 9.7 qt 9.2 L
4.6L V8 Engine 12.7 qt 12.0 L
Engine Oil with Filter
3.9L V6 Engine 4.0 qt 3.8 L
4.6L V8 Engine 7.4 qt 7.0 L
Fuel Tank
3.9L Engine (with NU6 emissions) 18.3 gal 69.3 L
3.9L Engine (without NU6 emissions) 18.6 gal 70.4 L
4.6L Engines sold new in all states 18.6 gal 70.4 L
5-109
Page 389 of 436

Using the Maintenance Schedule
We want to help keep this vehicle in good working
condition. But we do not know exactly how you will drive
it. You might drive very short distances only a few times
a week. Or you might drive long distances all the time in
very hot, dusty weather. You might use the vehicle in
making deliveries. Or you might drive it to work, to do
errands, or in many other ways.
Because of all the different ways people use their
vehicles, maintenance needs vary. You might need
more frequent checks and replacements. So please
read the following and note how you drive. If you have
any questions on how to keep the vehicle in good
condition, see your dealer/retailer.
This schedule is for vehicles that:
carry passengers and cargo within recommended
limits on the Tire and Loading Information label.
SeeLoading the Vehicle on page 4-18.
are driven on reasonable road surfaces within legal
driving limits.
use the recommended fuel. SeeGasoline Octane
on page 5-6.
The services inScheduled Maintenance on page 6-4
should be performed when indicated. SeeAdditional
Required Services on page 6-6andMaintenance
Footnotes on page 6-7for further information.
{CAUTION:
Performing maintenance work on a vehicle can be
dangerous. In trying to do some jobs, you can be
seriously injured. Do your own maintenance work
only if you have the required know-how and the
proper tools and equipment for the job. If you
have any doubt, see your dealer/retailer to have
a quali�ed technician do the work. SeeDoing
Your Own Service Work on page 5-4.
Some maintenance services can be complex. So, unless
you are technically quali�ed and have the necessary
equipment, have your dealer/retailer do these jobs.
When you go to your dealer/retailer for service, trained
and supported service technicians will perform the
work using genuine parts.
To purchase service information, seeService
Publications Ordering Information on page 7-16.
Owner Checks and Services on page 6-8tells what
should be checked, when to check it, and what can easily
be done to help keep the vehicle in good condition.
6-3
Page 390 of 436
The proper replacement parts, �uids, and lubricants to
use are listed inRecommended Fluids and Lubricants
on page 6-12andMaintenance Replacement Parts
on page 6-13. When the vehicle is serviced, make
sure these are used. All parts should be replaced
and all necessary repairs done before you or anyone
else drives the vehicle. We recommend the use of
genuine parts from your dealer/retailer.
Scheduled Maintenance
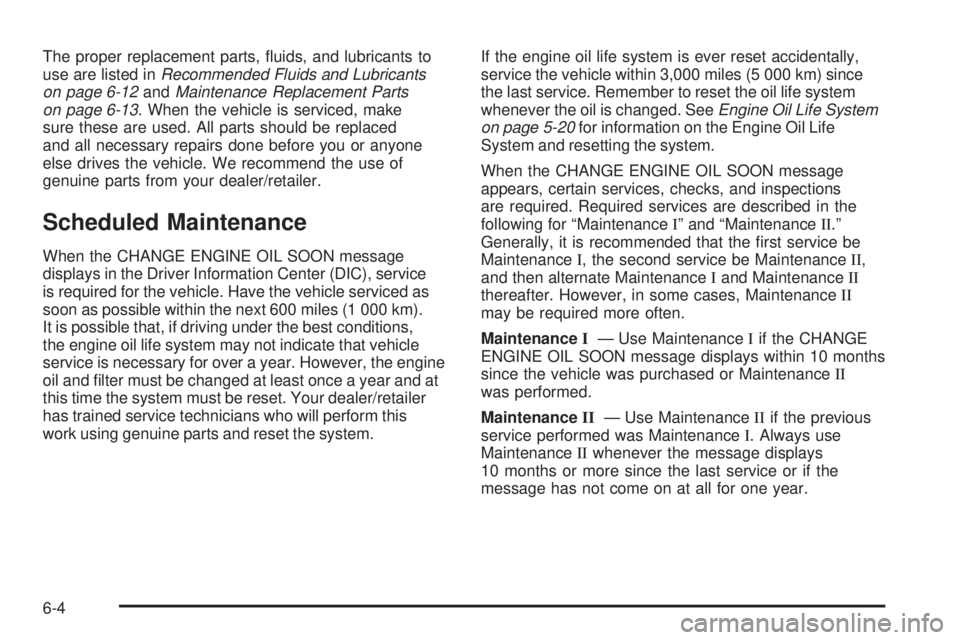
When the CHANGE ENGINE OIL SOON message
displays in the Driver Information Center (DIC), service
is required for the vehicle. Have the vehicle serviced as
soon as possible within the next 600 miles (1 000 km).
It is possible that, if driving under the best conditions,
the engine oil life system may not indicate that vehicle
service is necessary for over a year. However, the engine
oil and �lter must be changed at least once a year and at
this time the system must be reset. Your dealer/retailer
has trained service technicians who will perform this
work using genuine parts and reset the system.If the engine oil life system is ever reset accidentally,
service the vehicle within 3,000 miles (5 000 km) since
the last service. Remember to reset the oil life system
whenever the oil is changed. SeeEngine Oil Life System
on page 5-20for information on the Engine Oil Life
System and resetting the system.
When the CHANGE ENGINE OIL SOON message
appears, certain services, checks, and inspections
are required. Required services are described in the
following for “MaintenanceI” and “MaintenanceII.”
Generally, it is recommended that the �rst service be
MaintenanceI, the second service be MaintenanceII,
and then alternate MaintenanceIand MaintenanceII
thereafter. However, in some cases, MaintenanceII
may be required more often.
MaintenanceI— Use MaintenanceIif the CHANGE
ENGINE OIL SOON message displays within 10 months
since the vehicle was purchased or MaintenanceII
was performed.
MaintenanceII— Use MaintenanceIIif the previous
service performed was MaintenanceI. Always use
MaintenanceIIwhenever the message displays
10 months or more since the last service or if the
message has not come on at all for one year.
6-4
Page 391 of 436
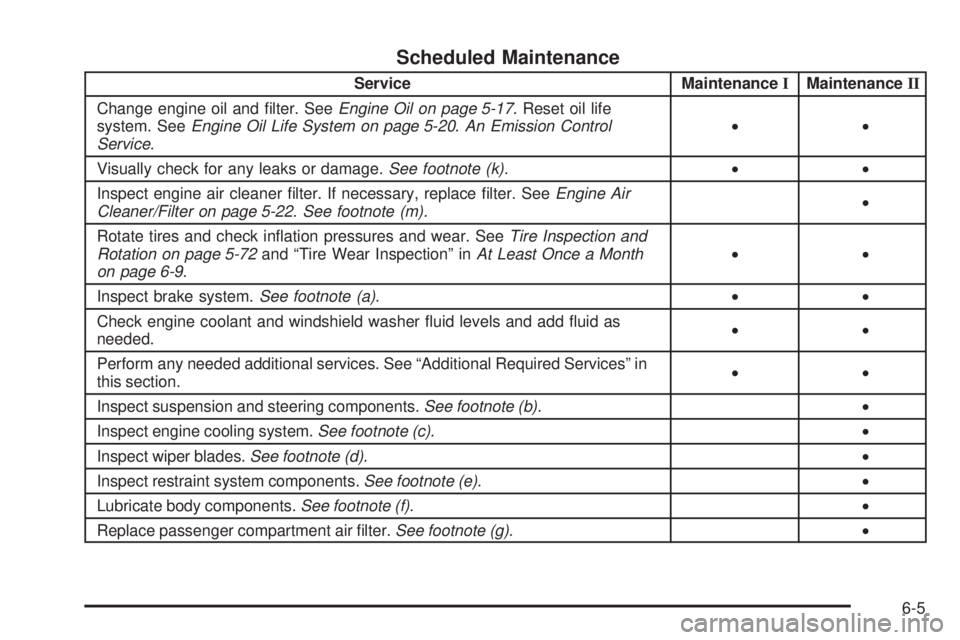
Scheduled Maintenance
Service MaintenanceIMaintenanceII
Change engine oil and �lter. SeeEngine Oil on page 5-17. Reset oil life
system. SeeEngine Oil Life System on page 5-20.An Emission Control
Service.••
Visually check for any leaks or damage.See footnote (k).••
Inspect engine air cleaner �lter. If necessary, replace �lter. SeeEngine Air
Cleaner/Filter on page 5-22.See footnote (m).•
Rotate tires and check in�ation pressures and wear. SeeTire Inspection and
Rotation on page 5-72and “Tire Wear Inspection” inAt Least Once a Month
on page 6-9.••
Inspect brake system.See footnote (a).••
Check engine coolant and windshield washer �uid levels and add �uid as
needed.••
Perform any needed additional services. See “Additional Required Services” in
this section.••
Inspect suspension and steering components.See footnote (b).•
Inspect engine cooling system.See footnote (c).•
Inspect wiper blades.See footnote (d).•
Inspect restraint system components.See footnote (e).•
Lubricate body components.See footnote (f).•
Replace passenger compartment air �lter.See footnote (g).•
6-5
Page 392 of 436
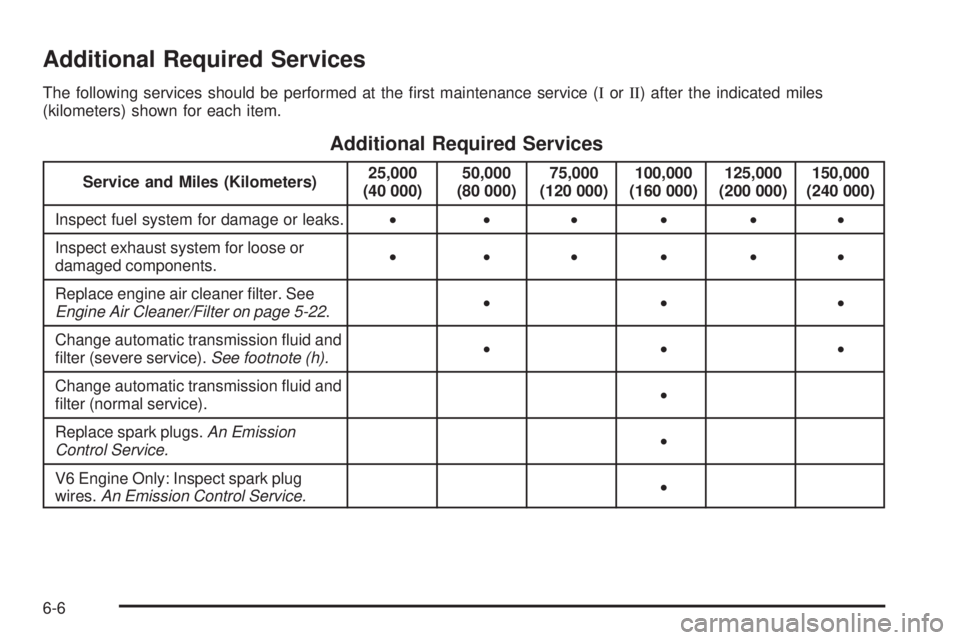
Additional Required Services
The following services should be performed at the �rst maintenance service (IorII) after the indicated miles
(kilometers) shown for each item.
Additional Required Services
Service and Miles (Kilometers)25,000
(40 000)50,000
(80 000)75,000
(120 000)100,000
(160 000)125,000
(200 000)150,000
(240 000)
Inspect fuel system for damage or leaks.• •••••
Inspect exhaust system for loose or
damaged components.• •••••
Replace engine air cleaner �lter. See
Engine Air Cleaner/Filter on page 5-22.•••
Change automatic transmission �uid and
�lter (severe service).See footnote (h).•••
Change automatic transmission �uid and
�lter (normal service).•
Replace spark plugs.An Emission
Control Service.•
V6 Engine Only: Inspect spark plug
wires.An Emission Control Service.•
6-6
Page 393 of 436
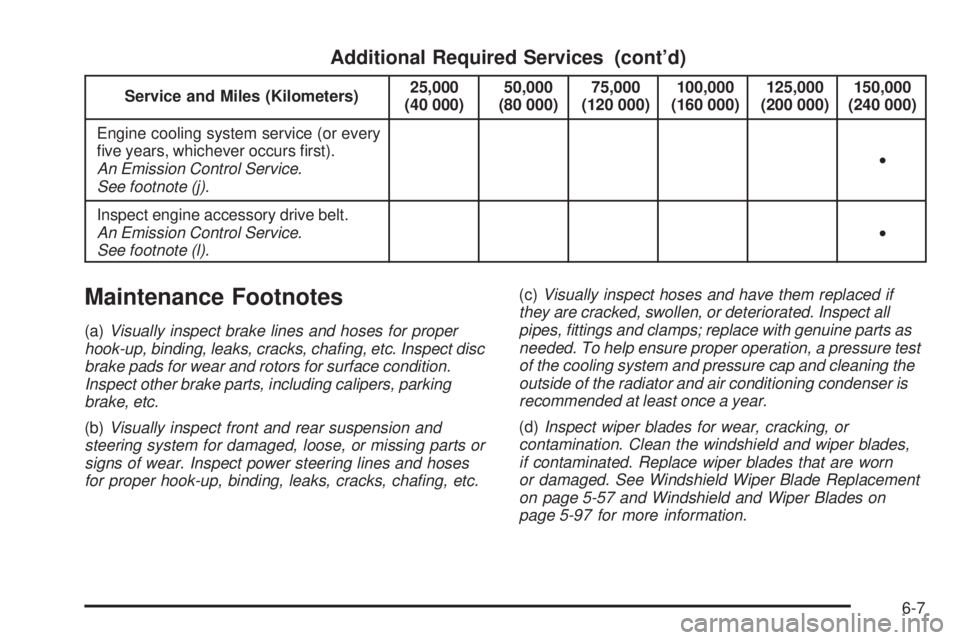
Additional Required Services (cont’d)
Service and Miles (Kilometers)25,000
(40 000)50,000
(80 000)75,000
(120 000)100,000
(160 000)125,000
(200 000)150,000
(240 000)
Engine cooling system service (or every
�ve years, whichever occurs �rst).
An Emission Control Service.
See footnote (j).•
Inspect engine accessory drive belt.
An Emission Control Service.
See footnote (l).•
Maintenance Footnotes
(a)Visually inspect brake lines and hoses for proper
hook-up, binding, leaks, cracks, chafing, etc. Inspect disc
brake pads for wear and rotors for surface condition.
Inspect other brake parts, including calipers, parking
brake, etc.
(b)Visually inspect front and rear suspension and
steering system for damaged, loose, or missing parts or
signs of wear. Inspect power steering lines and hoses
for proper hook-up, binding, leaks, cracks, chafing, etc.(c)Visually inspect hoses and have them replaced if
they are cracked, swollen, or deteriorated. Inspect all
pipes, fittings and clamps; replace with genuine parts as
needed. To help ensure proper operation, a pressure test
of the cooling system and pressure cap and cleaning the
outside of the radiator and air conditioning condenser is
recommended at least once a year.
(d)Inspect wiper blades for wear, cracking, or
contamination. Clean the windshield and wiper blades,
if contaminated. Replace wiper blades that are worn
or damaged. See Windshield Wiper Blade Replacement
on page 5-57 and Windshield and Wiper Blades on
page 5-97 for more information.
6-7