ect BUICK LUCERNE 2009 Owner's Manual
[x] Cancel search | Manufacturer: BUICK, Model Year: 2009, Model line: LUCERNE, Model: BUICK LUCERNE 2009Pages: 436
Page 350 of 436
You need new tires if any of the following statements
are true:
You can see the indicators at three or more places
around the tire.
You can see cord or fabric showing through the
tire’s rubber.
The tread or sidewall is cracked, cut, or snagged
deep enough to show cord or fabric.
The tire has a bump, bulge, or split.
The tire has a puncture, cut, or other damage that
cannot be repaired well because of the size or
location of the damage.
The rubber in tires degrades over time, even if they are
not being used. This is also true for the spare tire, if your
vehicle has one. Multiple conditions affect how fast this
aging takes place, including temperatures, loading
conditions, and in�ation pressure maintenance. With
proper care and maintenance tires will typically wear out
before they degrade due to age. If you are unsure about
the need to replace your tires as they get older, consult
the tire manufacturer for more information.
Buying New Tires
GM has developed and matched speci�c tires for
your vehicle. The original equipment tires installed
on your vehicle, when it was new, were designed to
meet General Motors Tire Performance Criteria
Speci�cation (TPC Spec) system rating. If you need
replacement tires, GM strongly recommends that
you get tires with the same TPC Spec rating. This
way, your vehicle will continue to have tires that are
designed to give the same performance and vehicle
safety, during normal use, as the original tires.
GM’s exclusive TPC Spec system considers over
a dozen critical speci�cations that impact the
overall performance of your vehicle, including
brake system performance, ride and handling,
traction control, and tire pressure monitoring
performance. GM’s TPC Spec number is molded
onto the tire’s sidewall near the tire size. If the
tires have an all-season tread design, the
TPC Spec number will be followed by an MS for
mud and snow. SeeTire Sidewall Labeling on
page 5-60for additional information.
5-74
Page 351 of 436
GM recommends replacing tires in sets of four.
This is because uniform tread depth on all tires will
help keep your vehicle performing most like it did
when the tires were new. Replacing less than a full
set of tires can affect the braking and handling
performance of your vehicle. SeeTire Inspection
and Rotation on page 5-72for information on
proper tire rotation.
{CAUTION:
Mixing tires could cause you to lose control
while driving. If you mix tires of different
sizes, brands, or types (radial and bias-belted
tires), the vehicle may not handle properly,
and you could have a crash. Using tires of
different sizes, brands, or types may also
cause damage to your vehicle. Be sure to
use the correct size, brand, and type of tires
on all wheels. It is all right to drive with
your compact spare temporarily, as it was
developed for use on your vehicle. See
Compact Spare Tire on page 5-91.
{CAUTION:
If you use bias-ply tires on the vehicle, the
wheel rim �anges could develop cracks after
many miles of driving. A tire and/or wheel
could fail suddenly, causing a crash. Use
only radial-ply tires with the wheels on the
vehicle.
If you must replace your vehicle’s tires with those
that do not have a TPC Spec number, make sure
they are the same size, load range, speed rating,
and construction type (radial and bias-belted tires)
as your vehicle’s original tires.
Vehicles that have a tire pressure monitoring
system could give an inaccurate low-pressure
warning if non-TPC Spec rated tires are installed
on your vehicle. Non-TPC Spec rated tires may give
a low-pressure warning that is higher or lower than
the proper warning level you would get with TPC
Spec rated tires. SeeTire Pressure Monitor System
on page 5-67.
Your vehicle’s original equipment tires are
listed on the Tire and Loading Information Label.
SeeLoading the Vehicle on page 4-18, for more
information about the Tire and Loading Information
Label and its location on your vehicle.
5-75
Page 352 of 436
Different Size Tires and Wheels
If you add wheels or tires that are a different size than
your original equipment wheels and tires, this may affect
the way your vehicle performs, including its braking, ride
and handling characteristics, stability, and resistance to
rollover. Additionally, if your vehicle has electronic
systems such as, antilock brakes, traction control, and
electronic stability control, the performance of these
systems can be affected.
{CAUTION:
If you add different sized wheels, your vehicle may
not provide an acceptable level of performance and
safety if tires not recommended for those wheels
are selected. You may increase the chance that you
will crash and suffer serious injury. Only use GM
speci�c wheel and tire systems developed for your
vehicle, and have them properly installed by a GM
certi�ed technician.
SeeBuying New Tires on page 5-74andAccessories
and Modifications on page 5-3for additional information.
Uniform Tire Quality Grading
Quality grades can be found where applicable on
the tire sidewall between tread shoulder and
maximum section width. For example:
Treadwear 200 Traction AA
Temperature A
The following information relates to the system
developed by the United States National Highway
Traffic Safety Administration (NHTSA), which
grades tires by treadwear, traction, and
temperature performance. This applies only to
vehicles sold in the United States. The grades are
molded on the sidewalls of most passenger car
tires. The Uniform Tire Quality Grading (UTQG)
system does not apply to deep tread, winter-type
snow tires, space-saver, or temporary use
spare tires, tires with nominal rim diameters
of 10 to 12 inches (25 to 30 cm), or to some
limited-production tires.
While the tires available on General Motors
passenger cars and light trucks may vary with
respect to these grades, they must also conform
to federal safety requirements and additional
General Motors Tire Performance Criteria (TPC)
standards.
5-76
Page 355 of 436
Wheel Replacement
Replace any wheel that is bent, cracked, or badly rusted
or corroded. If wheel nuts keep coming loose, the wheel,
wheel bolts, and wheel nuts should be replaced. If the
wheel leaks air, replace it (except some aluminum
wheels, which can sometimes be repaired). See your
dealer/retailer if any of these conditions exist.
Your dealer/retailer will know the kind of wheel you need.
Each new wheel should have the same load-carrying
capacity, diameter, width, offset, and be mounted
the same way as the one it replaces.
If you need to replace any of your wheels, wheel bolts,
wheel nuts, or Tire Pressure Monitor System (TPMS)
sensors, replace them only with new GM original
equipment parts. This way, you will be sure to have
the right wheel, wheel bolts, wheel nuts, and TPMS
sensors for your vehicle.{CAUTION:
Using the wrong replacement wheels, wheel bolts,
or wheel nuts on your vehicle can be dangerous.
It could affect the braking and handling of your
vehicle, make your tires lose air and make you
lose control. You could have a collision in which
you or others could be injured. Always use the
correct wheel, wheel bolts, and wheel nuts for
replacement.
Notice:The wrong wheel can also cause problems
with bearing life, brake cooling, speedometer or
odometer calibration, headlamp aim, bumper height,
vehicle ground clearance, and tire or tire chain
clearance to the body and chassis.
SeeChanging a Flat Tire on page 5-82for more
information.
5-79
Page 357 of 436
Notice:If your vehicle has P225/60R16 size tires,
use tire chains only where legal and only when you
must. Use only SAE Class S-type chains that are
the proper size for your tires. Install them on
the front tires and tighten them as tightly as
possible with the ends securely fastened. Drive
slowly and follow the chain manufacturer’s
instructions. If you can hear the chains contacting
your vehicle, stop and retighten them. If the contact
continues, slow down until it stops. Driving too
fast or spinning the wheels with chains on will
damage your vehicle.
If a Tire Goes Flat
It is unusual for a tire to blowout while you are driving,
especially if you maintain your vehicle’s tires properly.
If air goes out of a tire, it is much more likely to leak out
slowly. But if you should ever have a blowout, here
are a few tips about what to expect and what to do:
If a front tire fails, the �at tire creates a drag that pulls
the vehicle toward that side. Take your foot off the
accelerator pedal and grip the steering wheel �rmly.
Steer to maintain lane position, and then gently brake
to a stop well out of the traffic lane.A rear blowout, particularly on a curve, acts much like a
skid and may require the same correction you would
use in a skid. In any rear blowout remove your foot from
the accelerator pedal. Get the vehicle under control
by steering the way you want the vehicle to go. It may
be very bumpy and noisy, but you can still steer. Gently
brake to a stop, well off the road if possible.
{CAUTION:
Lifting a vehicle and getting under it to do
maintenance or repairs is dangerous without the
appropriate safety equipment and training. If a jack
is provided with the vehicle, it is designed only for
changing a �at tire. If it is used for anything else,
you or others could be badly injured or killed if the
vehicle slips off the jack. If a jack is provided with
the vehicle, only use it for changing a �at tire.
If a tire goes �at, the next part shows how to use the
jacking equipment to change a �at tire safely.
5-81
Page 364 of 436
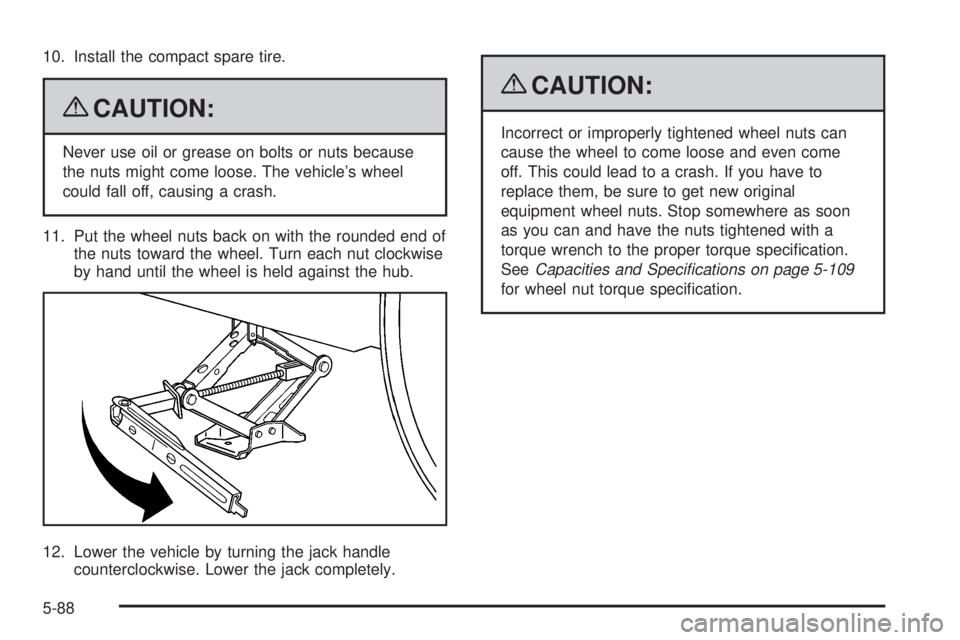
10. Install the compact spare tire.
{CAUTION:
Never use oil or grease on bolts or nuts because
the nuts might come loose. The vehicle’s wheel
could fall off, causing a crash.
11. Put the wheel nuts back on with the rounded end of
the nuts toward the wheel. Turn each nut clockwise
by hand until the wheel is held against the hub.
12. Lower the vehicle by turning the jack handle
counterclockwise. Lower the jack completely.
{CAUTION:
Incorrect or improperly tightened wheel nuts can
cause the wheel to come loose and even come
off. This could lead to a crash. If you have to
replace them, be sure to get new original
equipment wheel nuts. Stop somewhere as soon
as you can and have the nuts tightened with a
torque wrench to the proper torque speci�cation.
SeeCapacities and Specifications on page 5-109
for wheel nut torque speci�cation.
5-88
Page 367 of 436

4. Insert the jack container (E) into the spare tire (F).
5. Insert the wheel wrench (G) and jack (H) into
the center of the compact spare tire making sure to
line up the wheel nut hole with the bolt (I) on the
compartment �oor.
6. Secure the compact spare tire and the jack
container (E) with the washer (D) and the
retainer (C).
7. Reinstall the compact spare tire cover (B).
8. Secure with the center retainer (A).
The compact spare tire is for temporary use only.
Replace the compact spare tire with a full-size tire
as soon as you can. SeeCompact Spare Tire on
page 5-91.
Compact Spare Tire
Although the compact spare tire was fully in�ated
when the vehicle was new, it can lose air after a time.
Check the in�ation pressure regularly. It should be
60 psi (420 kPa).After installing the compact spare on the vehicle, stop as
soon as possible and make sure the spare tire is correctly
in�ated. The compact spare is made to perform well at
speeds up to 65 mph (105 km/h) for distances up to
3,000 miles (5 000 km), so you can �nish your trip and
have the full-size tire repaired or replaced at your
convenience. Of course, it is best to replace the spare
with a full-size tire as soon as possible. The spare tire
will last longer and be in good shape in case it is needed
again.
Notice:When the compact spare is installed, do not
take the vehicle through an automatic car wash with
guide rails. The compact spare can get caught on the
rails which can damage the tire, wheel and other
parts of the vehicle.
Do not use the compact spare on other vehicles.
And do not mix the compact spare tire or wheel with other
wheels or tires. They will not �t. Keep the spare tire and
its wheel together.
Notice:Tire chains will not �t the compact spare.
Using them can damage the vehicle and can damage
the chains too. Do not use tire chains on the compact
spare.
5-91
Page 368 of 436

Appearance Care
Interior Cleaning
The vehicle’s interior will continue to look its best if it is
cleaned often. Although not always visible, dust and
dirt can accumulate on the upholstery. Dirt can damage
carpet, fabric, leather, and plastic surfaces. Regular
vacuuming is recommended to remove particles from the
upholstery. It is important to keep the upholstery from
becoming and remaining heavily soiled. Soils should be
removed as quickly as possible. The vehicle’s interior
may experience extremes of heat that could cause
stains to set rapidly.
Lighter colored interiors may require more frequent
cleaning. Use care because newspapers and garments
that transfer color to home furnishings may also
transfer color to the vehicle’s interior.
When cleaning the vehicle’s interior, only use cleaners
speci�cally designed for the surfaces being cleaned.
Permanent damage may result from using cleaners onsurfaces for which they were not intended. Use glass
cleaner only on glass. Remove any accidental over-spray
from other surfaces immediately. To prevent over-spray,
apply cleaner directly to the cleaning cloth.
Notice:Using abrasive cleaners when cleaning
glass surfaces on the vehicle, could scratch
the glass and/or cause damage to the rear window
defogger. When cleaning the glass on the vehicle,
use only a soft cloth and glass cleaner.
Many cleaners contain solvents that may become
concentrated in the vehicle’s breathing space. Before
using cleaners, read and adhere to all safety instructions
on the label. While cleaning the vehicle’s interior,
maintain adequate ventilation by opening the vehicle’s
doors and windows.
Dust may be removed from small buttons and knobs
using a small brush with soft bristles.
Products that remove odors from the vehicle’s
upholstery and clean the vehicle’s glass can be obtained
from your dealer/retailer.
5-92
Page 369 of 436
Do not clean the vehicle using:
A knife or any other sharp object to remove a soil
from any interior surface.
A stiff brush. It can cause damage to the vehicle’s
interior surfaces.
Heavy pressure or aggressive rubbing with a
cleaning cloth. Use of heavy pressure can damage
the interior and does not improve the effectiveness
of soil removal.
Laundry detergents or dishwashing soaps with
degreasers can leave residue that streaks and
attracts dirt. For liquid cleaners, about 20 drops
per gallon (3.78 L) of water is a good guide.
Use only mild, neutral-pH soaps.
Too much cleaner that saturates the upholstery.
Organic solvents such as naptha, alcohol, etc. that
can damage the vehicle’s interior.
Fabric/Carpet
Use a vacuum cleaner with a soft brush attachment
frequently to remove dust and loose dirt. A canister
vacuum with a beater bar in the nozzle may only
be used on �oor carpet and carpeted �oor mats.
For any soil, always try to remove it �rst with plain
water or club soda. Before cleaning, gently remove as
much of the soil as possible using one of the following
techniques:
For liquids: gently blot the remaining soil with a
paper towel. Allow the soil to absorb into the
paper towel until no more can be removed.
For solid dry soils: remove as much as possible
and then vacuum.
5-93
Page 370 of 436

To clean:
1. Saturate a lint-free, clean white cloth with water or
club soda.
2. Wring the cloth to remove excess moisture.
3. Start on the outside edge of the soil and gently rub
toward the center. Continue cleaning, using a clean
area of the cloth each time it becomes soiled.
4. Continue to gently rub the soiled area until the
cleaning cloth remains clean.
5. If the soil is not completely removed, use a mild soap
solution and repeat the cleaning process that was
used with plain water.
If any of the soil remains, a commercial fabric cleaner
or spot lifter may be necessary. When a commercial
upholstery cleaner or spot lifter is to be used, test
a small hidden area for colorfastness �rst. If the locally
cleaned area gives any impression that a ring
formation may result, clean the entire surface.
After the cleaning process has been completed, a paper
towel can be used to blot excess moisture from the fabric
or carpet.Leather
A soft cloth dampened with water can be used to
remove dust. If a more thorough cleaning is necessary,
a soft cloth dampened with a mild soap solution can
be used. Allow the leather to dry naturally. Do not use
heat to dry. Never use steam to clean leather. Never
use spot lifters or spot removers on leather. Many
commercial leather cleaners and coatings that are
sold to preserve and protect leather may permanently
change the appearance and feel of the leather and
are not recommended. Do not use silicone or wax-based
products, or those containing organic solvents to
clean the vehicle’s interior because they can alter the
appearance by increasing the gloss in a non-uniform
manner. Never use shoe polish on leather.
5-94