BUICK PARK AVENUE 1996 Owners Manual
Manufacturer: BUICK, Model Year: 1996, Model line: PARK AVENUE, Model: BUICK PARK AVENUE 1996Pages: 388, PDF Size: 20.04 MB
Page 301 of 388
surfaces. Wash the vehicle as soon as possible.
If necessary, use non-abrasive cleaners that are marked
safe for painted surfaces to remove foreign matter.
Exterior painted surfaces are subject to aging, weather
and chemical fallout that can take their toll over a period
of years. You can help to keep the paint finish looking
new by keeping your Buick garaged or covered
whenever possible.
Aluminum Wheels (If So Equipped)
Keep your wheels clean using a soft clean cloth with
mild soap and water. Rinse with clean water. After
rinsing thoroughly, dry with a soft clean towel. A wax
may then be applied.
The surface of these wheels
is similar to the painted
surface
of your vehicle. Don’t use strong soaps,
chemicals, abrasive polishes, abrasive cleaners or
abrasive cleaning brushes on them because you could
damage the surface.
Don’t take your vehicle through an automatic car wash
that has silicon carbide tire cleaning brushes. These
brushes can also damage the surface
of these wheels.
Tires
To clean your tires, use a stiff brush with a tire cleaner.
NOTICE:
When applying a tire dressing always take care to
wipe
off any overspray or splash from all painted
surfaces on the body
or wheels of the vehicle.
Petroleum-based products may damage the
paint finish.
Sheet Metal Damage
If your vehicle is damaged and requires sheet metal
repair or replacement, make sure the body repair shop
applies anti-corrosion material
to the parts repaired or
replaced to restore corrosion protection.
ProCarManuals.com
Page 302 of 388
Finish Damage
Any stone chips, fractures or deep scratches in the finish
should be repaired right away. Bare metal will corrode
quickly and may develop into a major repair expense.
Minor chips and scratches can be repaired with touch-up
materials available from your dealer or other service
outlets. Larger areas
of finish damage can be corrected
in your dealer’s body and paint shop.
Underbody Maintenance
Chemicals used for ice and snow removal and dust control
can collect on the underbody.
If these are not removed,
accelerated corrosion (rust) can occur on
the underbody
parts such as fuel lines, frame, floor pan and exhaust system even though they have corrosion protection.
At least every spring, flush these materials from the
underbody with plain water. Clean any areas where
mud
and other debris can collect. Dirt packed in closed areas
of the frame should be loosened before being flushed.
Your dealer or an underbody car washing system can do
this
for you.
Chemical Paint Spotting
Some weather and atmospheric conditions can create a
chemical fallout. Airborne pollutants can fall upon and
attack painted surfaces on your vehicle.
This damage
can take two forms: blotchy, ringlet-shaped
discolorations, and small irregular dark spots etched into
the paint surface.
Although no defect in the paint job causes this, Buick
will repair, at no charge
to the owner, the surfaces of
new vehicles damaged by this fallout condition within
12 months or 12,000 miles (20 000 km) of purchase,
whichever occurs first.
ProCarManuals.com
Page 303 of 388
c
ENNUMBER I SIZE 1 DESCRIPTION USAGE
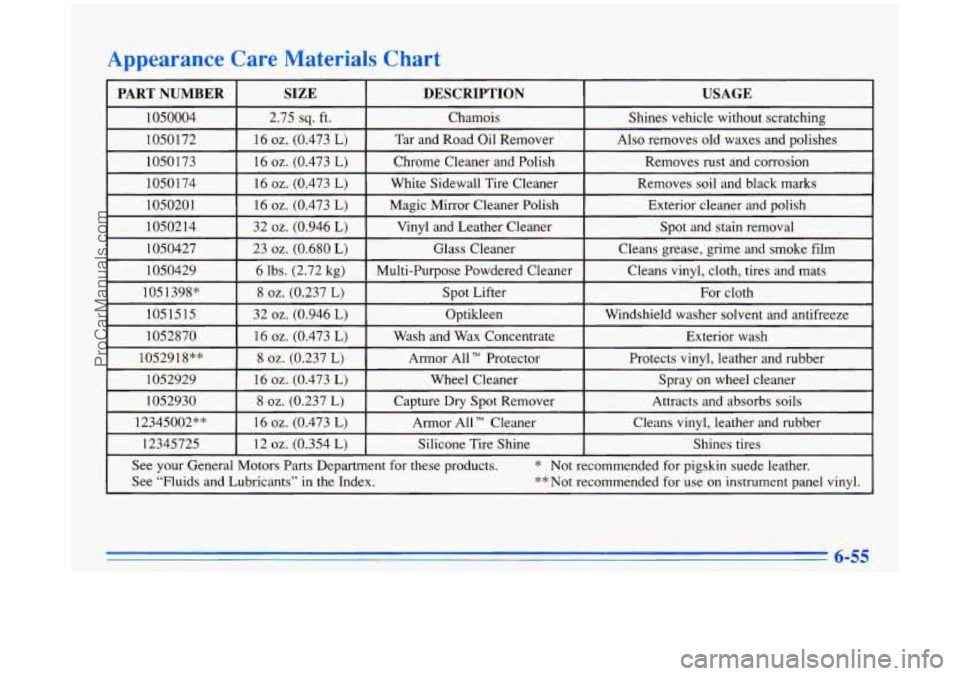
See your General Motors Parts Department for these products. * Not recommended for pigskin suede leather.
See “Fluids and Lubricants” in the Index.
** Not recommended for use on instrument panel vinyl. 1
ProCarManuals.com
Page 304 of 388
Vehicle Identification Number (VIN)
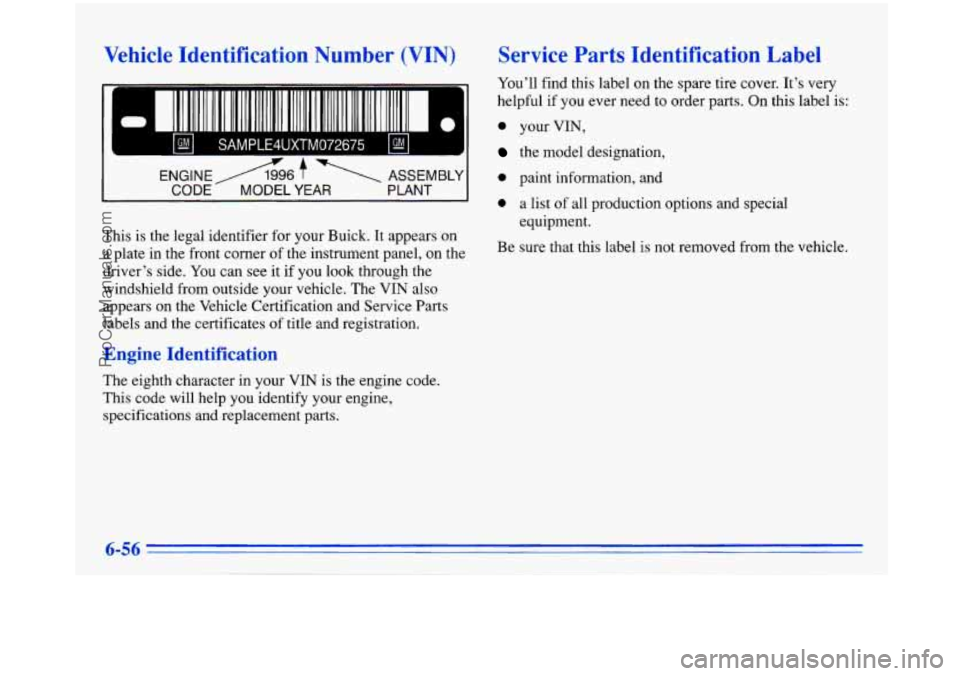
SAMPLE4UXTM072675 P
This is the legal identifier for your Buick. It appears on
a plate in the front corner of the instrument panel, on the
driver’s side. You can
see it if you look through the
windshield from outside your vehicle. The VIN also
appears on the Vehicle Certification and Service Parts
labels and the certificates of title and registration.
Engine Identification
The eighth character in your VIN is the engine code.
This code will help you identify your engine,
specifications and replacement parts.
Service Parts Identification Label
You’ll find this label on the spare tire cover. It’s very
helpful if you ever need to order parts. On this label is:
0 your VIN,
the model designation,
0 paint information, and
0 a list of all production options and special
Be sure that this label
is not removed from the vehicle.
equipment.
ProCarManuals.com
Page 305 of 388
Electrical System Headlamp Wiring
Add-on Electrical Equipment
I NOTICE: I
Don’t add anything electrical to your Buick unless
you check with your dealer first. Some electrical
equipment can damage your vehicle and the
damage wouldn’t be covered by your warranty. Some add-on electrical equipment can keep other
components from working as they should.
Your vehicle has an air bag system. Before attempting to
add anything electrical to your Buick, see “Servicing
Your Air Bag-Equipped Buick” in the Index. The
headlamp wiring is protected by a circuit breaker in
the underhood fuse center. An electrical overload will
cause the lamps to go on and
off, or in some cases to
remain off. If this happens, have your headlamp wiring
checked right away.
Windshield Wipers
The windshield wiper motor is protected by a circuit
breaker and a fuse.
If the motor overheats due to heavy
snow, etc., the wiper will stop until the motor cools.
If
the overload is caused by some electrical problem and
not snow, etc., be sure
to get it fixed.
Power Windows and Other Power Options
Circuit breakers in the fuse panel protect the power
windows and other power accessories. When the current
load is too heavy, the circuit breaker opens and closes,
protecting the circuit until the problem is fixed or
goes away.
& 6-57
ProCarManuals.com
Page 306 of 388
MaxifuseslRelay Center
To check the fuses in this underhood fuse center, turn
the two knobs one-quarter
turn counterclockwise and
remove the cover. There
is a chart inside the cover that
explains the features and controls governed by each fuse
and relay.
The PASS-Key
11 fuse is located in the right side
relay center.
Fuses and Circuit Breakers
The wiring circuits in your vehicle are protected from
short circuits by a combination of fuses and circuit
breakers. This greatly reduces the chance of damage
caused by electrical problems. Look
at the silver-colored band inside the fuse. If the
band
is broken or melted, replace the fuse. Be sure you
replace
a bad fuse with a new one of the identical size
and rating.
If you ever have a problem on the road and don’t have
a spare fuse, you can borrow one that has the same
amperage. Just pick some feature of your vehicle that
you can get along without -- like the radio or cigarette
lighter
-- and use its fuse, if it is the correct amperage.
Replace it as soon as you can.
There are two fuse blocks in your vehicle: the driver’s
side and passenger’s side fuse blocks.
ProCarManuals.com
Page 307 of 388
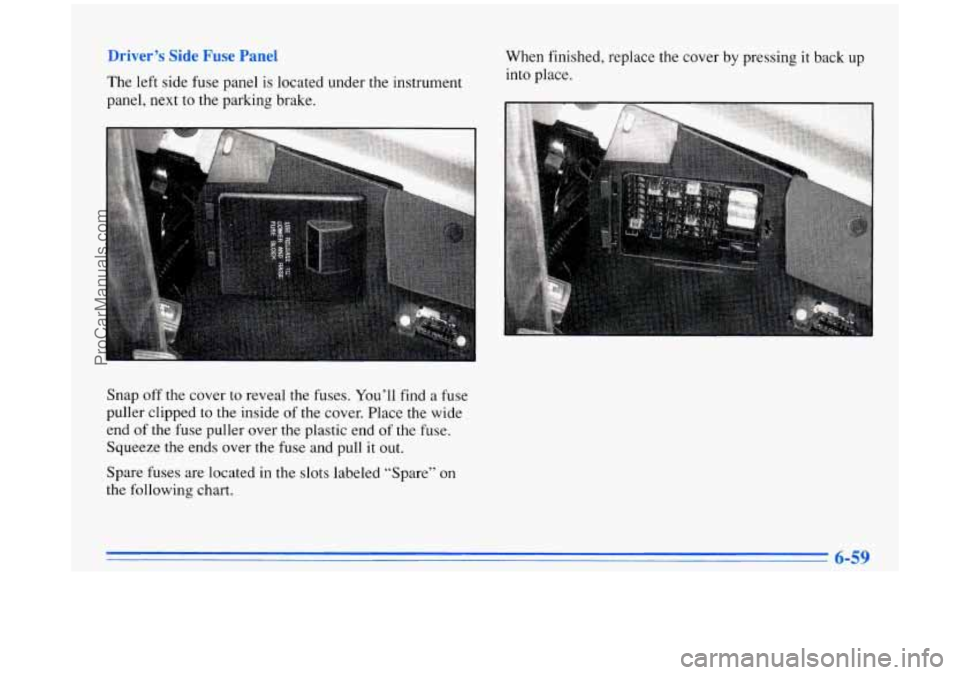
- - er ’s Slae r ‘use Panel
The left side fuse panel is located under the instrument
panel, next to the parking brake. When
finished, replace the cover by pressing
it back up
into place.
Snap
off the cover to reveal the fuses. You’ll find a fuse
puller clipped to the inside of
the cover. Place the wide
end
of the fuse puller over the plastic end of the fuse.
Squeeze the ends over the fuse and pull it out.
Spare fuses are located in the slots labeled “Spare”
on
the following chart.
ProCarManuals.com
Page 308 of 388
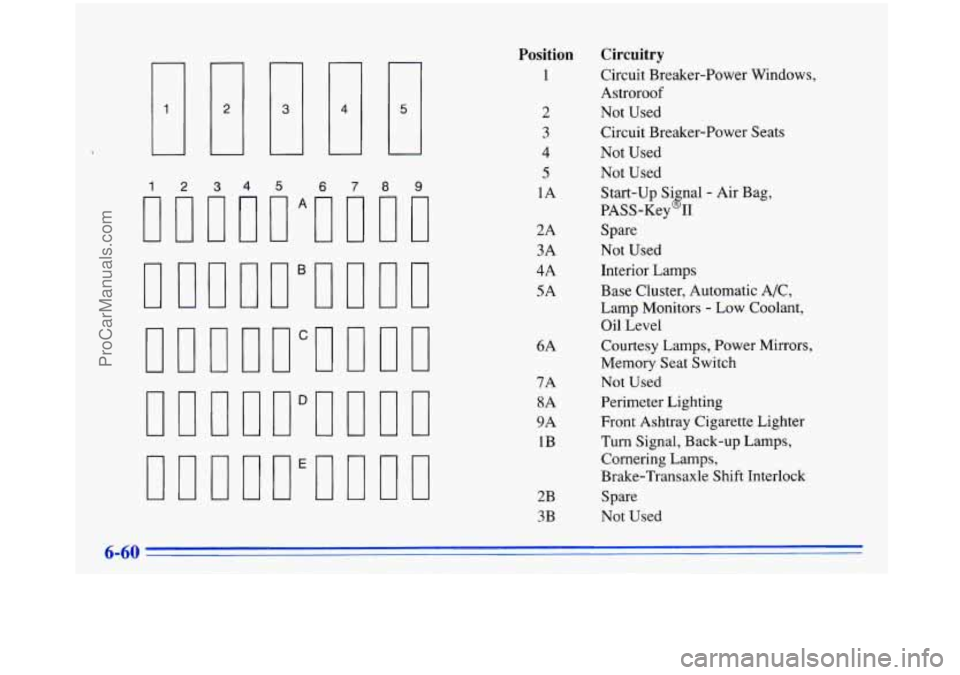
1 4
1 I*
5 6789
Position
1
2
3
4
5
1A
2A
3A
4A
5A
6A
7A 8A
9A 1B
2B 3B
Circuitry
Circuit Breaker-Power Windows,
Astroroof
Not Used
Circuit Breaker-Power Seats
Not Used
Not Used Start-up Si nal- Air Bag,
PASS-Key
8 I1
Spare
Not Used Interior Lamps
Base Cluster, Automatic
A/C,
Lamp Monitors - Low Coolant,
Oil Level
Courtesy Lamps, Power Mirrors,
Memory Seat Switch
Not Used
Perimeter Lighting
Front Ashtray Cigarette Lighter
Turn Signal, Back-up Lamps,
Cornering Lamps,
Brake-Transaxle Shift Interlock
Spare
Not Used
6-60
ProCarManuals.com
Page 309 of 388
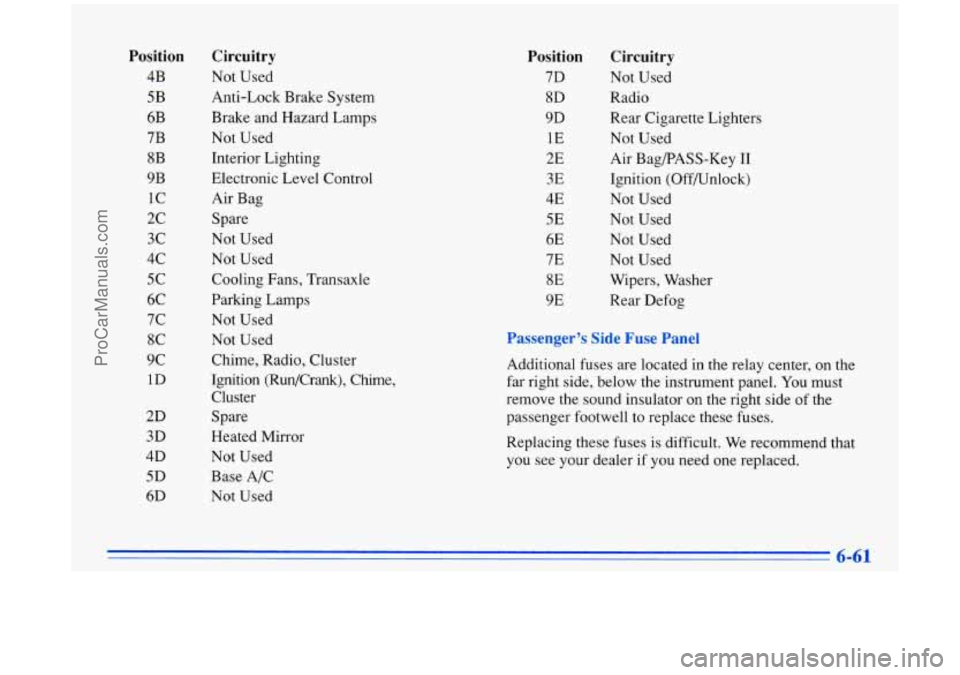
Position
4B
5B
6B
7B 8B
9B 1c
2c 3c
4c
5c
6C
7c 8C
9c
1D
2D
3D
4D
5D
6D
Circuitry
Not Used
Anti-Lock Brake System
Brake and Hazard Lamps
Not Used
Interior Lighting
Electronic Level Control Air Bag
Spare
Not Used
Not Used
Cooling Fans, Transaxle
Parking Lamps
Not Used Not Used
Chime, Radio, Cluster
Ignition (Run/Crank), Chime, Cluster
Spare
Heated Mirror
Not Used
Base A/C
Not Used
Position
7D
8D
9D
1E
2E
3E
4E
5E
6E
7E
8E
9E
Circuitry
Not Used
Radio
Rear Cigarette Lighters
Not Used
Air BagPASS-Key
I1
Ignition (Off/Unlock)
Not Used
Not Used
Not Used
Not Used
Wipers, Washer
Rear Defog
Passenger’s Side Fuse Panel
Additional fuses are located in the relay center, on the
far right side, below the instrument panel. You must
remove the sound insulator on
the right side of the
passenger footwell to replace these fuses.
Replacing these fuses is difficult. We recommend that
you see your dealer if you need one replaced.
ProCarManuals.com
Page 310 of 388
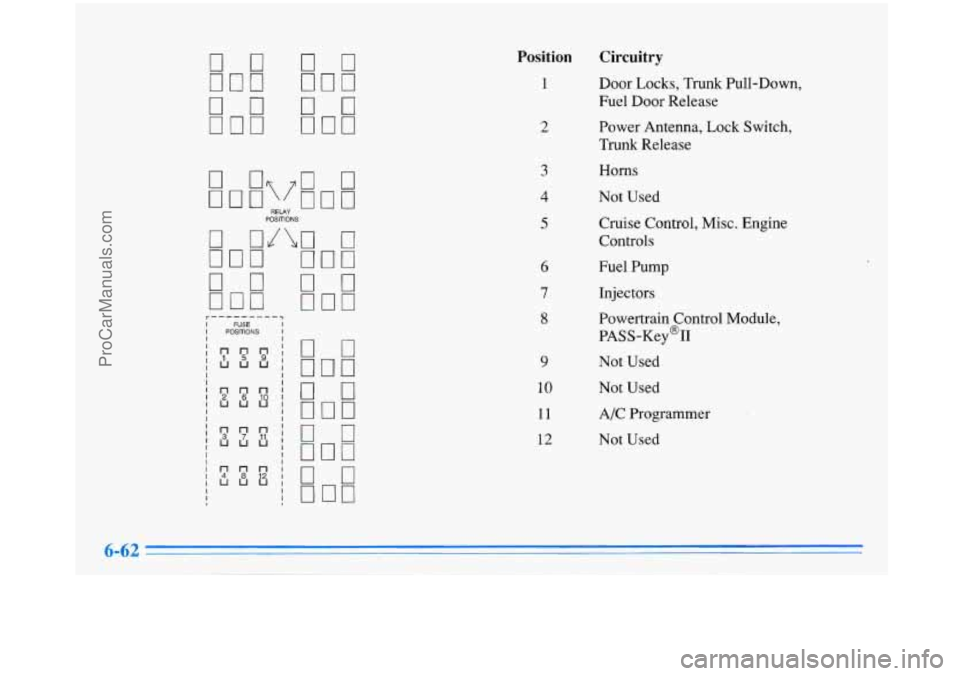
POSl?lONS
r---------? I FUSE I I POSITIONS I
Position Circuitry
1
2
9
10
11
12
Door Locks, Trunk Pull-Down,
Fuel Door Release
Power Antenna, Lock Switch,
Trunk Release
Horns
Not Used Cruise Control, Misc. Engine
Controls
Fuel
F’ump
Injectors
Powertrain Control Module,
PASS-Key@II
Not Used
Not Used
A/C Programmer
Not Used
6-62
ProCarManuals.com