air filter BUICK PARK AVENUE 2003 Owner's Manual
[x] Cancel search | Manufacturer: BUICK, Model Year: 2003, Model line: PARK AVENUE, Model: BUICK PARK AVENUE 2003Pages: 372, PDF Size: 2.8 MB
Page 113 of 372
Instrument Panel Overview...............................3-2
Hazard Warning Flashers................................3-4
Other Warning Devices...................................3-4
Horn.............................................................3-5
Tilt Wheel.....................................................3-5
Turn Signal/Multifunction Lever.........................3-5
Exterior Lamps.............................................3-12
Interior Lamps..............................................3-14
Head-Up Display (HUD).................................3-17
Ultrasonic Rear Parking Assist (URPA)............3-19
Accessory Power Outlets...............................3-21
Ashtrays and Cigarette Lighter........................3-22
Climate Controls............................................3-22
Dual Automatic Climate Control System...........3-22
Outlet Adjustment.........................................3-26
Passenger Compartment Air Filter...................3-27
Steering Wheel Climate Controls.....................3-28
Climate Controls Personalization.....................3-28
Warning Lights, Gages and Indicators.............3-29
Instrument Panel Cluster................................3-30
Speedometer and Odometer...........................3-32
Tachometer.................................................3-32
Safety Belt Reminder Light.............................3-33
Air Bag Readiness Light................................3-33
Battery Warning Light....................................3-34
Brake System Warning Light..........................3-34Anti-Lock Brake System Warning Light.............3-36
Traction Control System (TCS) Warning Light . . .3-36
Engine Coolant Temperature Gage..................3-37
Malfunction Indicator Lamp.............................3-37
Oil Pressure Light.........................................3-40
Security Light...............................................3-41
Cruise Control Light......................................3-41
Service Vehicle Soon Light............................3-41
Fuel Gage...................................................3-42
Driver Information Center (DIC).......................3-43
DIC Controls and Displays.............................3-43
DIC Warnings and Messages.........................3-45
DIC Vehicle Personalization............................3-46
Audio System(s).............................................3-51
Setting the Time...........................................3-52
Radio with Cassette......................................3-52
Radio with Cassette and CD..........................3-56
Trunk-Mounted CD Changer...........................3-62
Personal Choice Radio Controls......................3-65
Theft-Deterrent Feature..................................3-66
Audio Steering Wheel Controls.......................3-68
Understanding Radio Reception......................3-68
Care of Your Cassette Tape Player.................3-69
Care of Your CDs.........................................3-70
Care of Your CD Player................................3-70
Heated Backlite Antenna................................3-70
Section 3 Instrument Panel
3-1
Page 135 of 372
Automatic Operation
AUTO (Automatic):Press the AUTO button for
automatic control of the inside temperature, the air
delivery mode and the fan speed.
1. Press the AUTO button.
2. Adjust the temperature to 75É F (24É C).
Choosing the coldest or warmest temperature
setting will not cause the system to heat or cool any
faster. If you set the system at the warmest
temperature setting, the system will remain in
manual mode at that temperature and it will not go
into automatic mode.
In cold weather, the system will start at reduced fan
speeds to avoid blowing cold air into your vehicle
until warmer air is available. The system will
start out blowing air at the ¯oor but may change
modes automatically as the vehicle warms up
to maintain the chosen temperature setting. The
length of time needed for warm up will depend on
the outside temperature and the length of time
that has elapsed since your vehicle was last driven.
3. Wait for the system to regulate. This may take from
10 to 30 minutes. Then adjust the temperature, if
necessary.
Do not cover the solar sensor located in the center of
the instrument panel, near the windshield. For more
information on the solar sensor, see ªSensorsº later in
this section.
Manual Operation
Pressing the FAN or AIR FLOW buttons cancels
automatic operation and places the system in manual
mode. Press the AUTO button to return to automatic
operation.
TEMP (Temperature):To manually adjust the
temperature inside the vehicle, push the TEMP arrow.
Push the TEMP up arrow for warmer temperature
settings and the TEMP down arrow for cooler
temperature settings. The setting will be shown on the
display. The display will return to the outside
temperature after a few seconds.
9FAN:Pressing the FAN button will display and hold
the current fan speed while in manual mode. If you
want the fan to run at a lower speed, push the down
arrow on the FAN button. If you want to increase the fan
speed, push the up arrow on the FAN button. The fan
indicators will also be shown on the display.
If the air¯ow seems low when the fan is at the highest
setting, the passenger compartment air ®lter may
need to be replaced. For more information, see
Passenger Compartment Air Filter on page 3-27.
AIR FLOW:Pressing the AIR FLOW button will display
and hold the current setting while in manual mode.
Use the up and down arrows on the AIR FLOW button
to cycle through the available modes.
3-23
Page 139 of 372
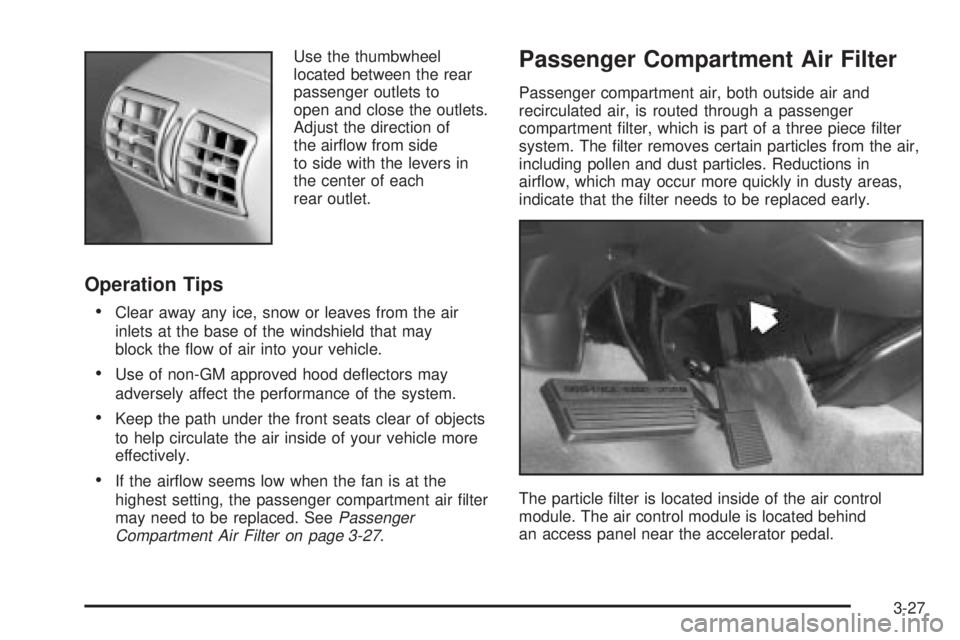
Use the thumbwheel
located between the rear
passenger outlets to
open and close the outlets.
Adjust the direction of
the air¯ow from side
to side with the levers in
the center of each
rear outlet.
Operation Tips
·
Clear away any ice, snow or leaves from the air
inlets at the base of the windshield that may
block the ¯ow of air into your vehicle.
·Use of non-GM approved hood de¯ectors may
adversely affect the performance of the system.
·Keep the path under the front seats clear of objects
to help circulate the air inside of your vehicle more
effectively.
·If the air¯ow seems low when the fan is at the
highest setting, the passenger compartment air ®lter
may need to be replaced. See
Passenger
Compartment Air Filter on page 3-27.
Passenger Compartment Air Filter
Passenger compartment air, both outside air and
recirculated air, is routed through a passenger
compartment ®lter, which is part of a three piece ®lter
system. The ®lter removes certain particles from the air,
including pollen and dust particles. Reductions in
air¯ow, which may occur more quickly in dusty areas,
indicate that the ®lter needs to be replaced early.
The particle ®lter is located inside of the air control
module. The air control module is located behind
an access panel near the accelerator pedal.
3-27
Page 221 of 372
Service............................................................5-3
Doing Your Own Service Work.........................5-3
Adding Equipment to the Outside of
Your Vehicle..............................................5-4
Fuel................................................................5-4
Gasoline Octane............................................5-4
Gasoline Speci®cations....................................5-5
California Fuel...............................................5-5
Additives.......................................................5-6
Fuels in Foreign Countries...............................5-6
Filling Your Tank............................................5-7
Filling a Portable Fuel Container.......................5-9
Checking Things Under
the Hood....................................................5-10
Hood Release..............................................5-10
Engine Compartment Overview.......................5-12
Engine Oil...................................................5-14
Supercharger Oil..........................................5-19
Engine Air Cleaner/Filter................................5-20
Automatic Transaxle Fluid..............................5-22
Engine Coolant.............................................5-24
Radiator Pressure Cap..................................5-27
Engine Overheating.......................................5-27
Cooling System............................................5-30
Power Steering Fluid.....................................5-38Windshield Washer Fluid................................5-38
Brakes........................................................5-40
Battery........................................................5-42
Jump Starting...............................................5-43
Headlamp Aiming...........................................5-47
Bulb Replacement..........................................5-49
Halogen Bulbs..............................................5-49
Headlamps..................................................5-50
Front Turn Signal Lamps...............................5-52
Rear Turn Signal, Stoplamps and
Back-Up Lamps........................................5-52
Rear Quarter Panel Turn Signal and
Stoplamps................................................5-56
Replacement Bulbs.......................................5-57
Windshield Wiper Blade Replacement..............5-58
Tires..............................................................5-59
In¯ation Ð Tire Pressure...............................5-59
Check Tire Pressure System..........................5-60
Tire Inspection and Rotation...........................5-62
When It Is Time for New Tires.......................5-63
Buying New Tires.........................................5-64
Uniform Tire Quality Grading..........................5-65
Wheel Alignment and Tire Balance..................5-66
Wheel Replacement......................................5-66
Section 5 Service and Appearance Care
5-1
Page 233 of 372
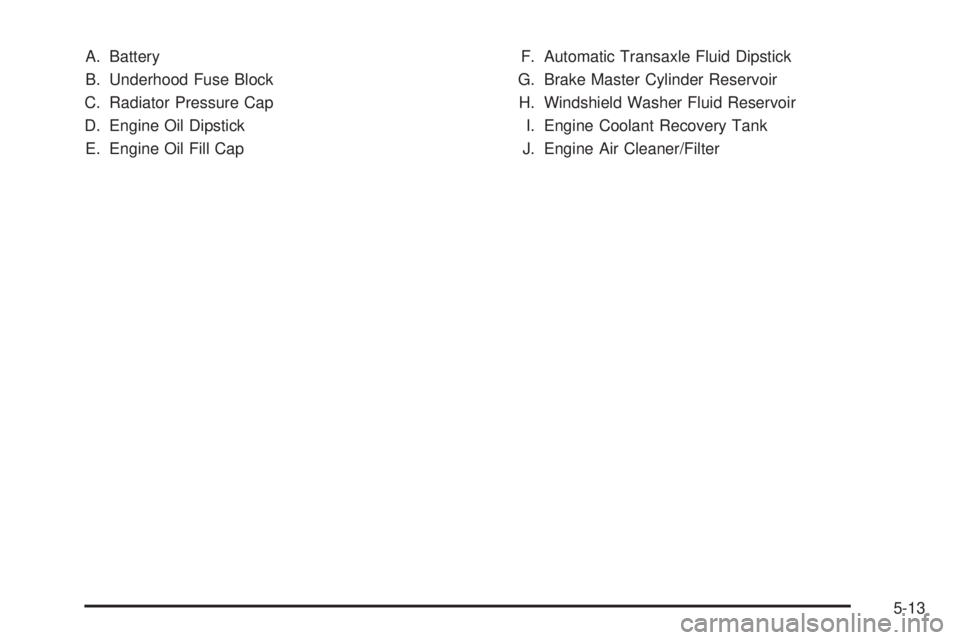
A. Battery
B. Underhood Fuse Block
C. Radiator Pressure Cap
D. Engine Oil Dipstick
E. Engine Oil Fill CapF. Automatic Transaxle Fluid Dipstick
G. Brake Master Cylinder Reservoir
H. Windshield Washer Fluid Reservoir
I. Engine Coolant Recovery Tank
J. Engine Air Cleaner/Filter
5-13
Page 240 of 372
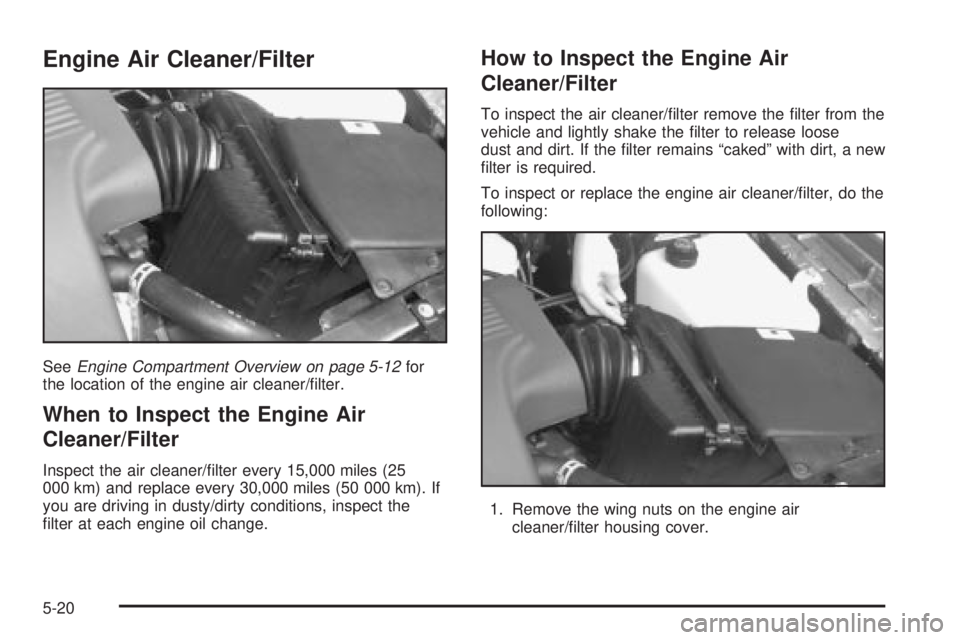
Engine Air Cleaner/Filter
SeeEngine Compartment Overview on page 5-12for
the location of the engine air cleaner/®lter.
When to Inspect the Engine Air
Cleaner/Filter
Inspect the air cleaner/®lter every 15,000 miles (25
000 km) and replace every 30,000 miles (50 000 km). If
you are driving in dusty/dirty conditions, inspect the
®lter at each engine oil change.
How to Inspect the Engine Air
Cleaner/Filter
To inspect the air cleaner/®lter remove the ®lter from the
vehicle and lightly shake the ®lter to release loose
dust and dirt. If the ®lter remains ªcakedº with dirt, a new
®lter is required.
To inspect or replace the engine air cleaner/®lter, do the
following:
1. Remove the wing nuts on the engine air
cleaner/®lter housing cover.
5-20
Page 316 of 372
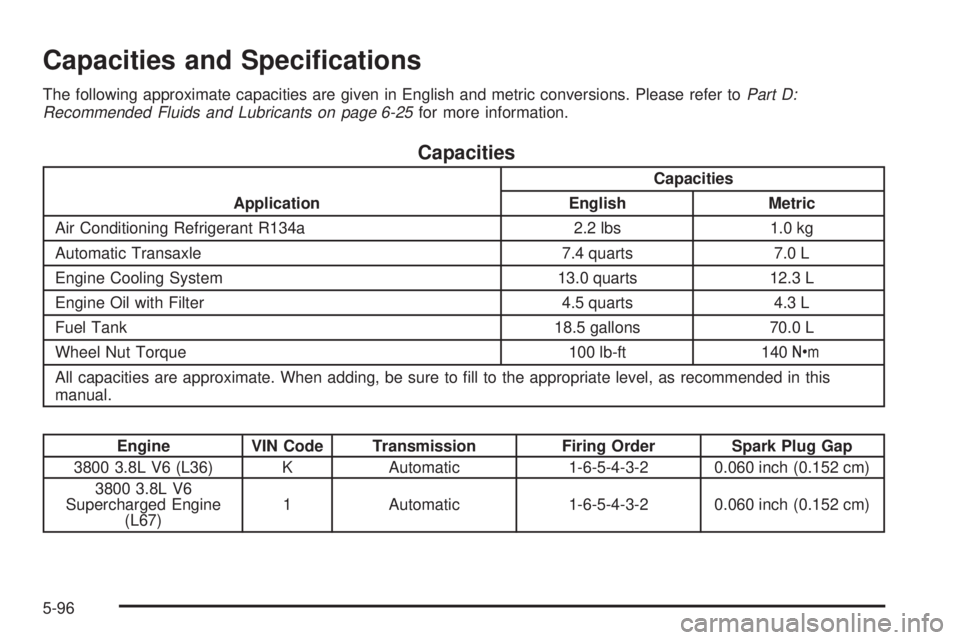
Capacities and Speci®cations
The following approximate capacities are given in English and metric conversions. Please refer toPart D:
Recommended Fluids and Lubricants on page 6-25for more information.
Capacities
ApplicationCapacities
English Metric
Air Conditioning Refrigerant R134a 2.2 lbs 1.0 kg
Automatic Transaxle 7.4 quarts 7.0 L
Engine Cooling System 13.0 quarts 12.3 L
Engine Oil with Filter 4.5 quarts 4.3 L
Fuel Tank 18.5 gallons 70.0 L
Wheel Nut Torque 100 lb-ft 140Y
All capacities are approximate. When adding, be sure to ®ll to the appropriate level, as recommended in this
manual.
Engine VIN Code Transmission Firing Order Spark Plug Gap
3800 3.8L V6 (L36) K Automatic 1-6-5-4-3-2 0.060 inch (0.152 cm)
3800 3.8L V6
Supercharged Engine
(L67)1 Automatic 1-6-5-4-3-2 0.060 inch (0.152 cm)
5-96
Page 317 of 372
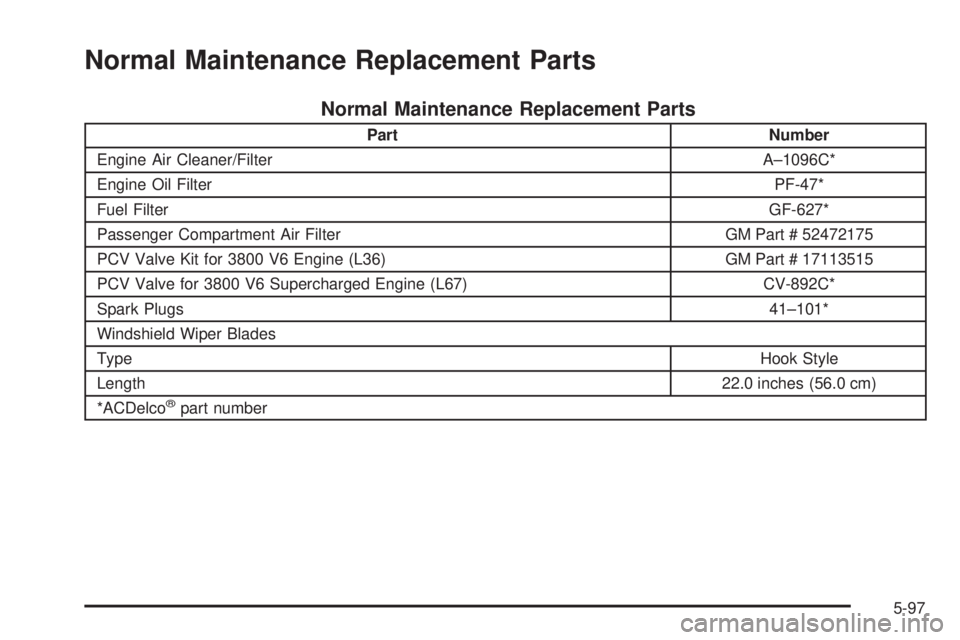
Normal Maintenance Replacement Parts
Normal Maintenance Replacement Parts
Part Number
Engine Air Cleaner/Filter A±1096C*
Engine Oil FilterPF-47*
Fuel FilterGF-627*
Passenger Compartment Air Filter GM Part # 52472175
PCV Valve Kit for 3800 V6 Engine (L36) GM Part # 17113515
PCV Valve for 3800 V6 Supercharged Engine (L67) CV-892C*
Spark Plugs41±101*
Windshield Wiper Blades
TypeHook Style
Length22.0 inches (56.0 cm)
*ACDelco
žpart number
5-97
Page 323 of 372
·Most trips include extensive idling (such as frequent
driving in stop-and-go traffic).
·You frequently tow a trailer or use a carrier on top
of your vehicle.
·If the vehicle is used for delivery service, police,
taxi or other commercial application.
One of the reasons you should follow this schedule if
you operate your vehicle under any of these conditions
is that these conditions cause engine oil to break
down sooner.
Short Trip/City Intervals
Every 3,000 Miles (5 000 km):Engine Oil and Filter
Change (or 3 months, whichever occurs ®rst).
Every 6,000 Miles (10 000 km):Tire Rotation.
Every 15,000 Miles (25 000 km):Engine Air Cleaner
Filter Inspection. Passenger Compartment Air Filter
Replacement.
Every 30,000 Miles (50 000 km):Engine Air Cleaner
Filter Replacement. Supercharger Oil Check (or
every 36 months, whichever occurs ®rst) (3800 Code 1
V6 engine only).Every 50,000 Miles (83 000 km):Automatic Transaxle
Service (severe conditions only).
Every 100,000 Miles (166 000 km):Spark Plug Wire
Inspection. Spark Plug Replacement. Automatic
Transaxle Service (normal conditions).
Every 150 000 Miles (240 000 km):Cooling System
Service (or every 60 months, whichever occurs
®rst). Engine Accessory Drive Belt Inspection.
These intervals only summarize maintenance services.
Be sure to follow the complete scheduled maintenance
on the following pages.
Long Trip/Highway De®nition
Follow this scheduled maintenanceonlyif none of the
conditions from the Short Trip/City Scheduled
Maintenance are true. Do not use this schedule if the
vehicle is used for trailer towing, driven in a dusty area
or used off paved roads. Use the Short Trip/City
schedule for these conditions
Driving a vehicle with a fully warmed engine under
highway conditions will cause engine oil to break down
slower.
6-5
Page 324 of 372
Long Trip/Highway Intervals
Every 7,500 Miles (12 500 km):Engine Oil and Filter
Change (or every 12 months, whichever occurs
®rst). Tire Rotation.
Every 15,000 Miles (25 000 km):Engine Air Cleaner
Filter Inspection. Passenger Compartment Air Filter
Replacement.
Every 30,000 Miles (50 000 km):Supercharger Oil
Check (or every 36 months, whichever occurs ®rst)
(3800 Code 1 V6 engine only). Engine Air Cleaner Filter
Replacement.
Every 50,000 Miles (83 000 km):Automatic Transaxle
Service (severe conditions only).
Every 100,000 Miles (166 000 km):Spark Plug Wire
Inspection. Spark Plug Replacement. Automatic
Transaxle Service (normal conditions).
Every 150,000 Miles (240 000 km):Cooling System
Service (or every 60 months, whichever occurs
®rst). Engine Accessory Drive Belt Inspection.
These intervals only summarize maintenance services.
Be sure to follow the complete scheduled maintenance
on the following pages.
Short Trip/City Scheduled
Maintenance
The services shown in this schedule up to 100,000 miles
(166 000 km) should be repeated after 100,000 miles
(166 000 km) at the same intervals for the life of
this vehicle. The services shown at 150,000 miles
(240 000 km) should be repeated at the same interval
after 150,000 miles (240 000 km) for the life of this
vehicle.
See
Part B: Owner Checks and Services on page 6-19andPart C: Periodic MaintenanceInspections on
page 6-23.
Footnotes
²The U.S. Environmental Protection Agency or the
California Air Resources Board has determined that the
failure to perform this maintenance item will not nullify
the emission warranty or limit recall liability prior to
the completion of the vehicle's useful life. We, however,
urge that all recommended maintenance services be
performed at the indicated intervals and the
maintenance be recorded.
6-6