park assist BUICK PARK AVENUE 2003 Owner's Manual
[x] Cancel search | Manufacturer: BUICK, Model Year: 2003, Model line: PARK AVENUE, Model: BUICK PARK AVENUE 2003Pages: 372, PDF Size: 2.8 MB
Page 1 of 372
Seats and Restraint Systems........................... 1-1
Front Seats
............................................... 1-2
Safety Belts
.............................................. 1-6
Child Restraints
.......................................1-27
Air Bag Systems
......................................1-48
Restraint System Check
............................1-56
Features and Controls..................................... 2-1
Keys
........................................................ 2-3
Doors and Locks
....................................... 2-9
Windows
.................................................2-15
Theft-Deterrent Systems
............................2-17
Starting and Operating Your Vehicle
...........2-21
Mirrors
....................................................2-33
OnStar
žSystem
......................................2-37
HomeLinkžTransmitter
.............................2-39
Storage Areas
.........................................2-42
Sunroof
..................................................2-45
Vehicle Personalization
.............................2-46
Instrument Panel............................................. 3-1
Instrument Panel Overview
.......................... 3-2
Climate Controls
......................................3-22
Warning Lights, Gages and Indicators
.........3-29
Driver Information Center (DIC)
..................3-43
Audio System(s)
.......................................3-51Driving Your Vehicle....................................... 4-1
Your Driving, the Road, and Your Vehicle
..... 4-2
Towing
...................................................4-29
Service and Appearance Care.......................... 5-1
Service
..................................................... 5-3
Fuel
......................................................... 5-4
Checking Things Under the Hood
...............5-10
Headlamp Aiming
.....................................5-47
Bulb Replacement
....................................5-49
Windshield Wiper Blade Replacement
.........5-58
Tires
......................................................5-59
Appearance Care
.....................................5-78
Vehicle Identi®cation
.................................5-86
Electrical System
......................................5-86
Capacities and Speci®cations
.....................5-96
Normal Maintenance Replacement Parts
......5-97
Maintenance Schedule..................................... 6-1
Maintenance Schedule
................................ 6-2
Customer Assistance Information.................... 7-1
Customer Assistance Information
.................. 7-2
Reporting Safety Defects
............................ 7-8
Index................................................................ 1
2003 Buick Park Avenue Owner ManualM
Page 65 of 372
Keys...............................................................2-3
Remote Keyless Entry System.........................2-5
Remote Keyless Entry System Operation...........2-5
Doors and Locks.............................................2-9
Door Locks....................................................2-9
Central Door Unlocking System........................2-9
Power Door Locks........................................2-10
Door Ajar Reminder......................................2-10
Delayed Locking...........................................2-10
Programmable Automatic` Door Locks..............2-11
Rear Door Security Locks..............................2-12
Lockout Protection........................................2-13
Leaving Your Vehicle....................................2-13
Trunk..........................................................2-13
Windows........................................................2-15
Power Windows............................................2-16
Sun Visors...................................................2-17
Theft-Deterrent Systems..................................2-17
Content Theft-Deterrent.................................2-17
PASS-Key
žIII ..............................................2-19
PASS-KeyžIII Operation...............................2-19Starting and Operating Your Vehicle................2-21
New Vehicle Break-In....................................2-21
Ignition Positions..........................................2-21
Starting Your Engine.....................................2-22
Engine Coolant Heater..................................2-23
Automatic Transaxle Operation.......................2-24
Parking Brake..............................................2-27
Shifting Into Park (P).....................................2-28
Shifting Out of Park (P).................................2-30
Parking Over Things That Burn.......................2-31
Engine Exhaust............................................2-31
Running Your Engine While You Are Parked. . . .2-32
Mirrors...........................................................2-33
Manual Rearview Mirror.................................2-33
Automatic Dimming Rearview Mirror................2-33
Automatic Dimming Rearview Mirror with
Compass.................................................2-33
Outside Power Mirrors...................................2-36
Outside Curb View Assist Mirror.....................2-36
Outside Convex Mirror...................................2-37
Outside Automatic Dimming Heated Mirror........2-37
Section 2 Features and Controls
2-1
Page 70 of 372
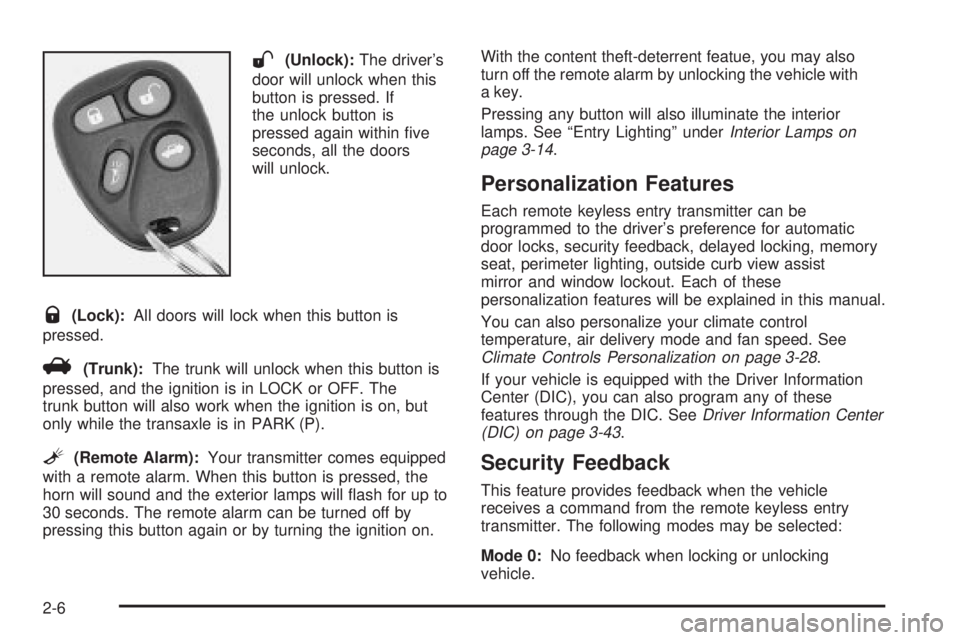
W(Unlock):The driver's
door will unlock when this
button is pressed. If
the unlock button is
pressed again within ®ve
seconds, all the doors
will unlock.
Q(Lock):All doors will lock when this button is
pressed.
V(Trunk):The trunk will unlock when this button is
pressed, and the ignition is in LOCK or OFF. The
trunk button will also work when the ignition is on, but
only while the transaxle is in PARK (P).
L(Remote Alarm):Your transmitter comes equipped
with a remote alarm. When this button is pressed, the
horn will sound and the exterior lamps will ¯ash for up to
30 seconds. The remote alarm can be turned off by
pressing this button again or by turning the ignition on.With the content theft-deterrent featue, you may also
turn off the remote alarm by unlocking the vehicle with
a key.
Pressing any button will also illuminate the interior
lamps. See ªEntry Lightingº under
Interior Lamps on
page 3-14.
Personalization Features
Each remote keyless entry transmitter can be
programmed to the driver's preference for automatic
door locks, security feedback, delayed locking, memory
seat, perimeter lighting, outside curb view assist
mirror and window lockout. Each of these
personalization features will be explained in this manual.
You can also personalize your climate control
temperature, air delivery mode and fan speed. See
Climate Controls Personalization on page 3-28.
If your vehicle is equipped with the Driver Information
Center (DIC), you can also program any of these
features through the DIC. See
Driver Information Center
(DIC) on page 3-43.
Security Feedback
This feature provides feedback when the vehicle
receives a command from the remote keyless entry
transmitter. The following modes may be selected:
Mode 0:No feedback when locking or unlocking
vehicle.
2-6
Page 100 of 372
Outside Power Mirrors
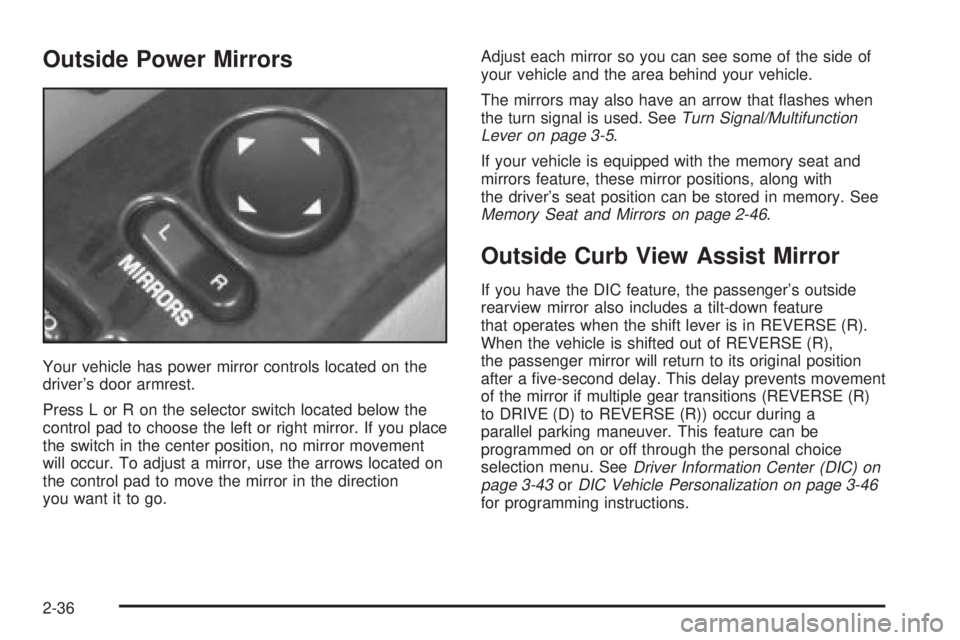
Your vehicle has power mirror controls located on the
driver's door armrest.
Press L or R on the selector switch located below the
control pad to choose the left or right mirror. If you place
the switch in the center position, no mirror movement
will occur. To adjust a mirror, use the arrows located on
the control pad to move the mirror in the direction
you want it to go.Adjust each mirror so you can see some of the side of
your vehicle and the area behind your vehicle.
The mirrors may also have an arrow that ¯ashes when
the turn signal is used. See
Turn Signal/Multifunction
Lever on page 3-5.
If your vehicle is equipped with the memory seat and
mirrors feature, these mirror positions, along with
the driver's seat position can be stored in memory. See
Memory Seat and Mirrors on page 2-46.
Outside Curb View Assist Mirror
If you have the DIC feature, the passenger's outside
rearview mirror also includes a tilt-down feature
that operates when the shift lever is in REVERSE (R).
When the vehicle is shifted out of REVERSE (R),
the passenger mirror will return to its original position
after a ®ve-second delay. This delay prevents movement
of the mirror if multiple gear transitions (REVERSE (R)
to DRIVE (D) to REVERSE (R)) occur during a
parallel parking maneuver. This feature can be
programmed on or off through the personal choice
selection menu. See
Driver Information Center (DIC) on
page 3-43orDIC Vehicle Personalization on page 3-46for programming instructions.
2-36
Page 104 of 372
Keep the original transmitter for use in other vehicles as
well as for future HomeLinkžprogramming. It is also
recommended that upon the sale of the vehicle,
the programmed HomeLink
žbuttons should be erased
for security purposes. Refer to ªErasing HomeLinkž
Buttonsº or, for assistance, contact HomeLinkžon the
internet at: www.homelink.com or by calling
1-800-355-3515.
Be sure that people and objects are clear of the garage
door or gate operator you are programming. When
programming a garage door, it is advised to park outside
of the garage.
It is recommended that a new battery be installed in
your hand-held transmitter for quicker and more
accurate transmission of the radio frequency.
Your vehicle's engine should be turned off while
programming the transmitter. Follow these steps to
program up to three channels:
1. Press and hold down the two outside buttons,
releasing only when the indicator light begins to
¯ash, after 20 seconds. Do not hold down the
buttons for longer than 30 seconds and do not
repeat this step to program a second and/or third
transmitter to the remaining two HomeLink
žbuttons.
2. Position the end of your hand-held transmitter about
1 to 3 inches (3 to 8 cm) away from the HomeLink
ž
buttons while keeping the indicator light in view.3. Simultaneously press and hold both the desired
button on HomeLink
žand the hand-held transmitter
button. Do not release the buttons until Step 4
has been completed.
Some entry gates and garage door openers may
require you to substitute Step 3 with the procedure
noted in ªGate Operator and Canadian
Programmingº later in this section.
4. The indicator light will ¯ash slowly at ®rst and then
rapidly after HomeLink
žsuccessfully receives the
frequency signal from the hand-held transmitter.
Release both buttons.
5. Press and hold the newly-trained HomeLink
žbutton
and observe the indicator light.
If the indicator light stays on constantly,
programming is complete and your device should
activate when the HomeLink
žbutton is pressed and
released.
To program the remaining two HomeLink
žbuttons,
begin with Step 2 under ªProgramming HomeLinkž.º
Do not repeat Step 1 as this will erase all of the
programmed channels.
If the indicator light blinks rapidly for two seconds
and then turns to a constant light, continue with
Steps 6 through 8 following to complete the
programming of a rolling-code equipped device
(most commonly, a garage door opener).
2-40
Page 113 of 372
Instrument Panel Overview...............................3-2
Hazard Warning Flashers................................3-4
Other Warning Devices...................................3-4
Horn.............................................................3-5
Tilt Wheel.....................................................3-5
Turn Signal/Multifunction Lever.........................3-5
Exterior Lamps.............................................3-12
Interior Lamps..............................................3-14
Head-Up Display (HUD).................................3-17
Ultrasonic Rear Parking Assist (URPA)............3-19
Accessory Power Outlets...............................3-21
Ashtrays and Cigarette Lighter........................3-22
Climate Controls............................................3-22
Dual Automatic Climate Control System...........3-22
Outlet Adjustment.........................................3-26
Passenger Compartment Air Filter...................3-27
Steering Wheel Climate Controls.....................3-28
Climate Controls Personalization.....................3-28
Warning Lights, Gages and Indicators.............3-29
Instrument Panel Cluster................................3-30
Speedometer and Odometer...........................3-32
Tachometer.................................................3-32
Safety Belt Reminder Light.............................3-33
Air Bag Readiness Light................................3-33
Battery Warning Light....................................3-34
Brake System Warning Light..........................3-34Anti-Lock Brake System Warning Light.............3-36
Traction Control System (TCS) Warning Light . . .3-36
Engine Coolant Temperature Gage..................3-37
Malfunction Indicator Lamp.............................3-37
Oil Pressure Light.........................................3-40
Security Light...............................................3-41
Cruise Control Light......................................3-41
Service Vehicle Soon Light............................3-41
Fuel Gage...................................................3-42
Driver Information Center (DIC).......................3-43
DIC Controls and Displays.............................3-43
DIC Warnings and Messages.........................3-45
DIC Vehicle Personalization............................3-46
Audio System(s).............................................3-51
Setting the Time...........................................3-52
Radio with Cassette......................................3-52
Radio with Cassette and CD..........................3-56
Trunk-Mounted CD Changer...........................3-62
Personal Choice Radio Controls......................3-65
Theft-Deterrent Feature..................................3-66
Audio Steering Wheel Controls.......................3-68
Understanding Radio Reception......................3-68
Care of Your Cassette Tape Player.................3-69
Care of Your CDs.........................................3-70
Care of Your CD Player................................3-70
Heated Backlite Antenna................................3-70
Section 3 Instrument Panel
3-1
Page 131 of 372
3. Keep pressing the bottom arrow on the image
height adjuster to move the image as low as
possible, while still keeping it in full view.
4. Slide the dimmer switch downward until the HUD
image is no brighter than necessary.
To turn the HUD display off, slide the dimmer switch all
the way down.
If the sun comes out, the sky becomes cloudy, or if you
turn your headlamps on, you may need to adjust the
HUD brightness using the dimmer switch. Polarized
sunglasses could make the HUD image harder to see.
To change the display from English to metric units,
push the ENG/MET button located to the left of
the steering column.
Care of the HUD
Clean the inside of the windshield as necessary to
remove any dirt or ®lm that reduces the sharpness or
clarity of the HUD image.
To clean the HUD lens, spray household glass cleaner
on a soft, clean cloth. Gently wipe and dry the HUD
lens. Do not spray cleaner directly on the lens to avoid
cleaner leaking inside the unit.
If You Can't See The HUD Image When
the Ignition is On
If the ignition is on and you can't see the HUD image,
check to see if:
·The headlamps are on.
·Something is covering the HUD unit.
·The HUD dimmer control is adjusted properly.
·The HUD image is adjusted to the proper height.
·A fuse is blown. SeeFuses and Circuit Breakers on
page 5-87
.
Keep in mind that your windshield is part of the HUD
system. If you ever have to have your windshield
replaced, be sure to get one that is designed for HUD
or your HUD image may look blurred or out of focus.
Ultrasonic Rear Parking
Assist (URPA)
If your vehicle has this feature, ultrasonic rear parking
assist can help you to determine how close an object is
to your rear bumper within a given area, making
parking easier.
3-19
Page 132 of 372
The URPA display is located inside the vehicle, above
the rear window. It has three color-coded lights that can
be seen through the rearview mirror.
{CAUTION:
Even with the Ultrasonic Rear Park Assist
system, the driver must check carefully before
backing up. The system does not operate
above typical backing speeds of 3 mph
(5 km/h) while parking. And, the system
doesn't detect objects that are more than
5 feet (1.5 meters) behind the vehicle.
So, unless you check carefully behind you
before and when you back up, you could strike
children, pedestrians, bicyclists or pets behind
you, and they could be injured or killed.
Whether or not you are using Rear Park Assist,
always check carefully behind your vehicle
before you back up and then watch closely as
you do.
How the System Works
Ultrasonic rear parking assist comes on automatically
when the shift lever is moved into REVERSE (R) and the
vehicle speed is less than 3 mph (5 km/h). When the
system comes on, the three lights on the display
will illuminate to let you know that the system is working.
URPA senses how close your vehicle is to an object.
The distance is determined by the four rear sensors
located on the bumper. When shifting into REVERSE (R)
and an object is detected, one of the following will
occur:
·At 5 ft. (1.5 m) an amber light will come on.
·At 40 in. (1.0 m) two amber lights will come on.
·At 20 in. (0.5 m) two amber lights and a red light will
come on and a continuous chime will sound.
·At 1 ft. (0.3 m) the chime will still be going
continuously and all three lights will ¯ash.
A chime will sound the ®rst time an object is detected, if
the object is between 20 inches (0.5 m) and 5 feet
(1.5 m) away.
URPA can detect objects 3 inches (7.6 cm) and wider,
and at least 10 inches (2.5 cm) tall, but cannot detect
objects that are above trunk level. In order for the rear
sensors to recognize an object, it must be within
operating range.
3-20
Page 159 of 372
After you press the unlock button on your transmitter
with the ignition in RUN, the DIC will automatically
display the identi®ed driver number. The vehicle
will recall the personal choice settings that were last
made to correspond to your transmitter, including your
radio and climate control settings. See
Climate
Controls Personalization on page 3-28.
If you unlock the vehicle using your door key instead of
your transmitter, the DIC will not change drivers and
will recall the information from the last transmitter used
or the last driver using one of the MEMORY buttons.
If this happens and you were not the last driver of
the vehicle, simply press your correct driver number on
the appropriate MEMORY button or press the unlock
button on your transmitter.
The DIC can be used to program the following personal
choice features available with your vehicle:
·Memory Seat Recall
·Programmable Automatic Door Locks
·Security Feedback
·Delayed Locking
·Perimeter Lighting
·Outside Curb View Assist Mirror
·Window Lock OutSee the following steps for personalization programming
instructions.
1. Turn the ignition on and keep the transaxle in
PARK (P).
2. Inform the DIC which driver you are by pressing the
unlock button on your transmitter or the appropriate
memory seat control.
3. Press and hold the ENG/MET button for ®ve
seconds. WELCOME TO BUICK OPTION
FEATURE will appear in the display.
The next display will be your driver number and the
message ARMREST BUTTON CHANGES
DRIVER #. Follow the instructions in the display.
You are now in the selection mode and the DIC is
ready to program your personal choices in
memory.
The selections you make for the personal choice
features will be saved after the display reads
FEATURE OPTION SELECTION DONE.
Each feature that can be personalized will appear in
the display. Once you have made a selection for
a feature, the DIC will move on to the next personal
choice feature.
3-47
Page 160 of 372
4. Scroll through the following messages and feature
options:
·PARALLEL PARK ± OFF/ON
·AUTO DOOR LOCKS ± OFF/ON
·UNLOCK IN PARK ± OFF/ON
·WHICH DOORS ± ALL/DRIVER
·DELAYED LOCKING ± OFF/ON
·LOCK FEEDBACK ± OFF/ON
·LOCK FEEDBACK ± LIGHTS/LIGHTS + HORN
·UNLOCK FEEDBACK ± OFF/LIGHTS
·PERIMETER LIGHTS ± OFF/ON
·SEAT RECALL ± OFF/ON
·RECALL POSITION ± MEMORY/EXIT
·WINDOW LOCKOUT ± ALL PASS/REAR
If you would like to exit the selection mode without
moving through each of the personal choice features,
simply press a different button on the DIC or turn off the
ignition. However, personal choices you made may
not be retained.
If you happen to move past a selection you would like to
make a personal choice for, press the unlock button on
your transmitter or press the appropriate driver number
on the seat control. This will return you to the beginning of
the option feature programming mode.
A description of each feature programmable through the
DIC follows.
Outside Curb View Assist Mirror
The outside curb view assist mirror, which tilts the
passenger mirror while the vehicle is in REVERSE (R),
can be made active or inactive through the DIC.
When PARALLEL PARK-OFF-ON appears on the
display, use the ENG/MET button to toggle the arrow
between OFF and ON. When you have made your
choice, press the RESET button to record your
selection. For more information on this feature, see
Outside Curb View Assist Mirror on page 2-36.
Programmable Automatic Door Locks
The automatic door lock modes, when shifting in and out
of PARK (P), can be changed through the DIC. You
can change these modes using different selections from
the following DIC displays:
·AUTO DOOR LOCKS Ð OFF/ON
·UNLOCK IN PARK ÐOFF/ON
If you choose OFF for AUTO DOOR LOCKS, your door
locks will operate normally with no automatic feature.
If you choose ON for AUTO DOOR LOCKS, and ON for
UNLOCK IN PARK, your doors will lock every time
you shift out of PARK (P), and the doors will unlock
every time you stop and shift into PARK (P).
3-48