stop start BUICK RANDEZVOUS 2006 User Guide
[x] Cancel search | Manufacturer: BUICK, Model Year: 2006, Model line: RANDEZVOUS, Model: BUICK RANDEZVOUS 2006Pages: 478, PDF Size: 2.97 MB
Page 227 of 478

4 RDM (Random):Press this pushbutton to hear
the tracks in random, rather than sequential, order.
Press RDM again to turn off random play.
EQ (Equalizer):Press EQ to select an equalization
setting while playing a CD. The equalization will be set
whenever a CD is played. See “EQ” listed previously
for more information.
©SEEK¨:Press the left arrow to go to the start
of the current track if more than eight seconds
have played. Press the right arrow to go to the next
track. If either arrow is held or pressed more than once,
the player will continue moving backward or forward
through the CD.
To scan tracks, press and hold either SEEK arrow for
two seconds until SCAN appears on the display and you
will hear a beep. The CD will go to the next track,
play for a few seconds, then go on to the next track.
The sound will mute and SCAN and the track number
will appear on the display while scanning. The CD
will only scan forward. Press either SEEK arrow again
to stop scanning.DISP (Display):Press this button to see which track is
playing. Press it again within �ve seconds to see
how long it has been playing. To change the default on
the display, track or elapsed time, press this button
until you see the display you want, then hold the button
until the display �ashes. The selected display will
now be the default.
BAND:Press this button to listen to the radio when a
CD is playing. The inactive CD will remain safely
inside the radio for future listening.
CD:Press this button to play a CD when listening to
the radio.
Z(Eject):Press this button to eject the CD. The
CD can be removed. If the CD is not removed,
after 25 seconds, the CD will be automatically pulled
back into the player. If the CD is pushed back into the
player, before the 25 second time period is complete,
the player will sense an error and will try to eject the
CD several times before stopping.
Eject may be activated with either the ignition or radio
off. CDs may be loaded with the ignition or radio
off, if this button is pressed �rst.
3-85
Page 237 of 478

Playing a Cassette Tape
The tape player is built to work best with tapes that are
up to 30 to 45 minutes long on each side. Tapes
longer than that are so thin they may not work well in
this player. The longer side with the tape visible should
face to the right. If you hear nothing or hear a garbled
sound, the tape may not be in squarely. Press the eject
button to remove the tape and start over.
If the ignition and radio are off, press the eject or the
DISP button to insert and to begin play of a tape. If the
ignition is on and the radio is off, the tape can be
inserted and will begin playing.
While the tape is playing, use the VOLUME and AUDIO
controls just as you do for the radio. The display will
show an arrow to show which side of the tape is playing.
Cassette tape adapter kits for portable CD players will
work in the cassette tape player. See “CD Adapter Kits”
later for more information.
The tape bias is set automatically when a metal or
chrome tape is inserted.
If an error appears on the display, see “Cassette Tape
Messages” later in this section.1
s(Reverse):Press this pushbutton to quickly
reverse the tape. The radio will play while the tape
reverses. Press this pushbutton again to return to
playing speed.
2
\(Forward):Press this pushbutton to quickly
advance the tape. The radio will play while the tape
advances. Press this pushbutton again to return
to playing speed.
6 SIDE:Press this pushbutton to play the other side
of the tape.
©SEEK¨:The tape must have at least three
seconds of silence between each selection for seek to
work. Press the left or the right arrow to go to the
previous or to the next selection on the tape. SEEK and
a negative or positive number will appear on the
display. Pressing the left or right arrow multiple times
will increase the number of selections to be searched up
to -5 or +5. If -5 or +5 is shown on the display, the
cassette tape player will fast forward or rewind through
the four selections and stop at the �fth selection.
3-95
Page 239 of 478
CD Adapter Kits
It is possible to use a portable CD player with the
cassette tape player after activating the bypass feature
on the tape player.
To activate the bypass feature, use the following steps:
1. Turn the ignition on.
2. Turn the radio off.
3. Insert the adapter into the cassette slot.
4. Press and hold the CD TAPE button until READY
appears on the display.
The override feature will remain active until the eject
button is pressed.
Playing a CD
Insert a CD partway into the slot, label side up. The
player will pull it in and the CD should begin playing.
If you want to insert a CD when the ignition or the radio
is off, �rst press the eject or the DISP button.
If the ignition or radio is turned off with the CD in the
player, it will stay in the player. When the ignition
or radio is turned on, the CD will start playing where it
stopped, if it was the last selected audio source.
When a CD is inserted, the CD symbol will appear on
the display. As each new track starts to play, the
track number will appear on the display.
The CD player can play the smaller 3 inch (8 cm) single
CDs with an adapter ring. Full-size CDs and the
smaller CDs are loaded in the same manner.
If playing a CD-R, the sound quality may be reduced
due to CD-R quality, the method of recording, the quality
of the music that has been recorded, and the way the
CD-R has been handled. There may be an increase
in skipping, difficulty in �nding tracks, and/or difficulty in
loading and ejecting. If these problems occur, check
the bottom surface of the CD. If the surface of the CD is
damaged, such as cracked, broken, or scratched, the
CD will not play properly. If the surface of the CD
is soiled, see “Care of Your CDs” later in this section.
If there is no apparent damage, try a known good CD.
3-97
Page 251 of 478
Playing a CD
If the ignition or radio is turned off, with a CD in the
player, it will stay in the player. When the ignition
or radio is turned on, the CD will start playing where it
stopped, if it was the last selected audio source.
When a CD is inserted, the CD symbol will appear on
the CD. As each new track starts to play, the track
number will appear on the display.
The CD player can play the smaller 3 inch (8 cm) single
CDs with an adapter ring. Full-size CDs and the
smaller CDs are loaded in the same manner.
If playing a CD-R, the sound quality may be reduced
due to CD-R quality, the method of recording, the quality
of the music that has been recorded, and the way the
CD-R has been handled. There may be an increase
in skipping, difficulty in �nding tracks, and/or difficulty in
loading and ejecting. If these problems occur, check
the bottom surface of the CD. If the surface of the CD is
damaged, such as cracked, broken, or scratched, the
CD will not play properly. If the surface of the CD
is soiled, see “Care of Your CDs” later in this section.
If there is no apparent damage, try a known good CD.Do not add any label to a CD, it could get caught in the
CD player. If a CD is recorded on a personal computer
and a description label is needed, try labeling the top of
the recorded CD with a soft marker instead.
Notice:If you add any label to a CD, insert more
than one CD into the slot at a time, or attempt
to play scratched or damaged CDs, you could
damage the CD player. When using the CD player,
use only CDs in good condition without any
label, load one CD at a time, and keep the CD player
and the loading slot free of foreign materials,
liquids, and debris.
If an error appears on the display, see “CD Messages”
later in this section.
LOAD CD
Z:Press the LOAD side of this button to
load CDs into the CD player. This CD player will
hold up to six CDs.
To insert one CD, do the following:
1. Turn the ignition on.
2. Press and release the LOAD button.
3. Wait for the light, located to the right of the slot,
to turn green.
4. Load a CD. Insert the CD partway into the slot,
label side up. The player will pull the CD in.
3-109
Page 253 of 478
Once the player stops and the CD is ejected, remove
the CD. After removing the CD, push the PWR knob off
and then on again, or wait for the system to reset.
This will clear the CD-sensing feature and enable CDs
to be loaded into the player again.
{REV (Reverse):Press and hold this button to
reverse quickly within a track. You will hear sound at a
reduced volume. Release this button to play the
passage. The elapsed time of the track will appear on
the display.
FWD
|(Forward):Press and hold this button to
advance quickly within a track. You will hear sound at a
reduced volume. Release this button to play the
passage. The elapsed time of the track will appear on
the display.
RPT (Repeat):With repeat, one track or an entire CD
can be repeated.
To use repeat, do the following:
To repeat the track you are listening to, press and
release the RPT button. RPT will appear on the
display. Press RPT again to turn off repeat play.
To repeat the CD you are listening to, press and
hold the RPT button for two seconds. RPT will
appear on the display. Press RPT again to turn off
repeat play.RDM (Random):With random, you can listen to the
tracks in random, rather than sequential, order, on one
CD or on all of the CDs.
To use random, do one of the following:
To play the tracks on the CD you are listening to in
random order, press and release the RDM button.
RANDOM ONE will appear on the display. Press
RDM again to turn off random play.
To play the tracks on all of the CDs that are loaded
in random order, press and hold RDM for more
than two seconds. You will hear a beep and
RANDOM ALL will appear on the display. Press
RDM again to turn off random play.
AUTO EQ (Automatic Equalization):Press AUTO EQ
to select the desired equalization setting while playing
a CD. The equalization will be set whenever a CD
is played. For more information on AUTO EQ,
see “AUTO EQ” listed previously in this section.
sSEEKt:Press the left arrow to go to the start of
the current track, if more than ten seconds have played.
Press the right arrow to go to the next track. If either
arrow is held or pressed more than once, the player
will continue moving backward or forward through
the CD.
3-111
Page 261 of 478
DVD Player
The DVD player is located in the overhead console.
The DVD player can be controlled by the buttons on
the DVD player, and/or by the buttons on the remote
control. See “Remote Control” later in this section
for more information.
The RSE system DVD player is only compatible with
DVDs of the appropriate region code for the country
that the vehicle was sold in. The DVD region code
is printed on the jacket of most DVDs.
Standard audio CDs, CD-R, CD-RW, Video CD and
Photo CD/CD-R media are fully supported by this
DVD player. DVD-R and DVD-RW media is supported
if formatted as DVD-Video. DVD+R and DVD+RW media
may or may not be supported by the DVD player. The
DVD player does not support DVD-RAM, DVD-ROM,
and DVD Audio media. An error message will appear
on the display if this type of media is inserted into
the DVD player.
If an error message appears on the video screen,
see “DVD Messages” later in this section.
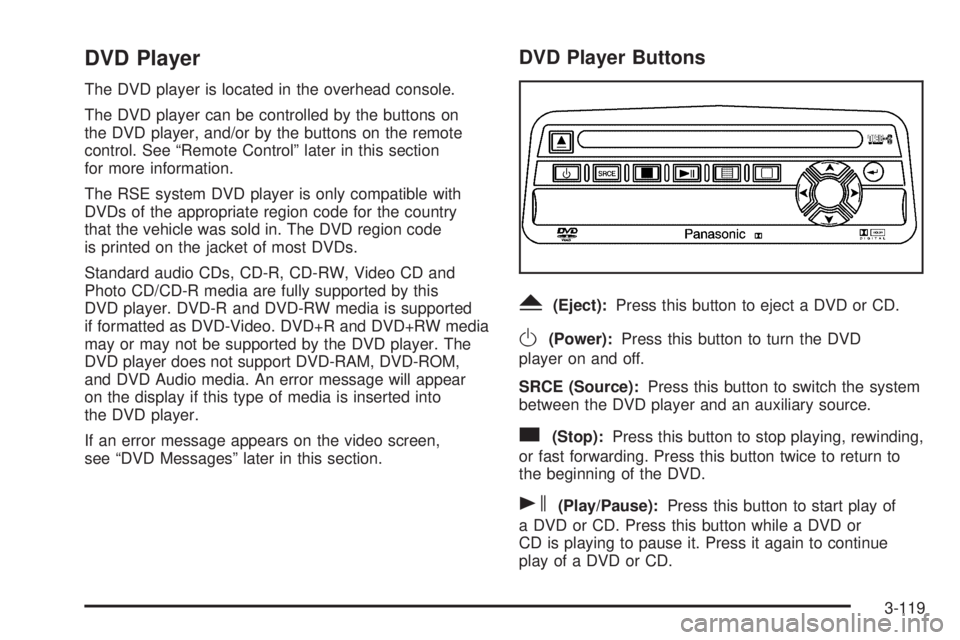
DVD Player Buttons
Y(Eject):Press this button to eject a DVD or CD.
O(Power):Press this button to turn the DVD
player on and off.
SRCE (Source):Press this button to switch the system
between the DVD player and an auxiliary source.
c(Stop):Press this button to stop playing, rewinding,
or fast forwarding. Press this button twice to return to
the beginning of the DVD.
s(Play/Pause):Press this button to start play of
a DVD or CD. Press this button while a DVD or
CD is playing to pause it. Press it again to continue
play of a DVD or CD.
3-119
Page 262 of 478
y(Main Menu):Press this button to view the media
menu. The media menu is different on every DVD.
Use the up, down, right, and left arrow buttons to move
the cursor around the media menu. After making a
selection press enter. This button only operates when
using a DVD.
z(Display Control Button):Press this button to
adjust the color, tint, brightness, contrast, display mode,
and dynamic range compression. The dynamic range
compression feature can be used to reduce loud
audio and increase low audio produced by some DVDs.
To change a feature back to the factory default
setting, press this button to display the feature, then
press and hold this button. The default setting will
appear on the display.
While playing an Audio or DVD disc, press and hold
this button to display and to remove the track and time
information.
n,q,p,o(Directional Control Circle):Press
these buttons to move through menu choices, or
to move forward or back in a movie. These controls can
be used to move forward or backward through a CD.
r(Enter):Press this button to select choices
highlighted in any menu.
Playing a Disc
To play a disc, gently insert the disc, label side up, into
the loading slot. The DVD player will continue loading
the disc and the player will automatically start if the
vehicle is in ACCESSORY, ON, START, or RAP.
If a disc is already in the player, make sure that the
DVD player is on, then press the play/pause button on
the player faceplate or on the remote control.
Some DVDs will not allow fast forwarding or skipping
of the copyright information or the previews. Some
DVDs will begin playing after the previews have �nished.
If the DVD does not begin playing at the main title,
refer to the on-screen instructions.
Stopping and Resuming Playback
To stop playing a disc, press and release the stop
button on the DVD player faceplate or the remote
control.
To resume playback, press the play/pause button on
the DVD player faceplate or the remote control.
The movie should resume play from where it was
last stopped if the disc has not been ejected and the
stop button has not been pressed twice on the remote
control or the DVD player faceplate.
3-120
Page 266 of 478
{(Subtitles):This button turns on subtitles and
moves through subtitle options (English, Spanish,
French, etc., if available). Press this button to call up
a menu that will operate only when a DVD is being
played. The format and content of this function will
vary for each disc.
[(Fast Forward):Press this button to fast forward
the DVD. To stop fast forwarding, press this button
again. This button may not work when the DVD
is playing the copyright information or the previews.
s(Play/Pause):Press this button to start play of
a DVD or CD. Press this button while a DVD is playing
to pause it. Press it again to continue playing the
DVD or CD.
u(Next Chapter/Track):Press this button to go
to the beginning of the next chapter or track. This button
may not work when the DVD is playing the copyright
information or the previews.
Setup Menu
To access the setup menu, ensure that a DVD is
in the player and the video is stopped. Press the main
menu button. Once the menu is activated, use the
directional arrows and the enter button to navigate the
screen.
The setup menu allows the user to select default
preferences for Menu Language, Subtitle Language,
Audio Language, TV Aspect, TV Mode, and Dynamic
Range Compression.
Not all DVDs support all the feature defaults in the
setup menus. In the event a particular feature is
not supported, defaults will be provided by the
DVD media.
Exit the setup menu by pressing the return button on
the remote control or the DVD player. If changes
are made to the system setup defaults, the disc will
resume play from the beginning and not where it
previously left off.
3-124
Page 269 of 478
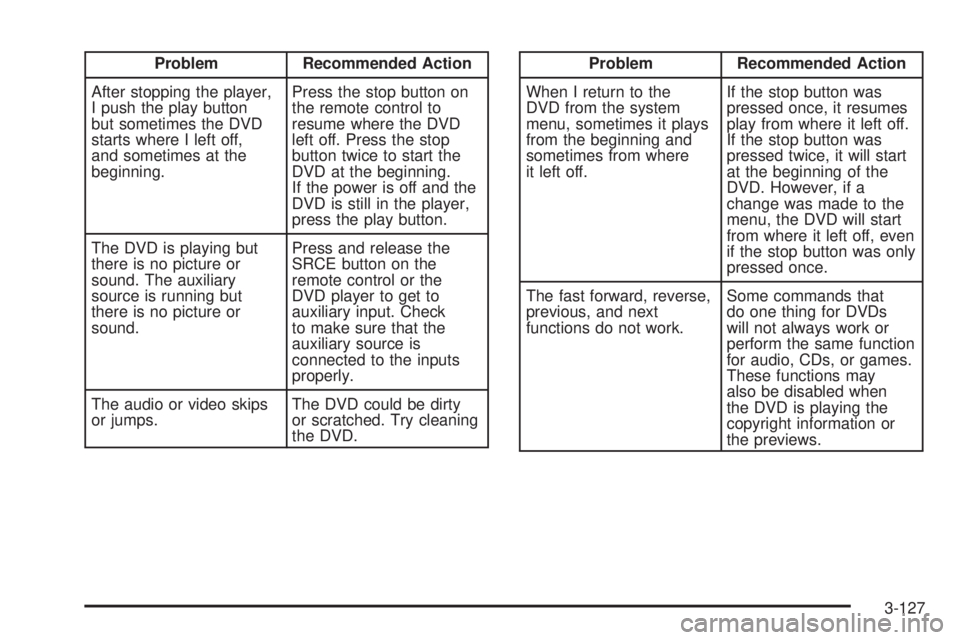
Problem Recommended Action
After stopping the player,
I push the play button
but sometimes the DVD
starts where I left off,
and sometimes at the
beginning.Press the stop button on
the remote control to
resume where the DVD
left off. Press the stop
button twice to start the
DVD at the beginning.
If the power is off and the
DVD is still in the player,
press the play button.
The DVD is playing but
there is no picture or
sound. The auxiliary
source is running but
there is no picture or
sound.Press and release the
SRCE button on the
remote control or the
DVD player to get to
auxiliary input. Check
to make sure that the
auxiliary source is
connected to the inputs
properly.
The audio or video skips
or jumps.The DVD could be dirty
or scratched. Try cleaning
the DVD.Problem Recommended Action
When I return to the
DVD from the system
menu, sometimes it plays
from the beginning and
sometimes from where
it left off.If the stop button was
pressed once, it resumes
play from where it left off.
If the stop button was
pressed twice, it will start
at the beginning of the
DVD. However, if a
change was made to the
menu, the DVD will start
from where it left off, even
if the stop button was only
pressed once.
The fast forward, reverse,
previous, and next
functions do not work.Some commands that
do one thing for DVDs
will not always work or
perform the same function
for audio, CDs, or games.
These functions may
also be disabled when
the DVD is playing the
copyright information or
the previews.
3-127
Page 273 of 478
This function is inactive if the front seat passengers
are listening to a cassette tape.
When a CD is playing, press the up arrow to go to the
next track on the CD. Press the down arrow to go to
the start of the current track if more than eight seconds
have played. This function is inactive if the front seat
passengers are listening to a CD.
PWR (Power):Press this button to turn the system
on or off.
TAPE CD:Press this button to switch between playing
a cassette tape, a CD, or a DVD when listening to
the radio. The inactive tape, CD, or DVD will remain
safely inside the radio for future listening.
BAND:Press this button to switch between FM1,
FM2, AM, or XM1 or XM2 (if equipped). If the front
passengers are listening to the radio, the RSA will not
switch between the bands or change the frequency.
Press BAND to listen to the radio when a cassette tape
or a CD is playing. The inactive cassette or CD will
remain safely inside the radio for future listening.
The BAND button will not access XM™ Satellite Radio
service when the front seat passengers are listening
to the RSE system through the vehicle’s speakers
and the rear seat passengers are using the wired
headphones to listen to the RSA system.P.SET PROG (Preset Program):Press this button
to scan through the preset radio stations set on
the pushbuttons on the main radio. The radio will go to
a preset station stored on the pushbuttons, play for
a few seconds, then go on to the next preset station.
Press this button again to stop scanning presets.
This function is inactive if the front seat passengers
are listening to the radio.
When a cassette tape is playing, press this button
to go to the other side of the tape. This function
is inactive if the front seat passengers are listening
to a cassette tape.
When a CD is playing, press this button to select the
next CD, if multiple CDs are loaded. This function
is inactive if the front seat passengers are listening
to a CD.
VOL
#(Volume):Press this knob lightly so it extends.
Turn the knob to increase or to decrease the volume.
Push the knob back into its stored position when you
are not using it. The upper knob controls the upper
headphones and the lower knob controls the lower
headphones.
PHONES:To listen to the RSA sound, plug the wired
headphones, into these RCA jacks.
3-131