battery BUICK REGAL 2012 Service Manual
[x] Cancel search | Manufacturer: BUICK, Model Year: 2012, Model line: REGAL, Model: BUICK REGAL 2012Pages: 440, PDF Size: 6.22 MB
Page 304 of 440
Black plate (30,1)Buick Regal Owner Manual - 2012
10-30 Vehicle Care
Vehicle Storage
{WARNING
Batteries have acid that can burn
you and gas that can explode.
You can be badly hurt if you are
not careful. SeeJump Starting
(On-board with eAssist Only) on
page 10‑89 orJump Starting (with
or without eAssist) on page 10‑91
for tips on working around a
battery without getting hurt.
Infrequent Usage: Remove the
12‐volt battery black, negative (−)
cable from the battery to keep the
battery from running down.
Extended Storage: Remove the
12‐volt battery black, negative (−)
cable from the battery or use a
battery trickle charger.
Remember to reconnect the battery
when ready to drive the vehicle.
Starter Switch Check
{WARNING
When you are doing this
inspection, the vehicle could
move suddenly. If the vehicle
moves, you or others could be
injured.
1. Before starting this check, be sure there is enough room
around the vehicle.
2. Firmly apply both the parking brake and the regular brake.
See Parking Brake on
page 9‑34.
Do not use the accelerator
pedal, and be ready to turn off
the engine immediately if it
starts. 3. For automatic transmission
vehicles, try to start the engine
in each gear. The vehicle
should start only in P (Park) or
N (Neutral). If the vehicle starts
in any other position, contact
your dealer for service.
For manual transmission
vehicles, put the shift lever in
Neutral, push the clutch pedal
down halfway, and try to start
the engine. The vehicle should
start only when the clutch pedal
is pushed down all the way to
the floor. If the vehicle starts
when the clutch pedal is not
pushed all the way down,
contact your dealer for service.
Page 315 of 440
Black plate (41,1)Buick Regal Owner Manual - 2012
Vehicle Care 10-41
Fuse
Number Usage
42 Radiator Fan 1
43 Not Used
44 Headlamp Washer
System (if equipped)
45 Radiator Fan 2
46 Terminal 87, Main
Relay
47 Oxygen Sensor
48 Fog Lamps
49 Right‐Hand Low
Beam, High Intensity
Discharge
Headlamp
50 Left‐Hand Low
Beam, High Intensity
Discharge
Headlamp
51 Horn
52 Motor
Indicator Lamp Fuse
Number Usage
53 Ignition, Inside
Rearview Mirror
54 Not Used
55 Power Windows
56 Windshield Washer
57 Not Used
58 Not Used
59 Secondary Air
Induction
60 Heated Mirrors
61 Not Used
62 Canister Vent
Solenoid
63 Not Used
64 Not Used
65 Not Used
66 Not Used
67 Fuel System Control
Module Fuse
Number Usage
68 Not Used
69 Battery Sensor
70 Not Used
71 Not Used
Relay
Number Usage
1 Not Used
2 Starter
3 Cooling Fan (LHU)
4 Front Wiper (Step 2)
5 Front Wiper
(Step 1, Interval)
6 SAI Valve
7 Main Relay
8 Not Used
9 Cooling Fan
(LAF/LHU)
10 Cooling Fan (LAF)
Page 363 of 440
Black plate (89,1)Buick Regal Owner Manual - 2012
Vehicle Care 10-89
Compact Spare Tire
{WARNING
Driving with more than one
compact spare tire at a time could
result in loss of braking and
handling. This could lead to a
crash and you or others could be
injured. Use only one compact
spare tire at a time.
If this vehicle has a compact spare
tire, it was fully inflated when the
vehicle was new; however, it can
lose air after a time. Check the
inflation pressure regularly. It should
be 420 kPa (60 psi).
Stop as soon as possible and check
that the spare tire is correctly
inflated after installing the spare on
the vehicle. The compact spare is
designed to perform well at speeds
up to 105 km/h (65 mph) for
distances up to 5 000 km (3,000 mi), so a trip can be completed and the
full-size tire repaired or replaced
when possible. However, the
compact spare tire will last longer
and be in good shape if it is
replaced as soon as possible.
Notice:
When the compact spare
is installed, do not take the
vehicle through an automatic car
wash with guide rails. The
compact spare can get caught on
the rails which can damage the
tire, wheel, and other parts of the
vehicle.
Do not use the compact spare on
other vehicles.
Do not mix the compact spare tire or
wheel with other wheels or tires.
They will not fit. Keep the spare tire
and its wheel together.
Notice: Tire chains will not fit the
compact spare. Using them can
damage the vehicle and can
damage the chains too. Do not
use tire chains on the compact
spare.
Jump Starting
Jump Starting (On-board
with eAssist Only)
If the vehicle fails to crank, it may
be jump started by using the eAssist
battery to charge the 12-volt battery.
Use the following procedure to
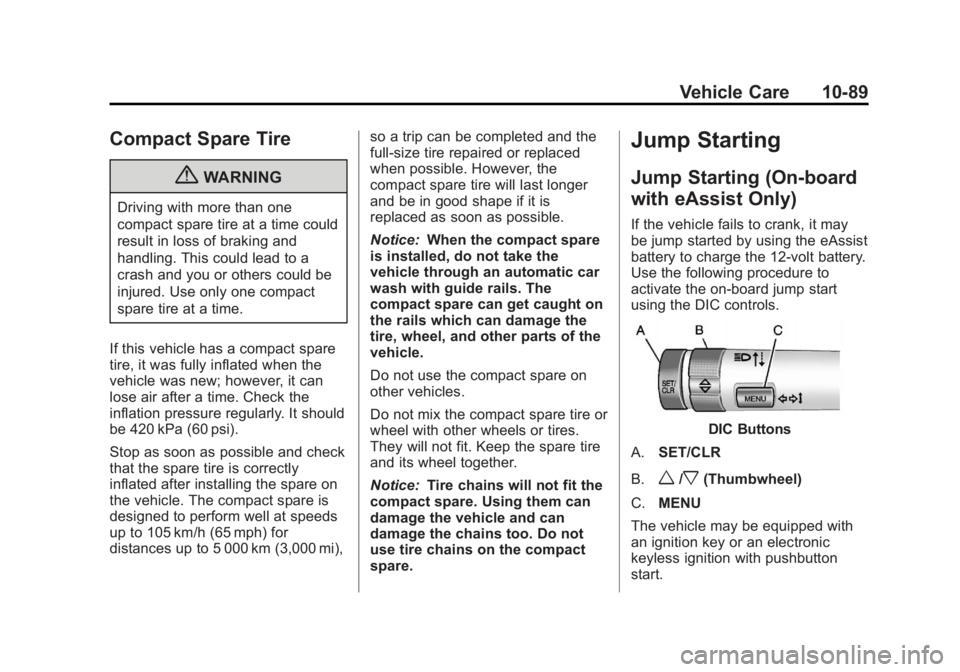
activate the on‐board jump start
using the DIC controls.
DIC Buttons
A. SET/CLR
B.
w/x(Thumbwheel)
C. MENU
The vehicle may be equipped with
an ignition key or an electronic
keyless ignition with pushbutton
start.
Page 364 of 440
Black plate (90,1)Buick Regal Owner Manual - 2012
10-90 Vehicle Care
Key Access
Place the ignition key in the run
position and proceed as follows:
1. Press MENU (C) on the turnsignal lever until Vehicle
Information Menu is displayed.
Use
w/x(Thumbwheel) (B) to
scroll through the menu items
until Jump Start is displayed.
2. Press SET/CLR (A) to activate the jump start.
3. The system will then ask for confirmation. If yes is selected,
the jump start will begin and the
display will show JUMP START
ACTIVE WAIT TO START.
4. When the jump start is complete, the display will show JUMP
START COMPLETE ATTEMPT
START. Keyless Access
With the brake pedal not applied,
press and hold the ENGINE START/
STOP button for more than
five seconds. This will place the
vehicle in the Service Only Mode.
Proceed as follows:
1. Press MENU (C) on the turn
signal lever until Vehicle
Information Menu is displayed.
Use
w/x(Thumbwheel) (B) to
scroll through the menu items
until Jump Start is displayed.
2. Press SET/CLR (A) to activate the jump start.
3. The system will then ask for confirmation. If yes is selected,
the jump start will begin and the
display will show JUMP START
ACTIVE WAIT TO START.
4. When the jump start is complete, the display will show JUMP
START COMPLETE ATTEMPT
START. If the vehicle is started, the
on‐board jump start function will be
automatically disabled. If the vehicle
cranks but does not start, the
procedure may be repeated
again. If the vehicle start is still
unsuccessful, the jump start can be
attempted using the following jump
starting procedure under
“Jump
Starting (with or without eAssist).”
On‐board jump starting may be
unavailable due to the 12-volt
battery charge level, the eAssist
battery charge level, power
capability, or an issue with the
eAssist system. In these cases, the
display will not be available because
of the power issue, or the DIC will
display JUMP START DISABLED
SEE OWNERS MANUAL.
Page 365 of 440
Black plate (91,1)Buick Regal Owner Manual - 2012
Vehicle Care 10-91
Jump Starting (with or
without eAssist)
For more information about the
vehicle battery, seeBattery on
page 10‑29.
If the battery has run down, try to
use another vehicle and some
jumper cables to start your vehicle.
Be sure to use the following steps to
do it safely.
{WARNING
Batteries can hurt you. They can
be dangerous because:
.They contain acid that can
burn you.
.They contain gas that can
explode or ignite.
.They contain enough
electricity to burn you.
If you do not follow these steps
exactly, some or all of these
things can hurt you. Notice:
Ignoring these steps
could result in costly damage to
the vehicle that would not be
covered by the warranty.
Trying to start the vehicle by
pushing or pulling it will not
work, and it could damage the
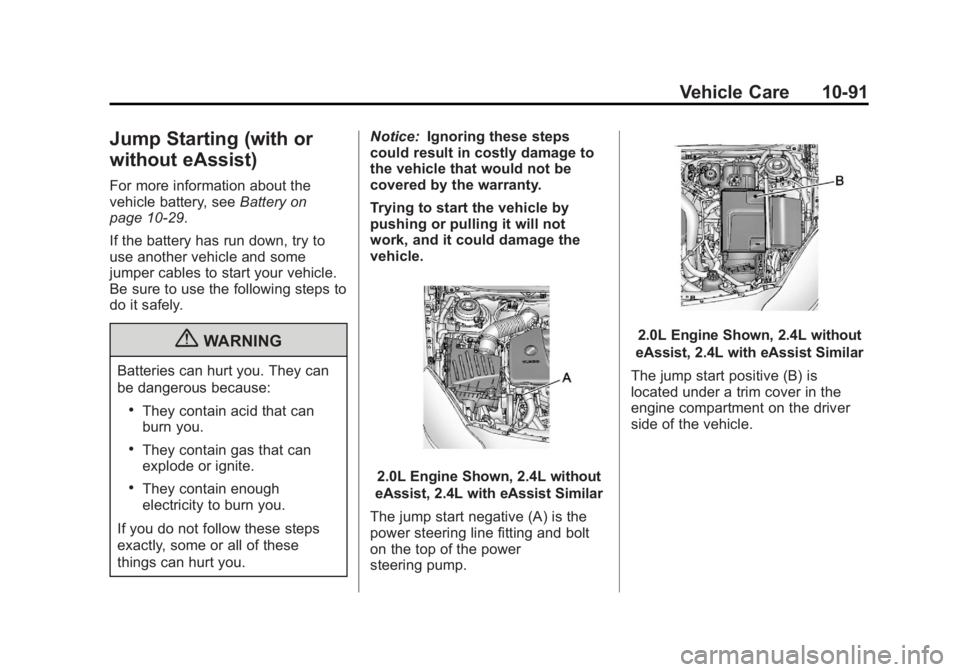
vehicle.2.0L Engine Shown, 2.4L without
eAssist, 2.4L with eAssist Similar
The jump start negative (A) is the
power steering line fitting and bolt
on the top of the power
steering pump.
2.0L Engine Shown, 2.4L without
eAssist, 2.4L with eAssist Similar
The jump start positive (B) is
located under a trim cover in the
engine compartment on the driver
side of the vehicle.
Page 366 of 440
Black plate (92,1)Buick Regal Owner Manual - 2012
10-92 Vehicle Care
These locations are used instead of
a direct connection to the battery.
1. Check the other vehicle. It musthave a 12-volt battery with a
negative ground system.
Notice: Only use a vehicle that
has a 12-volt system with a
negative ground for jump
starting. If the other vehicle does
not have a 12-volt system with a
negative ground, both vehicles
can be damaged.
2. Position the two vehicles so that they are not touching.
3. To avoid the possibility of the vehicles rolling, set the parking
brake firmly on both vehicles
involved in the jump start
procedure. Put an automatic
transmission in P (Park) or a
manual transmission in Neutral
before setting the parking brake. Notice:
If any accessories are left
on or plugged in during the jump
starting procedure, they could be
damaged. The repairs would not
be covered by the vehicle
warranty. Whenever possible,
turn off or unplug all accessories
on either vehicle when jump
starting the vehicle.
4. Turn the ignition to LOCK/OFF
and switch off all lights and
accessories in both vehicles,
except the hazard warning
flashers if needed.
{WARNING
An electric fan can start up even
when the engine is not running
and can injure you. Keep hands,
clothing and tools away from any
underhood electric fan.
{WARNING
Using a match near a battery can
cause battery gas to explode.
People have been hurt doing this,
and some have been blinded.
Use a flashlight if you need more
light.
Be sure the battery has enough
water. You do not need to add
water to the battery installed in
your new vehicle. But if a battery
has filler caps, be sure the right
amount of fluid is there. If it is low,
add water to take care of that
first. If you do not, explosive gas
could be present.
Battery fluid contains acid that
can burn you. Do not get it on
you. If you accidentally get it in
your eyes or on your skin, flush
the place with water and get
medical help immediately.
Page 367 of 440
Black plate (93,1)Buick Regal Owner Manual - 2012
Vehicle Care 10-93
{WARNING
Fans or other moving engine
parts can injure you badly. Keep
your hands away from moving
parts once the engine is running.
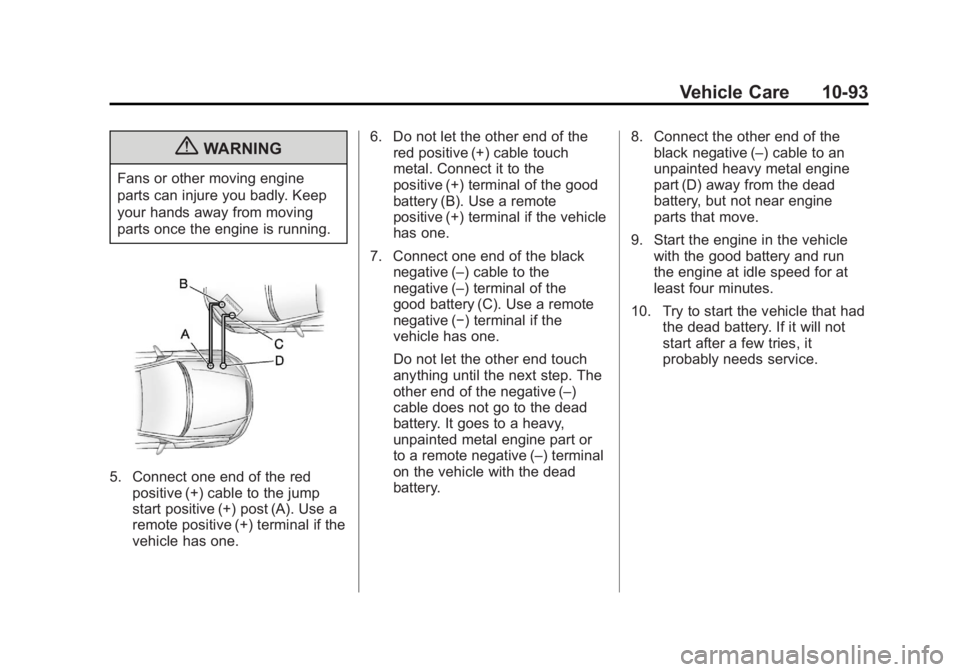
5. Connect one end of the redpositive (+) cable to the jump
start positive (+) post (A). Use a
remote positive (+) terminal if the
vehicle has one. 6. Do not let the other end of the
red positive (+) cable touch
metal. Connect it to the
positive (+) terminal of the good
battery (B). Use a remote
positive (+) terminal if the vehicle
has one.
7. Connect one end of the black negative (–) cable to the
negative (–) terminal of the
good battery (C). Use a remote
negative (−) terminal if the
vehicle has one.
Do not let the other end touch
anything until the next step. The
other end of the negative (–)
cable does not go to the dead
battery. It goes to a heavy,
unpainted metal engine part or
to a remote negative (–) terminal
on the vehicle with the dead
battery. 8. Connect the other end of the
black negative (–) cable to an
unpainted heavy metal engine
part (D) away from the dead
battery, but not near engine
parts that move.
9. Start the engine in the vehicle with the good battery and run
the engine at idle speed for at
least four minutes.
10. Try to start the vehicle that had the dead battery. If it will not
start after a few tries, it
probably needs service.
Page 368 of 440
Black plate (94,1)Buick Regal Owner Manual - 2012
10-94 Vehicle Care
Notice:If the jumper cables are
connected or removed in the
wrong order, electrical shorting
may occur and damage the
vehicle. The repairs would not be
covered by the vehicle warranty.
Always connect and remove the
jumper cables in the correct
order, making sure that the
cables do not touch each other or
other metal.
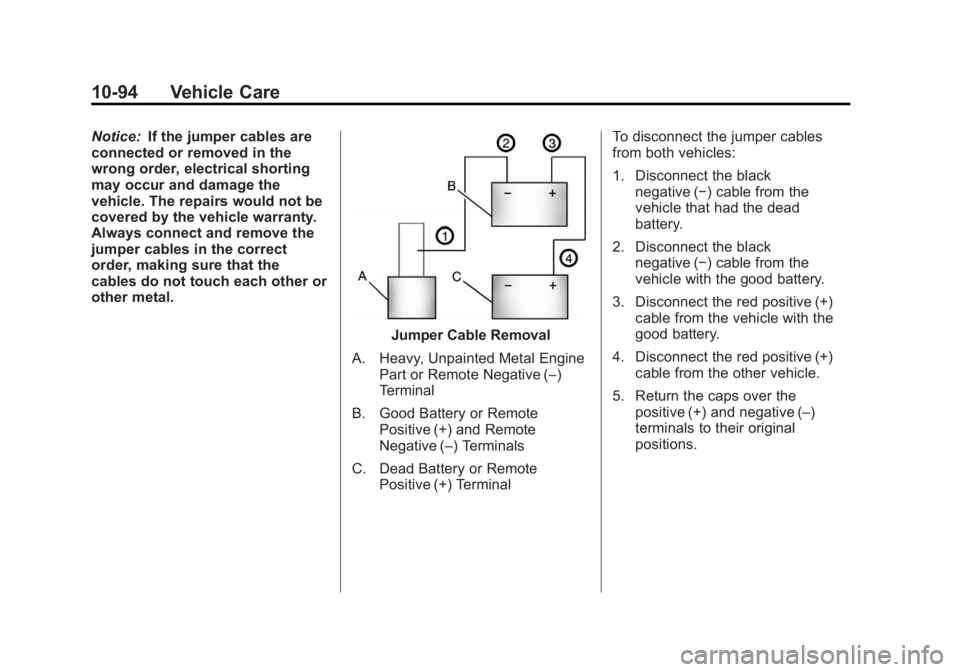
Jumper Cable Removal
A. Heavy, Unpainted Metal Engine Part or Remote Negative (–)
Terminal
B. Good Battery or Remote Positive (+) and Remote
Negative (–) Terminals
C. Dead Battery or Remote Positive (+) Terminal To disconnect the jumper cables
from both vehicles:
1. Disconnect the black
negative (−) cable from the
vehicle that had the dead
battery.
2. Disconnect the black negative (−) cable from the
vehicle with the good battery.
3. Disconnect the red positive (+) cable from the vehicle with the
good battery.
4. Disconnect the red positive (+) cable from the other vehicle.
5. Return the caps over the positive (+) and negative (–)
terminals to their original
positions.
Page 370 of 440
Black plate (96,1)Buick Regal Owner Manual - 2012
10-96 Vehicle Care
Dinghy Towing (With
Automatic Transmission)
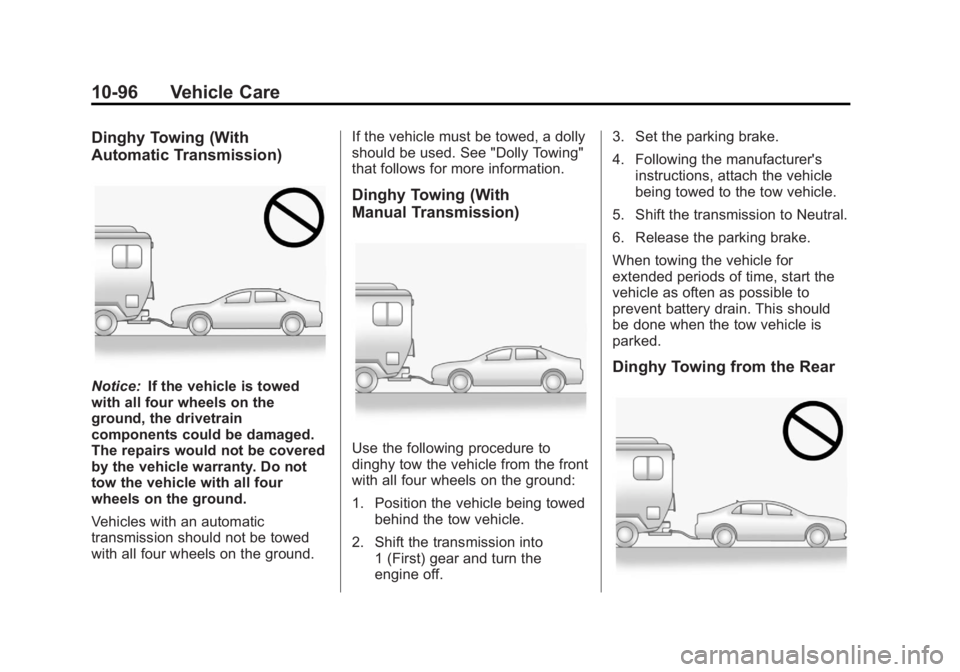
Notice:If the vehicle is towed
with all four wheels on the
ground, the drivetrain
components could be damaged.
The repairs would not be covered
by the vehicle warranty. Do not
tow the vehicle with all four
wheels on the ground.
Vehicles with an automatic
transmission should not be towed
with all four wheels on the ground. If the vehicle must be towed, a dolly
should be used. See "Dolly Towing"
that follows for more information.
Dinghy Towing (With
Manual Transmission)
Use the following procedure to
dinghy tow the vehicle from the front
with all four wheels on the ground:
1. Position the vehicle being towed
behind the tow vehicle.
2. Shift the transmission into 1 (First) gear and turn the
engine off. 3. Set the parking brake.
4. Following the manufacturer's
instructions, attach the vehicle
being towed to the tow vehicle.
5. Shift the transmission to Neutral.
6. Release the parking brake.
When towing the vehicle for
extended periods of time, start the
vehicle as often as possible to
prevent battery drain. This should
be done when the tow vehicle is
parked.
Dinghy Towing from the Rear
Page 388 of 440
Black plate (10,1)Buick Regal Owner Manual - 2012
11-10 Service and Maintenance
Battery
The battery supplies power to start
the engine and operate any
additional electrical accessories.
.To avoid break‐down or failure to
start the vehicle, maintain a
battery with full cranking power.
.Trained dealer technicians have
the diagnostic equipment to test
the battery and ensure that the
connections and cables are
corrosion‐free.
Belts
.Belts may need replacing if
they squeak or show signs of
cracking or splitting.
.Trained dealer technicians
can inspect the belts and
recommend replacement when
necessary. Brakes
Brakes stop the vehicle and are
crucial to safe driving.
.Signs of brake wear may include
chirping, grinding, or squealing
noises, or difficulty stopping.
.Trained dealer technicians have
access to tools and equipment
to inspect the brakes and
recommend quality parts
engineered for the vehicle.
Fluids
Proper fluid levels and approved
fluids protect the vehicle’s systems
and components. See
Recommended Fluids and
Lubricants on page 11‑13 for GM
approved fluids.
.Engine oil and windshield
washer fluid levels should be
checked at every fuel fill.
.Instrument cluster lights may
come on to indicate that fluids
may be low and need to be
filled. Hoses
Hoses transport fluids and should
be regularly inspected to ensure
that there are no cracks or leaks.
With a multi‐point inspection, your
dealer can inspect the hoses and
advise if replacement is needed.
Lamps
Properly working headlamps,
taillamps, and brake lamps are
important to see and be seen on
the road.
.Signs that the headlamps need
attention include dimming, failure
to light, cracking, or damage.
The brake lamps need to be
checked periodically to ensure
that they light when braking.
.With a multi‐point inspection,
your dealer can check the lamps
and note any concerns.