display BUICK REGAL 2013 Get To Know Guide
[x] Cancel search | Manufacturer: BUICK, Model Year: 2013, Model line: REGAL, Model: BUICK REGAL 2013Pages: 20, PDF Size: 3.17 MB
Page 8 of 20
8
IntelliLink System
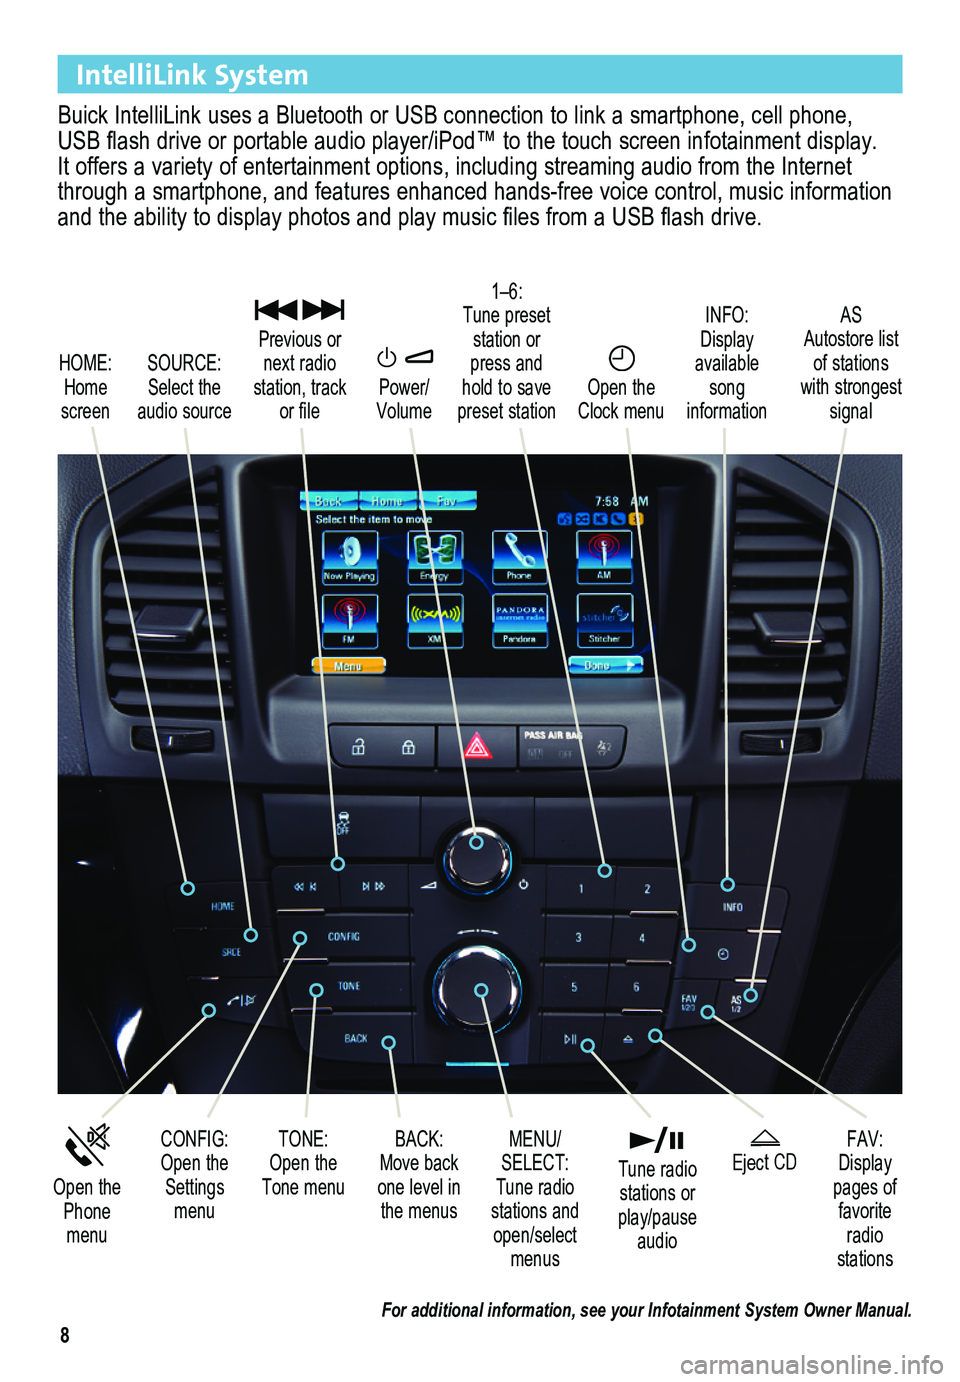
Buick IntelliLink uses a Bluetooth or USB connection to link a smartphone, cell phone, USB flash drive or portable audio player/iPod™ to the touch screen infotainment display. It offers a variety of entertainment options, including streaming audio from the Internet through a smartphone, and features enhanced hands-free voice control, mu\
sic information and the ability to display photos and play music files from a USB flash drive.
Power/ Volume
SOURCE: Select the audio source
CONFIG: Open the Settings menu
1–6: Tune preset station or press and hold to save preset station
FAV: Display pages of favorite radio stations
HOME: Home screen
INFO: Display available song information
AS Autostore list of stations with strongest signal
Open the Phone menu
MENU/ SELECT: Tune radio stations and open/select menus
Eject CD
Previous or next radio station, track or file
BACK: Move back one level in the menus
Open the Clock menu
TONE: Open the Tone menu
Tune radio stations or play/pause audio
For additional information, see your Infotainment System Owner Manual.
Page 9 of 20
9
IntelliLink System
Bluetooth® System
Before using a Bluetooth-enabled device in the vehicle, it must be paired with the IntelliLink system. Not all devices will support all functions. Bluetooth streaming audio is available with the IntelliLink system. For more information, visit www.gm.com/bluetooth.
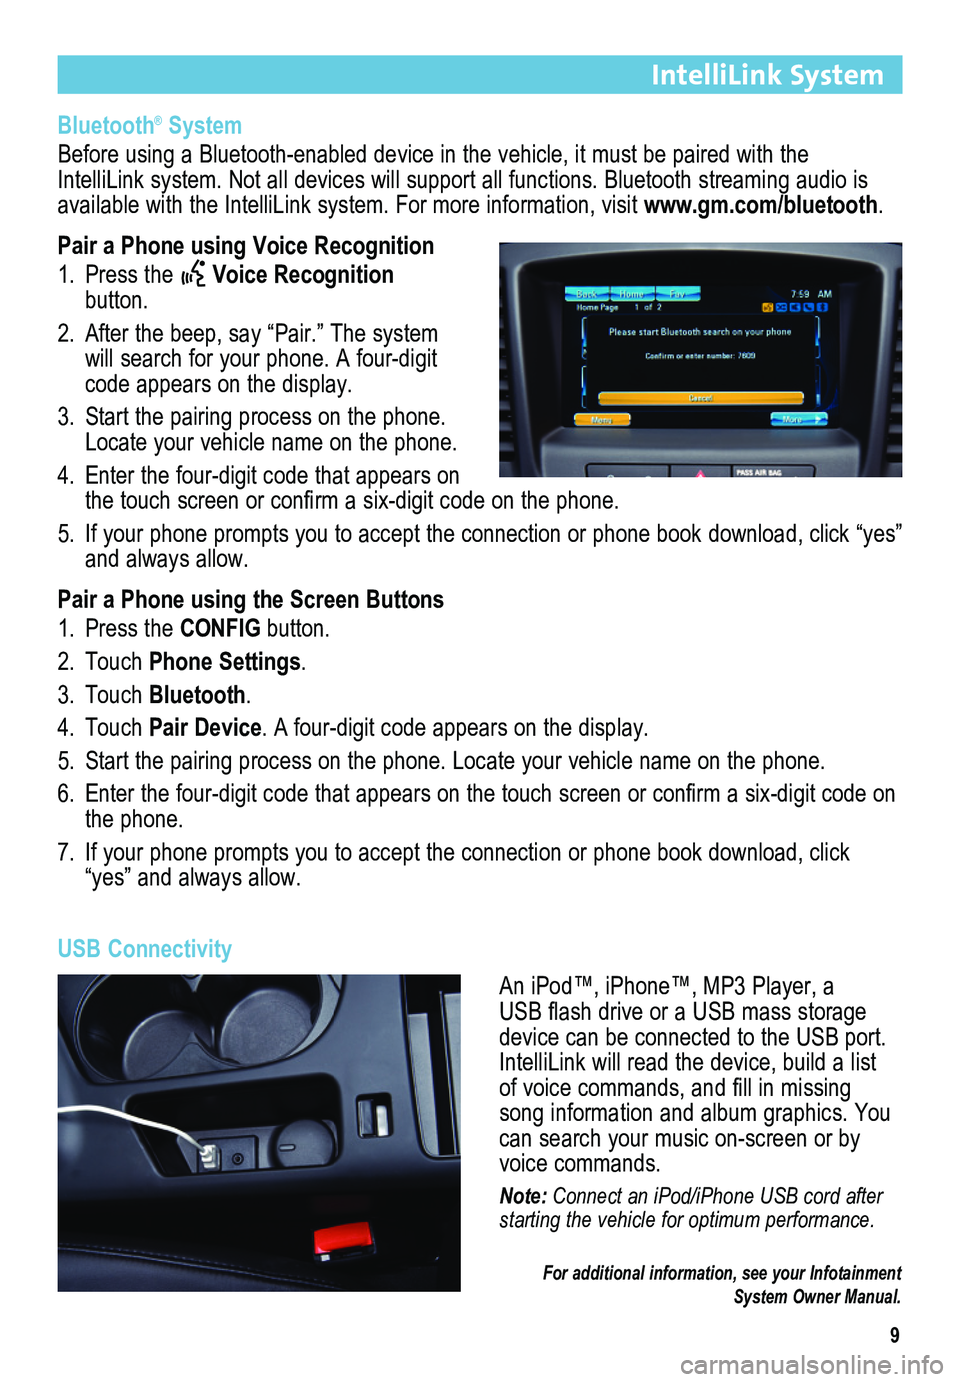
Pair a Phone using Voice Recognition
1. Press the Voice Recognition button.
2. After the beep, say “Pair.” The system will search for your phone. A four-digit code appears on the display.
3. Start the pairing process on the phone. Locate your vehicle name on the phone.
4. Enter the four-digit code that appears on the touch screen or confirm a six-digit code on the phone.
5. If your phone prompts you to accept the connection or phone book download, click “yes” and always allow.
Pair a Phone using the Screen Buttons
1. Press the CONFIG button.
2. Touch Phone Settings.
3. Touch Bluetooth.
4. Touch Pair Device. A four-digit code appears on the display.
5. Start the pairing process on the phone. Locate your vehicle name on the \
phone.
6. Enter the four-digit code that appears on the touch screen or confirm a six-digit code on the phone.
7. If your phone prompts you to accept the connection or phone book download, click “yes” and always allow.
USB Connectivity
An iPod™, iPhone™, MP3 Player, a USB flash drive or a USB mass storage device can be connected to the USB port. IntelliLink will read the device, build a list of voice commands, and fill in missing song information and album graphics. You can search your music on-screen or by voice commands.
Note: Connect an iPod/iPhone USB cord after starting the vehicle for optimum performance.
For additional information, see your Infotainment System Owner Manual.
Page 11 of 20
11
IntelliLink System
Note: ALWAYS VERIFY THAT YOUR PHONE HAS THE LATEST VERSION OF AN APPLICATION AND THAT THE PHONE
VOLUME IS TURNED UP.
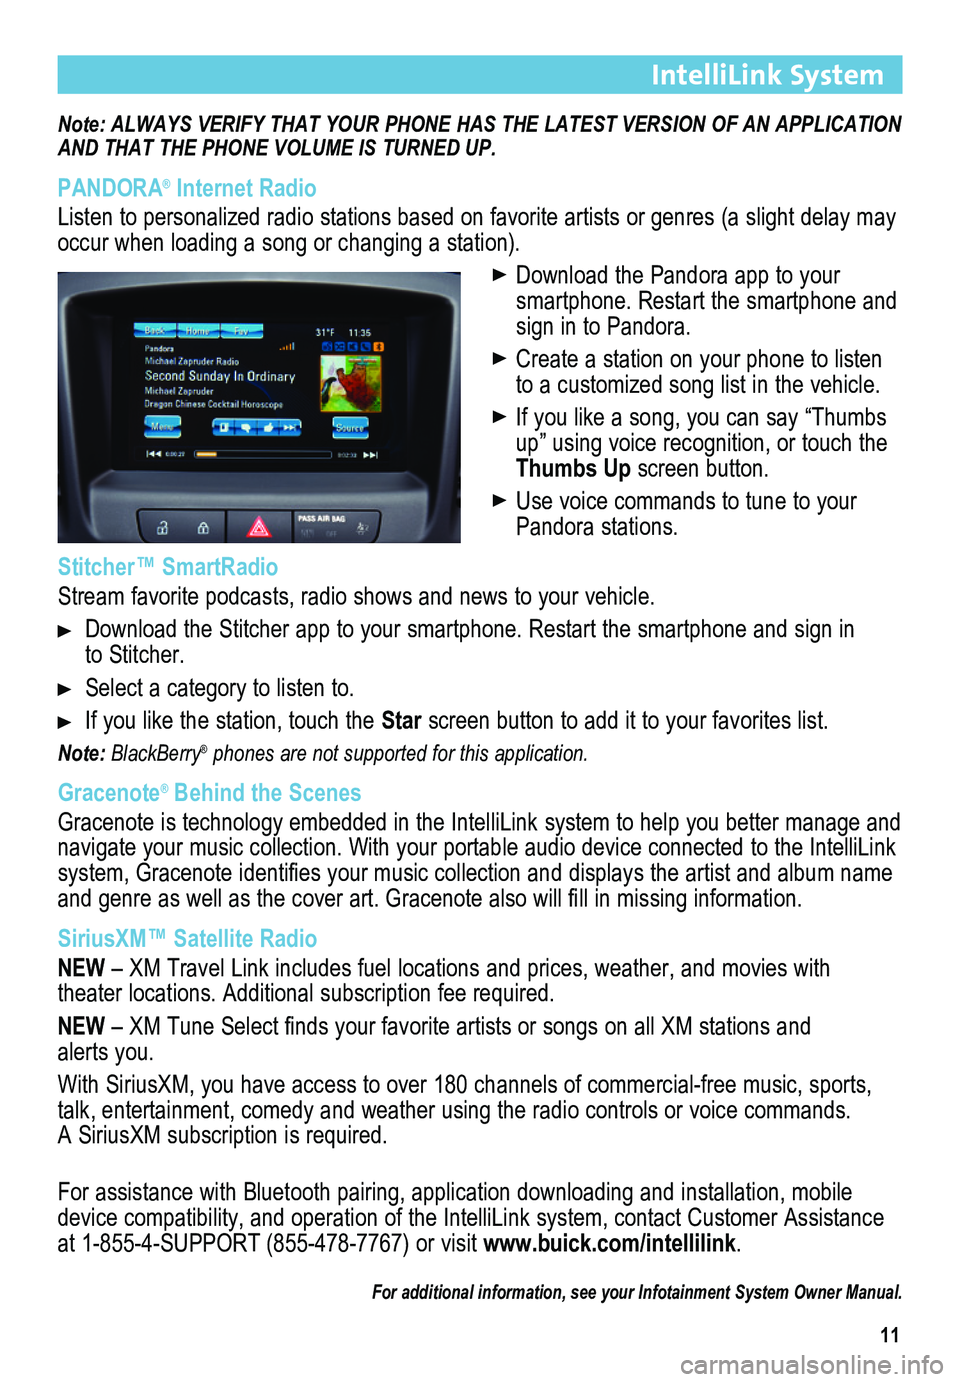
PANDORA® Internet Radio
Listen to personalized radio stations based on favorite artists or genres (a slight delay may \
occur when loading a song or changing a station).
Download the Pandora app to your smartphone. Restart the smartphone and sign in to Pandora.
Create a station on your phone to listen to a customized song list in the vehicle.
If you like a song, you can say “Thumbs up” using voice recognition, or touch the Thumbs Up screen button.
Use voice commands to tune to your Pandora stations.
Stitcher™ SmartRadio
Stream favorite podcasts, radio shows and news to your vehicle.
Download the Stitcher app to your smartphone. Restart the smartphone and sign in to Stitcher.
Select a category to listen to.
If you like the station, touch the Star screen button to add it to your favorites list.
Note: BlackBerry® phones are not supported for this application.
Gracenote® Behind the Scenes
Gracenote is technology embedded in the IntelliLink system to help you better manage and navigate your music collection. With your portable audio device connected to the IntelliLink system, Gracenote identifies your music collection and displays the artist and album name and genre as well as the cover art. Gracenote also will fill in missing information.
SiriusXM™ Satellite Radio
NEW – XM Travel Link includes fuel locations and prices, weather, and movies with
theater locations. Additional subscription fee required.
NEW – XM Tune Select finds your favorite artists or songs on all XM stations and alerts you.
With SiriusXM, you have access to over 180 channels of commercial-free music, sports, talk, entertainment, comedy and weather using the radio controls or voice commands. A SiriusXM subscription is required.
For assistance with Bluetooth pairing, application downloading and installation, mobile device compatibility, and operation of the IntelliLink system, contact Customer Assistance at 1-855-4-SUPPORT (855-478-7767) or visit www.buick.com/intellilink.
For additional information, see your Infotainment System Owner Manual.
Page 12 of 20
12
Note: AVOID EXTENDED SEARCHING FOR ITEMS OR CONFIGURING SETTINGS WHILE DRIVING.
Navigation SystemF
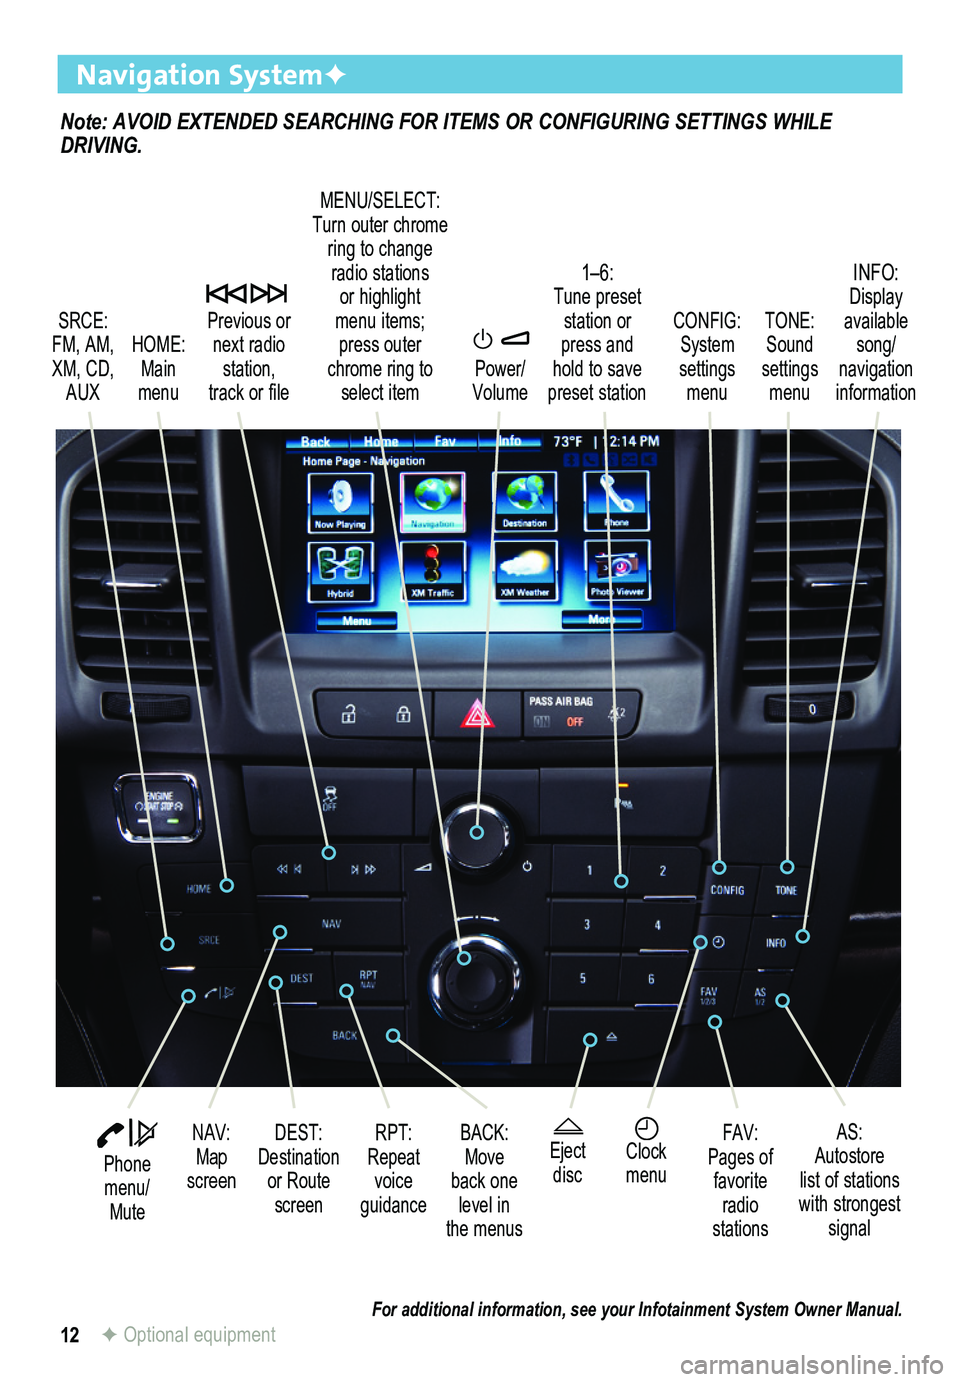
SRCE: FM, AM, XM, CD, AUX
1–6: Tune preset station or press and hold to save preset station
TONE: Sound settings menu
INFO: Display available song/ navigation information
CONFIG: System settings menu
Previous or next radio station, track or file
HOME: Main menu
Power/ Volume
DEST: Destination or Route screen
NAV: Map screen
RPT: Repeat voice guidance
FAV:Pages of favorite radio stations
AS:Autostore list of stations with strongest signal
MENU/SELECT:Turn outer chrome ring to change radio stations or highlight menu items;press outer chrome ring to select item
Eject discClock menu
BACK: Move back one level in the menus
Phone menu/ Mute
For additional information, see your Infotainment System Owner Manual.F Optional equipment
Page 13 of 20
13
Note: WHEN THE VEHICLE IS MOVING, VARIOUS ON-SCREEN FUNCTIONS ARE DISABLED TO REDUCE DRIVER DISTRACTION.
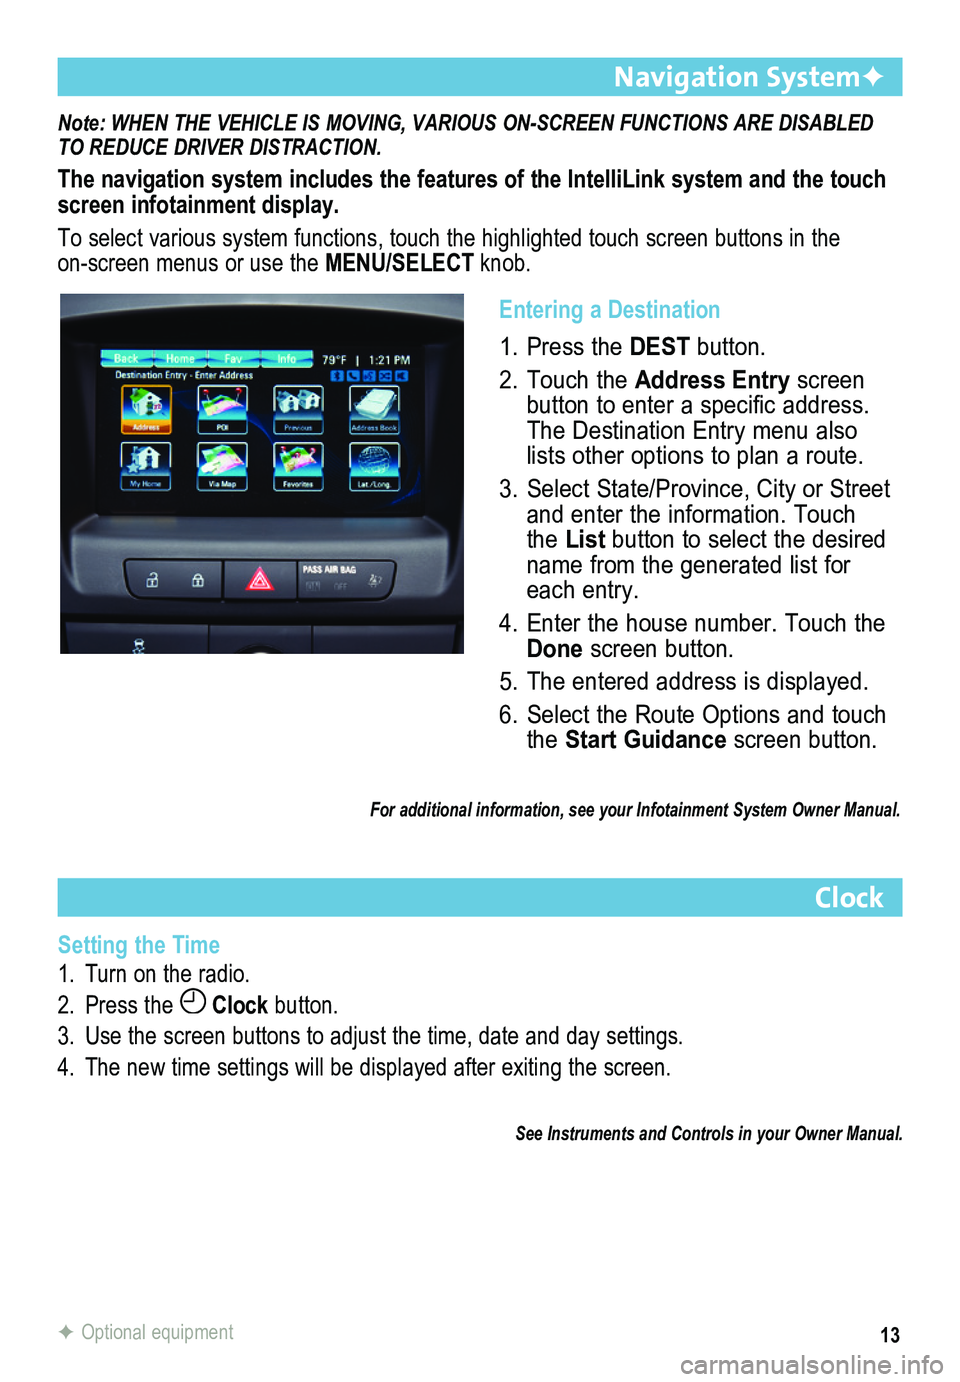
The navigation system includes the features of the IntelliLink system an\
d the touch screen infotainment display.
To select various system functions, touch the highlighted touch screen buttons in the on-screen menus or use the MENU/SELECT knob.
Navigation SystemF
Clock
Setting the Time
1. Turn on the radio.
2. Press the Clock button.
3. Use the screen buttons to adjust the time, date and day settings.
4. The new time settings will be displayed after exiting the screen.
See Instruments and Controls in your Owner Manual.
F Optional equipment
Entering a Destination
1. Press the DEST button.
2. Touch the Address Entry screen button to enter a specific address. The Destination Entry menu also lists other options to plan a route.
3. Select State/Province, City or Street and enter the information. Touch the List button to select the desired name from the generated list for each entry.
4. Enter the house number. Touch the Done screen button.
5. The entered address is displayed.
6. Select the Route Options and touch the Start Guidance screen button.
For additional information, see your Infotainment System Owner Manual.
Page 16 of 20
16
Driver Information Center
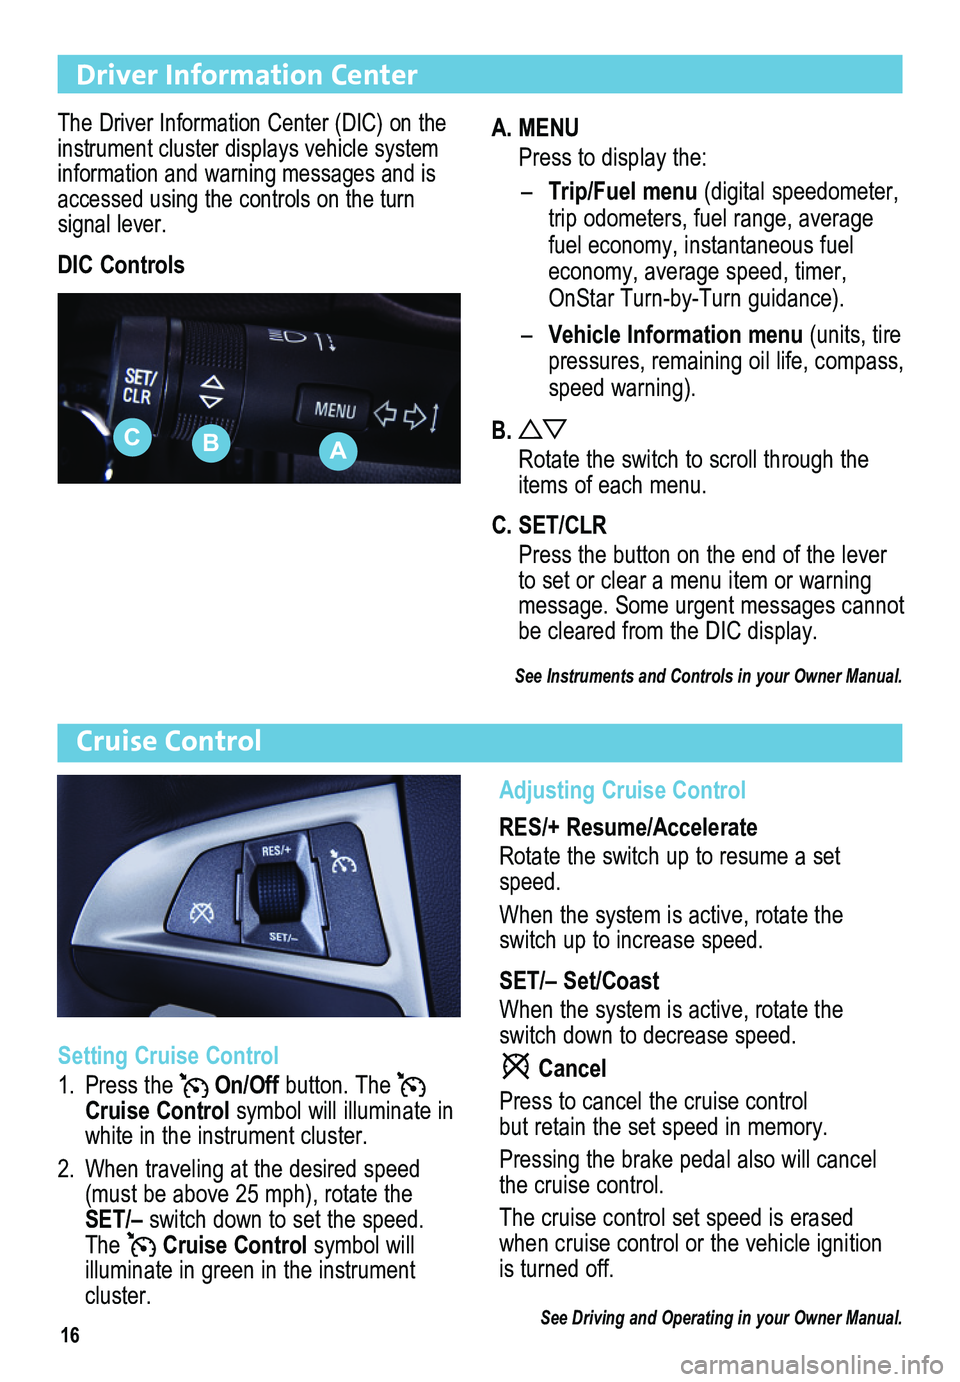
The Driver Information Center (DIC) on the instrument cluster displays vehicle system info r mation and warning messages and is accessed using the controls on the turn signal lever.
DIC Controls
Cruise Control
Adjusting Cruise Control
RES/+ Resume/Accelerate
Rotate the switch up to resume a set speed.
When the system is active, rotate the switch up to increase speed.
SET/– Set/Coast
When the system is active, rotate the switch down to decrease speed.
Cancel
Press to cancel the cruise control but retain the set speed in memory.
Pressing the brake pedal also will cancel the cruise control.
The cruise control set speed is erased when cruise control or the vehicle ignition is turned off.
See Driving and Operating in your Owner Manual.
Setting Cruise Control
1. Press the On/Off button. The Cruise Control symbol will illuminate in white in the instrument cluster.
2. When traveling at the desired speed (must be above 25 mph), rotate the SET/– switch down to set the speed. The Cruise Control symbol will
illuminate in green in the instrument cluster.
A. MENU
Press to display the:
– Trip/Fuel menu (digital speed ometer, trip odometers, fuel range, average fuel economy, instantaneous fuel economy, average speed, timer, OnStar Turn-by-Turn guidance).
– Vehicle Information menu (units, tire pressures, remaining oil life, compass, speed warning).
B.
Rotate the switch to scroll through the items of each menu.
C. SET/CLR
Press the button on the end of the lever to set or clear a menu item or warning message. Some urgent messages
cannot be cleared from the DIC display.
See Instruments and Controls in your Owner Manual.
ABC
Page 17 of 20
17
Automatic Transmission
Detected objects are indicated by audible beeps when the vehicle is in Reverse. The
interval between beeps becomes shorter as the vehicle gets closer to an object. When the distance is less than 12 in. (30cm), the beeps are continuous. The system operates only at speeds less than 5 mph.
• To turn the system on/off, press the Parking Assist button on the center of the instrument panel.
Note: THE SYSTEM MAY BE DISABLED IF DIRT, SNOW OR ICE BUILDS UP ON THE SENSORS. KEEP THE VEHICLE CLEAN FOR PROPER OPERATION.
See Driving and Operating in your Owner Manual.
Electric Parking Brake
• To apply the parking brake, pull up theParking Brake switch by the shift lever.
• To release the parking brake, turn on the ignition, press the brake pedal and press the Parking Brake switch.
See Driving and Operating in your Owner Manual.
Ultrasonic Rear Parking AssistF
The full-time, full-function traction control system limits wheelspin and the StabiliTrak
electronic stability control system assists with directional control of the vehicle in difficult driving conditions. Both systems turn on automatically every time the vehicle is started.
Turning the Systems Off/On
• To turn off traction control, press the StabiliTrak/Traction Control button on the center of the instrument panel. The Traction Control Off light will illuminate in the instrument cluster.
• To turn off both traction control and StabiliTrak, press and hold the button. The StabiliTrak Off light will illuminate in the instrument cluster.
• Press the button again to turn on both systems.
See Driving and Operating in your Owner Manual.
StabiliTrak®/Traction Control Systems
Driver Shift Control
Driver Shift Control (DSC) allows the driver to shift gears manually. This feature can be used to drive the vehicle in a sportier manner or to downshift when driv\
ing on a downhill grade to provide engine braking.
• Move the shift lever to the left of the Drive (D) position. Tap the shift lever forward (+) to upshift or rearward to downshift (–). The currently selected gear will be displayed in the Driver Information Center.
If vehicle speed is too high or too low for the requested gear, the shif\
t will not occur. When coming to a stop, the transmission will automatically downshift.
See Driving and Operating in your Owner Manual.
F Optional equipment
Page 19 of 20
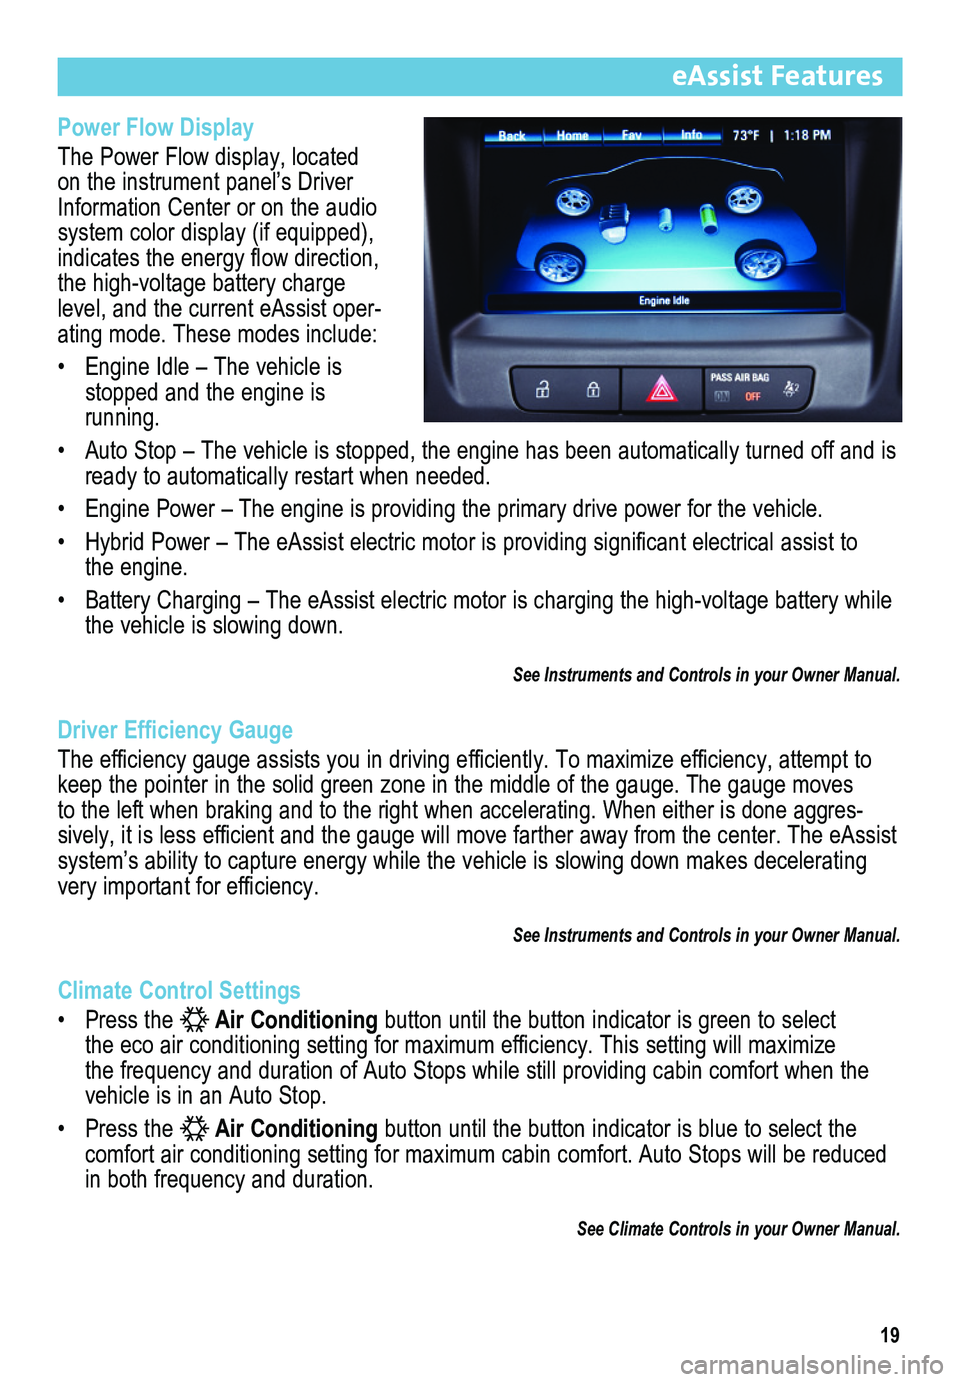
Power Flow Display
The Power Flow display, located on the instrument panel’s Driver Information Center or on the audio system color display (if equipped),
indicates the energy flow direction, the high-voltage battery charge level, and the current eAssist oper-ating mode. These modes include:
• Engine Idle – The vehicle is stopped and the engine is running.
• Auto Stop – The vehicle is stopped, the engine has been automatically turned off and is ready to automatically restart when needed.
• Engine Power – The engine is providing the primary drive power for the vehicle.
• Hybrid Power – The eAssist electric motor is providing significant electrical assist to the engine.
• Battery Charging – The eAssist electric motor is charging the high-voltage battery while the vehicle is slowing down.
See Instruments and Controls in your Owner Manual.
Driver Efficiency Gauge
The efficiency gauge assists you in driving efficiently. To maximize efficiency, attempt to keep the pointer in the solid green zone in the middle of the gauge. The\
gauge moves to the left when braking and to the right when accelerating. When either is\
done aggres-sively, it is less efficient and the gauge will move farther away from the center. The eAssist
system’s ability to capture energy while the vehicle is slowing down makes decelerating very important for efficiency.
See Instruments and Controls in your Owner Manual.
Climate Control Settings
• Press the Air Conditioning button until the button indicator is green to select the eco air conditioning setting for maximum efficiency. This setting will maximize the frequency and duration of Auto Stops while still providing cabin comfort\
when the
vehicle is in an Auto Stop.
• Press the Air Conditioning button until the button indicator is blue to select the comfort air conditioning setting for maximum cabin comfort. Auto Stops will be reduced in both frequency and duration.
See Climate Controls in your Owner Manual.
19
eAssist Features