maintenance BUICK SKYLARK 1993 Owners Manual
[x] Cancel search | Manufacturer: BUICK, Model Year: 1993, Model line: SKYLARK, Model: BUICK SKYLARK 1993Pages: 306, PDF Size: 15.84 MB
Page 10 of 306
Table of Contents
How to Use this Manual ................................................................. 10
Seats and Safety Belts
............................ .:. ................................... 13
FeaturesandControls
.................................................................. 61
Comfort Controls and Audio Systems
..................................................... 119
YourDrivingandtheRoad
.............................................................. 137
ProblemsontheRoad
.................................................................. 185
This part tells you how to use your manual and includes safety and vehicle damage warnings & symbols.
This part tells you how
to use your seats and safety belts properly.
This part explains how to start and operate your Buick.
This part tells you how to adjust the ventilation
& comfort controls and how to operate your sound system.
Here you’ll find helpful information and tips about the road and how to drive under different conditions.
This part tells you what to do if you have a problem while driving, such as a flat tire or engine overheating.
Here the manual tells you how to keep your Buick running properly and looking good.
This part tells you when to perform vehicle maintenance and what fluids and lubricants
to use.
This part tells you how to contact Buick for assistance and how to get service publications. It also gives
you information on “Reporting Safety Defects.’’
Here’s an alphabetical listing
of almost every subject in this manual. You can use it to quickly find
something you want to read.
ServiceandAppearanceCare ............................................................ 215
Maintenanceschedule
.................................................................. 265
Customer Assistance Information
........................................................ 285
Index
........................................................................\
........ 293
9
Page 140 of 306
L
m
Y
RAILROAD ADVANCE
CROSSING
I
NARROW BRIDGE
4
Q
LOW WORK’ERS
SHOULDER FLAGGER AHEAD
AHEAD
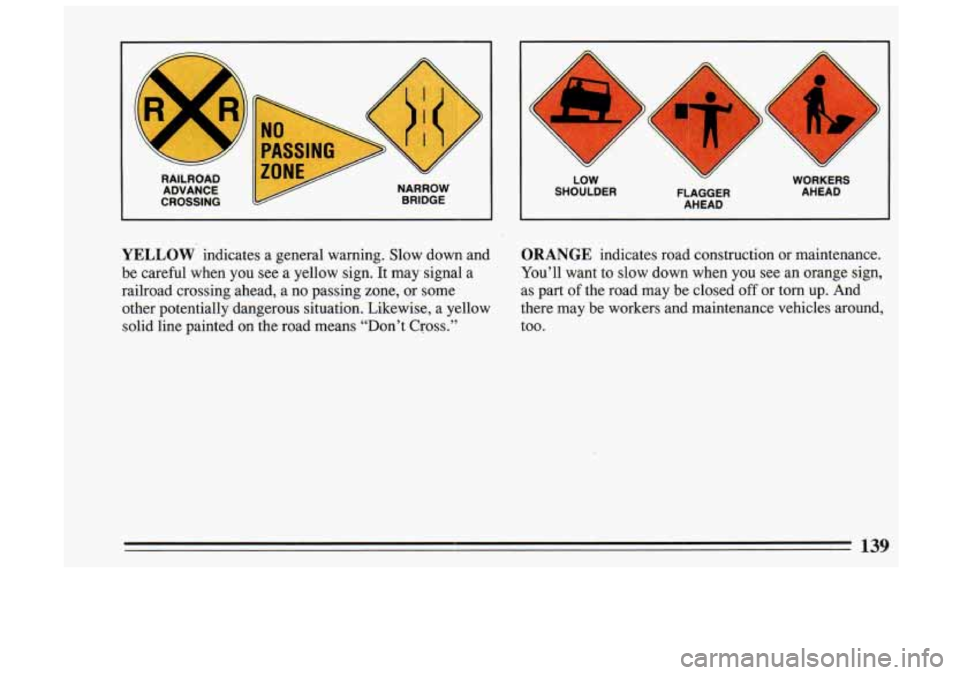
YELLOW indicates a general warning. Slow down and
be careful when you see a yellow sign. It may signal a
railroad crossing ahead, a no passing zone, or some other potentially dangerous situation. Likewise, a yellow
solid line painted on the road means “Don’t
Cross.’’
ORANGE indicates road construction or maintenance.
You’ll want
to slow down when you see an orange sign,
as part of the road may be closed
off or torn up. And
there may be workers and maintenance vehicles around,
too.
1
i
139
Page 185 of 306
But if you ever have to park your rig on a hill, here’s
, how to do it:
1 1. Apply your regular brakes, but don’t shift into.“P”
I (Park) yet.
I 2. Have someone place chocks under.the trailer wheels.
1
I
I I
I 3. When the wheel chocks are in place, release the
regular brakes until the chocks absorb the load.
4. Reapply the regular brakes. Then apply your parking
brake, and then shift to
“F’” (Park).
5. Release the regular brakes.
,. I I
~ When You Are Ready to Leave After
I Parking on a Hill
Maintenance When Trailer Towing
Your vehicle will need service more often when you’re
pulling a trailer. See the Maintenance Schedule for more
on this. Things that are especially important in trailer
operation are automatic transaxle fluid (don’t overfill),
engine oil, belt, cooling system, and brake adjustment.
Each of these is covered in this manual, and the Index
will help you find them quickly.
If you’re trailering, it’s
a good idea to review these sections before
you start
your trip.
Check periodically to see that all hitch nuts and bolts are
tight.
I 1. Apply your regular brakes and hold the pedal down
while you:
Start your engine;
0 Shift into a gear; and
0 Release the parking brake.
2. Let up on the brake pedal.
3. Drive slowly until the trailer is clear of the chocks.
4. Stop and have someone pick up and store the chocks.
284
Page 217 of 306
L
Doing Your Own Service Work
A CAUTION:
a
a
You can be injured if you try to do service work
on a vehicle without knowing enough about
it.
Be sure you have sufficient knowledge,
experience, and the proper replacement
parts and tools before you attempt any
vehicle maintenance task.
Be sure to use the proper nuts, bolts and
other fasteners. “English” and “metric”
fasteners
can be easily confused. If you
use the wrong fasteners, parts can later
break or
fall off. You could be hurt.
Page 229 of 306
Air Cleaner
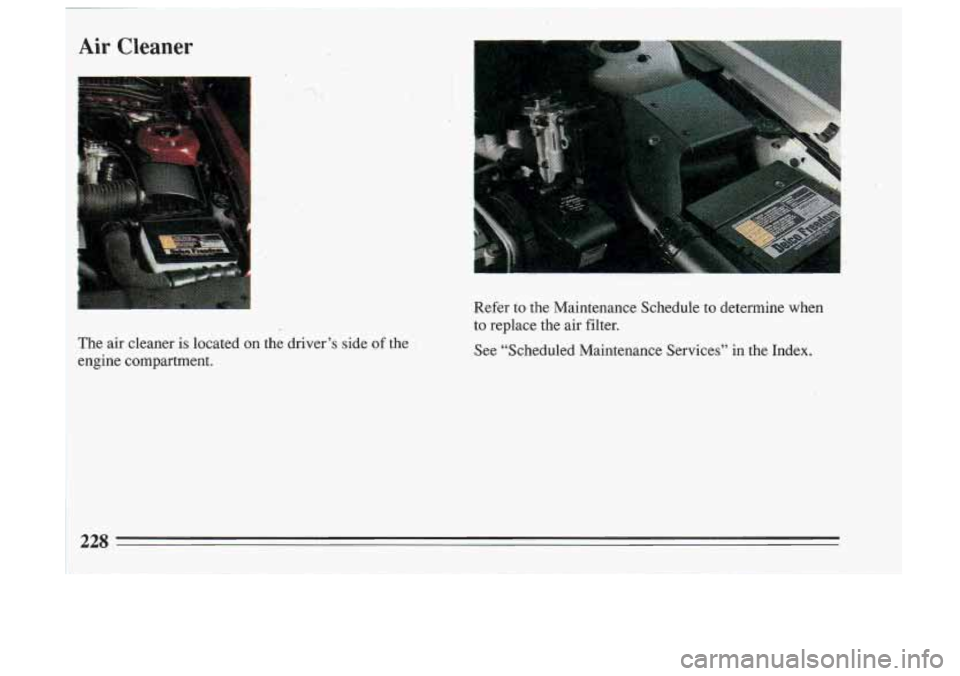
The air cleaner is located on the driver’s side of the
engine compartment. Refer to the Maintenance Schedule to determine when
to replace the air filter.
See “Scheduled Maintenance Services” in the Index.
Page 235 of 306
Power Steering Fluid What to Add:
I
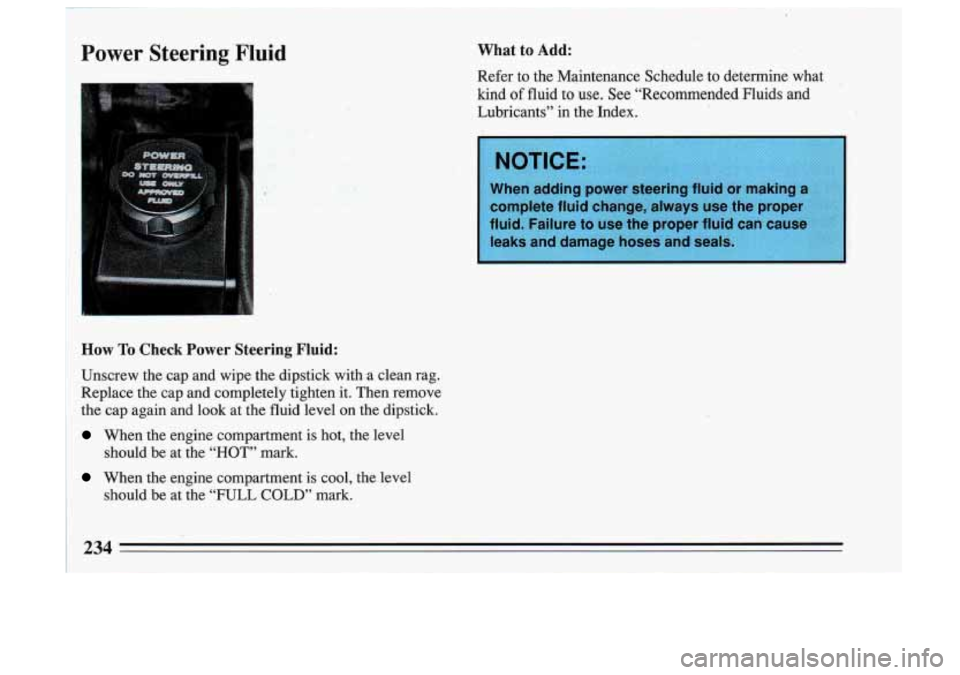
How To Check Power Steering Fluid:
Unscrew the cap and wipe the dipstick with .a clean rag.
Replace the cap and completely tighten it. Then remove
the cap again and look at the fluid level on the dipstick.
When the engine compartment is hot, the level
When the engine compartment is cool, the level
should be at the
“HOT” mark.
should be at the “FULL COLD” mark. Refer
to the Maintenance Schedule
to determine what
kind
of fluid to use. See “Recommended Fluids and
Lubricants”
in the Index.
234
Page 244 of 306
When to Check: Check your tires once a month or
more.
Don’t forget your compact spare tire. It should be at
60
psi (420 Pa).
How tco Check: Use a good quality pocket-type gage to
check tire pressure. Simply looking at the tires will not
tell you the pressure, especially if
you have radial tires --
which may look~properly inflated even if they’re
underinflated. 1
If your tires have valve caps, be sure to put them back
on. They help prevent leaks~ by keeping out dirt and
moisture.
Tire Inspection and Rotation
To make your tires last longer, have them, inspected and
rotated at the mileages recommended in the
Maintenance Schedule. See “Scheduled Maintenance
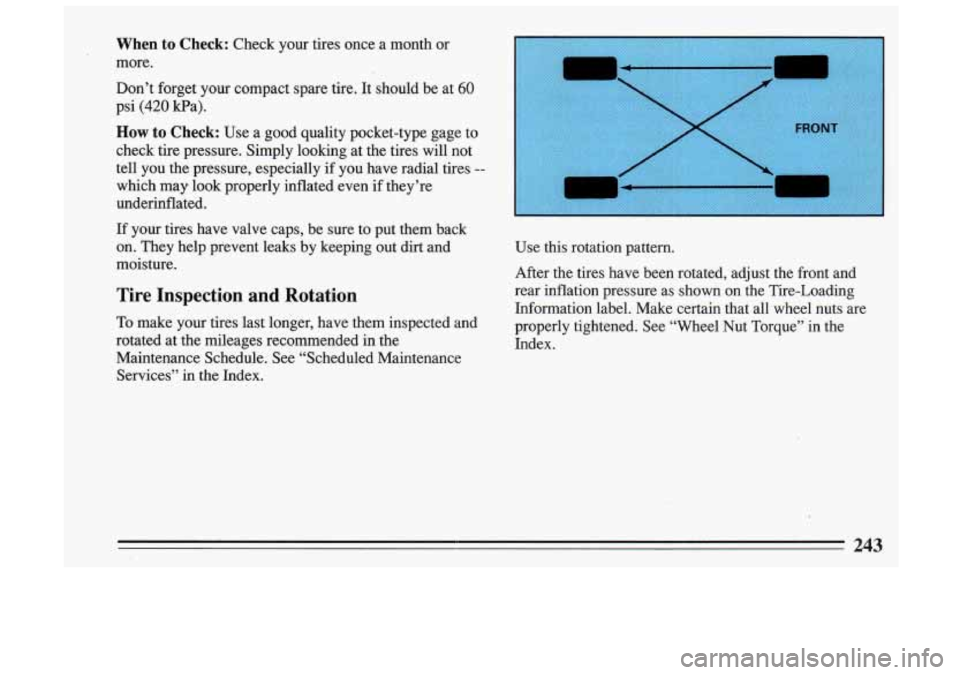
Services” in the Index. Use this rotation pattern.
After the tires have been rotated, adjust the
front and
rear inflation pressure as shown on the Tire-Loading
Information label. Make certain that all wheel nuts are
properly tightened. See “Wheel Nut Torque” in the
Index.
243
Page 256 of 306
Underbody Maintenance
Chemicals used for ice and snow removal and dust
control can collect on the underbody. If these are not
removed, accelerated corrosion (rust) can occur on the
underbody parts such as fuel lines, frame, floor pan, and
exhaust system even though they have corrosion
protection.
x
At least every spring, flush these materials from the
underbody with plain water. Clean any areas where mud
and other debris can collect. Dirt packed in closed areas
of the frame should be loosened before being flushed.
Your dealer or an underbody vehicle washing system
can
do this for you.
Chemical Paint Spotting
Some weather and atmospheric conditions can create a
chemical fallout. Airborne pollutants can fall upon and
attack painted surfaces on your vehicle. This damage
can take two forms: blotchy, ringlet-shaped
discolorations, and small irregular dark spots etched into
the paint surface.
Although no defect in the paint job causes this, Buick
will repair, at no charge to the owner, the surfaces of
new vehicles damaged by this fallout condition within
12 months or 12,000 miles (20 000 km) of purchase,
whichever comes first.
255
Page 257 of 306
I
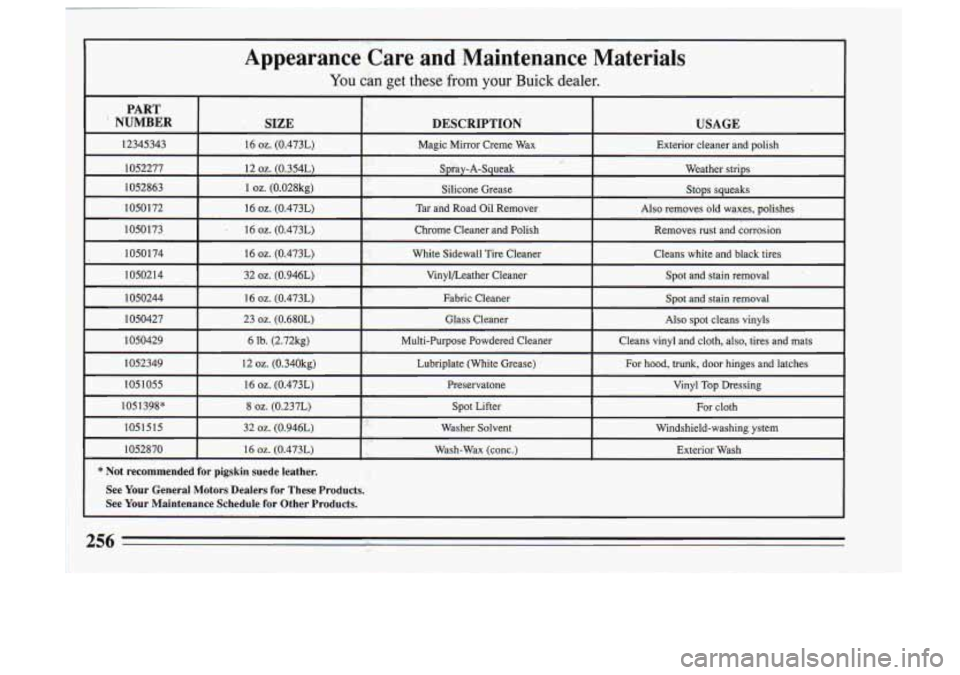
Appearance Care,and Maintenance Materials
You can get these from your Buick dealer.
PART
' NUMBER . SIZE DESCRIPTION USAGE
12345343 16 oz. (0.473L) Magic Mirror Creme
Wax
Exterior cleaner and polish
I052277 12
OZ. (0.354L)
Spray-A-Squeak Weather
strips
1052863
1 oz. (0.028kg) ,. Silicone Grease Stops squeaks
10501 72 16
oz. (0.473L) Tar and Road Oil Remover
Also removes old waxes, polishes
1050 173 . 16 OZ. (0.473L) Chrome Cleaner and Polish
Removes rust and corrosion
1050 174 16
oz. (0.473L) White Sidewall Tire Cleaner
Cleans white and black tires
10502 14 32
oz. (0.946L) Vinylbeather
Cleaner
Spot and stain removal
1050244 16
02. (0.473L) Fabric Cleaner
Spot and stain removal
1050427 23
oz. (0.680L) Glass Cleaner Also spot cleans vinyls
1050429 6 lb. (2.72kg) Multi-Purpose Powdered Cleaner Cleans vinyl and cloth, also, tires and mats
1052349 12
oz. (0.340kg)
Lubriplate (White Grease) For hood, trunk, door hinges
and latches
105 1055 16
oz. (0.473L) Preservatone
Vinyl Top Dressing
1051398* 8
oz. (0.237L) Spot Lifter
For cloth
1051515 32
oz. (0.946L) Washer Solvent
Windshield-washing ystem
1052870 16
oz. (0.473L)
Wash-Wax (conc.) Exterior
Wash
~
~
* Not recommended for pigskin suede leather.
See Your General Motors Dealers for These Products.'
See Your Maintenance Schedule for Other Products.
256 ..
Page 264 of 306
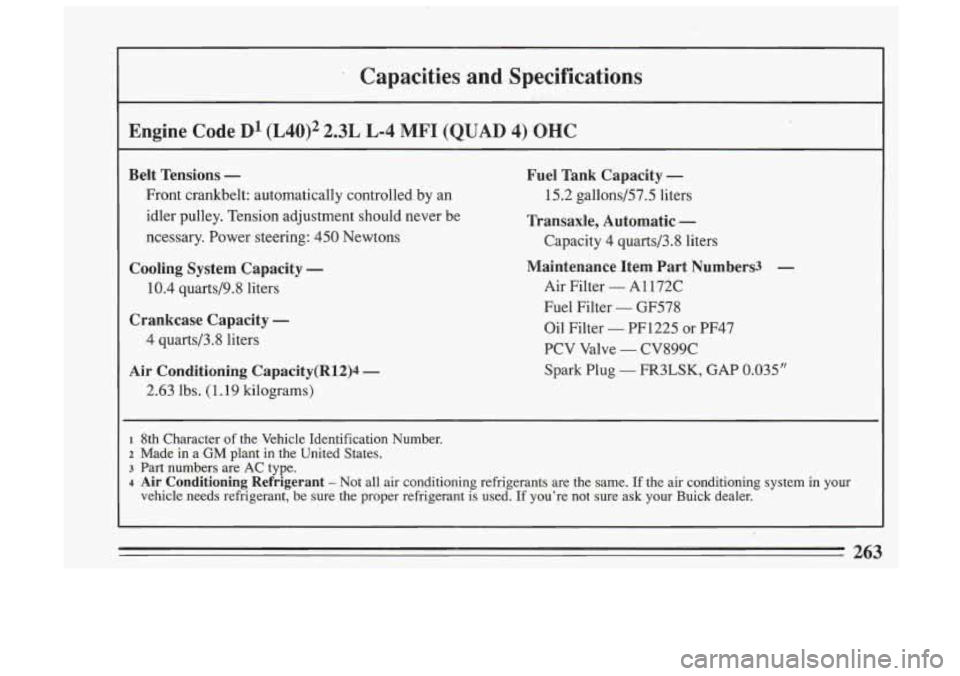
. Capacities and Specifications
Engine Code D1 (L40)2 2.3L L-4 (QUAD 4) OHC
Belt Tensions -
Front crankbelt: automatically controlled by an
idler pulley. Tension adjustment should never be
ncessary. Power steering:
450 Newtons
Cooling System Capacity -
10.4 quarts/9.8 liters
Crankcase Capacity -
4 quarts/3.8 liters
Air Conditioning Capaeity(Rl2)4 -
2.63 lbs. (1.19 kilograms)
Fuel Tank Capacity -
15.2 gallons/57.5 liters
Transaxle, Automatic -
Capacity 4 quarts/3.8 liters
Maintenance Item Part Numbers3
Air Filter - AI 172C
Fuel Filter
- GF578
Oil Filter
- PF1225 or PF47
PCV Valve
- CV899C
Spark Plug
- FR3LSK, GAP 0.035”
~~~~
1 8th Character of the Vehicle Identification Number.
z Made in a GM plant in the United States.
3 Part numbers are AC type.
4 Air Conditioning Refrigerant - Not all air conditioning refrigerants are the same. If the air conditioning system in your
vehicle needs refrigerant, be sure the proper refrigerant
is used. If you’re not sure ask your Buick dealer.
263