ESP BUICK VERANO 2012 Get To Know Guide
[x] Cancel search | Manufacturer: BUICK, Model Year: 2012, Model line: VERANO, Model: BUICK VERANO 2012Pages: 16, PDF Size: 2.22 MB
Page 10 of 16

10
Bluetooth® System
The in-vehicle Bluetooth system allows users with a Bluetooth-enabled cell phone to make
and receive hands-free calls in the vehicle. The Bluetooth-enabled cell phone must be
paired with the vehicle’s Bluetooth system. Not all phones will support all functions.
Pair a Device
1. Turn on the radio; press the CONFIGbutton.
2. Use the MENUknob to open the Phone Settings menu.
3. Select Bluetooth.
4. Select Pair Device. A four-digit PIN appears on the display.
5. Start the pairing process on the device. Locate the device named Your Vehicle on the
device list. Follow the instructions to enter the PIN.
6. The system prompts for a name for the device.
7. When complete, the system responds that the device has been successfully paired.
Visit www.gm.com/bluetooth and see Infotainment System in your Owner Manual.
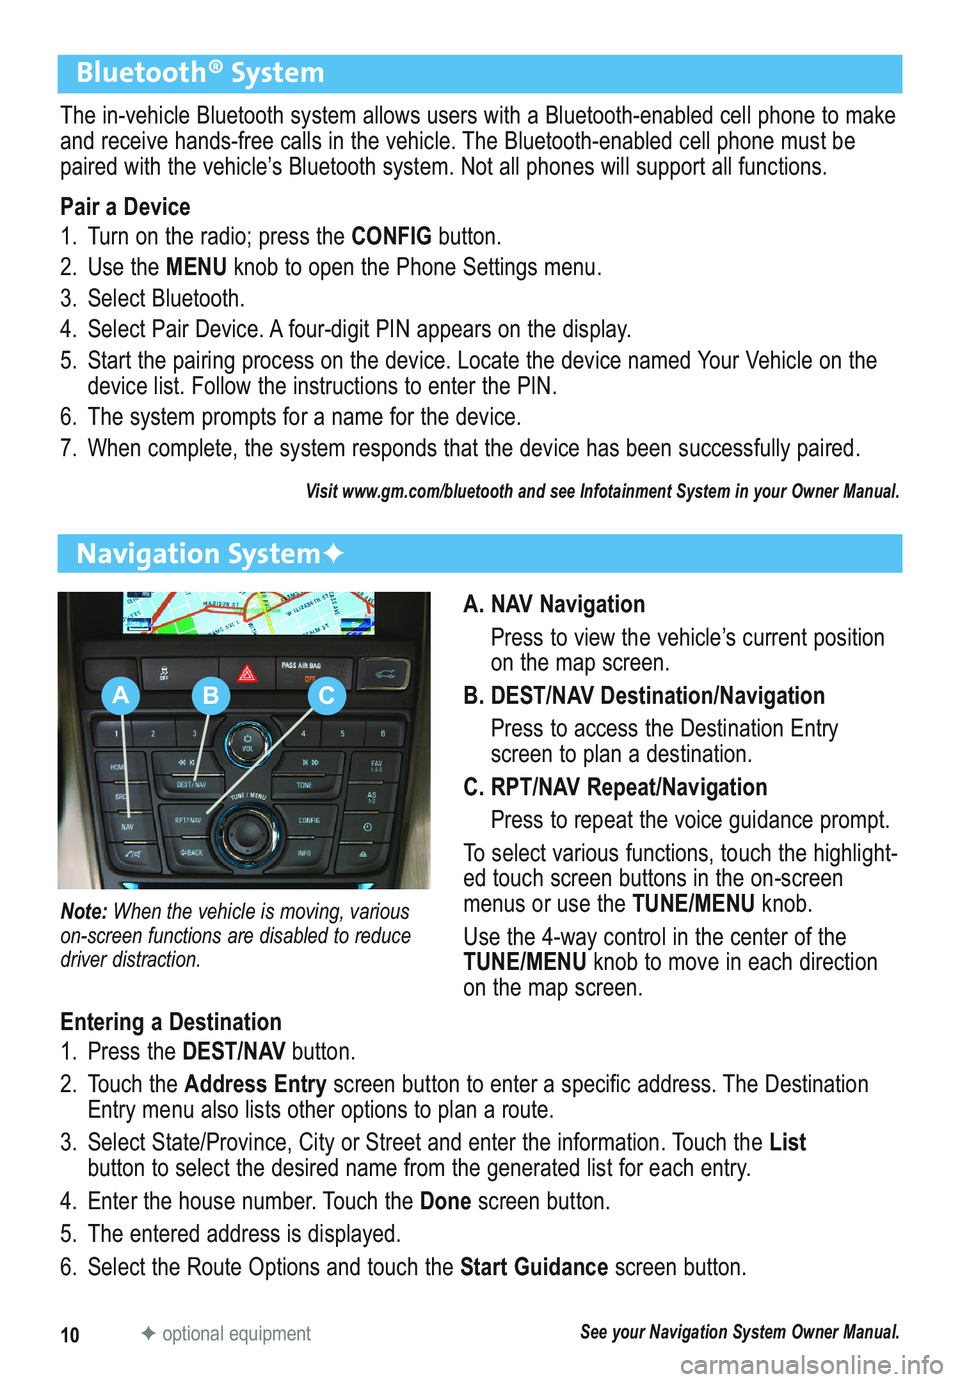
A. NAV Navigation
Press to view the vehicle’s current position
on the map screen.
B. DEST/NAV Destination/Navigation
Press to access the Destination Entry
screen to plan a destination.
C. RPT/NAV Repeat/Navigation
Press to repeat the voice guidance prompt.
To select various functions, touch the highlight-
ed touch screen buttons in the on-screen
menus or use the TUNE/MENU knob.
Use the 4-way control in the center of the
TUNE/MENUknob to move in each direction
on the map screen.
Navigation System✦
Note: When the vehicle is moving, various
on-screen functions are disabled to reduce
driver distraction.
Entering a Destination
1. Press the DEST/NAVbutton.
2. Touch the Address Entryscreen button to enter a specific address. The Destination
Entry menu also lists other options to plan a route.
3. Select State/Province, City or Street and enter the information. Touch the List
button to select the desired name from the generated list for each entry.
4. Enter the house number. Touch the Donescreen button.
5. The entered address is displayed.
6. Select the Route Options and touch the Start Guidancescreen button.
See your Navigation System Owner Manual.✦optional equipment
ABC
Page 15 of 16

15
Ultrasonic Rear Parking Assist✦
Detected objects are indicated by audible beeps when the vehicle is in Reverse. The
interval between beeps becomes shorter as the vehicle gets closer to an object. When the
distance is less than 12 in. (30cm), the beeps are continuous. The system operates only
at speeds less than 5 mph.
To turn the system off/on, open the Collision Detection menu in the Vehicle Settings
menu by using the audio system controls.
When the system is on, a beep sounds when shifting into Reverse.
Note: The system may be disabled if dirt, snow or ice builds up on the sensors. Keep the vehicle
clean for proper operation.
See Driving and Operating in your Owner Manual.
Tire Pressure Monitor
TheLow Tire Pressurewarning light on the instrument cluster illuminates when a sig-
nificant reduction in pressure occurs in one or more of the vehicle’s tires. The warning light
will remain on until the tire pressure is corrected. The proper tire pressures for the vehicle
are listed on the Tire and Loading Information label, located below the driver’s door latch.
Tire pressure is affected by cold weather and distance driven. If the low tire pressure
warning light illuminates when the vehicle is first started and then turns off as the vehicle
is driven in cooler temperatures, check for the proper tire pressures.
Note:The Tire Pressure Monitor can alert you about low tire pressure, but it doesn’t replace normal
monthly tire maintenance. It is the driver’s responsibility to maintain correct tire pressures.
See Vehicle Care in your Owner Manual.
Engine Oil Life System
The Oil Life System calculates engine oil life based on vehicle use and displays Change
Engine Oil Soon on the Driver Information Center (DIC) when it’s necessary to change the
engine oil and filter. The system should be reset to 100% only following an oil change.
Resetting the Oil Life System
1. Turn the ignition to the On position, but do not start the engine.
2. Press the MENUbutton to display the Vehicle Information menu on the DIC.
3. Rotate the switch to view Remaining Oil Life.
4. Press the SET/CLRbutton until 100% is displayed.
5. Turn off the ignition.
See Vehicle Care in your Owner Manual.