clock BUICK VERANO 2016 Owner's Manual
[x] Cancel search | Manufacturer: BUICK, Model Year: 2016, Model line: VERANO, Model: BUICK VERANO 2016Pages: 355, PDF Size: 5.16 MB
Page 18 of 355
Buick Verano Owner Manual (GMNA-Localizing-U.S./Canada/Mexico-
9085356) - 2016 - crc - 10/19/15
In Brief 17
Transmission
Driver Shift Control (DSC)
DSC allows you to shift an
automatic transmission similar to a
manual transmission. To use the
DSC feature:1. Move the shift lever from D (Drive) to the left into the (+)
or (−) manual position.
2. Press the shift lever forward (+) to upshift or rearward (−) to
downshift. An M and the
current gear will be displayed
in the Driver Information
Center (DIC).
See Manual Mode 0198.
While using the DSC feature, the
vehicle will have firmer, quicker
shifting. You can use this for sport
driving or when climbing or
descending hills, to stay in gear
longer, or to downshift for more
power or engine braking.
Vehicle Features
Infotainment System
See the infotainment manual for
information on the radio, audio
players, phone, navigation system,
and voice or speech recognition.
There is also information on settings
and downloadable applications (if
equipped).
Radio(s)
O
/VOL : Press to turn the system
on and off. Turn to increase or
decrease the volume.
RADIO/BAND : Press to choose
between FM, AM, or SiriusXM
®,
if equipped.
TUNE/MENU : Turn to select radio
stations. Press to select a menu.
s ©:Press to seek the previous
station or track.
¨ \:Press to seek the next
station or track.
Buttons 1 to 6 : Press to save and
select favorite stations. INFO (Information) :
Press to show
available information about the
current station or track.
For more information about these
and other radio features, see
Operation 0142.
Storing a Station as a Favorite
Stations from all bands can be
stored in the favorite lists in any
order. Up to six stations can be
stored in each favorite page and the
number of available favorite pages
can be set.
To store the station to a position in
the list, press the FAV 1-2-3 button,
then press the corresponding
numeric button 1 to 6 for more than
two seconds.
For more information, see “Storing a
Station as a Favorite” inAM-FM
Radio 0145.
Setting the Clock (Radio
with CD)
The clock menu can be only be
used with the radio on while in ON/
RUN or ACC/ACCESSORY.
Page 19 of 355
Buick Verano Owner Manual (GMNA-Localizing-U.S./Canada/Mexico-
9085356) - 2016 - crc - 10/19/15
18 In Brief
To set the time:1. Press the CONFIG button and select Time and Date or
press
H.
2. Select Set Time.
3. Turn the TUNE/MENU knob to adjust the highlighted number.
4. Press TUNE/MENU to select the next number.
5. To save the time and return to the Time and Date menu, press
/BACK at any time or press
the TUNE/MENU knob after
adjusting the minutes.
Setting the 12/24 Hour Format 1. Press the CONFIG button and select Time and Date or
press
H.
2. Highlight 12/24 Hour Format.
3. Press TUNE/MENU to select the 12 hour or 24 hour display
format.
Setting the Clock (Radio with
CD and Touch Screen)
The clock menu can be only be
used with the radio on while in ON/
RUN or ACC/ACCESSORY.
To set the time:
1. Press the CONFIG button to enter the menu options or
press
H. Turn the TUNE/
MENU knob to scroll through
the available setup features
and select Time and Date.
Press TUNE/MENU or press
the Time screen button to
display other options within that
feature.
2. Press + or −to increase or
decrease the Hours and
Minutes displayed on the clock.
12/24 HR Format : Press the 12 HR
screen button for standard time;
press the 24 HR screen button for
military time.
Day + or Day −:Press the Day +
or Day −display buttons to increase
or decrease the day. Display :
Press Display to turn the
display of the time on the screen on
or off.
See Clock 099.
Satellite Radio
If equipped, vehicles with a
SiriusXM®satellite radio tuner and a
valid SiriusXM satellite radio
subscription can receive SiriusXM
programming.
SiriusXM Satellite Radio
Service
SiriusXM is a satellite radio service
based in the 48 contiguous United
States and 10 Canadian provinces.
SiriusXM satellite radio has a wide
variety of programming and
commercial-free music, coast to
coast, and in digital-quality sound.
A fee is required to receive the
SiriusXM service.
Refer to:
. www.siriusxm.com or call
1-866-635-2349 (U.S.).
. www.xmradio.ca or call
1-877-209-0079 (Canada).
Page 97 of 355
Buick Verano Owner Manual (GMNA-Localizing-U.S./Canada/Mexico-
9085356) - 2016 - crc - 10/19/15
96 Instruments and Controls
Instruments and
Controls
Controls
Steering Wheel Adjustment . . . . 97
Steering Wheel Controls . . . . . . . 97
Heated Steering Wheel . . . . . . . . 98
Horn . . . . . . . . . . . . . . . . . . . . . . . . . . . 98
Windshield Wiper/Washer . . . . . . 98
Compass . . . . . . . . . . . . . . . . . . . . . . 99
Clock . . . . . . . . . . . . . . . . . . . . . . . . . . 99
Power Outlets . . . . . . . . . . . . . . . . 100
Warning Lights, Gauges, and
Indicators
Warning Lights, Gauges, andIndicators . . . . . . . . . . . . . . . . . . . 101
Instrument Cluster . . . . . . . . . . . . 102
Speedometer . . . . . . . . . . . . . . . . . 103
Odometer . . . . . . . . . . . . . . . . . . . . . 103
Trip Odometer . . . . . . . . . . . . . . . . 103
Tachometer . . . . . . . . . . . . . . . . . . . 103
Fuel Gauge . . . . . . . . . . . . . . . . . . . 103
Engine Coolant Temperature Gauge . . . . . . . . . . . . . . . . . . . . . . 104
Safety Belt Reminders . . . . . . . . 104
Airbag Readiness Light . . . . . . . 105
Passenger Airbag Status Indicator . . . . . . . . . . . . . . . . . . . . 105 Charging System Light . . . . . . . 106
Malfunction Indicator Lamp
(Check Engine Light) . . . . . . . . 106
Brake System Warning Light . . . . . . . . . . . . . . . . . . . . . . . . 108
Electric Parking Brake Light . . . . . . . . . . . . . . . . . . . . . . . . 109
Antilock Brake System (ABS) Warning Light . . . . . . . . . . . . . . . 109
Lane Departure Warning (LDW) Light . . . . . . . . . . . . . . . . . 110
Vehicle Ahead Indicator . . . . . . . 110
Traction Off Light . . . . . . . . . . . . . 110
StabiliTrak
®OFF Light . . . . . . . . 110
Traction Control System (TCS)/ StabiliTrak
®Light . . . . . . . . . . . . 111
Tire Pressure Light . . . . . . . . . . . 111
Engine Oil Pressure Light . . . . . 112
Low Fuel Warning Light . . . . . . . 112
Security Light . . . . . . . . . . . . . . . . . 112
High-Beam On Light . . . . . . . . . . 113
Front Fog Lamp Light . . . . . . . . . 113
Lamps On Reminder . . . . . . . . . . 113
Cruise Control Light . . . . . . . . . . 113
Door Ajar Light . . . . . . . . . . . . . . . 113
Information Displays
Driver Information Center (DIC) . . . . . . . . . . . . . . . . 114
Vehicle Messages
Vehicle Messages . . . . . . . . . . . . 117
Battery Voltage and ChargingMessages . . . . . . . . . . . . . . . . . . . 117
Brake System Messages . . . . . 118
Compass Messages . . . . . . . . . . 118
Door Ajar Messages . . . . . . . . . . 118
Engine Cooling System Messages . . . . . . . . . . . . . . . . . . . 119
Engine Oil Messages . . . . . . . . . 119
Engine Power Messages . . . . . 120
Fuel System Messages . . . . . . . 120
Key and Lock Messages . . . . . 120
Object Detection System Messages . . . . . . . . . . . . . . . . . . . 120
Ride Control System Messages . . . . . . . . . . . . . . . . . . . 121
Security Messages . . . . . . . . . . . 122
Tire Messages . . . . . . . . . . . . . . . . 122
Transmission Messages . . . . . . 122
Washer Fluid Messages . . . . . . 123
Window Messages . . . . . . . . . . . 123
Vehicle Personalization
Vehicle Personalization . . . . . . . 123
Page 100 of 355
Buick Verano Owner Manual (GMNA-Localizing-U.S./Canada/Mexico-
9085356) - 2016 - crc - 10/19/15
Instruments and Controls 99
activated. SeeWasher Fluid0245
for information on filling the
windshield washer fluid reservoir.
{Warning
In freezing weather, do not use
the washer until the windshield is
warmed. Otherwise the washer
fluid can form ice on the
windshield, blocking your vision.
Clear snow and ice from the wiper
blades and windshield before using
them. If frozen to the windshield,
carefully loosen or thaw them.
Damaged blades should be
replaced. See Wiper Blade
Replacement 0250.
Heavy snow or ice can overload the
wiper motor.
Wiper Parking
If the ignition is turned to LOCK/
OFF while the wipers are on LO, HI,
or INT, they will immediately stop. If the windshield wiper lever is then
moved to off before the driver door
is opened or within 10 minutes, the
wipers will restart and move to the
base of the windshield.
If the ignition is turned to LOCK/
OFF while the wipers are performing
wipes due to windshield washing,
the wipers continue to run until they
reach the base of the windshield.
Compass
The vehicle may have a compass
display on the Driver Information
Center (DIC). The compass receives
its heading and other information
from the Global Positioning
System (GPS) antenna,
StabiliTrak
®, and vehicle speed
information.
The compass system is designed to
operate for a certain number of
miles or degrees of turn before
needing a signal from the GPS
satellites. When the compass
display shows CAL, drive the
vehicle for a short distance in an
open area where it can receive a
GPS signal. The compass system will automatically determine when a
GPS signal is restored and provide
a heading again. See
Compass
Messages 0118 for the messages
that may be displayed for the
compass.
Clock
The infotainment system controls
are used to access the time and
date settings through the menu
system. The clock menu can be
only be used with the radio on while
in ON/RUN or ACC/ACCESSORY.
See Operation 0142 for information
about how to use the menu system.
Setting the Clock (Radio
with CD)
To set the time:
1. Press the CONFIG button and select Time and Date or
press
H.
2. Select Set Time.
3. Turn the TUNE/MENU knob to adjust the highlighted number.
4. Press TUNE/MENU to select the next number.
Page 101 of 355
Buick Verano Owner Manual (GMNA-Localizing-U.S./Canada/Mexico-
9085356) - 2016 - crc - 10/19/15
100 Instruments and Controls
5. To save the time and return tothe Time and Date menu, press
/BACK at any time or press
the TUNE/MENU knob after
adjusting the minutes.
Setting the 12/24 Hour Format 1. Press the CONFIG button and select Time and Date or
press
H.
2. Highlight 12/24 Hour Format.
3. Press TUNE/MENU to select the 12 hour or 24 hour display
format.
Setting the Clock (Radio with
CD and Touch Screen)
The clock is in the center stack
display.
To set the time:
1. Press the CONFIG button to enter the menu options or
press
H. Turn the TUNE/
MENU knob to scroll through
the available setup features
and select Time and Date.
Press TUNE/MENU or press the Time screen button to
display other options within that
feature.
2. Press + or −to increase or
decrease the Hours and
Minutes displayed on the clock.
If auto timing is set, the time
displayed on the clock may not
update immediately when driving
into a new time zone.
12/24 HR Format : Press the 12 HR
screen button for standard time;
press the 24 HR screen button for
military time.
Day + or Day −:Press the Day +
or Day −display buttons to increase
or decrease the day.
Display : Press Display to turn the
display of the time on the screen on
or off.
Power Outlets
The accessory power outlets can be
used to plug in electrical equipment,
such as a cell phone or MP3 player. There is one accessory power outlet
on the center stack below the
climate controls and one on the rear
of the center floor console. These
outlets are powered when the key is
in ON/RUN or ACC/ACCESSORY,
or until the driver door is opened
within 10 minutes of turning off the
vehicle. See
Retained Accessory
Power (RAP) 0192.
Caution
Leaving electrical equipment
plugged in for an extended period
of time while the vehicle is off will
drain the battery. Always unplug
electrical equipment when not in
use and do not plug in equipment
that exceeds the maximum
20 amp rating.
Certain electrical accessories may
not be compatible with the
accessory power outlet and could
overload vehicle or adapter fuses.
If a problem is experienced, see
your dealer.
Page 125 of 355
Buick Verano Owner Manual (GMNA-Localizing-U.S./Canada/Mexico-
9085356) - 2016 - crc - 10/19/15
124 Instruments and Controls
.Radio Settings
. Phone Settings
. Navigation Settings
. Display Settings
. Vehicle Settings
Each menu is detailed in the
following information.
Languages
Select Language, then select from
the available language(s).
Time and Date
Manually set the time and date. See
Clock 099.
Radio Settings
Select and depending on the radio
the following may display:
.
Auto Volume
. Gracenote Options
. XM Channel Art
. Max Startup Volume
. Maximum Startup Volume
. Number of Favorites Pages .
Radio Favorites
. RDS Options
. XM Categories
. Software Versions Menu
Auto Volume
This feature adjusts the volume to
minimize the effects of unwanted
background noise that can result
from changing road surfaces, driving
speeds, or open windows. This
feature works best at lower volume
settings where background noise is
typically louder than the sound
system volume.
Select Off, Low, Medium, or High.
Gracenote Options
Select and the following may
display:
. Normalization
Normalization
This feature improves voice
recognition and media groupings.
See “CD Player,” “USB,” “Auxiliary
Devices,” and“Bluetooth Audio” in
the infotainment manual. Select to enable or disable.
XM Channel Art
This feature turns the XM Audio
page background on the XM
Channel display on and off.
Select to enable or disable.
Max Startup Volume or Maximum
Startup Volume
This feature sets the maximum
startup volume. If the vehicle is
started and the volume is greater
than this level, the volume is
adjusted to this level.
Press + or
−to increase or
decrease the volume.
Number of Favorites Pages or
Radio Favorites
Press to set the number of favorites
to display.
Select the desired number.
RDS Options
Select and the following may
display:
. RDS
Page 142 of 355
Buick Verano Owner Manual (GMNA-Localizing-U.S./Canada/Mexico-
9085356) - 2016 - crc - 10/19/15
Infotainment System 141
Overview (Radio with CD)
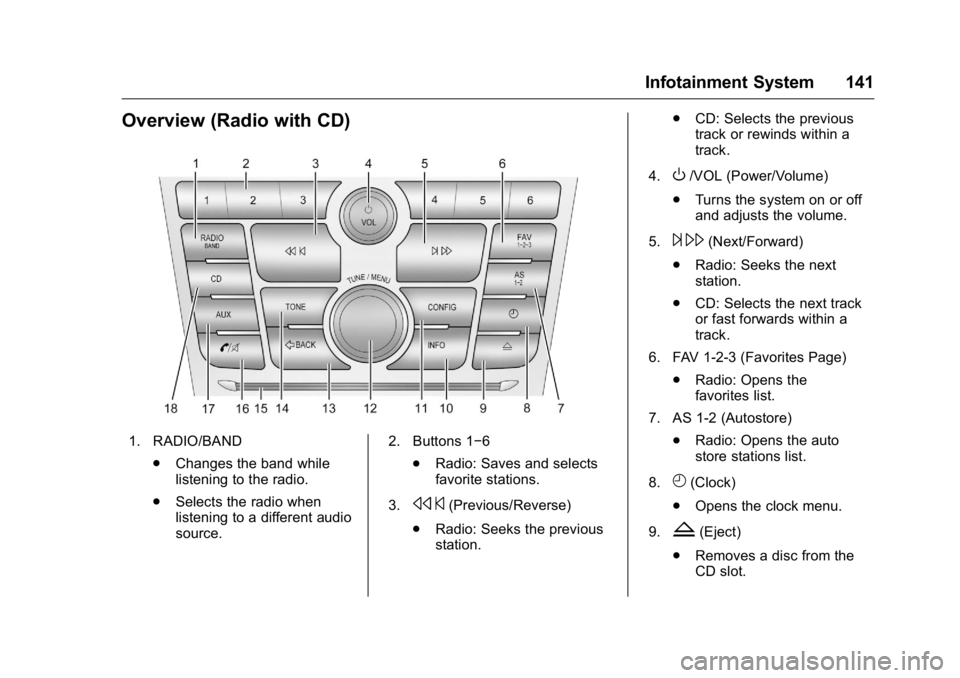
1. RADIO/BAND.Changes the band while
listening to the radio.
. Selects the radio when
listening to a different audio
source. 2. Buttons 1−6
.Radio: Saves and selects
favorite stations.
3.
s ©(Previous/Reverse)
. Radio: Seeks the previous
station. .
CD: Selects the previous
track or rewinds within a
track.
4.
O/VOL (Power/Volume)
. Turns the system on or off
and adjusts the volume.
5.
¨ \(Next/Forward)
. Radio: Seeks the next
station.
. CD: Selects the next track
or fast forwards within a
track.
6. FAV 1-2-3 (Favorites Page) .Radio: Opens the
favorites list.
7. AS 1-2 (Autostore) .Radio: Opens the auto
store stations list.
8.
H(Clock)
. Opens the clock menu.
9.
Z(Eject)
. Removes a disc from the
CD slot.
Page 220 of 355
Buick Verano Owner Manual (GMNA-Localizing-U.S./Canada/Mexico-
9085356) - 2016 - crc - 10/19/15
Driving and Operating 219
Treatment PLUS is the only
gasoline additive recommended by
General Motors. It is available at
your dealer.
Filling the Tank
{Warning
Fuel vapors and fuel fires burn
violently and can cause injury or
death.. To help avoid injuries to you
and others, read and follow
all the instructions on the
fuel pump island.
. Turn off the engine when
refueling.
. Keep sparks, flames, and
smoking materials away
from fuel.
. Do not leave the fuel pump
unattended.
. Do not use a cell phone
while refueling.
(Continued)
Warning (Continued)
.Do not re-enter the vehicle
while pumping fuel.
. Keep children away from
the fuel pump and never let
children pump fuel.
. Fuel can spray out if the fuel
cap is opened too quickly.
This spray can happen if the
tank is nearly full, and is
more likely in hot weather.
Open the fuel cap slowly
and wait for any hiss noise
to stop, then unscrew the
cap all the way.
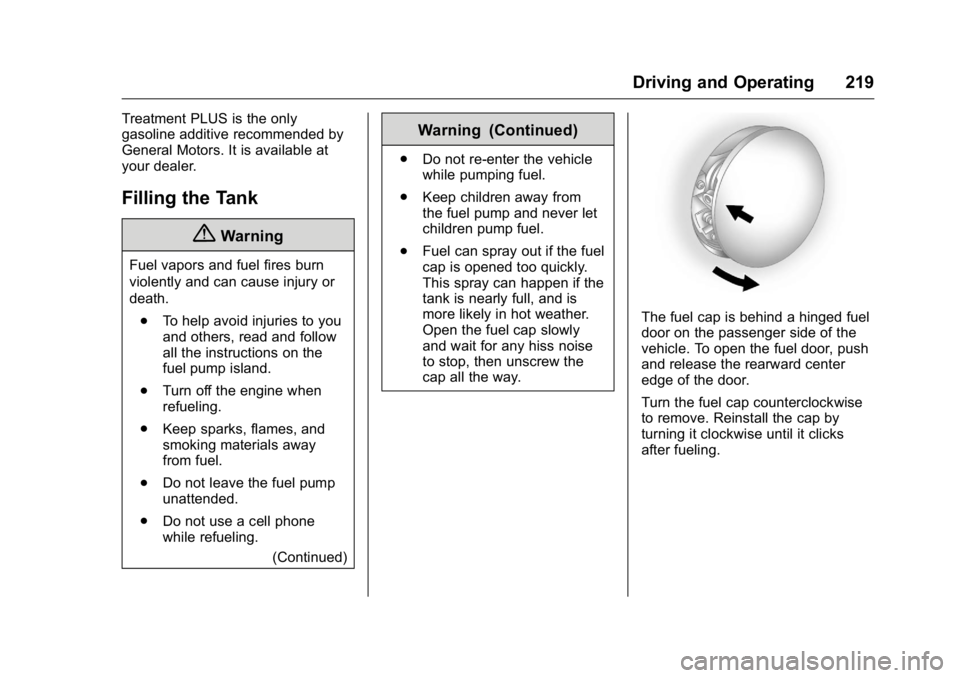
The fuel cap is behind a hinged fuel
door on the passenger side of the
vehicle. To open the fuel door, push
and release the rearward center
edge of the door.
Turn the fuel cap counterclockwise
to remove. Reinstall the cap by
turning it clockwise until it clicks
after fueling.
Page 245 of 355

Buick Verano Owner Manual (GMNA-Localizing-U.S./Canada/Mexico-
9085356) - 2016 - crc - 10/20/15
244 Vehicle Care
1. Remove the coolant surge tankpressure cap when the cooling
system, including the coolant
surge tank pressure cap and
upper radiator hose, is no
longer hot.
Turn the pressure cap slowly
counterclockwise about
one-quarter of a turn. If you
hear a hiss, wait for that to
stop. This will allow any
pressure still left to be vented
out the discharge hose.
2. Keep turning the pressure cap slowly and remove it.
3. Fill the coolant surge tank with the proper DEX-COOL coolant
mixture to the indicated
level mark.
4. With the coolant surge tank pressure cap off, start the
engine and let it run until the upper radiator hose can be felt
getting hot. Watch out for the
engine cooling fan.
By this time, the coolant level
inside the coolant surge tank
may be lower. If the level is
lower, add more of the proper
DEX-COOL coolant mixture to
the coolant surge tank until the
level reaches the indicated
level mark.
5. Replace the pressure cap. Be sure the pressure cap is
hand-tight.
Check the level in the coolant surge
tank when the cooling system has
cooled down. If the coolant is not at
the proper level, repeat Steps 1–
3 and reinstall the pressure cap.
If the coolant still is not at the proper
level when the system cools down
again, see your dealer.
Engine Overheating
The vehicle has an coolant
temperature gauge to warn of the
engine overheating. See Engine
Coolant Temperature Gauge 0104. If the decision is made not to lift the
hood when this warning appears,
get service help right away. See
Roadside Assistance
Program
0324.
If the decision is made to lift the
hood, make sure the vehicle is
parked on a level surface.
Then check to see if the engine
cooling fan is running. If the engine
is overheating, the fan should be
running. If it is not, do not continue
to run the engine. Have the vehicle
serviced.
Caution
Running the engine without
coolant may cause damage or a
fire. Vehicle damage would not be
covered by the vehicle warranty.
Page 253 of 355
Buick Verano Owner Manual (GMNA-Localizing-U.S./Canada/Mexico-
9085356) - 2016 - crc - 10/20/15
252 Vehicle Care
2. For the driver side bulb,remove the windshield washer
bottle filler neck by firmly
pulling it straight up and out of
the bottle.
3. Remove the headlamp bulb access cover.
4. Turn the bulb counterclockwise and pull straight back.
5. Disconnect the wiring harness connector from the bulb.
6. Install the new bulb in the headlamp assembly by turning
clockwise.
7. Reconnect the wiring harness connector.
8. Install the headlamp bulb access cover.
9. For the driver side, reinstall the windshield washer bottle filler
neck by firmly pushing it
straight into the bottle. Ensure
that the filler neck clip engages
into the underhood electrical
center retainer.Parking/Turn Signal Lamp
1. Open the hood. See
Hood 0230.
2. Remove the parking/turn signal lamp bulb socket from the
headlamp assembly by turning
counterclockwise.
3. Remove the bulb from the bulb socket by pulling it straight out.
4. Install the new bulb in the bulb socket.
5. Install the bulb socket into the headlamp assembly by turning
clockwise.
Fog Lamps
To replace the front fog lamp bulb:
1. Locate the bulb.
2. Remove the three screws holding the closeout panel
under the front fascia.
3. Remove the bulb by turning it counterclockwise and pulling
straight out of the assembly. 4. Disconnect the electrical
connector from the fog lamp
bulb assembly.
5. Install the new bulb by engaging the locking tabs.
6. Reverse Steps 1–3 to reinstall.
Taillamps, Turn Signal,
Stoplamps, and Back-Up
Lamps
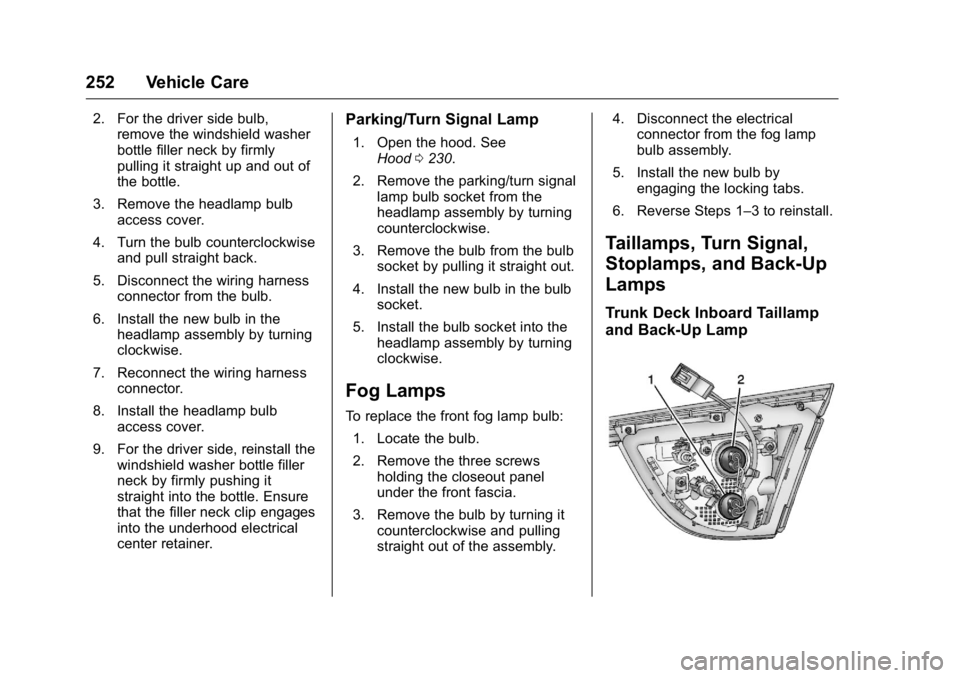
Trunk Deck Inboard Taillamp
and Back-Up Lamp