change time CADILLAC ATS 2016 1.G CUE Manual
[x] Cancel search | Manufacturer: CADILLAC, Model Year: 2016, Model line: ATS, Model: CADILLAC ATS 2016 1.GPages: 94, PDF Size: 0.96 MB
Page 13 of 94
Cadillac CUE Infotainment System (GMNA-Localizing-MidEast-9369286) -
2016 - crc - 5/14/15
12 Radio
To scroll through the favorites :
.Drag up along the top of the
favorites. To close the favorites,
drag them down.
. Slide a finger to the right or left
to scroll through each page of
favorites. A
Vindicates which
page is being viewed.
Tone Settings : While viewing the
tone settings and lifting up the
favorite buttons, touch and hold to
store a tone setting. Touch a screen
button in the favorite area to recall a
favorite tone setting.
The number of favorites displayed is
automatically adjusted by default,
but can be manually adjusted in the
Settings menu under Radio and
then Manage Favorites.
Timeshifting (If Equipped)
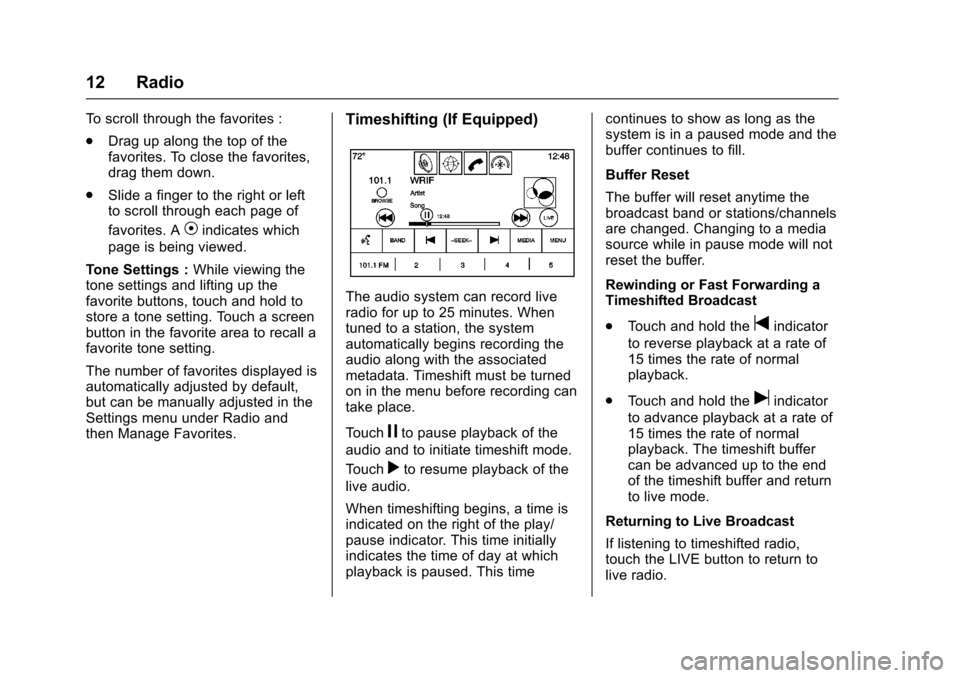
The audio system can record live
radio for up to 25 minutes. When
tuned to a station, the system
automatically begins recording the
audio along with the associated
metadata. Timeshift must be turned
on in the menu before recording can
take place.
Touch
jto pause playback of the
audio and to initiate timeshift mode.
Touch
rto resume playback of the
live audio.
When timeshifting begins, a time is
indicated on the right of the play/
pause indicator. This time initially
indicates the time of day at which
playback is paused. This time continues to show as long as the
system is in a paused mode and the
buffer continues to fill.
Buffer Reset
The buffer will reset anytime the
broadcast band or stations/channels
are changed. Changing to a media
source while in pause mode will not
reset the buffer.
Rewinding or Fast Forwarding a
Timeshifted Broadcast
.
Touch and hold the
tindicator
to reverse playback at a rate of
15 times the rate of normal
playback.
. Touch and hold the
uindicator
to advance playback at a rate of
15 times the rate of normal
playback. The timeshift buffer
can be advanced up to the end
of the timeshift buffer and return
to live mode.
Returning to Live Broadcast
If listening to timeshifted radio,
touch the LIVE button to return to
live radio.
Page 32 of 94
Cadillac CUE Infotainment System (GMNA-Localizing-MidEast-9369286) -
2016 - crc - 5/14/15
Rear Seat Infotainment 31
Errors
Errors can occur if the local storage
area has been broken or if the
ignition is turned off during
formatting. Closing the screen
during formatting will not interrupt it.
If the screen is opened again, the
current state of format will be
displayed. If an error occurs, the
Error screen will display when the
ignition is turned on.
Wired Headphones
Select from the Settings menu, then
select the headphone audio for the
wired headphone jack based on
screen 1 or screen 2 and press
ENTER or the right arrow. Press
4
(Back) to exit.
The headphones are set to screen 1
by default.
Title Search (CD-DA Only)
This displays a list of titles to select
by using the up and down arrows.Disc Information (CD-DA Only)
If the inserted disc is a BDMV,
BDAV, AVCHD, AVCREC,
DVD-Video, or DVD-VR, the disc
title should display. If the inserted
disc is DVD-Audio, DTS-CD, CDDA,
or Mixed-CD, the track number will
display.
DivX
®
If supported, this indicates the
vehicle is registered to play DivX
media and explains how to obtain
more information.
Software Information
This allows access to Version
Information, Save Vehicle Info to
USB, and View Open Source.
Save Vehicle Info to USB allows the
current version to be saved to a
jump drive, which must be done
before an update can be performed.
View Open Source indicates where
software information can be found.Changing Between SCREEN 1 and
SCREEN 2
For single overhead screen systems
only :
Although two audio sources can be
listened to at one time, only one
video source can be viewed on the
overhead screen at a time.
Press the SCREEN 1 or SCREEN 2
button on the remote control to
change between which source will
display on the overhead screen.
When SCREEN 1 is being displayed
and the SCREEN 2 button on the
remote is pressed, the source for
SCREEN 2 will be displayed. The
audio for SCREEN 1 is available on
channel 1 of the headphones and
the audio for SCREEN 2 is available
on channel 2 of the headphones.
Change the channel on the
headphones to the desired screen
source.
One user can listen to the audio
from SCREEN 1 and view the
source on the overhead display
while another user can listen to a
separate audio source by changing
Page 36 of 94
Cadillac CUE Infotainment System (GMNA-Localizing-MidEast-9369286) -
2016 - crc - 5/14/15
Rear Seat Infotainment 35
can also indicate weak batteries.
See“Battery Replacement” later in
this section.
Turn the headphones off when not
in use.
Press the center of the right side of
the headphone to change the
channel. Channel 1 will provide
audio associated with screen 1 and
channel 2 will provide audio
associated with screen 2.
Infrared transmitters are on the top
of the left seatback video screen or
in front of the second overhead
screen. The headphones shut off
automatically to save the battery
power if the RSE system is off or if
the headphones are out of range of
the transmitters for more than
three minutes. Moving too far
forward or stepping out of the
vehicle can cause the headphones
to lose the signal or have static.
Use the volume control on the
headphones to adjust the volume. For best audio performance, wear
the headphones as indicated with
L (Left) and R (Right) on the ear
pads. Do not let anything cover the
ear pads.
Caution
Do not store the headphones in
heat or direct sunlight. This could
damage the headphones and
repairs will not be covered by the
warranty. Storage in extreme cold
can weaken the batteries. Keep
the headphones stored in a cool,
dry place.
If the foam ear pads become worn
or damaged, the pads can be
replaced separately. Contact your
dealer.
Battery Replacement
To change the batteries : 1. Loosen the screw to the battery door on the left side of the
headphones.
2. Slide the battery door open. 3. Replace the two AAA batteries.
4. Replace the battery door and
tighten the screw.
Remove the batteries if the
headphones will not be used for a
long time.Auxiliary Inputs
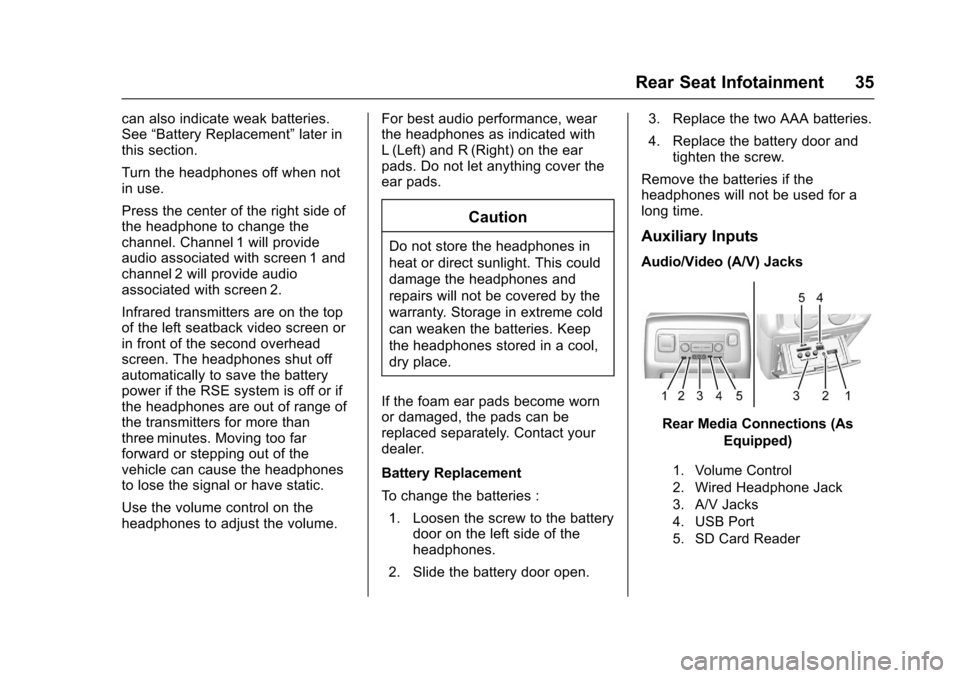
Audio/Video (A/V) Jacks
Rear Media Connections (As Equipped)
1. Volume Control
2. Wired Headphone Jack
3. A/V Jacks
4. USB Port
5. SD Card Reader
Page 38 of 94
Cadillac CUE Infotainment System (GMNA-Localizing-MidEast-9369286) -
2016 - crc - 5/14/15
Rear Seat Infotainment 37
Wired Headphone Jack
Select MENU on the remote control,
then select Settings and then Wired
Headphones to listen to audio on
the wired headphones. The
headphone audio plays depending
on which screen is selected. The
default is screen 1 audio.
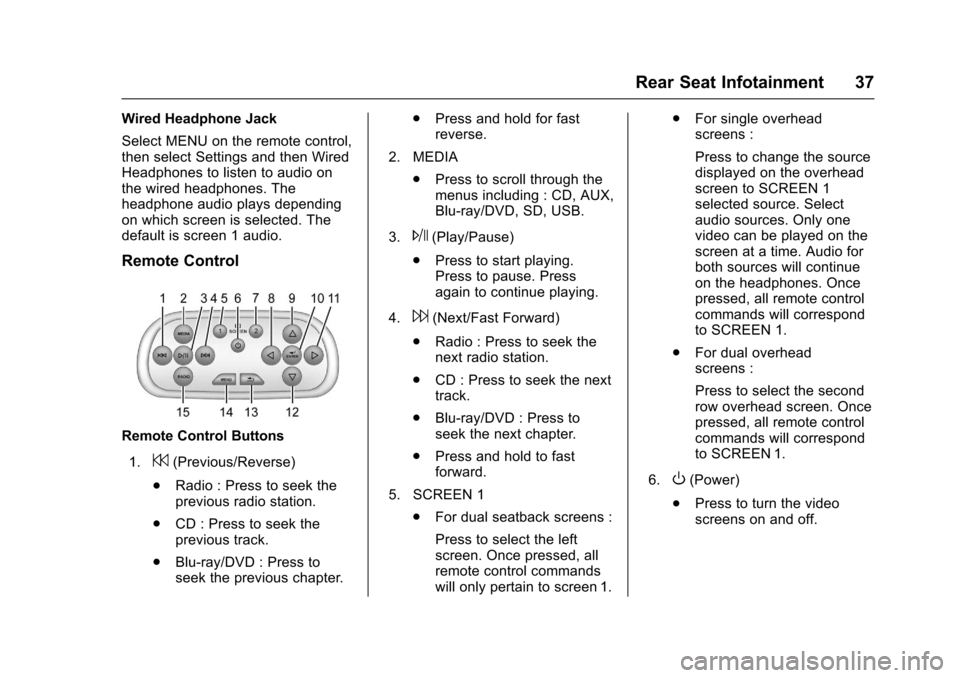
Remote Control
Remote Control Buttons1.
7(Previous/Reverse)
. Radio : Press to seek the
previous radio station.
. CD : Press to seek the
previous track.
. Blu-ray/DVD : Press to
seek the previous chapter. .
Press and hold for fast
reverse.
2. MEDIA .Press to scroll through the
menus including : CD, AUX,
Blu-ray/DVD, SD, USB.
3.
J(Play/Pause)
. Press to start playing.
Press to pause. Press
again to continue playing.
4.
6(Next/Fast Forward)
. Radio : Press to seek the
next radio station.
. CD : Press to seek the next
track.
. Blu-ray/DVD : Press to
seek the next chapter.
. Press and hold to fast
forward.
5. SCREEN 1 .For dual seatback screens :
Press to select the left
screen. Once pressed, all
remote control commands
will only pertain to screen 1. .
For single overhead
screens :
Press to change the source
displayed on the overhead
screen to SCREEN 1
selected source. Select
audio sources. Only one
video can be played on the
screen at a time. Audio for
both sources will continue
on the headphones. Once
pressed, all remote control
commands will correspond
to SCREEN 1.
. For dual overhead
screens :
Press to select the second
row overhead screen. Once
pressed, all remote control
commands will correspond
to SCREEN 1.
6.
O(Power)
. Press to turn the video
screens on and off.
Page 39 of 94
Cadillac CUE Infotainment System (GMNA-Localizing-MidEast-9369286) -
2016 - crc - 5/14/15
38 Rear Seat Infotainment
7. SCREEN 2.For dual seatback screens :
Press to select the right
screen. Once pressed, all
remote control commands
will only pertain to
SCREEN 2.
. For single overhead
screens :
Press to change the source
displayed on the overhead
screen to SCREEN 2
selected source. Only one
video can be played on the
screen at a time. Audio for
both sources will continue
on the headphones. Once
pressed, all remote control
commands will correspond
to SCREEN 2.
. For dual overhead
screens :
Press to select the optional
third row overhead screen.
Once pressed, all remote
control commands will
correspond to SCREEN 2. 8.o(Previous/Reverse/
Decrease)
. Radio and CD : Press to go
to the previous station or
track.
. Press to go to the
previous menu.
. Press to decrease the
brightness of the RSE
screen.
9.
w(Up Arrow)
. Press to scroll up a list.
10.
r/ENTER
. Press to select the
highlighted choice in
any menu.
. Press and hold for
quick play.
11.
p(Next/Forward/Increase)
. Radio and CD : Press to go
to the next station or track.
. Press to go to the
next menu. .
Press to increase the
brightness of the RSE
screen.
12.
x(Down Arrow)
. Press to go down a list.
13.
4(Back)
. Press to go back to the
previous menu.
. Press and hold to go back
to the now playing screen.
14. MENU .Press to go to the menu of
the now playing screen.
15. RADIO .Press to scroll through the
radio sources including AM
or FM.
To use the remote control, aim it at
the transmitter window at either
seatback console or at the second
row overhead screen and press the
buttons firmly. Direct sunlight or very
bright light could affect the ability of
the RSE transmitter to receive
signals from the remote control.
Page 40 of 94
Cadillac CUE Infotainment System (GMNA-Localizing-MidEast-9369286) -
2016 - crc - 5/14/15
Rear Seat Infotainment 39
Check the batteries if the remote
control does not seem to be
working. See“Battery Replacement”
following. Objects blocking the line
of sight could also affect the
function of the remote control.
If a CD, Blu-ray/DVD, or MP3 disc is
in the CD slot, the remote control
O
button can be used to turn on the
video screen display and start the
disc. The infotainment system can
also turn on the video screen
display.
Caution
Storing the remote control in a hot
area or in direct sunlight can
damage it, and the repairs will not
be covered by the warranty.
Storage in extreme cold can
weaken the batteries. Keep the
remote control stored in a cool,
dry place. Battery Replacement
To change the remote control
batteries :
1. Insert a coin or key to pull up the rear cover on the remote
control.
2. Replace the two AAA batteries in the compartment.
3. Replace the battery cover.
Remove the batteries from the
remote control if it will not be used
for an extended period of time.
RSE Troubleshooting
No power : The ignition might not
be in ON/RUN or ACC/
ACCESSORY.
The picture does not fill the
screen. There are black borders
on the top and bottom or on both
sides or it looks stretched out :
Press the MENU button on the
remote control to change the display
mode setting. In auxiliary mode, the picture
moves or scrolls :
Check the
auxiliary input connections at both
devices.
The remote control does not
work : Check to make sure the
remote control is programmed to the
correct screen. Make sure there is
no obstruction between the remote
control and the transmitter window
and check the batteries to make
sure they are not dead or installed
incorrectly.
There is no sound from the
headphones with the indicator
light on : If the batteries are good,
make sure the headphones are
programmed to the correct screen
and on the correct channel for the
screen being viewed.
The auxiliary source is running
but there is no picture or sound :
Check that the RSE video screen is
in the auxiliary source mode by
pressing the MEDIA button on the
remote control. Check the auxiliary
input connections at both devices.
Page 47 of 94
Cadillac CUE Infotainment System (GMNA-Localizing-MidEast-9369286) -
2016 - crc - 5/14/15
46 Rear Seat Infotainment
To change the Parental Control
Password :1. Press the SETUP button on the remote control.
2. Navigate to the Password sub-menu under the
Preference Menu and press
ENTER.
3. At the Old Password option, enter the old password or the
default password (136900).
4. At the New Password option, enter the new password (six
digits) using numeric buttons.
5. At the Confirm PWD option, confirm the new password by
entering the new password
again.
6. Scroll to the OK button and press ENTER. The message
“Your password has been
changed” displays.
To reset the system back to the
factory default settings : 1. Press the SETUP button on the remote control. 2. Use the left/right and down
navigation arrows on the
remote control to select the
Default sub-menu under the
Preference Page and press the
ENTER button to reset the
settings. The parental settings
will not be affected.
Vehicle Speakers
Audio from the DVD player or an
auxiliary device can be heard
through the vehicle speakers or the
wireless/wired headphones, while
the radio is tuned to one of the
many frequencies selected on the
Sound Around portion of the
system’ s remote control. See
“Remote Control” later in this
section.
Only one audio source can be heard
through the vehicle’ s speakers at a
time. The audio source being used
is specified by the A/V (audio/video)
source selected on the driver side
head restraint video display screen.
To turn the RSE system audio
output to the vehicle’s speakers,
press Sound Around ON, on the
system’ s remote control. The audio from the RSE system can be heard
through the wireless/wired
headphones and the vehicle’s
speakers at the same time. The
volume on the radio can vary when
switching between the radio, CD,
DVD, MP3, or an auxiliary device.
Wired Headphones
VOL0(Volume) :
Use to adjust
the volume on the headphones.
100 Channel FM-Modulation
Control
For Screen “3”Only :
To activate the FM modulation
feature, press the “Sound Around
On/Off ”button on the remote until
the text “FM CH XX.XMH2” is
dislpayed on the monitor.
On the remote, press the “Sound
Around Select” button to cycle
through a pre-established list of 6
channels (88.3MHz, 88.7MHz,
89.1MHz, 89.5MHz, 89.9MHz,
90.3MHz).
If none of these stations are suitable
for FM Modulation, use the “Fine
Tune” Option. To “Fine Tune” the
Page 49 of 94
Cadillac CUE Infotainment System (GMNA-Localizing-MidEast-9369286) -
2016 - crc - 5/14/15
48 Rear Seat Infotainment
SETUP :Press to change the
default settings. See “Using the
RSE On-Screen Display (OSD)
Menus” earlier in this manual. There
are four main menu screens. Each
screen displays a menu to select
different setting options. The
screens are :
1. General Setup —adjusts
screen settings.
2. Audio Setup —sets the
language.
3. Preference Screen —sets the
subtitles and parental controls.
4. Password Setup —allows a
password to be set.
Press SETUP again to exit.
EJECT
X: Press to eject or reload
a disc.
DVD-Video Screen 3 : Press the
DVD button located under 3 to
transmit IR codes for DVD mode on
Video Screen 3.
TV-Video Screen 3 : This button is
not used with the system. DVD-Video Screen 4 :
Press the
DVD button located under 4 to
transmit IR codes for DVD mode on
Video Screen 4.
TV-Video Screen 4 : This button is
not used with the system.
SOUND AROUND ON/OFF : Press
to turn the FM Transmitter power on
or off.
MUTE
>(For DVD Only) : Press to
turn off the headphone sound. Press
again to turn the sound on again.
PIX (Picture Selection) : Press to
adjust the picture’s On Screen
Display (OSD). Each time this
button is pressed, the picture
adjustment OSD cycles through
bars for BRIGHTNESS,
CONTRAST, COLOR, and TINT.
Use the right/left navigation arrows
to adjust the setting. This feature
automatically shuts off if another
button is pressed or adjustments
are not made within six seconds.
SOUND AROUND SELECT : Press
to select an FM transmitter channel.
The SOUND AROUND SELECT
lets the DVD audio play over the vehicle’s sound system by tuning
the radio to one of the many FM
frequencies.
MENU :
Press to enter the DVD
disc menu while the disc is playing.
Q,R,q,r(Navigation Arrows) :
Press to navigate through menus.
ENTER : Press to enter a selected
function or to begin playback of
the disc.
REPEAT
7: Press to repeat part
or all of a chapter, title, track, or the
entire disc after using the A-B
button to setup repeat preset
sections.
RETURN
8: This button is not
used with the system.
A-B : This button is used to set up
repeat preset sections. Press this
button once while the disc is playing
to select the starting position. Press
a second time to select the end
position. Press a third time to turn
the function off. To view the preset
section, press
7.
AUTO MEMORY : This button is not
used with the system.
Page 50 of 94
Cadillac CUE Infotainment System (GMNA-Localizing-MidEast-9369286) -
2016 - crc - 5/14/15
Rear Seat Infotainment 49
SEARCH/SKIP :This button is not
used with the system.
ERASE/ADD : This button is not
used with the system.
R-S : This button is not used with
the system.
TITLE : Press to enter the disc title
mode. The title feature is
disc-specific, and may not be
available on all discs.
SUBTITLE : Press to change the
subtitle language to another
available language or to turn
subtitles off.
ANGLE : Press to select a different
viewing angle for discs that are
recorded with different camera
angles.
AUDIO : Press to select a different
language for discs that are recorded
with different languages.
0-9 (Numbers) : The numbers
located on the lower left side of the
remote control can be used to enter
numbered menu options, channels,
or track numbers. GOTO :
Press to enter the GOTO
menu to choose a desired title,
chapter, track, or song inside
the disc.
DISPLAY : Press to scroll through
display information on the upper left
corner of the screen, such as title,
chapter/track, time elapsed, and
time remaining, or to turn off the
display
PROGRAM : Press to edit a
playback program containing
desired titles in the DVD or tracks in
the CD-DA.
RANDOM : Press to play titles
randomly.
PLAY/PAUSE
r/j: Press to start
playback of the disc, or to pause
playback.
STOP
c: Press to stop playback of
a disc.
. To resume disc playback,
press PLAY.
. To start playback from the
beginning of the disc, press
STOP, STOP, then PLAY. ZOOM :
Press to either enlarge the
viewed image by 2X, 3X, and 4X,
or reduce the image by 1/2X, 1/3X,
and 1/4X.
PBC (Playback Control) : Press to
turn video CD playback control on
or off.
FR
r(Fast Reverse) : Press to
fast reverse the disc. Press multiple
times to choose between 2X, 4X,
8X, 16X, and 32X speeds.
FF
[(Fast Forward) : Press to
fast forward the disc. Press multiple
times to choose between 2X, 4X,
8X, 16X, and 32X speeds.
PREV
g(Previous) : Press to play
the previous chapter or track. To
return to previous chapters or tracks
one at a time, press and release
multiple times until the desired
chapter or track is reached.
NEXT
d: Press to play the next
chapter or track. To go to the next
chapter or track one at a time, press
and release multiple times until the
desired chapter or track is reached.
Page 51 of 94
Cadillac CUE Infotainment System (GMNA-Localizing-MidEast-9369286) -
2016 - crc - 5/14/15
50 Rear Seat Infotainment
Battery Replacement
To change batteries in the remote
control :1. Turn the remote control face down.
2. Press down on the ridged area of the battery cover and slide
it off.
3. Install two AAA batteries into the battery compartment.
4. Slide the cover back on until it clicks.
If the remote control is to be stored
for a long period of time, remove the
batteries and keep it in a cool, dry
place.
Playing Audio CD
When an audio CD is playing, the
display shows the current track and
the amount of time that track has
been playing, the total amount of
time on the disc, and the current
time running on the disc. DISPLAY :
Press to choose from
the following display options :
1. Press DISPLAY once and Single Elapsed appears along
with the current track playing
and the length of time for that
track.
2. Press DISPLAY twice and Single Remain appears along
with the current track playing
and the amount of time left on
the track.
3. Press DISPLAY three times and Total Elapsed appears
along with the current track
playing and the total time that
has played on the CD.
4. Press DISPLAY four times and Total Remain appears along
with the current track playing
and the amount of time left on
the CD.
REPEAT : Press to toggle between
Track and All. The default for repeat
is OFF.
. Track repeats the track that is
playing. .
All repeats the disc that is
playing.
Playing MP3 CD
MP3 is the format for storing digital
audio. An audio CD quality song
can be compressed into the MP3
format with very little loss of quality,
while taking up much less space.
CD-R/RW discs that have been
encoded in MP3 format can be
played on the DVD player.
Selecting Folders and Songs
When an MP3 disc is inserted in the
player, the navigation screen
appears. The folders and songs can
be changed by navigating through
the file system. The DVD player
plays the songs in the order they
were burned to the disc.
1. Press STOP if a disc is playing. Press the up or down
navigation arrows on the
remote control to go through
the folder list on the left side of
the screen.
2. Press ENTER when the desired folder is highlighted.