display CADILLAC ATS 2019 User Guide
[x] Cancel search | Manufacturer: CADILLAC, Model Year: 2019, Model line: ATS, Model: CADILLAC ATS 2019Pages: 384, PDF Size: 6.11 MB
Page 35 of 384
Cadillac ATS/ATS-V Owner Manual (GMNA-Localizing-U.S./Canada/Mexico-
12460272) - 2019 - crc - 5/8/18
34 KEYS, DOORS, AND WINDOWS
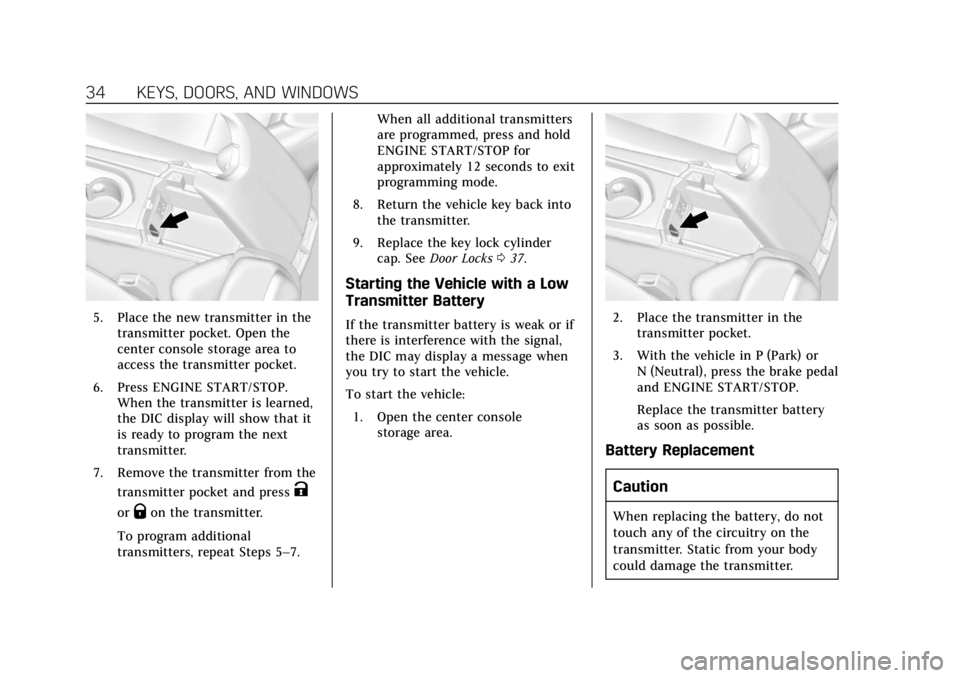
5. Place the new transmitter in thetransmitter pocket. Open the
center console storage area to
access the transmitter pocket.
6. Press ENGINE START/STOP. When the transmitter is learned,
the DIC display will show that it
is ready to program the next
transmitter.
7. Remove the transmitter from the transmitter pocket and press
K
orQon the transmitter.
To program additional
transmitters, repeat Steps 5–7. When all additional transmitters
are programmed, press and hold
ENGINE START/STOP for
approximately 12 seconds to exit
programming mode.
8. Return the vehicle key back into the transmitter.
9. Replace the key lock cylinder cap. See Door Locks 037.
Starting the Vehicle with a Low
Transmitter Battery
If the transmitter battery is weak or if
there is interference with the signal,
the DIC may display a message when
you try to start the vehicle.
To start the vehicle:
1. Open the center console storage area.2. Place the transmitter in thetransmitter pocket.
3. With the vehicle in P (Park) or N (Neutral), press the brake pedal
and ENGINE START/STOP.
Replace the transmitter battery
as soon as possible.
Battery Replacement
Caution
When replacing the battery, do not
touch any of the circuitry on the
transmitter. Static from your body
could damage the transmitter.
Page 36 of 384
Cadillac ATS/ATS-V Owner Manual (GMNA-Localizing-U.S./Canada/Mexico-
12460272) - 2019 - crc - 5/8/18
KEYS, DOORS, AND WINDOWS 35
Replace the battery if the DIC displays
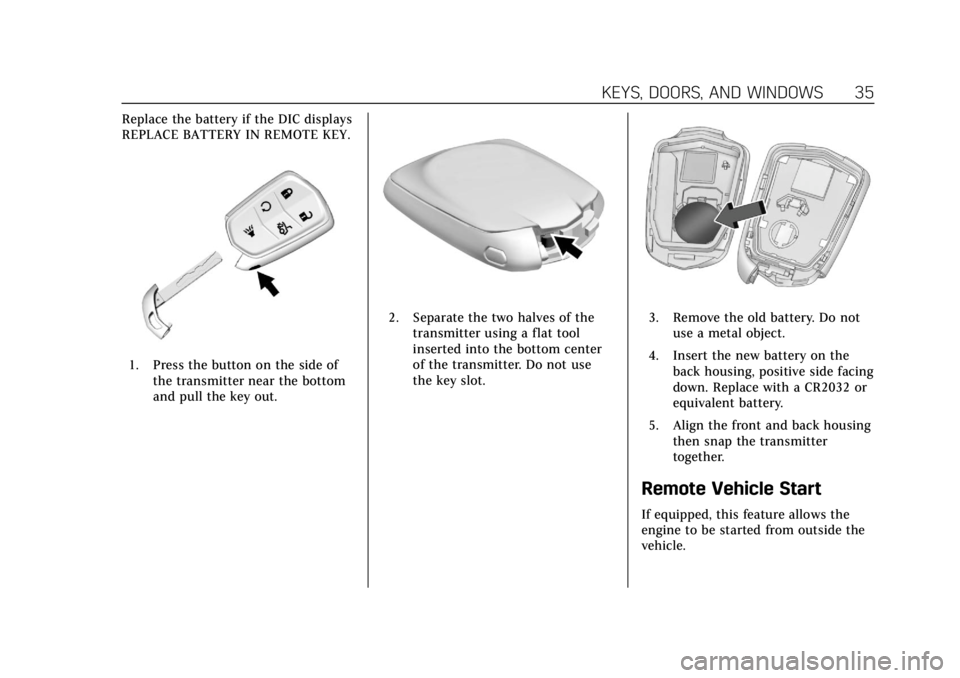
REPLACE BATTERY IN REMOTE KEY.
1. Press the button on the side ofthe transmitter near the bottom
and pull the key out.
2. Separate the two halves of the
transmitter using a flat tool
inserted into the bottom center
of the transmitter. Do not use
the key slot.3. Remove the old battery. Do notuse a metal object.
4. Insert the new battery on the back housing, positive side facing
down. Replace with a CR2032 or
equivalent battery.
5. Align the front and back housing then snap the transmitter
together.
Remote Vehicle Start
If equipped, this feature allows the
engine to be started from outside the
vehicle.
Page 56 of 384
Cadillac ATS/ATS-V Owner Manual (GMNA-Localizing-U.S./Canada/Mexico-
12460272) - 2019 - crc - 5/8/18
SEATS AND RESTRAINTS 55
To adjust the lumbar support, see
Lumbar Adjustment056.
Some vehicles are equipped with a
Safety Alert Seat. This feature
activates a vibrating pulse alert in the
driver seat to help the driver avoid
crashes.
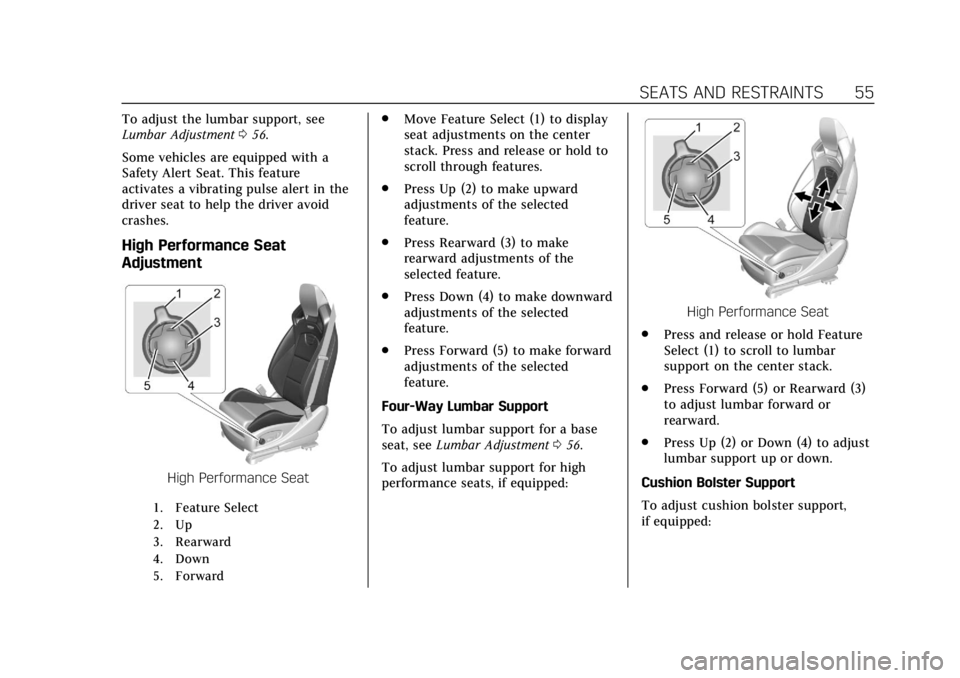
High Performance Seat
Adjustment
High Performance Seat
1. Feature Select
2. Up
3. Rearward
4. Down
5. Forward
. Move Feature Select (1) to display
seat adjustments on the center
stack. Press and release or hold to
scroll through features.
. Press Up (2) to make upward
adjustments of the selected
feature.
. Press Rearward (3) to make
rearward adjustments of the
selected feature.
. Press Down (4) to make downward
adjustments of the selected
feature.
. Press Forward (5) to make forward
adjustments of the selected
feature.
Four-Way Lumbar Support
To adjust lumbar support for a base
seat, see Lumbar Adjustment 056.
To adjust lumbar support for high
performance seats, if equipped:
High Performance Seat
. Press and release or hold Feature
Select (1) to scroll to lumbar
support on the center stack.
. Press Forward (5) or Rearward (3)
to adjust lumbar forward or
rearward.
. Press Up (2) or Down (4) to adjust
lumbar support up or down.
Cushion Bolster Support
To adjust cushion bolster support,
if equipped:
Page 60 of 384
Cadillac ATS/ATS-V Owner Manual (GMNA-Localizing-U.S./Canada/Mexico-
12460272) - 2019 - crc - 5/8/18
SEATS AND RESTRAINTS 59
number may display for the first few
ignition cycles following a transmitter
change. For Auto Memory Recall to
work properly, save the positions to
the memory button (1 or 2) matching
the RKE transmitter number displayed
in the DIC welcome message. Carry
the linked RKE transmitter when
entering the vehicle.
Memory adjustments may not be
available upon delivery or after service
until steps in“Saving Memory
Positions” section are performed.
Vehicle Personalization Settings
. To have the Auto Memory Recall
movement begin when the vehicle
is started, select the Settings
menu, then Vehicle, then Comfort
and Convenience, and then Auto
Memory Recall. Select On or Off.
See “Auto Memory Recall” later in
this section.
. To begin Easy Exit Recall
movement when the ignition is
turned off and the driver door is
opened, or when the ignition is
turned off with the driver door
already opened, select the Settings menu, then Vehicle, then Comfort
and Convenience, and then Easy
Exit Options. Select On or Off. See
“Easy Exit Recall”
later in this
section.
. See Vehicle Personalization 0135
for additional setting information.
Identifying Driver Number
To identify the driver number: 1. Start the vehicle with a different key or RKE transmitter. The DIC
should display the driver
number; 1 or 2. Turn the ignition
off and remove the key or RKE
transmitter from the vehicle.
2. Start the vehicle with the initial key or RKE transmitter. The DIC
should display the other driver
number not shown in Step 1.
Saving Memory Positions
Read these instructions completely
before saving memory positions.
To save preferred driving positions
1 and 2: 1. Turn the ignition on or to ACC/ ACCESSORY. A DIC welcome message may
indicate driver number 1 or 2.
2. Adjust all available memory features to the desired driving
position.
3. Press and release SET; a beep will sound.
4. Immediately press and hold the 1 or 2 memory button matching
the above DIC welcome message
until two beeps sound.
If too much time passes between
releasing SET and pressing 1, the
memory position will not be
saved and two beeps will not
sound. Repeat Steps 3 and 4.
1 or 2 corresponds to the driver
number. See “Identifying Driver
Number” previously in this
section.
5. Repeat Steps 1–4 for a second driver using 1 or 2.
To save the position for
Band easy
exit features, repeat Steps 1–4 using
B. This saves the position for getting
out of the vehicle.
Page 70 of 384
Cadillac ATS/ATS-V Owner Manual (GMNA-Localizing-U.S./Canada/Mexico-
12460272) - 2019 - crc - 5/8/18
SEATS AND RESTRAINTS 69
To unlatch the belt, push the button
on the buckle. The belt should return
to its stowed position.
Always stow the seat belt slowly. If the
seat belt webbing returns quickly to
the stowed position, the retractor may
lock and cannot be pulled out. If this
happens, pull the seat belt straight out
firmly to unlock the webbing, and
then release it. If the webbing is still
locked in the retractor, see your
dealer.
Before a door is closed, be sure the
seat belt is out of the way. If a door is
slammed against a seat belt, damage
can occur to both the seat belt and
the vehicle.
Automatic Seat Belt Tightening
System
The vehicle may have the Automatic
Seat Belt Tightening System.
Each time the vehicle is started with
the front seat belts buckled, the
system activates once to tighten the
seat belts when the forward vehicle
speed exceeds the threshold for
activation.The system also activates during
emergency braking and/or sudden
driving maneuvers and releases when
driving conditions return to normal.
The system turns off whenever
Competitive Driving Mode is activated,
and will turn back on when
Competitive Driving Mode is
deactivated. See
Competitive Driving
Mode (FE3 Only) 0209.
The system will not activate if the
Traction Control/Electronic Stability
Control system is not functioning
properly. See Traction Control/
Electronic Stability Control 0204.
If there is a problem with the
Automatic Seat Belt Tightening
System, a message displays on the
Driver Information Center (DIC). If a
system unavailable message displays
repeatedly or a service message
displays, see your dealer. Other seat
belt functions are not affected by the
Automatic Seat Belt Tightening
System.
Seat Belt Pretensioners
This vehicle has seat belt
pretensioners for front outboard
occupants. Although the seat belt
pretensioners cannot be seen, they are
part of the seat belt assembly. They
can help tighten the seat belts during
the early stages of a moderate to
severe frontal, near frontal, or rear
crash if the threshold conditions for
pretensioner activation are met. Seat
belt pretensioners can also help
tighten the seat belts in a side crash
or a rollover event.
Pretensioners work only once. If the
pretensioners activate in a crash, the
pretensioners and probably other
parts of the vehicle’s seat belt system
will need to be replaced. See Replacing
Seat Belt System Parts after a Crash
0 71.
Do not sit on the outboard seat belt
while entering or exiting the vehicle or
at any time while sitting in the seat.
Sitting on the seat belt can damage
the webbing and hardware.
Page 105 of 384
Cadillac ATS/ATS-V Owner Manual (GMNA-Localizing-U.S./Canada/Mexico-
12460272) - 2019 - crc - 5/8/18
104 INSTRUMENTS AND CONTROLS
Instruments and
Controls
Controls
Steering Wheel Adjustment . . . . . 105
Steering Wheel Controls . . . . . . . . . 105
Heated Steering Wheel . . . . . . . . . . 105
Horn . . . . . . . . . . . . . . . . . . . . . . . . . . . . . . . 106
Windshield Wiper/Washer . . . . . . . 106
Headlamp Washer . . . . . . . . . . . . . . . . 107
Compass . . . . . . . . . . . . . . . . . . . . . . . . . . 108
Clock . . . . . . . . . . . . . . . . . . . . . . . . . . . . . . 108
Power Outlets . . . . . . . . . . . . . . . . . . . . . 108
Wireless Charging . . . . . . . . . . . . . . . . 109
Warning Lights, Gauges, and
Indicators
Warning Lights, Gauges, andIndicators . . . . . . . . . . . . . . . . . . . . . . . 112
Instrument Cluster . . . . . . . . . . . . . . . 113
Speedometer . . . . . . . . . . . . . . . . . . . . . . 116
Odometer . . . . . . . . . . . . . . . . . . . . . . . . . 116
Trip Odometer . . . . . . . . . . . . . . . . . . . . 116
Tachometer . . . . . . . . . . . . . . . . . . . . . . . 116
Fuel Gauge . . . . . . . . . . . . . . . . . . . . . . . . 116
Engine Coolant Temperature Gauge . . . . . . . . . . . . . . . . . . . . . . . . . . . . 117
Seat Belt Reminders . . . . . . . . . . . . . . 117 Airbag Readiness Light . . . . . . . . . . 118
Passenger Airbag Status
Indicator . . . . . . . . . . . . . . . . . . . . . . . . . 119
Charging System Light . . . . . . . . . . . 120
Malfunction Indicator Lamp (Check Engine Light) . . . . . . . . . . . 120
Brake System Warning Light . . . . 122
Parking Brake Light . . . . . . . . . . . . . . 122
Service Electric Parking Brake Light . . . . . . . . . . . . . . . . . . . . . . . . . . . . . 123
Antilock Brake System (ABS) Warning Light . . . . . . . . . . . . . . . . . . 123
Lane Keep Assist (LKA) Light . . . 123
Vehicle Ahead Indicator . . . . . . . . . 124
Traction Off Light . . . . . . . . . . . . . . . . 124
StabiliTrak OFF Light . . . . . . . . . . . . 124
Traction Control System (TCS)/ StabiliTrak Light . . . . . . . . . . . . . . . . 125
Engine Coolant Temperature Warning Light . . . . . . . . . . . . . . . . . . 125
Tire Pressure Light . . . . . . . . . . . . . . . 125
Engine Oil Pressure Light . . . . . . . . 126
Low Fuel Warning Light . . . . . . . . . 126
Security Light . . . . . . . . . . . . . . . . . . . . . 127
High-Beam On Light . . . . . . . . . . . . . 127
Adaptive Forward Lighting (AFL) Light . . . . . . . . . . . . . . . . . . . . . . . . . . . . . 127
Lamps On Reminder . . . . . . . . . . . . . 128
Cruise Control Light . . . . . . . . . . . . . . 128
Door Ajar Light . . . . . . . . . . . . . . . . . . . 128
Information Displays
Driver Information Center (DIC) . . . . . . . . . . . . . . . . . . . . . 128
Head-Up Display (HUD) . . . . . . . . . 131
Vehicle Messages
Vehicle Messages . . . . . . . . . . . . . . . . . 134
Engine Power Messages . . . . . . . . . . 135
Vehicle Speed Messages . . . . . . . . . 135
Vehicle Personalization
Vehicle Personalization . . . . . . . . . . 135
Universal Remote System
Universal Remote System . . . . . . . . 140
Universal Remote System Programming . . . . . . . . . . . . . . . . . . . 140
Universal Remote System Operation . . . . . . . . . . . . . . . . . . . . . . . . 142
Page 106 of 384
Cadillac ATS/ATS-V Owner Manual (GMNA-Localizing-U.S./Canada/Mexico-
12460272) - 2019 - crc - 5/8/18
INSTRUMENTS AND CONTROLS 105
Controls
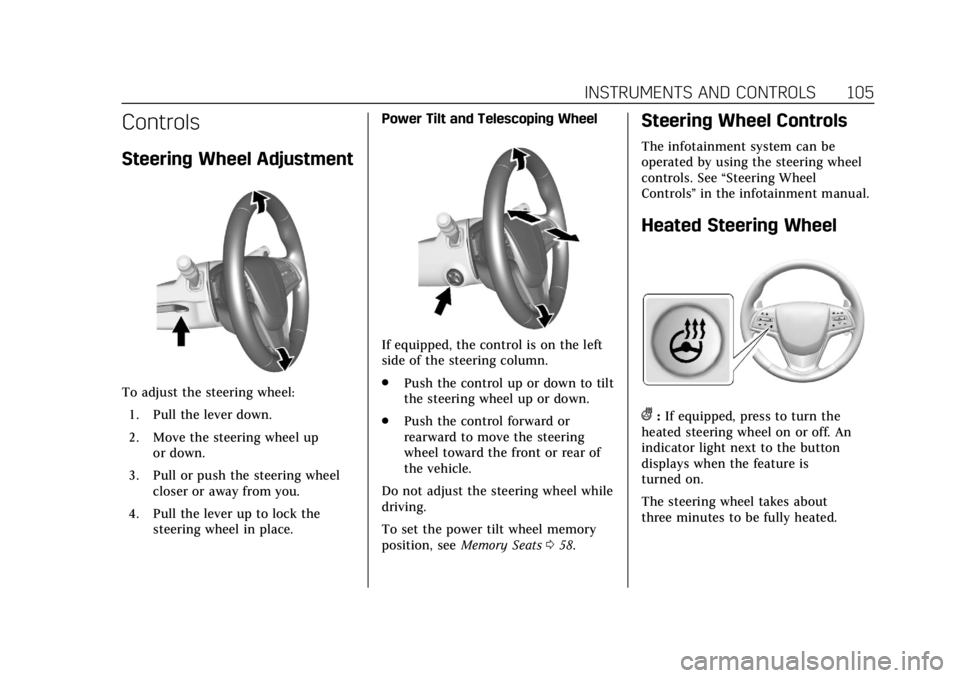
Steering Wheel Adjustment
To adjust the steering wheel:1. Pull the lever down.
2. Move the steering wheel up or down.
3. Pull or push the steering wheel closer or away from you.
4. Pull the lever up to lock the steering wheel in place. Power Tilt and Telescoping Wheel
If equipped, the control is on the left
side of the steering column.
.
Push the control up or down to tilt
the steering wheel up or down.
. Push the control forward or
rearward to move the steering
wheel toward the front or rear of
the vehicle.
Do not adjust the steering wheel while
driving.
To set the power tilt wheel memory
position, see Memory Seats 058.
Steering Wheel Controls
The infotainment system can be
operated by using the steering wheel
controls. See “Steering Wheel
Controls ”in the infotainment manual.
Heated Steering Wheel
(:If equipped, press to turn the
heated steering wheel on or off. An
indicator light next to the button
displays when the feature is
turned on.
The steering wheel takes about
three minutes to be fully heated.
Page 109 of 384
Cadillac ATS/ATS-V Owner Manual (GMNA-Localizing-U.S./Canada/Mexico-
12460272) - 2019 - crc - 5/8/18
108 INSTRUMENTS AND CONTROLS
Compass
The vehicle may have a compass
display on the Driver Information
Center (DIC). The compass receives its
heading and other information from
the Global Positioning System (GPS)
antenna, StabiliTrak/Electronic
Stability Control (ESC), and vehicle
speed information.
The compass system is designed to
operate for a certain number of miles
or degrees of turn before needing a
signal from the GPS satellites. When
the compass display shows CAL, drive
the vehicle for a short distance in an
open area where it can receive a GPS
signal. The compass system will
automatically determine when a GPS
signal is restored and provide a
heading again.
Clock
The time and date for the clock can be
set using the infotainment system. See
“Time/Date”in “System“ under
“Settings ”in the infotainment manual.
Power Outlets
The accessory power outlets can be
used to plug in electrical equipment,
such as a cell phone or MP3 player.
The vehicle has two accessory power
outlets:
.
Inside the instrument panel
storage area below the climate
control system.
. On the rear of the center floor
console.
Lift the cover to access the accessory
power outlet.
Certain electrical accessories may not
be compatible with the accessory
power outlet and could overload a
vehicle circuit breaker or adapter fuse.
If overloaded, the circuit breaker will
reset after all devices are disconnected
or if Retained Accessory Power (RAP)
is turned off and then back on. See
Retained Accessory Power (RAP) 0190.
Wait one minute to allow the circuit
breaker to reset before reconnecting
devices or turning RAP back on. If the
problem continues, the issue could be
within your device. Try another known good device to make sure the
circuit breaker is operating properly.
If this does not resolve your problem,
see your dealer.
It is possible to replace the factory
power outlet with a cigar lighter
receptacle, if desired. This requires the
factory installed circuit breaker to be
replaced with a standard minifuse by
the dealer. A minifuse will not reset
and will have to be replace if blown.
Caution
Failure to replace the circuit
breaker with the minifuse could
overheat the cigar lighter and
damage the vehicle.
When adding electrical equipment, be
sure to follow the proper installation
instructions included with the
equipment. See Add-On Electrical
Equipment 0240.
Page 112 of 384
Cadillac ATS/ATS-V Owner Manual (GMNA-Localizing-U.S./Canada/Mexico-
12460272) - 2019 - crc - 5/8/18
INSTRUMENTS AND CONTROLS 111
2. Remove all objects from thecharging pad. The system may
not charge if there are any
objects between the smartphone
and charging pad.
3. Place the smartphone face up on the
@symbol on the
charging pad.
To maximize the charge rate,
ensure the smartphone is fully
seated and centered in the holder
with nothing under it. A thick
smartphone case may prevent
the wireless charger from
working, or may reduce the
charging performance. See your
dealer for additional information.
4. The
}will show above theV
on the infotainment display. This
indicates that the smartphone is
properly positioned and charging.
If a smartphone is placed on the
charging pad and
}does not
display, remove the smartphone
from the pad, turn it
180 degrees, and wait three seconds before placing/
aligning the smartphone on the
pad again.
Keep the storage door closed while
driving.
Software Acknowledgements
Certain Wireless Charging Module
product from LG Electronics, Inc.
("LGE") contains the open source
software detailed below. Refer to the
indicated open source licenses (as are
included following this notice) for the
terms and conditions of their use.
OSS Notice Information
To obtain the source code that is
contained in this product, please visit
http://opensource.lge.com. In addition
to the source code, all referred license
terms, warranty disclaimers and
copyright notices are available for
download. LG Electronics will also
provide open source code to you on
CD-ROM for a charge covering the
cost of performing such distribution
(such as the cost of media, shipping,
and handling) upon email request to [email protected]. This offer is
valid for three (3) years from the date
on which you purchased the product.
Freescale-WCT library
Copyright (c) 2012-2014 Freescale
Semiconductor, Inc.. All rights
reserved.
1. Redistributions of source code must retain the above copyright
notice, this list of conditions and
the following disclaimer.
2. Redistributions in binary form must reproduce the above
copyright notice, this list of
conditions and the following
disclaimer in the documentation
and/or other materials provided
with the distribution.
3. Neither the name of the copyright holder nor the names
of its contributors may be used
to endorse or promote products
derived from this software
without specific prior written
permission.
Page 116 of 384
Cadillac ATS/ATS-V Owner Manual (GMNA-Localizing-U.S./Canada/Mexico-
12460272) - 2019 - crc - 5/8/18
INSTRUMENTS AND CONTROLS 115
Cluster Application Displays
The cluster has three interactive
display zones.
Use the five-way control on the right
steering wheel control to move
between the different display zones
and scroll through the different
displays.
The left and right zones display Driver
Information Center (DIC) information.
SeeDriver Information Center (DIC)
0 128.
The center zone displays application
information for the digital
speedometer, navigation, audio,
phone, efficiency gauge, best fuel
economy, or options.
Digital Speedometer
While the digital speedometer is
displayed, press SEL to select speed
limit information.
Navigation
If there is no active route, a compass
will be displayed. If there is an active
route, press SEL to end route guidance
or turn the voice prompts on or off. Audio
While the Audio application page is
displayed, press SEL to enter the
Audio menu. In the Audio menu
search for music, select from favorites,
or change the audio source.
Phone
While the Phone application page is
displayed, press SEL to enter the
Phone menu. In the Phone menu,
if there is no active phone call, view
recent calls, select from favorites,
or scroll through contacts. If there is
an active call, mute the phone or
switch to handset operation.
Best Fuel Economy
This page displays average fuel
economy, the best fuel economy over
the selected distance, and a bar graph
showing instantaneous fuel economy.
Options
Press SEL while the Options
application page is displayed to enter
the Options menu.
Units :
Press SEL while Units is
highlighted to enter the Units menu.
Choose English or metric units by
pressing SEL while the desired item is
highlighted. A checkmark will be
displayed next to the selected item.
Info Pages : Press SEL while Info
Pages is highlighted to select the
items to be displayed in the DIC
information displays. See Driver
Information Center (DIC) 0128.
Head-up Display (HUD) Rotation :
This feature allows for adjusting the
angle of the HUD image. Press SEL on
the steering wheel controls while
Head-up Display Rotation is
highlighted to enter Adjust Mode.
Press
yorzto adjust the angle of
the HUD display. Press
SorTto
highlight OK, then press SEL to save
the setting. Cancel can also be
selected to cancel the setting. The
vehicle must be in P (Park).
Fav Button Options : Press SEL while
Fav Button Options is highlighted to
select between FAV Primary and SEEK
Primary. This selection allows for
configuration of the
CandB