Button CADILLAC CT5 2020 Owner's Guide
[x] Cancel search | Manufacturer: CADILLAC, Model Year: 2020, Model line: CT5, Model: CADILLAC CT5 2020Pages: 359, PDF Size: 6.04 MB
Page 131 of 359
Cadillac CT5 Owner Manual (GMNA-Localizing-U.S./Canada-13060105) -
2020 - CRC - 2/14/20
130 INSTRUMENTS AND CONTROLS
Universal Remote
System
SeeRadio Frequency Statement 0334.
Universal Remote System
Programming
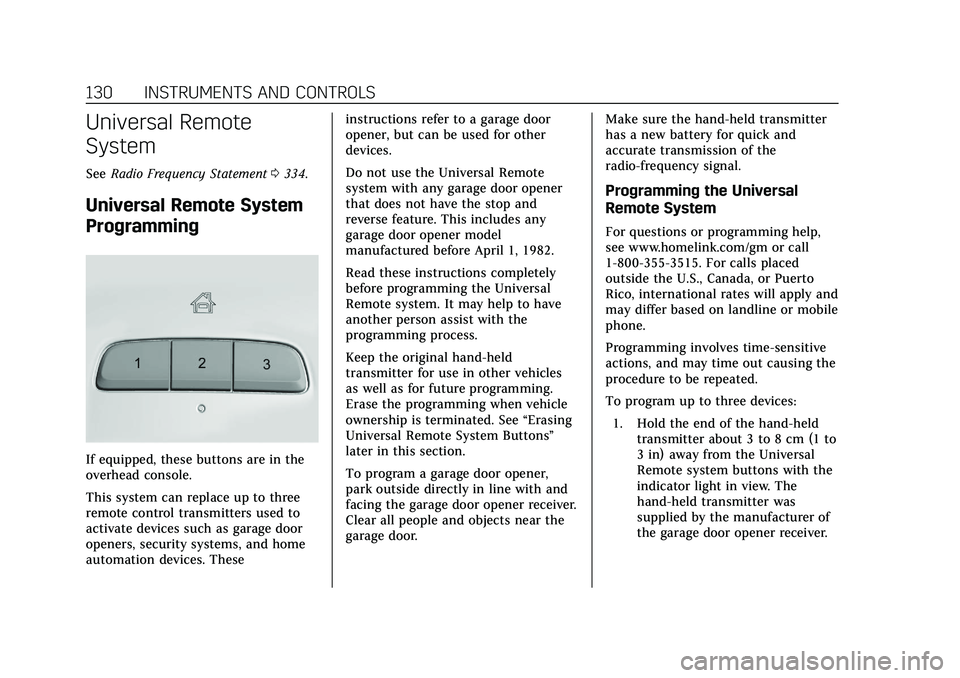
If equipped, these buttons are in the
overhead console.
This system can replace up to three
remote control transmitters used to
activate devices such as garage door
openers, security systems, and home
automation devices. These instructions refer to a garage door
opener, but can be used for other
devices.
Do not use the Universal Remote
system with any garage door opener
that does not have the stop and
reverse feature. This includes any
garage door opener model
manufactured before April 1, 1982.
Read these instructions completely
before programming the Universal
Remote system. It may help to have
another person assist with the
programming process.
Keep the original hand-held
transmitter for use in other vehicles
as well as for future programming.
Erase the programming when vehicle
ownership is terminated. See
“Erasing
Universal Remote System Buttons”
later in this section.
To program a garage door opener,
park outside directly in line with and
facing the garage door opener receiver.
Clear all people and objects near the
garage door. Make sure the hand-held transmitter
has a new battery for quick and
accurate transmission of the
radio-frequency signal.
Programming the Universal
Remote System
For questions or programming help,
see www.homelink.com/gm or call
1-800-355-3515. For calls placed
outside the U.S., Canada, or Puerto
Rico, international rates will apply and
may differ based on landline or mobile
phone.
Programming involves time-sensitive
actions, and may time out causing the
procedure to be repeated.
To program up to three devices:
1. Hold the end of the hand-held transmitter about 3 to 8 cm (1 to
3 in) away from the Universal
Remote system buttons with the
indicator light in view. The
hand-held transmitter was
supplied by the manufacturer of
the garage door opener receiver.
Page 132 of 359
Cadillac CT5 Owner Manual (GMNA-Localizing-U.S./Canada-13060105) -
2020 - CRC - 2/14/20
INSTRUMENTS AND CONTROLS 131
2. At the same time, press and holdboth the hand-held transmitter
button and one of the three
Universal Remote system
buttons to be used to operate the
garage door. Do not release either
button until the indicator light
changes from a slow to a rapid
flash. Then release both buttons.
Some garage door openers may
require substitution of Step 2
with the procedure under “Radio
Signals for Some Gate Operators”
later in this section.
3. Press and hold the newly programmed Universal Remote
system button for five seconds
while watching the indicator
light and garage door activation.
.If the indicator light stays on
continuously or the garage
door moves when the button
is pressed, then programming
is complete. There is no need
to complete Steps 4–6.
. If the indicator light does not
come on or the garage door
does not move, a second
button press may be required. For a second time,
press and hold the newly
programmed button for
five seconds. If the light stays
on or the garage door moves,
programming is complete.
. If the indicator light blinks
rapidly for two seconds, then
changes to a solid light and
the garage door does not
move, continue with
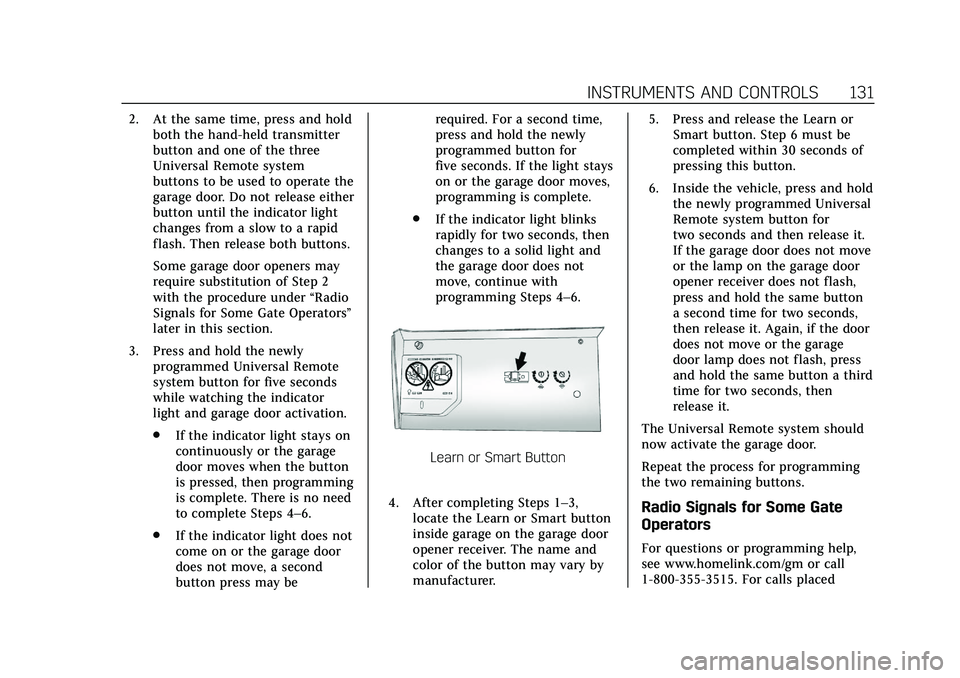
programming Steps 4–6.
Learn or Smart Button
4. After completing Steps 1–3, locate the Learn or Smart button
inside garage on the garage door
opener receiver. The name and
color of the button may vary by
manufacturer. 5. Press and release the Learn or
Smart button. Step 6 must be
completed within 30 seconds of
pressing this button.
6. Inside the vehicle, press and hold the newly programmed Universal
Remote system button for
two seconds and then release it.
If the garage door does not move
or the lamp on the garage door
opener receiver does not flash,
press and hold the same button
a second time for two seconds,
then release it. Again, if the door
does not move or the garage
door lamp does not flash, press
and hold the same button a third
time for two seconds, then
release it.
The Universal Remote system should
now activate the garage door.
Repeat the process for programming
the two remaining buttons.
Radio Signals for Some Gate
Operators
For questions or programming help,
see www.homelink.com/gm or call
1-800-355-3515. For calls placed
Page 133 of 359
Cadillac CT5 Owner Manual (GMNA-Localizing-U.S./Canada-13060105) -
2020 - CRC - 2/14/20
132 INSTRUMENTS AND CONTROLS
outside the U.S., Canada, or Puerto
Rico, international rates will apply and
may differ based on landline or mobile
phone.
Some gate operators and
radio-frequency laws require
transmitter signals to time out or quit
after several seconds of transmission.
This may not be long enough for the
Universal Remote system to pick up
the signal during programming.
If the programming did not work,
replace Step 2 under“Programming
the Universal Remote System ”with
the following:
Press and hold the Universal Remote
system button while pressing and
releasing the hand-held transmitter
button every two seconds until the
signal has been successfully accepted
by the Universal Remote system. The
Universal Remote system indicator
light will flash slowly at first and then
rapidly. Proceed with Step 3 under
“Programming the Universal Remote
System ”to complete.Universal Remote System
Operation
Using the Universal Remote
System
Press and hold the appropriate
Universal Remote system button for at
least one-half second. The indicator
light will come on while the signal is
being transmitted.
Erasing Universal Remote
System Buttons
Erase all programmed buttons when
vehicle ownership is terminated.
To erase:
1. Press and hold the two outside buttons until the indicator light
begins to flash. This should take
about 10 seconds.
2. Release both buttons.
Reprogramming a Single
Universal Remote System Button
To reprogram any of the system
buttons: 1. Press and hold any one of the buttons. Do not release the
button.
2. The indicator light will begin to flash after 20 seconds. Without
releasing the button, proceed
with Step 1 under “Programming
the Universal Remote System.”
Page 135 of 359
Cadillac CT5 Owner Manual (GMNA-Localizing-U.S./Canada-13060105) -
2020 - CRC - 2/14/20
134 LIGHTING
;:Turns on the parking lamps
including all lamps, except the
headlamps.
2: Turns on the headlamps together
with the parking lamps and
instrument panel lights.
IntelliBeam System
If equipped, this system turns the
vehicle's high-beam headlamps on and
off according to surrounding traffic
conditions.
The system turns the high-beam
headlamps on when it is dark enough
and there is no other traffic present.
This light
bcomes on in the
instrument cluster when the
IntelliBeam system is enabled. Turning On and Enabling IntelliBeam
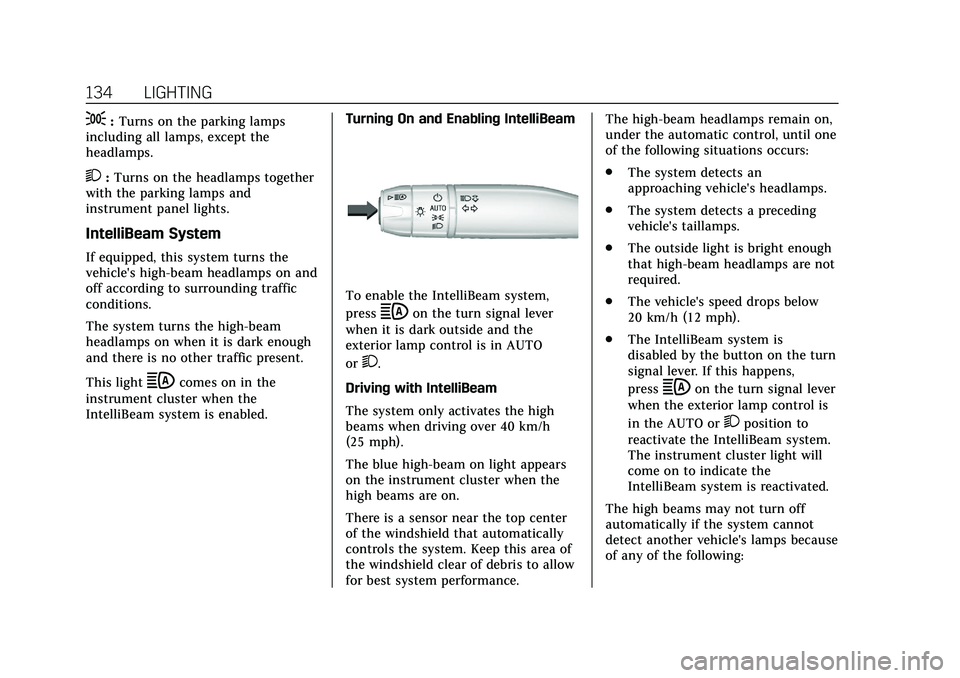
To enable the IntelliBeam system,
press
bon the turn signal lever
when it is dark outside and the
exterior lamp control is in AUTO
or
2.
Driving with IntelliBeam
The system only activates the high
beams when driving over 40 km/h
(25 mph).
The blue high-beam on light appears
on the instrument cluster when the
high beams are on.
There is a sensor near the top center
of the windshield that automatically
controls the system. Keep this area of
the windshield clear of debris to allow
for best system performance. The high-beam headlamps remain on,
under the automatic control, until one
of the following situations occurs:
.
The system detects an
approaching vehicle's headlamps.
. The system detects a preceding
vehicle's taillamps.
. The outside light is bright enough
that high-beam headlamps are not
required.
. The vehicle's speed drops below
20 km/h (12 mph).
. The IntelliBeam system is
disabled by the button on the turn
signal lever. If this happens,
press
bon the turn signal lever
when the exterior lamp control is
in the AUTO or
2position to
reactivate the IntelliBeam system.
The instrument cluster light will
come on to indicate the
IntelliBeam system is reactivated.
The high beams may not turn off
automatically if the system cannot
detect another vehicle's lamps because
of any of the following:
Page 137 of 359
Cadillac CT5 Owner Manual (GMNA-Localizing-U.S./Canada-13060105) -
2020 - CRC - 2/14/20
136 LIGHTING
Automatic Headlamp
System
When the exterior lamp control is set
to AUTO and it is dark enough
outside, the headlamps come on
automatically.
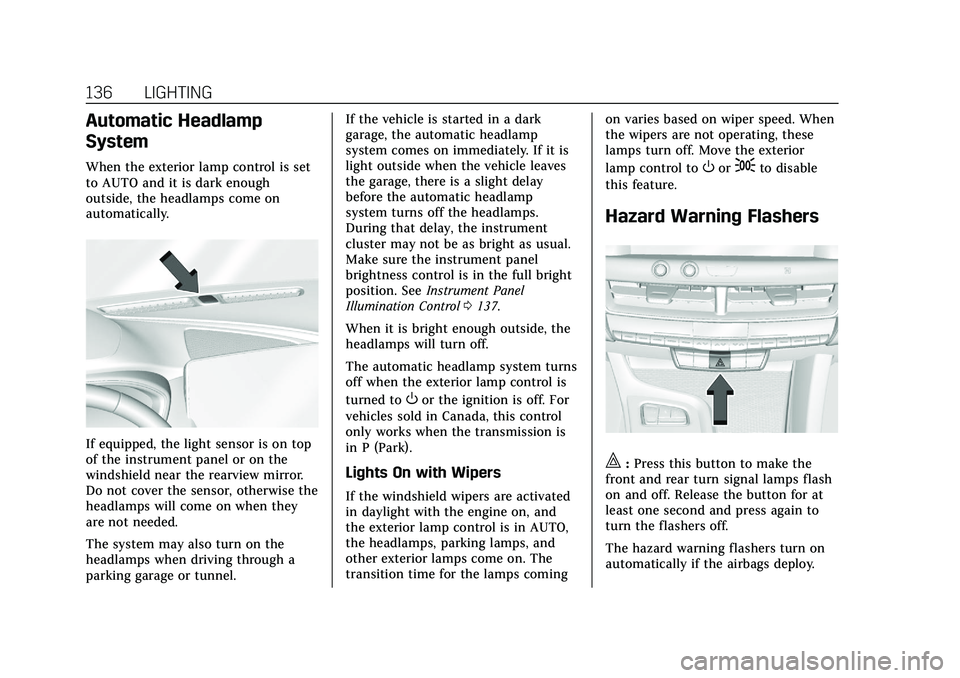
If equipped, the light sensor is on top
of the instrument panel or on the
windshield near the rearview mirror.
Do not cover the sensor, otherwise the
headlamps will come on when they
are not needed.
The system may also turn on the
headlamps when driving through a
parking garage or tunnel.If the vehicle is started in a dark
garage, the automatic headlamp
system comes on immediately. If it is
light outside when the vehicle leaves
the garage, there is a slight delay
before the automatic headlamp
system turns off the headlamps.
During that delay, the instrument
cluster may not be as bright as usual.
Make sure the instrument panel
brightness control is in the full bright
position. See
Instrument Panel
Illumination Control 0137.
When it is bright enough outside, the
headlamps will turn off.
The automatic headlamp system turns
off when the exterior lamp control is
turned to
Oor the ignition is off. For
vehicles sold in Canada, this control
only works when the transmission is
in P (Park).
Lights On with Wipers
If the windshield wipers are activated
in daylight with the engine on, and
the exterior lamp control is in AUTO,
the headlamps, parking lamps, and
other exterior lamps come on. The
transition time for the lamps coming on varies based on wiper speed. When
the wipers are not operating, these
lamps turn off. Move the exterior
lamp control to
Oor;to disable
this feature.
Hazard Warning Flashers
|: Press this button to make the
front and rear turn signal lamps flash
on and off. Release the button for at
least one second and press again to
turn the flashers off.
The hazard warning flashers turn on
automatically if the airbags deploy.
Page 139 of 359

Cadillac CT5 Owner Manual (GMNA-Localizing-U.S./Canada-13060105) -
2020 - CRC - 2/14/20
138 LIGHTING
panel illumination control will set the
lowest level to which the displays will
automatically be adjusted.
Courtesy Lamps
Courtesy lamps come on when any
door is opened, the remote key is
pressed, or when the ignition is
switched off. To deactivate the dome
lamp override, press
jOFF and
the indicator light on the button will
turn off.
Dome Lamps
The dome lamp controls are in the
overhead console.
To operate, press the following
buttons:
jOFF : Press to turn off the dome
lamps when any door is opened, the
remote key is pressed, or when the
ignition is switched off. An indicator
light on the button will turn on when
the dome lamp override is activated.
Press
jOFF again to deactivate
this feature and the indicator light will
turn off. The dome lamps will come
on when doors are opened.
+ ON/OFF : Press to turn the dome
lamps on and off manually.
Reading Lamps
There are front and rear reading
lamps on the overhead console and
over the rear passenger doors. These
lamps come on when any door is
opened, the remote key is pressed,
or when the ignition is switched off.
To operate, the ignition must be on,
or in ACC/ACCESSORY, or using
Retained Accessory Power (RAP). To manually turn the reading lamps
on or off:
Press the lamp lenses on the front
reading lamps.
Press the lamp lenses over the rear
passenger doors.
Page 140 of 359
Cadillac CT5 Owner Manual (GMNA-Localizing-U.S./Canada-13060105) -
2020 - CRC - 2/14/20
LIGHTING 139
Lighting Features
Entry Lighting
Some exterior lamps and most of the
interior lights turn on briefly at night,
or in areas of limited lighting when
K
is pressed on the remote key. After
about 30 seconds the exterior lamps
turn off. When any door is opened,
the remote unlock is pressed or the
vehicle power mode is transitioned to
OFF all interior lights turn on. The
dome and remaining interior lamps
dim to off after 20 seconds. Entry
lighting can be disabled manually by
turning the ignition on or to ACC/
ACCESSORY, or by pressing
Qon the
remote key.
The entry lighting feature for exterior
lighting can be changed. See “Vehicle
Locator Lights” underVehicle
Personalization 0124. Entry Lighting with Approach
Detection
If equipped with approach detection,
the entry lighting feature will
automatically turn on when the
remote key is detected within
approximately 2 m (6 ft) of the vehicle.
If the vehicle has remained parked for
an extended period of time with no
remote key use or Keyless Access
operation, approach detection will be
disabled. To reactivate, press any
button on the remote key or open and
close all vehicle doors to re-enable the
entry lighting feature on approach.
Approach detection will not work if:
.
The vehicle battery is low.
. The ignition is on or in ACC/
ACCESSORY.
. Entry lighting is set to Off. See
“Vehicle Locator Lights” under
Vehicle Personalization 0124.
Approach detection will not work with
a single remote key if:
. The remote key is left within a 5 m
(16 ft) range of the vehicle for
several minutes .
The remote key is left inside the
vehicle and all the doors are
closed
To help maximize remote key battery
life, do not store the remote key
within 5 m (16 ft) of the vehicle.
Exit Lighting
Some exterior lamps come on at night,
or in areas with limited lighting, when
the driver door is opened after the
ignition is turned off. The dome lamp
comes on after the ignition is turned
off. The exterior lamps and dome
lamp remain on after the door is
closed for a set amount of time, then
automatically turn off.
The exterior lamps turn off
immediately by turning the exterior
lamp control off.
This feature can be changed. See
Vehicle Personalization 0124.
Battery Load Management
The vehicle has Electric Power
Management (EPM), which estimates
the battery's temperature and state of
Page 143 of 359
Cadillac CT5 Owner Manual (GMNA-Localizing-U.S./Canada-13060105) -
2020 - CRC - 2/14/20
142 CLIMATE CONTROLS
Climate Controls
Climate Control Systems
Dual Automatic Climate ControlSystem . . . . . . . . . . . . . . . . . . . . . . . . . . 142
Air Vents
Air Vents . . . . . . . . . . . . . . . . . . . . . . . . . . 146
Maintenance
Passenger Compartment AirFilter . . . . . . . . . . . . . . . . . . . . . . . . . . . . . 147
Service . . . . . . . . . . . . . . . . . . . . . . . . . . . . 147
Climate Control Systems
Dual Automatic Climate Control System
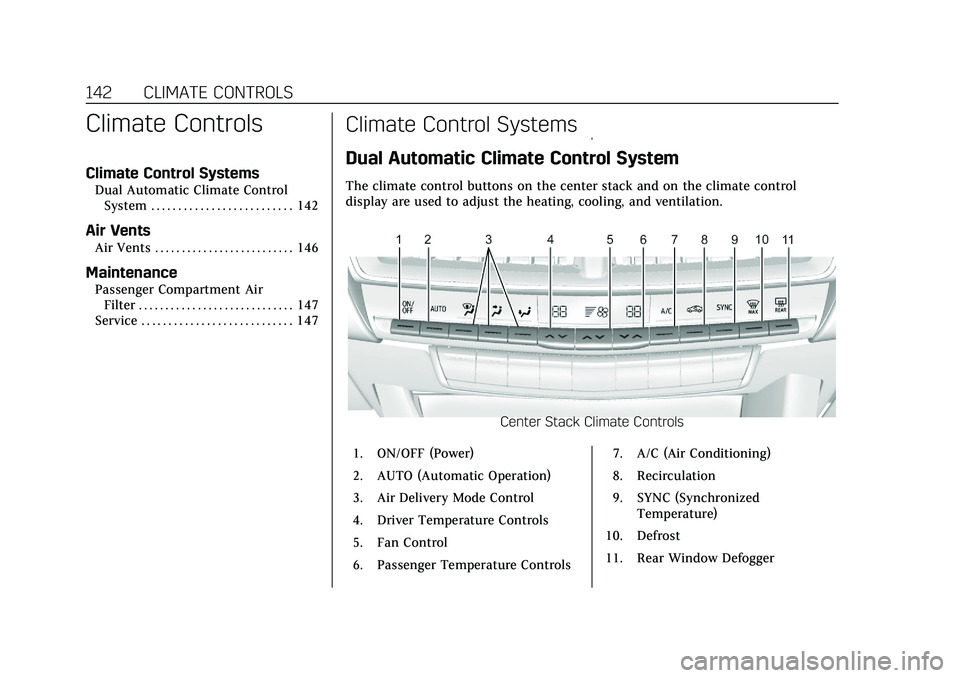
The climate control buttons on the center stack and on the climate control
display are used to adjust the heating, cooling, and ventilation.
Center Stack Climate Controls
1. ON/OFF (Power)
2. AUTO (Automatic Operation)
3. Air Delivery Mode Control
4. Driver Temperature Controls
5. Fan Control
6. Passenger Temperature Controls 7. A/C (Air Conditioning)
8. Recirculation
9. SYNC (Synchronized
Temperature)
10. Defrost
11. Rear Window Defogger
Page 144 of 359
Cadillac CT5 Owner Manual (GMNA-Localizing-U.S./Canada-13060105) -
2020 - CRC - 2/14/20
CLIMATE CONTROLS 143
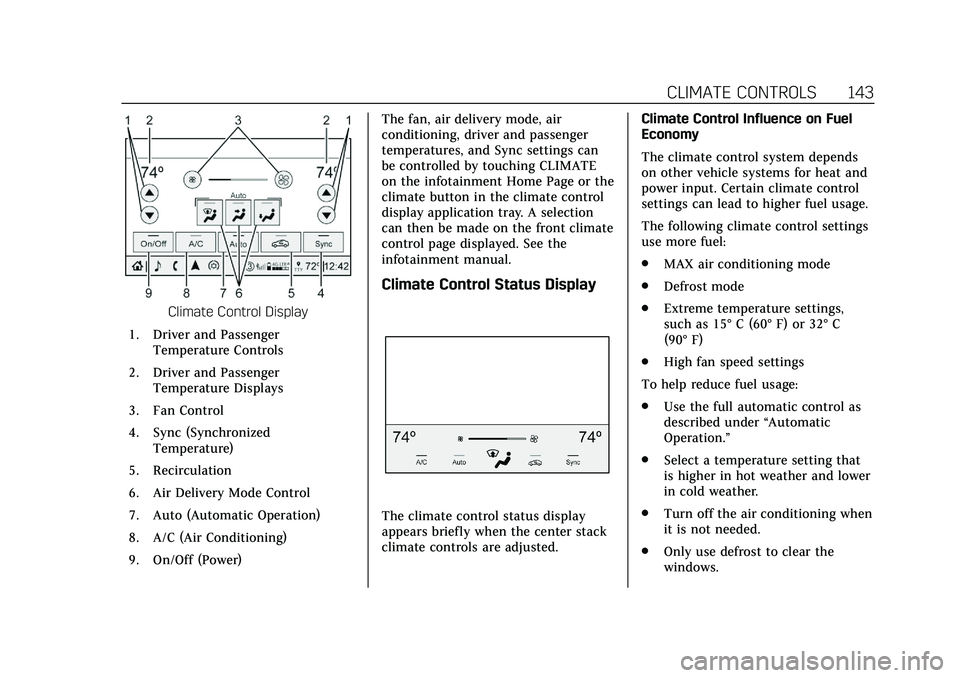
Climate Control Display
1. Driver and Passenger Temperature Controls
2. Driver and Passenger Temperature Displays
3. Fan Control
4. Sync (Synchronized Temperature)
5. Recirculation
6. Air Delivery Mode Control
7. Auto (Automatic Operation)
8. A/C (Air Conditioning)
9. On/Off (Power) The fan, air delivery mode, air
conditioning, driver and passenger
temperatures, and Sync settings can
be controlled by touching CLIMATE
on the infotainment Home Page or the
climate button in the climate control
display application tray. A selection
can then be made on the front climate
control page displayed. See the
infotainment manual.
Climate Control Status Display
The climate control status display
appears briefly when the center stack
climate controls are adjusted.
Climate Control Influence on Fuel
Economy
The climate control system depends
on other vehicle systems for heat and
power input. Certain climate control
settings can lead to higher fuel usage.
The following climate control settings
use more fuel:
.
MAX air conditioning mode
. Defrost mode
. Extreme temperature settings,
such as 15° C (60° F) or 32° C
(90° F)
. High fan speed settings
To help reduce fuel usage:
. Use the full automatic control as
described under “Automatic
Operation.”
. Select a temperature setting that
is higher in hot weather and lower
in cold weather.
. Turn off the air conditioning when
it is not needed.
. Only use defrost to clear the
windows.
Page 145 of 359
Cadillac CT5 Owner Manual (GMNA-Localizing-U.S./Canada-13060105) -
2020 - CRC - 2/14/20
144 CLIMATE CONTROLS
Automatic Operation
To place the system in
automatic mode:1. Press AUTO.
2. Set the driver and passenger temperature.
To find your comfort setting,
start with 22 °C (72 °F) and allow
the system time to stabilize.
Then adjust the temperature as
needed for best comfort.
To improve fuel efficiency and to cool
the vehicle faster, recirculation may be
automatically selected in warm
weather.
The recirculation light will not come
on when automatically controlled.
Press
@to manually select
recirculation; press it again to select
outside air.
Do not cover the solar sensor on the
top of the instrument panel near the
windshield. This sensor regulates air
temperature based on sun load. See
“Sensors ”later in this section.
Manual Operation
ON/OFF : Press to turn the climate
control system on or off. When the
system is off, outside air will be
prevented from entering the vehicle.
When the system is on, a button is
pressed, or knob is turned, the climate
control system will turn on and
deliver airflow per the current setting.
Q 9 R:Press the fan controls on the
center stack or the climate control
display to increase or decrease the fan
speed. Press and hold the controls to
adjust speed more quickly.
Press AUTO to return to automatic
operation.
Driver and Passenger Temperature
Control : The temperature can be
adjusted separately for the driver and
the passenger. Press
w/xto
increase or decrease the temperature.
SYNC : Press to link the passenger
and rear climate temperature settings,
if equipped, to the driver setting. The
SYNC indicator light will turn on.
When the passenger or rear climate
temperature settings are adjusted, the
SYNC indicator light is off. The driver side or passenger side
temperature display shows the
temperature setting increasing or
decreasing.
Air Delivery Mode Control :
Press
Y,
[, orzto change the direction of
the airf low. An indicator light comes
on in the selected mode button. All
three buttons or any combination of
the three buttons can be used to
select the air delivery mode.
Changing the mode cancels the
automatic operation and the system
goes into manual mode. Press AUTO
to return to automatic operation.
z: This mode clears the windows of
fog or moisture. Air is directed to the
windshield, outboard panel outlets,
and side window vents. The system
automatically forces outside air into
the vehicle and the air conditioning
compressor will run, unless the
outside temperature is close to
freezing.
Y: Air is directed to the instrument
panel outlets.