Mode CADILLAC CT6 2018 1.G Owner's Guide
[x] Cancel search | Manufacturer: CADILLAC, Model Year: 2018, Model line: CT6, Model: CADILLAC CT6 2018 1.GPages: 445, PDF Size: 7.7 MB
Page 160 of 445
Cadillac CT6 Owner Manual (GMNA-Localizing-U.S./Canada-11292458) -
2018 - crc - 2/14/17
INSTRUMENTS AND CONTROLS 159
charging screen, touch the X on the
far right side of the Charge Mode
button.
Temporary Override of the Next
Planned Departure Time
It is recommended to have the vehicle
unplugged while editing
departure time.
To temporarily override the Next
Planned Departure Time from inside
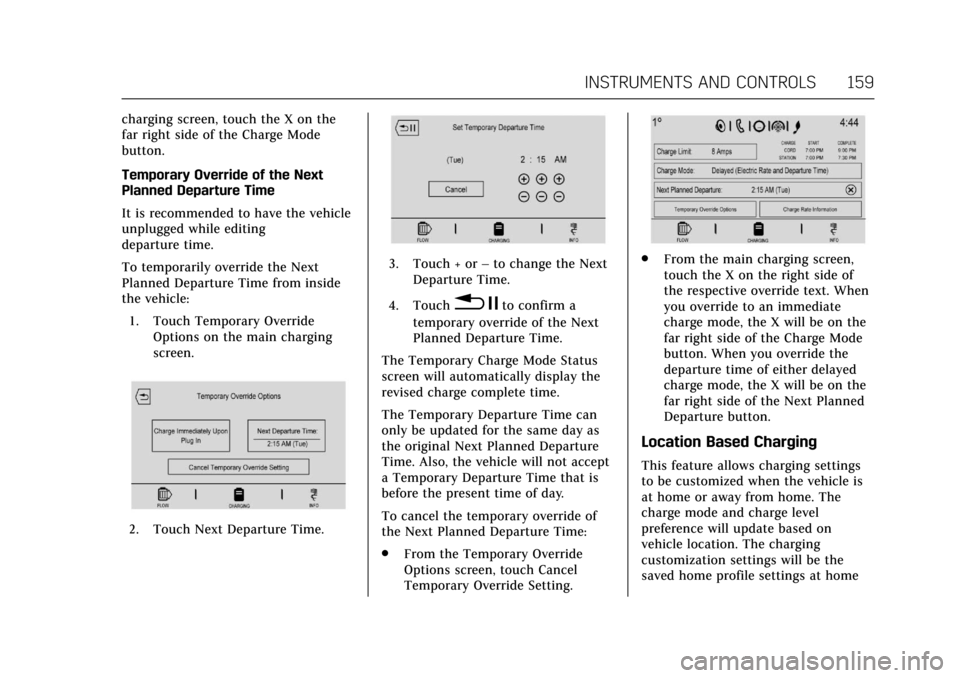
the vehicle:1. Touch Temporary Override Options on the main charging
screen.
2. Touch Next Departure Time.
3. Touch + or –to change the Next
Departure Time.
4. Touch
0 jto confirm a
temporary override of the Next
Planned Departure Time.
The Temporary Charge Mode Status
screen will automatically display the
revised charge complete time.
The Temporary Departure Time can
only be updated for the same day as
the original Next Planned Departure
Time. Also, the vehicle will not accept
a Temporary Departure Time that is
before the present time of day.
To cancel the temporary override of
the Next Planned Departure Time:
. From the Temporary Override
Options screen, touch Cancel
Temporary Override Setting.
.From the main charging screen,
touch the X on the right side of
the respective override text. When
you override to an immediate
charge mode, the X will be on the
far right side of the Charge Mode
button. When you override the
departure time of either delayed
charge mode, the X will be on the
far right side of the Next Planned
Departure button.
Location Based Charging
This feature allows charging settings
to be customized when the vehicle is
at home or away from home. The
charge mode and charge level
preference will update based on
vehicle location. The charging
customization settings will be the
saved home profile settings at home
Page 162 of 445
Cadillac CT6 Owner Manual (GMNA-Localizing-U.S./Canada-11292458) -
2018 - crc - 2/14/17
INSTRUMENTS AND CONTROLS 161
Programmable Charging
Disabled
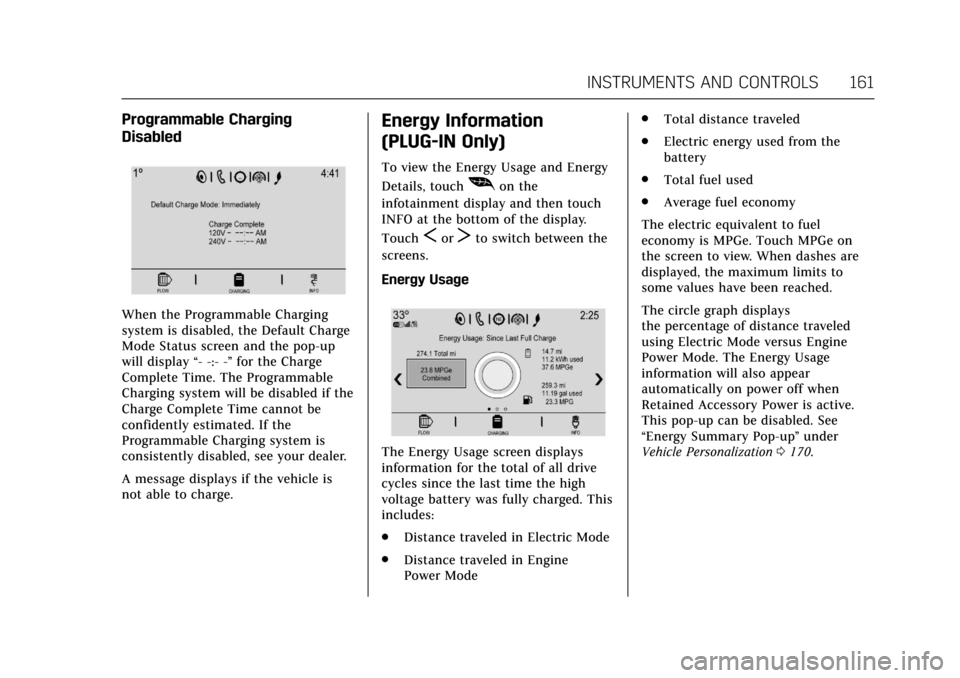
When the Programmable Charging
system is disabled, the Default Charge
Mode Status screen and the pop-up
will display“- -:- -”for the Charge
Complete Time. The Programmable
Charging system will be disabled if the
Charge Complete Time cannot be
confidently estimated. If the
Programmable Charging system is
consistently disabled, see your dealer.
A message displays if the vehicle is
not able to charge.
Energy Information
(PLUG-IN Only)
To view the Energy Usage and Energy
Details, touch
[on the
infotainment display and then touch
INFO at the bottom of the display.
Touch
SorTto switch between the
screens.
Energy Usage
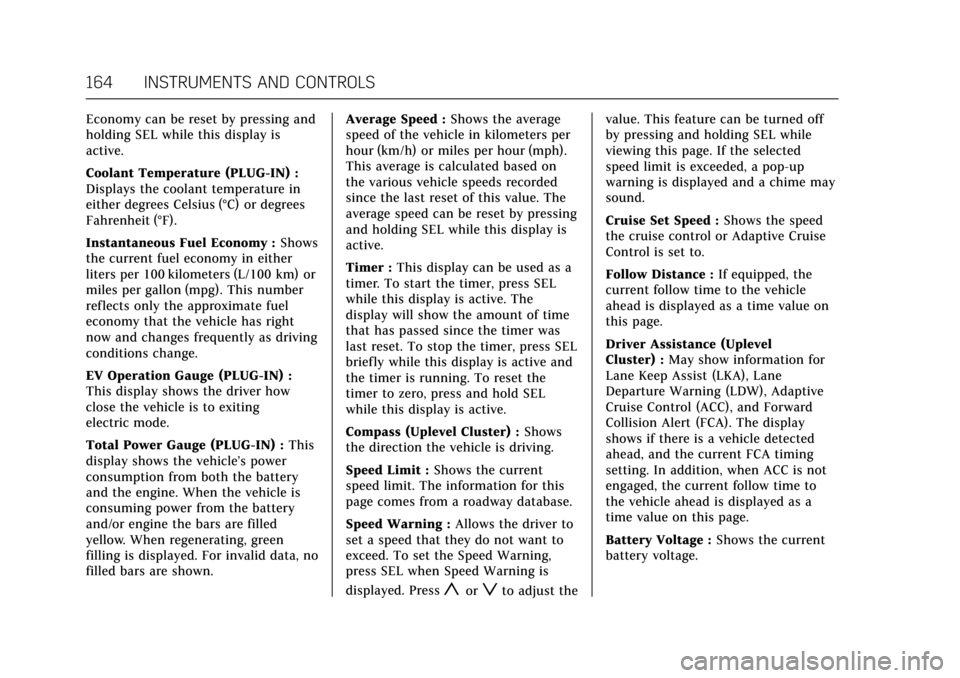
The Energy Usage screen displays
information for the total of all drive
cycles since the last time the high
voltage battery was fully charged. This
includes:
. Distance traveled in Electric Mode
. Distance traveled in Engine
Power Mode .
Total distance traveled
. Electric energy used from the
battery
. Total fuel used
. Average fuel economy
The electric equivalent to fuel
economy is MPGe. Touch MPGe on
the screen to view. When dashes are
displayed, the maximum limits to
some values have been reached.
The circle graph displays
the percentage of distance traveled
using Electric Mode versus Engine
Power Mode. The Energy Usage
information will also appear
automatically on power off when
Retained Accessory Power is active.
This pop-up can be disabled. See
“Energy Summary Pop-up ”under
Vehicle Personalization 0170.
Page 165 of 445
Cadillac CT6 Owner Manual (GMNA-Localizing-U.S./Canada-11292458) -
2018 - crc - 2/14/17
164 INSTRUMENTS AND CONTROLS
Economy can be reset by pressing and
holding SEL while this display is
active.
Coolant Temperature (PLUG-IN) :
Displays the coolant temperature in
either degrees Celsius (°C) or degrees
Fahrenheit (°F).
Instantaneous Fuel Economy :Shows
the current fuel economy in either
liters per 100 kilometers (L/100 km) or
miles per gallon (mpg). This number
reflects only the approximate fuel
economy that the vehicle has right
now and changes frequently as driving
conditions change.
EV Operation Gauge (PLUG-IN) :
This display shows the driver how
close the vehicle is to exiting
electric mode.
Total Power Gauge (PLUG-IN) : This
display shows the vehicle’s power
consumption from both the battery
and the engine. When the vehicle is
consuming power from the battery
and/or engine the bars are filled
yellow. When regenerating, green
filling is displayed. For invalid data, no
filled bars are shown. Average Speed :
Shows the average
speed of the vehicle in kilometers per
hour (km/h) or miles per hour (mph).
This average is calculated based on
the various vehicle speeds recorded
since the last reset of this value. The
average speed can be reset by pressing
and holding SEL while this display is
active.
Timer : This display can be used as a
timer. To start the timer, press SEL
while this display is active. The
display will show the amount of time
that has passed since the timer was
last reset. To stop the timer, press SEL
briefly while this display is active and
the timer is running. To reset the
timer to zero, press and hold SEL
while this display is active.
Compass (Uplevel Cluster) : Shows
the direction the vehicle is driving.
Speed Limit : Shows the current
speed limit. The information for this
page comes from a roadway database.
Speed Warning : Allows the driver to
set a speed that they do not want to
exceed. To set the Speed Warning,
press SEL when Speed Warning is
displayed. Press
yorzto adjust the value. This feature can be turned off
by pressing and holding SEL while
viewing this page. If the selected
speed limit is exceeded, a pop-up
warning is displayed and a chime may
sound.
Cruise Set Speed :
Shows the speed
the cruise control or Adaptive Cruise
Control is set to.
Follow Distance : If equipped, the
current follow time to the vehicle
ahead is displayed as a time value on
this page.
Driver Assistance (Uplevel
Cluster) : May show information for
Lane Keep Assist (LKA), Lane
Departure Warning (LDW), Adaptive
Cruise Control (ACC), and Forward
Collision Alert (FCA). The display
shows if there is a vehicle detected
ahead, and the current FCA timing
setting. In addition, when ACC is not
engaged, the current follow time to
the vehicle ahead is displayed as a
time value on this page.
Battery Voltage : Shows the current
battery voltage.
Page 167 of 445
Cadillac CT6 Owner Manual (GMNA-Localizing-U.S./Canada-11292458) -
2018 - crc - 2/14/17
166 INSTRUMENTS AND CONTROLS
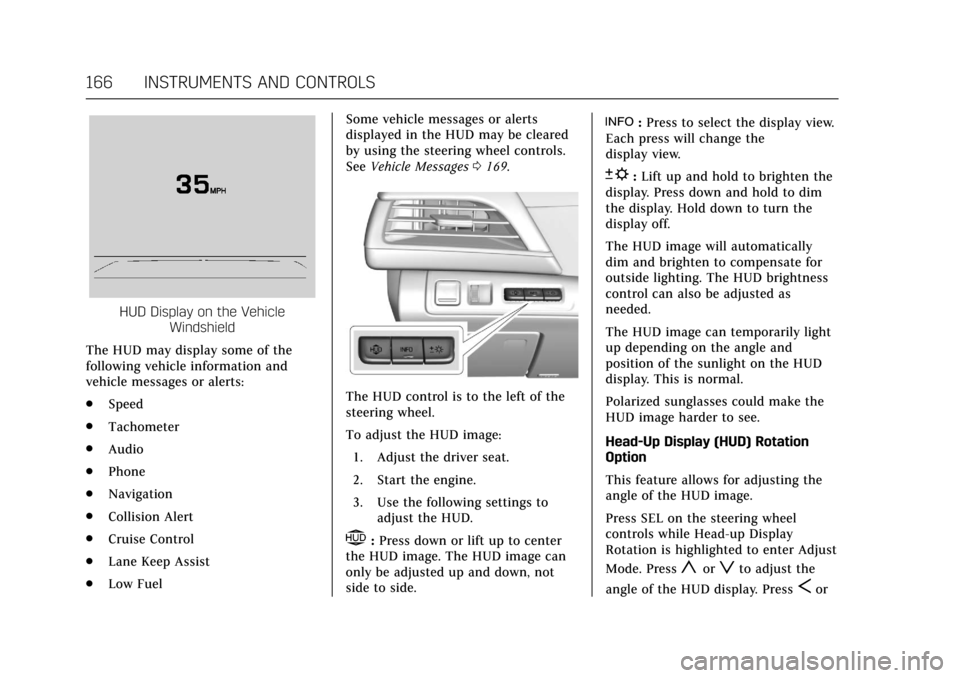
HUD Display on the VehicleWindshield
The HUD may display some of the
following vehicle information and
vehicle messages or alerts:
. Speed
. Tachometer
. Audio
. Phone
. Navigation
. Collision Alert
. Cruise Control
. Lane Keep Assist
. Low Fuel Some vehicle messages or alerts
displayed in the HUD may be cleared
by using the steering wheel controls.
See
Vehicle Messages 0169.
The HUD control is to the left of the
steering wheel.
To adjust the HUD image:
1. Adjust the driver seat.
2. Start the engine.
3. Use the following settings to adjust the HUD.
$:Press down or lift up to center
the HUD image. The HUD image can
only be adjusted up and down, not
side to side.
!: Press to select the display view.
Each press will change the
display view.
D: Lift up and hold to brighten the
display. Press down and hold to dim
the display. Hold down to turn the
display off.
The HUD image will automatically
dim and brighten to compensate for
outside lighting. The HUD brightness
control can also be adjusted as
needed.
The HUD image can temporarily light
up depending on the angle and
position of the sunlight on the HUD
display. This is normal.
Polarized sunglasses could make the
HUD image harder to see.
Head-Up Display (HUD) Rotation
Option
This feature allows for adjusting the
angle of the HUD image.
Press SEL on the steering wheel
controls while Head-up Display
Rotation is highlighted to enter Adjust
Mode. Press
yorzto adjust the
angle of the HUD display. Press
Sor
Page 171 of 445
Cadillac CT6 Owner Manual (GMNA-Localizing-U.S./Canada-11292458) -
2018 - crc - 2/14/17
170 INSTRUMENTS AND CONTROLS
Vehicle Personalization
Use the audio system controls to
access the personalization menus for
customizing vehicle features.
The following are all possible
personalization features. Depending
on the vehicle, some may not be
available.
Infotainment System Audio System
Controls
To access the personalization menu:1. Touch SETTINGS on the Home Page of the infotainment display.
2. Touch the desired feature to display a list of available options.
3. Touch to select the desired feature setting.
4. Touch
0Back to exit or move
backward in a menu.
Personalization Menus
The following list of menu items may
be available:
. Time and Date
. Rear Seat Reminder .
Language
. Video Voice-Over
. Valet Mode
. Teen Driver
. Radio
. Vehicle
. Bluetooth
. Apple CarPlay
. Android Auto
. Voice
. TouchPad
. Display
. Rear Camera
. Return to Factory Settings
. Software Information
. Wi-Fi
Each menu is detailed in the following
information.
Time and Date
Manually set the time and date. See
Clock 0122.
Rear Seat Reminder
This allows for a chime and a message
when the rear door has been opened
before or during operation of the
vehicle.
Select Off or On.
Language
Select Language, then select from the
available language(s).
The selected language will display on
the system, and voice recognition will
reflect the selected language.
Video Voice-Over
When activated, the RSI will read
aloud menu titles, menu listings,
pop-ups, alerts, and file titles from
audio and video media.
Select Off or On.
Valet Mode
This will lock the infotainment system
and steering wheel controls. It may
also limit access to vehicle storage
locations, if equipped.
Page 172 of 445
Cadillac CT6 Owner Manual (GMNA-Localizing-U.S./Canada-11292458) -
2018 - crc - 2/14/17
INSTRUMENTS AND CONTROLS 171
To enable valet mode:1. Enter a four-digit code on the keypad.
2. Select Enter to go to the confirmation screen.
3. Re-enter the four-digit code.
Touch LOCK or UNLOCK to lock or
unlock the system. Touch Back to go
back to the previous menu.
The four-digit code can be texted to a
paired phone if forgotten by pressing
Option on the Valet Mode lock screen.
Teen Driver
See “Teen Driver” under“Settings ”in
the infotainment manual.
Radio
Select and the following may display:
. Manage Favorites
. Number of Favorites Shown
. Audible Touch Feedback
. Bose Audio Pilot
. Maximum Start Up Volume Manage Favorites
This allows favorites to be edited. See
“Manage Favorites
”in “Settings” under
“Radio ”in the infotainment manual.
Number of Favorites Shown
Touch to set the number of favorites
to display.
Select the desired number or select
Auto and the infotainment system will
automatically adjust the number of
favorites shown.
Audible Touch Feedback
This allows Audible Touch Feedback
to be turned on or off.
Select Off or On.
Bose Audio Pilot
This feature adjusts the volume based
on the noise in the vehicle. See “Bose
AudioPilot Noise Compensation
Technology” under“Infotainment
System Settings” in the infotainment
manual.
Select Off or On. Maximum Start Up Volume
This feature sets the maximum
startup volume. If the vehicle is
started and the volume is greater than
this level, the volume is adjusted to
this level.
To set the maximum startup volume,
touch + or
−to increase or decrease.
Vehicle
Select and the following may display:
.
Climate and Air Quality
. Collision/Detection Systems
. Comfort and Convenience
. Energy
. Lighting
. Power Door Locks
. Remote Lock, Unlock, Start
Climate and Air Quality
Select and the following may display:
.
Auto Fan Speed
. Air Quality Sensor
. Auto Cooled Seats
. Auto Heated Seats
Page 173 of 445

Cadillac CT6 Owner Manual (GMNA-Localizing-U.S./Canada-11292458) -
2018 - crc - 2/14/17
172 INSTRUMENTS AND CONTROLS
.Auto Defog
. Auto Rear Defog
. Ionizer
. Engine Assist Heat
. Engine Assist Heat Plugged In
Auto Fan Speed
This feature will set the auto fan
speed.
Select Low, Medium, or High.
Air Quality Sensor
This allows for selection of air quality
sensor operation at high or low
sensitivity.
Select Off, Low Sensitivity, or High
Sensitivity.
Auto Cooled Seats
When enabled, this feature will
automatically activate the cooled seats
at the level required by the interior
temperature. See Heated and Ventilated
Front Seats 072.
Select Off or On. Auto Heated Seats
When enabled, this feature will
automatically activate heated seats at
the level required by the interior
temperature. See
Heated and Ventilated
Front Seats 072.
If equipped with Auto Heated Steering
Wheel, this feature will turn on when
the Auto Heated Seats turn on.
Select Off or On.
Auto Defog
When set to On, the front defog will
automatically react to temperature
and humidity conditions that may
cause fogging.
Select Off or On.
Auto Rear Defog
If equipped, this allows the Auto Rear
Defog to be turned on or off. This
feature will automatically turn on the
rear window defogger when it is cold
outside.
Select Off or On. Ionizer
If equipped and on, this feature
purifies the air in the interior of the
vehicle.
See
Automatic Climate Control System
(Quad Zone - Gasoline Only) 0197 or
Automatic Climate Control System (Dual
Zone - Gasoline and PLUG-IN) 0191.
Select Off or On.
Engine Assist Heat
If equipped, this feature selects the
outside temperature level at which the
engine may run to assist heating in
Electric Mode. A change in selection
will not take effect until after the
vehicle is first powered down.
Select On for temperatures below
approximately 2 °C (35 °F), or select
Deferred for temperatures below
approximately −10 °C (15 °F).
Engine Assist Heat Plugged In
During remote start, this feature turns
on or off the ability for the engine to
run to help heat the vehicle when it is
plugged in. A change in setting will
not take effect until after the vehicle
is first powered down.
Page 179 of 445
Cadillac CT6 Owner Manual (GMNA-Localizing-U.S./Canada-11292458) -
2018 - crc - 2/14/17
178 INSTRUMENTS AND CONTROLS
.Information
Feature
This feature allows the touchpad to be
turned on or off.
Touch to select Enabled or Disabled.
Information
Touch to read more about the
touchpad feature.
Inversion
Select and the following may display:
. Up/Down
. Left/Right
. Information
Up/Down
This feature allows the finger gesture
to be changed.
Touch to select Default or Inverted.
Left/Right
This feature allows the finger gesture
to be changed.
Touch to select Default or Inverted. Information
Touch to read more about the
inversion feature.
Cursor Tracking Speed
This feature changes the speed of the
cursor tracking.
Select Faster, Normal, or Slower.
Display
Select and the following may display:
.
Mode
. Proximity Sensing
. Calibrate Touchscreen
. Turn Display Off
Mode
Select to change the display screen for
day or night driving.
Select Auto, Day, or Night.
Proximity Sensing
When on, certain screen icons and
features will become visible when a
hand approaches the screen.
Select Off, On, or On-Map Only. Calibrate Touchscreen
Select to calibrate the touchscreen,
then follow the prompts.
Turn Display Off
Select to turn the display off. Touch
anywhere on the infotainment display
area or press any controls on the radio
center stack to turn the display on.Rear Camera
This allows for Rear Park Assist
Symbols and Guidance Lines to be
turned off or on.
Select Off or On for the desired
feature.
See
Assistance Systems for Parking or
Backing 0254.
Return to Factory Settings
Select and the following may display:
.
Restore Vehicle Settings
. Clear All Private Data
. Restore Radio Settings
Restore Vehicle Settings
This allows selection of restoring
vehicle settings.
Page 181 of 445
Cadillac CT6 Owner Manual (GMNA-Localizing-U.S./Canada-11292458) -
2018 - crc - 2/14/17
180 INSTRUMENTS AND CONTROLS
instructions refer to a garage door
opener, but can be used for other
devices.
Do not use the Universal Remote
system with any garage door opener
that does not have the stop and
reverse feature. This includes any
garage door opener model
manufactured before April 1, 1982.
Read these instructions completely
before programming the Universal
Remote system. It may help to have
another person assist with the
programming process.
Keep the original hand-held
transmitter for use in other vehicles
as well as for future programming.
Erase the programming when vehicle
ownership is terminated. See“Erasing
Universal Remote System Buttons”
later in this section.
To program a garage door opener,
park outside directly in line with and
facing the garage door opener receiver.
Clear all people and objects near the
garage door. Make sure the hand-held transmitter
has a new battery for quick and
accurate transmission of the
radio-frequency signal.
Programming the Universal
Remote System
For questions or help programming
the Universal Remote system, call
1-800-355-3515 or see
www.homelink.com.
Programming involves time-sensitive
actions, and may time out causing the
procedure to be repeated.
To program up to three devices:
1. Hold the end of the hand-held transmitter about 3 to 8 cm (1 to
3 in) away from the Universal
Remote system buttons with the
indicator light in view. The
hand-held transmitter was
supplied by the manufacturer of
the garage door opener receiver.
2. At the same time, press and hold both the hand-held transmitter
button and one of the three
Universal Remote system
buttons to be used to operate the
garage door. Do not release either button until the indicator light
changes from a slow to a rapid
flash. Then release both buttons.
Some garage door openers may
require substitution of Step 2
with the procedure under
“Radio
Signals for Canada and Some
Gate Operators” later in this
section.
3. Press and hold the newly programmed Universal Remote
system button for five seconds
while watching the indicator
light and garage door activation.
.If the indicator light stays on
continuously or the garage
door moves when the button
is pressed, then programming
is complete. There is no need
to complete Steps 4–6.
. If the indicator light does not
come on or the garage door
does not move, a second
button press may be
required. For a second time,
press and hold the newly
programmed button for
Page 184 of 445
Cadillac CT6 Owner Manual (GMNA-Localizing-U.S./Canada-11292458) -
2018 - crc - 2/14/17
LIGHTING 183
Lighting
Exterior Lighting
Exterior Lamp Controls . . . . . . . . . . 183
Exterior Lamps Off Reminder . . . 185
Headlamp High/Low-BeamChanger . . . . . . . . . . . . . . . . . . . . . . . . . . 185
Flash-to-Pass . . . . . . . . . . . . . . . . . . . . . 185
Daytime Running Lamps (DRL) . . . . . . . . . . . . . . . . . . . . 185
Automatic Headlamp System . . . 185
Hazard Warning Flashers . . . . . . . . 186
Turn and Lane-Change Signals . . . . . . . . . . . . . . . . . . . . . . . . . . . 186
Interior Lighting
Instrument Panel IlluminationControl . . . . . . . . . . . . . . . . . . . . . . . . . . 187
Courtesy Lamps . . . . . . . . . . . . . . . . . . 187
Dome Lamps . . . . . . . . . . . . . . . . . . . . . 187
Reading Lamps . . . . . . . . . . . . . . . . . . . 188
Lighting Features
Entry Lighting . . . . . . . . . . . . . . . . . . . . 188
Exit Lighting . . . . . . . . . . . . . . . . . . . . . . 189
Battery Power Protection . . . . . . . . 189
Exterior Lighting Battery Saver . . . . . . . . . . . . . . . . . . . . . . . . . . . . . 189
Exterior Lighting
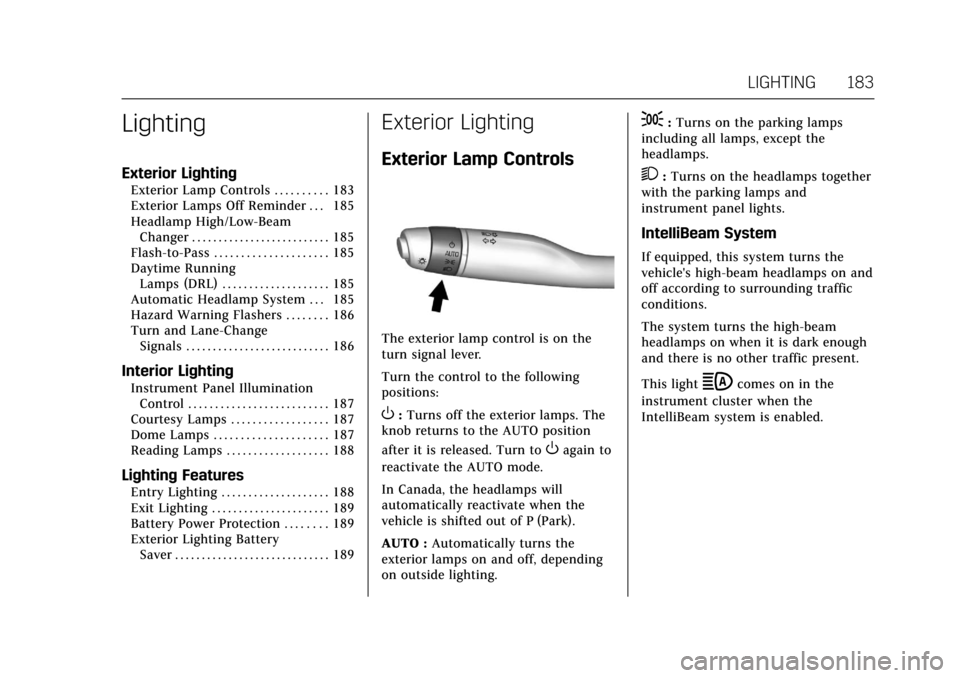
Exterior Lamp Controls
The exterior lamp control is on the
turn signal lever.
Turn the control to the following
positions:
O:Turns off the exterior lamps. The
knob returns to the AUTO position
after it is released. Turn to
Oagain to
reactivate the AUTO mode.
In Canada, the headlamps will
automatically reactivate when the
vehicle is shifted out of P (Park).
AUTO : Automatically turns the
exterior lamps on and off, depending
on outside lighting.
;: Turns on the parking lamps
including all lamps, except the
headlamps.
2: Turns on the headlamps together
with the parking lamps and
instrument panel lights.
IntelliBeam System
If equipped, this system turns the
vehicle's high-beam headlamps on and
off according to surrounding traffic
conditions.
The system turns the high-beam
headlamps on when it is dark enough
and there is no other traffic present.
This light
bcomes on in the
instrument cluster when the
IntelliBeam system is enabled.