stop start CADILLAC CTS 2012 2.G Owner's Manual
[x] Cancel search | Manufacturer: CADILLAC, Model Year: 2012, Model line: CTS, Model: CADILLAC CTS 2012 2.GPages: 496, PDF Size: 6.36 MB
Page 225 of 496
Black plate (29,1)Cadillac CTS/CTS-V Owner Manual (Include Mex) - 2012
Infotainment System 7-29
is not found in the Gracenote
Database and it does not have
CD-text information, the radio will
record the audio CD with all song,
artist, album and genre names as
“NO INFO.”
Songs recorded with“NO INFO”to
the HDD will be hard to sort,
identify, and select. To make HDD
navigation easier, CDs with “NO
INFO” can first be converted to MP3
format with Tag information on a
home computer and then recorded
to the HDD from an MP3 disc or
USB device.
Occasionally, the radio may find
more than one match in the
Gracenote Database for an audio
CD that has been recorded. If this
happens, the radio will display
“Multi‐Hit” for the name information
when the songs are selected from
the HDD. With a “Multi‐Hit”song
playing, press the button below the
EDIT tab to bring up the list of
multiple names found in the
Gracenote Database. Use the MENU/SELECT knob to highlight
and select the correct name for the
“Multi‐Hit”
recorded CD.
The Gracenote Database stored on
the HDD can be updated so that it
includes name information for more
recently released audio CDs. See
your dealer for more information on
Gracenote Database updates for the
HDD radio.
Recording from MP3/WMA
Discs or USB
REC (Record): Press to start
recording tracks from an MP3/WMA
disc or a USB device (excluding
iPods) while it is playing. The radio
has the option to record the current
track playing or all tracks from the
CD. Press the softkey under the
desired record option.
The last radio station that was on
begins playing and a status bar
appears on the top of the display
when the recording process starts.
The status bar disappears when the
process has ended. The recorded
songs are now available. AAC and OGG Vorbis file types are
not fully supported. These file types
may or may not play and may be
shown without Tag information.
Without Tag information available,
these file types may be identified
only by file name.
AudioBooks from www.audible.com
can also be transferred to the HDD
using the record function. See
“AudioBook”
later in this section for
more information.
USB Host Support
The USB connector uses the USB
standards, 1.1 and 2.0.
USB Supported Devices
.USB Flash Drives
.Portable USB Hard Drives
Playing from the Hard Drive
Device
HDD (Hard Drive Device): Press
the HDD button to start playing
tracks from the HDD. HDD displays
and playback resumes from where it
was last stopped.
Page 229 of 496
Black plate (33,1)Cadillac CTS/CTS-V Owner Manual (Include Mex) - 2012
Infotainment System 7-33
Pressr/j(play/pause) to pause
the radio. The radio display will
show the Time Shift buffer status
bar. The status bar shows the
amount of content stored in the
buffer and the current pause point.
To resume playback from the
current pause point, press
r/j
again. The radio will no longer be
playing “live”radio. Instead, time
shifted content is being played from
the buffer. When the radio is playing
time shifted content from the buffer,
a buffer status bar shows below the
station number on the left side of
the screen.
Press and hold
sREV or\FWD
to rewind or fast forward through the
time shift buffer. Hold
\FWD until
the end of the currently recorded
buffer to resume “live”radio
playback. With “live”radio playing,
the radio display will no longer show
the buffer bar below the station
number. On AM/FM, press
sREV or\
FWD multiple times to rewind or fast
forward. Each press will rewind or
fast forward 30 seconds of content.
On XM, press
sREV or\FWD
multiple times to jump to the
previous or next song or
commercial.
When the radio station is changed,
the buffer is cleared and
automatically restarted for the
current station. You cannot rewind
the content from a previously tuned
station.
Time shifting of AM/FM or XM is not
available while recording or while
other sources of playback are
selected.
Pausing AM/FM or XM™
(if equipped) with the Vehicle
Turned Off
If AM/FM or XM is paused before
the vehicle is turned off, the radio
will continue to buffer the current
radio station for up to one hour. If the vehicle is turned back on
within one hour, the radio will
automatically resume playback
from the pause point.Auxiliary Devices
The 3.5 mm (1/8 in) input jack and
the USB port (if equipped), located
in the center console bin, allow
portable devices to connect to the
vehicle. This is not an audio output;
do not plug headphones into the
auxiliary input jack.
Set up auxiliary devices while the
vehicle is stopped. See
Defensive
Driving on page 9‑3 for more
information on driver distraction.
When a device is first connected
to the 3.5 mm (1/8 in) input jack
or the USB port (if equipped) the
infotainment system automatically
switches to that device. If an
auxiliary device has already been
connected, press the AUX or CD/
AUX button.
Page 256 of 496
Black plate (6,1)Cadillac CTS/CTS-V Owner Manual (Include Mex) - 2012
9-6 Driving and Operating
If the vehicle starts to slide, follow
these suggestions:
.Ease your foot off the
accelerator pedal and quickly
steer the way you want the
vehicle to go. The vehicle may
straighten out. Be ready for a
second skid if it occurs.
.Slow down and adjust your
driving according to weather
conditions. Stopping distance
can be longer and vehicle
control can be affected when
traction is reduced by water,
snow, ice, gravel, or other
material on the road. Learn to
recognize warning clues—such
as enough water, ice, or packed
snow on the road to make a
mirrored surface —and slow
down when you have any doubt.
.Try to avoid sudden steering,
acceleration, or braking,
including reducing vehicle speed
by shifting to a lower gear. Any
sudden changes could cause
the tires to slide. Remember: Antilock brakes help
avoid only the braking skid.
Competitive Driving
Competitive driving may affect the
vehicle warranty. See the warranty
book before using the vehicle for
competitive driving.
Notice:
If you use your vehicle
for competitive driving, the
engine may use more oil than it
would with normal use. Low oil
levels can damage the engine. Be
sure to check the oil level often
during competitive driving and
keep the level at or near the
upper mark that shows the proper
operating range on the engine oil
dipstick. For information on how
to add oil, see Engine Oil on
page 10‑10.
CTS‐V Only: Be sure to check the
oil level often during racing, track
testing or other competitive driving
and keep the level at or near the upper mark that shows the proper
operating range on the engine oil
dipstick.
For competitive driving, it is
recommended that the brake fluid
be replaced with a high performance
brake fluid that has a dry boiling
point greater than 279°C (534°F).
After conversion to the high
performance brake fluid,
follow the brake fluid service
recommendations outlined by the
fluid manufacturer. Do not use
silicone or DOT‐5 brake fluids.
HF V6 Engine Only: Be sure to
check the oil level often during
racing, track testing or other
competitive driving and keep the
level at or near 0.5 L (0.5 qt) above
the upper mark that shows the
proper operating range on the
engine oil dipstick. For racing, track
testing or other competitive driving
an engine oil cooler must be
installed.
Page 266 of 496
Black plate (16,1)Cadillac CTS/CTS-V Owner Manual (Include Mex) - 2012
9-16 Driving and Operating
Starting and
Operating
New Vehicle Break-In
Follow these recommended
guidelines during the first 2 414 km
(1,500 miles) of driving this vehicle.
Parts have a break-in period and
performance will be better in the
long run.
For the first 2 414 km (1,500 miles):
.Avoid full throttle starts and
abrupt stops.
.Do not exceed
4,000 engine rpm.
.Avoid driving at any one
constant speed, fast or slow.
.Avoid downshifting to brake or
slow the vehicle when the
engine speed will exceed
4000 rpm.
.Do not let the engine labor.
Never lug the engine in high
gear at low speeds. With amanual transmission, shift to
the next lower gear. This rule
applies at all times, not just
during the break-in period.
.Do not participate in track
events, sport driving schools,
or similar activities during this
break–in period.
.Check engine oil with every
refueling and add if necessary.
Oil and fuel consumption may be
higher than normal during the
first 2 414 km (1,500 miles).
.To break in new tires, drive at
moderate speeds and avoid hard
cornering for the first 322 km
(200 miles). New tires do not
have maximum traction and may
tend to slip.
.New brake linings also need a
break–in period. Avoid making
hard stops during the first
322 km (200 miles). This is
recommended every time brake
linings are replaced.
Ignition Positions (Key
Access)
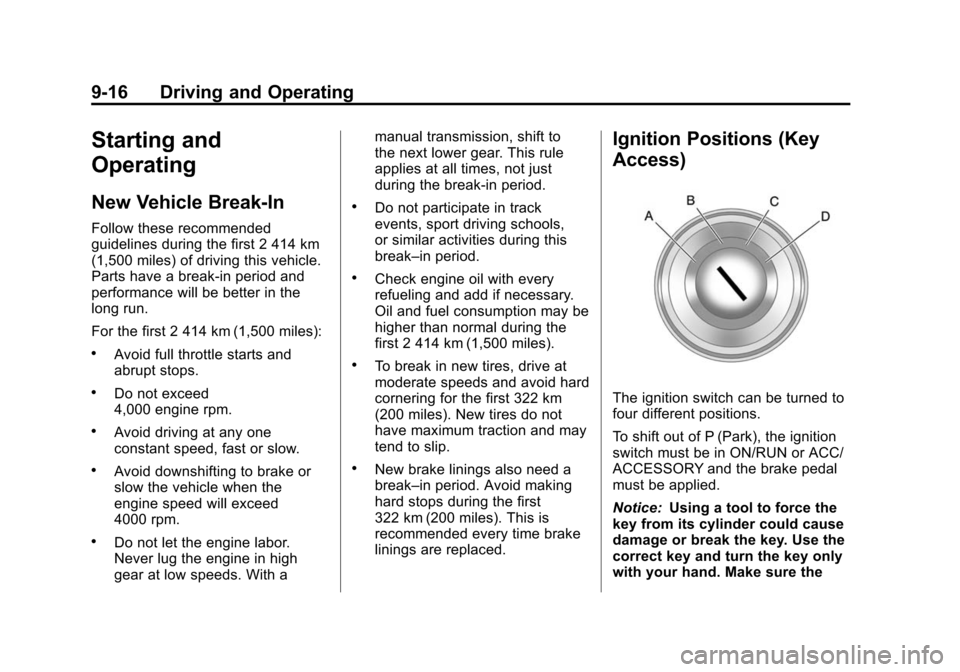
The ignition switch can be turned to
four different positions.
To shift out of P (Park), the ignition
switch must be in ON/RUN or ACC/
ACCESSORY and the brake pedal
must be applied.
Notice:
Using a tool to force the
key from its cylinder could cause
damage or break the key. Use the
correct key and turn the key only
with your hand. Make sure the
Page 269 of 496
Black plate (19,1)Cadillac CTS/CTS-V Owner Manual (Include Mex) - 2012
Driving and Operating 9-19
Using a tool to force the ignition
control knob from its cylinder could
damage it.
Make sure the keyless access
transmitter is inside the vehicle
when trying to turn the ignition
control knob.
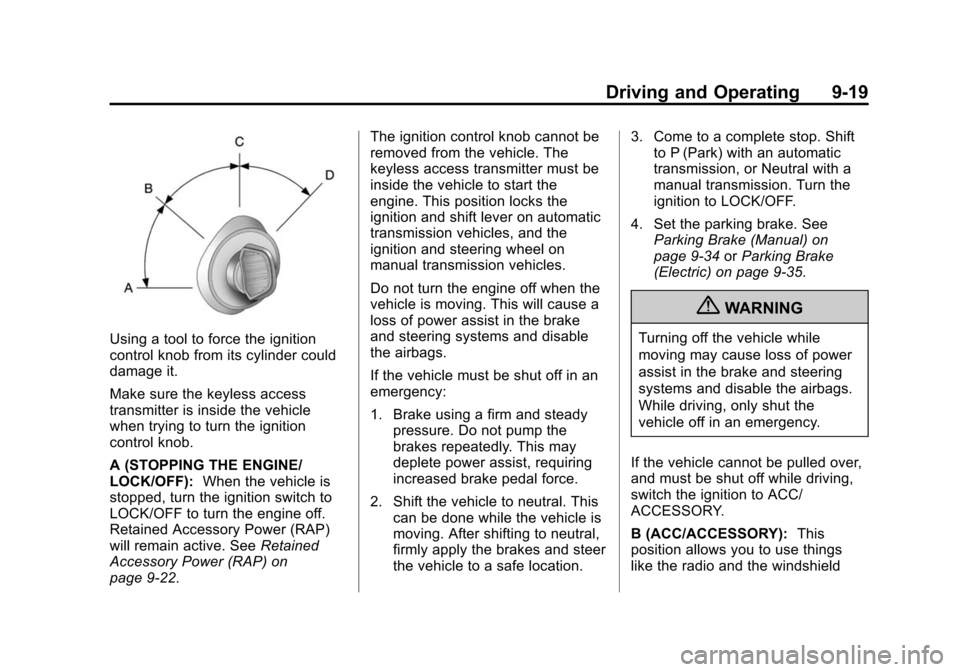
A (STOPPING THE ENGINE/
LOCK/OFF):When the vehicle is
stopped, turn the ignition switch to
LOCK/OFF to turn the engine off.
Retained Accessory Power (RAP)
will remain active. See Retained
Accessory Power (RAP) on
page 9‑22. The ignition control knob cannot be
removed from the vehicle. The
keyless access transmitter must be
inside the vehicle to start the
engine. This position locks the
ignition and shift lever on automatic
transmission vehicles, and the
ignition and steering wheel on
manual transmission vehicles.
Do not turn the engine off when the
vehicle is moving. This will cause a
loss of power assist in the brake
and steering systems and disable
the airbags.
If the vehicle must be shut off in an
emergency:
1. Brake using a firm and steady
pressure. Do not pump the
brakes repeatedly. This may
deplete power assist, requiring
increased brake pedal force.
2. Shift the vehicle to neutral. This can be done while the vehicle is
moving. After shifting to neutral,
firmly apply the brakes and steer
the vehicle to a safe location. 3. Come to a complete stop. Shift
to P (Park) with an automatic
transmission, or Neutral with a
manual transmission. Turn the
ignition to LOCK/OFF.
4. Set the parking brake. See Parking Brake (Manual) on
page 9‑34 orParking Brake
(Electric) on page 9‑35.
{WARNING
Turning off the vehicle while
moving may cause loss of power
assist in the brake and steering
systems and disable the airbags.
While driving, only shut the
vehicle off in an emergency.
If the vehicle cannot be pulled over,
and must be shut off while driving,
switch the ignition to ACC/
ACCESSORY.
B (ACC/ACCESSORY): This
position allows you to use things
like the radio and the windshield
Page 271 of 496

Black plate (21,1)Cadillac CTS/CTS-V Owner Manual (Include Mex) - 2012
Driving and Operating 9-21
Notice:Do not try to shift to
P (Park) if the vehicle is moving.
If you do, you could damage the
transmission. Shift to P (Park)
only when the vehicle is stopped.
Manual Transmission
The shift lever should be in neutral
position and the parking brake
engaged. Hold the clutch pedal
down to the floor and start the
engine. The vehicle will not start if
the clutch pedal is not all the
way down.
Starting Procedure
1. With your foot off the accelerator
pedal, turn the ignition key to
START. If the vehicle has the
keyless access system, push the
ignition control knob in and
rotate the knob to the START
position. When the engine starts,
let go of the ignition. The idle
speed will go down as your
engine gets warm. Do not race
the engine immediately after starting it. Operate the engine
and transmission gently to allow
the oil to warm up and lubricate
all moving parts.
The vehicle has a
Computer-Controlled Cranking
System. This feature assists in
starting the engine and protects
components. If the ignition key is
turned to the START position,
and then released when the
engine begins cranking, the
engine will continue cranking for
a few seconds or until the
vehicle starts. If the engine does
not start and the key is held in
START for many seconds,
cranking will be stopped after
15 seconds to prevent cranking
motor damage. To prevent gear
damage, this system also
prevents cranking if the engine
is already running. Engine
cranking can be stopped by
turning the ignition switch to
ACC/ACCESSORY or
LOCK/OFF.When first starting the vehicle,
the engine idle speed will be
elevated to allow the catalytic
converter, an emissions control
device, to quickly reach
operating temperature. After
approximately 20 seconds, the
engine will begin to transition to
its normal, quieter idle speed,
which can vary depending on
the temperature. This is normal
operation.
Notice: Cranking the engine for
long periods of time, by returning
the key to the START position
immediately after cranking has
ended, can overheat and damage
the cranking motor, and drain the
battery. Wait at least 15 seconds
between each try, to let the
cranking motor cool down.
2. If the engine does not start after 5‐10 seconds, especially in very
cold weather (below 0°F or
−18°C), it could be flooded with
too much gasoline. Try pushing
the accelerator pedal all the way
to the floor and holding it there
Page 272 of 496

Black plate (22,1)Cadillac CTS/CTS-V Owner Manual (Include Mex) - 2012
9-22 Driving and Operating
as you hold the key in START
for up to a maximum of
15 seconds. Wait at least
15 seconds between each try, to
allow the cranking motor to cool
down. When the engine starts,
let go of the key and accelerator.
If the vehicle starts briefly but
then stops again, do the same
thing. This clears the extra
gasoline from the engine. Do not
race the engine immediately
after starting it. Operate the
engine and transmission gently
until the oil warms up and
lubricates all moving parts.
Notice: The engine is designed to
work with the electronics in the
vehicle. If you add electrical parts
or accessories, you could change
the way the engine operates.
Before adding electrical
equipment, check with your
dealer. If you do not, the engine
might not perform properly. Any
resulting damage would not be
covered by the vehicle warranty.Retained Accessory
Power (RAP)
These vehicle accessories can be
used for up to 10 minutes after the
engine is turned off:
.Audio System
.Power Windows
.Sunroof (if equipped)
Power to the audio system will work
up to 10 minutes or until the driver
door is opened. Power to the
windows or sunroof will work up to
10 minutes or until any door is
opened. For an additional
10 minutes of operation, close all
the doors and turn the key to ON/
RUN and then back to LOCK/OFF.
Engine Coolant Heater
Vehicles with the engine coolant
heater can use this option in cold
weather conditions at or below
−18°C (0°F) for easier starting and
better fuel economy during engine
warm-up. Plug in the coolant heater at least four hours before starting
your vehicle. An internal thermostat
in the plug-end of the cord may exist
which will prevent engine coolant
heater operation at temperatures
above
−18°C (0°F).
To Use the Engine Coolant
Heater
1. Turn off the engine.
2. Open the hood and unwrap the
electrical cord. The cord is
located near the driver side strut
tower.
Remove the plastic cap to
access the plug.
3. Plug it into a normal, grounded 110-volt AC outlet.
{WARNING
Plugging the cord into an
ungrounded outlet could cause an
electrical shock. Also, the wrong
kind of extension cord could
(Continued)
Page 278 of 496
Black plate (28,1)Cadillac CTS/CTS-V Owner Manual (Include Mex) - 2012
9-28 Driving and Operating
the shift lever button before shifting
from P (Park) when the ignition key
is in ON/RUN. If you cannot shift out
of P (Park), ease pressure on the
shift lever and push the shift lever
all the way into P (Park) as you
maintain brake application. Then
press the shift lever button and
move the shift lever into another
gear. SeeShifting out of Park on
page 9‑24.
Notice: Shifting to R (Reverse)
while the vehicle is moving
forward could damage the
transmission. The repairs would
not be covered by the vehicle
warranty. Shift to R (Reverse) only
after the vehicle is stopped.
R (Reverse): Use this gear to
back up.
At low vehicle speeds, R (Reverse)
can be used to rock the vehicle
back and forth to get out of snow,
ice, or sand without damaging your
transmission. See If the Vehicle Is
Stuck on page 9‑11 for additional
information. N (Neutral):
In this position, the
engine does not connect with the
wheels. To restart when the vehicle
is already moving, use N (Neutral)
only. You can also use N (Neutral)
when the vehicle is being towed.
{WARNING
Shifting into a drive gear while the
engine is running at high speed is
dangerous. Unless your foot is
firmly on the brake pedal, the
vehicle could move very rapidly.
You could lose control and hit
people or objects. Do not shift
into a drive gear while the engine
is running at high speed.
Notice: Shifting out of P (Park) or
N (Neutral) with the engine
running at high speed may
damage the transmission. The
repairs would not be covered by
the vehicle warranty. Be sure the
engine is not running at high
speed when shifting the vehicle. D (Drive):
This position is for
normal driving. It provides the best
fuel economy. If you need more
power for passing, and you are:
.Going less than 55 km/h
(35 mph), push the accelerator
pedal about halfway down.
.Going about 55 km/h (35 mph) or
more, push the accelerator all
the way down.
The transmission will shift down
to a lower gear and have more
power.
Downshifting the transmission in
slippery road conditions could result
in skidding; see “Skidding”under
Loss of Control on page 9‑5
While in D (Drive), the CTS‐V
vehicle's first forward gear
automatic shift after starting the
vehicle will be from 1 (First).
Afterwards, the CTS‐V vehicles will
always start in 2 (Second) gear.
While in M (Manual Mode), for
increased performance, the vehicle
will start in 1 (First) gear.
Page 282 of 496
Black plate (32,1)Cadillac CTS/CTS-V Owner Manual (Include Mex) - 2012
9-32 Driving and Operating
2 (Second):Press the clutch pedal
and let up on the accelerator pedal,
then shift into 2 (Second). Then,
slowly let up on the clutch pedal
while accelerating.
3 (Third), 4 (Fourth), 5 (Fifth), and
6 (Sixth): Shift into 3 (Third),
4 (Fourth), 5 (Fifth), and 6 (Sixth) the
same for 2 (Second).
To stop, let up on the accelerator
pedal and press the brake pedal.
Just before the vehicle stops, press
the clutch pedal and the brake
pedal, and shift to Neutral.
Neutral: Use this position when
you start or idle your engine. Your
shift lever is in Neutral when it is
centered in the shift pattern, not in
any gear.
R (Reverse): To back up, press
down the clutch pedal, completely
stop the vehicle, and shift into
R (Reverse). Let up on the clutch
pedal slowly while pressing the
accelerator pedal. The CTS-V transmission prevents
easily shifting into R (Reverse) using
normal shifting force while the
vehicle is moving at more than
5 km/h (3 mph), or when the ignition
is in LOCK/OFF.
Shift Speeds (Manual
Transmission)
{WARNING
If you skip a gear when you
downshift, you could lose control
of the vehicle. You could injure
yourself or others. Do not shift
down more than one gear at a
time when you downshift.
Notice: If you skip more than one
gear when you downshift, or if
you race the engine when you
release the clutch pedal while
downshifting, you could damage
the engine, clutch, driveshaft or
the transmission. Do not skip
gears or race the engine when
downshifting. If the vehicle speed drops below
32 km/h (20 mph), or if the engine is
not running smoothly, downshift to
the next lower gear. You may have
to downshift two or more gears to
keep the engine running smoothly
or for good performance.
Up-Shift Light
Vehicles with a manual transmission
have an up‐shift light on the
instrument panel. This light shows
when to shift to the next higher gear
for the best fuel economy.
When this light comes on, you can
shift to the next higher gear if
weather, road, and traffic conditions
allow. For the best fuel economy,
accelerate slowly and shift when the
light comes on.
Page 287 of 496

Black plate (37,1)Cadillac CTS/CTS-V Owner Manual (Include Mex) - 2012
Driving and Operating 9-37
DIC message STEP ON BRAKE TO
RELEASE PARK BRAKE will be
displayed. The EPB is released
when the BRAKE light is off and the
DIC message PARK BRAKE
RELEASED is displayed.
If the yellow light is on, the EPB has
detected an error in another system
and is operating with reduced
functionality. To release the EPB
when this light is on, push down on
the EPB switch and hold it in the
down position. EPB release may
take a longer period of time than
normal when this light is on.
Continue to hold the switch until the
BRAKE light is off. If the yellow light
is on, see your dealer.
Notice:Driving with the parking
brake on can overheat the brake
system and cause premature
wear or damage to brake system
parts. Make sure that the parking
brake is fully released and the red
brake warning light is off before
driving.Automatic EPB Release
The EPB will automatically release if
the vehicle is running, placed into
gear, and an attempt is made to
drive away. Avoid rapid acceleration
when the EPB is applied, to
preserve park brake lining life.
The EPB can also be used to
prevent roll back for vehicles with a
manual transmission taking off on a
hill. In a situation where no roll back
is desired, an applied EPB will allow
both feet to be used for the clutch
and accelerator pedals in
preparation for starting the vehicle
moving in the intended direction.
In this situation, perform the normal
clutch and/or accelerator actions
required to begin moving the
vehicle. There is no need to push
the switch to release the EPB.
If you are towing a trailer and
parking on a hill, see Driving
Characteristics and Towing Tips on
page 9‑56 for more information.
Brake Assist
(Except CTS-V)
This vehicle has a brake assist
feature designed to assist the driver
in stopping or decreasing vehicle
speed in emergency driving
conditions. This feature uses the
stability system hydraulic brake
control module to supplement the
power brake system under
conditions where the driver has
quickly and forcefully applied the
brake pedal in an attempt to quickly
stop or slow down the vehicle. The
stability system hydraulic brake
control module increases brake
pressure at each corner of the
vehicle until the ABS activates.
Minor brake pedal pulsation or
pedal movement during this time
is normal and the driver should
continue to apply the brake pedal
as the driving situation dictates.
The brake assist feature will
automatically disengage when the
brake pedal is released or brake
pedal pressure is quickly
decreased.