height CADILLAC CTS 2014 Owner's Manual
[x] Cancel search | Manufacturer: CADILLAC, Model Year: 2014, Model line: CTS, Model: CADILLAC CTS 2014Pages: 400, PDF Size: 4.53 MB
Page 15 of 400

Black plate (9,1)Cadillac CTS Owner Manual (GMNA-Localizing-U.S./Canada/Mexico-
6081492) - 2014 - CRC 2nd Edition - 11/18/13
In Brief 1-9
PressCor{to ventilate the driver
or passenger seat. A ventilated seat
has a fan that pulls or pushes air
through the seat. The air is not
cooled.
Press the button once for the
highest setting. With each press of
the button, the seat will change to
the next lower setting, and then to
the off setting. The indicator lights
next to the buttons indicate three for
the highest setting and one for the
lowest. If the front heated seats are
on high, the level may automatically
be lowered after approximately
30 minutes.
See Heated and Ventilated Front
Seats on page 3-8.Head Restraint
Adjustment
Do not drive until the head restraints
for all occupants are installed and
adjusted properly.
To achieve a comfortable seating
position, change the seatback
recline angle as little as necessary
while keeping the seat and the head
restraint height in the proper
position.
See Head Restraints on page 3-2
and Power Seat Adjustment on
page 3-3.
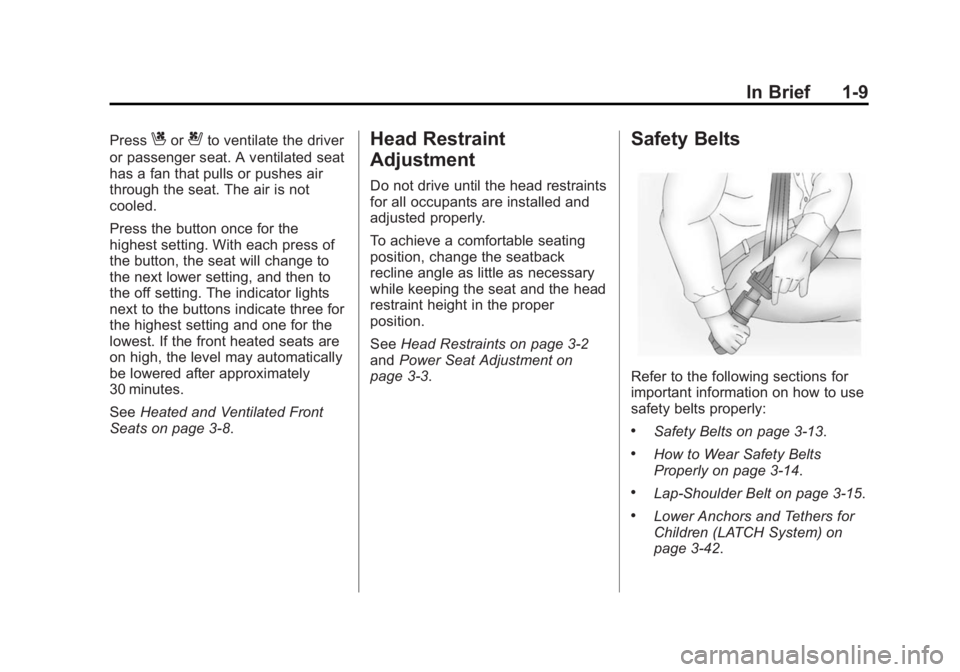
Safety Belts
Refer to the following sections for
important information on how to use
safety belts properly:
.Safety Belts on page 3-13.
.How to Wear Safety Belts
Properly on page 3-14.
.Lap-Shoulder Belt on page 3-15.
.Lower Anchors and Tethers for
Children (LATCH System) on
page 3-42.
Page 56 of 400

Black plate (2,1)Cadillac CTS Owner Manual (GMNA-Localizing-U.S./Canada/Mexico-
6081492) - 2014 - CRC 2nd Edition - 11/18/13
3-2 Seats and Restraints
Head Restraints
{Warning
With head restraints that are not
installed and adjusted properly,
there is a greater chance that
occupants will suffer a neck/
spinal injury in a crash. Do not
drive until the head restraints for
all occupants are installed and
adjusted properly.
Adjust the head restraint so that the
top of the restraint is at the same
height as the top of the occupant's
head. This position reduces the
chance of a neck injury in a crash.
Front Seats
The vehicle's front seats have
adjustable head restraints in the
outboard seating positions.
The height of the head restraint can
be adjusted. Pull the head restraint
up to raise it. Try to move the head
restraint to make sure that it is
locked in place.To lower the head restraint, press
the button located on the side of the
head restraint, push the head
restraint down, and release the
button. Pull and push on the head
restraint after the button is released
to make sure that it is locked in
place.
The head restraints can be adjusted
forward or rearward. To adjust the
head restraint forward, grasp the
head restraint and pull it forward to
the desired locking position. To
adjust the head restraint rearward,
press the button located on the side
Page 57 of 400

Black plate (3,1)Cadillac CTS Owner Manual (GMNA-Localizing-U.S./Canada/Mexico-
6081492) - 2014 - CRC 2nd Edition - 11/18/13
Seats and Restraints 3-3
of the head restraint and move the
head restraint rearward until the
desired locking position is reached.
Try to move the head restraint after
the button is released to make sure
that it is locked in place.
The front seat outboard head
restraints are not designed to be
removed.
Rear Seats
The vehicle's rear seats have
adjustable head restraints in the
outboard seating positions.
The height of the head restraint can
be adjusted. Pull the head restraint
up to raise it. Try to move the head
restraint to make sure that it is
locked in place.
To lower the head restraint, press
the button, located on the top of the
seatback, and push the head
restraint down. Try to move the
head restraint after the button is
released to make sure that it is
locked in place.
Rear outboard head restraints are
not designed to be removed.
Front Seats
Power Seat Adjustment
{Warning
You can lose control of the
vehicle if you try to adjust a driver
seat while the vehicle is moving.
Adjust the driver seat only when
the vehicle is not moving.
Page 70 of 400

Black plate (16,1)Cadillac CTS Owner Manual (GMNA-Localizing-U.S./Canada/Mexico-
6081492) - 2014 - CRC 2nd Edition - 11/18/13
3-16 Seats and Restraints
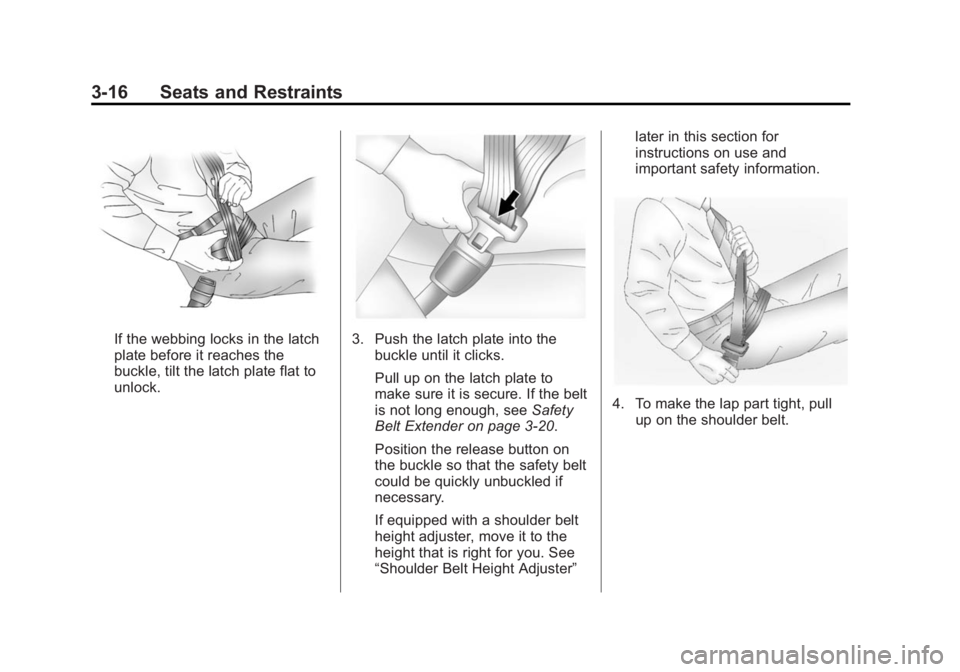
If the webbing locks in the latch
plate before it reaches the
buckle, tilt the latch plate flat to
unlock.3. Push the latch plate into thebuckle until it clicks.
Pull up on the latch plate to
make sure it is secure. If the belt
is not long enough, see Safety
Belt Extender on page 3-20.
Position the release button on
the buckle so that the safety belt
could be quickly unbuckled if
necessary.
If equipped with a shoulder belt
height adjuster, move it to the
height that is right for you. See
“Shoulder Belt Height Adjuster” later in this section for
instructions on use and
important safety information.
4. To make the lap part tight, pull
up on the shoulder belt.
Page 71 of 400

Black plate (17,1)Cadillac CTS Owner Manual (GMNA-Localizing-U.S./Canada/Mexico-
6081492) - 2014 - CRC 2nd Edition - 11/18/13
Seats and Restraints 3-17
To unlatch the belt, push the button
on the buckle. The belt should
return to its stowed position.
Before a door is closed, be sure the
safety belt is out of the way. If a
door is slammed against a safety
belt, damage can occur to both the
safety belt and the vehicle.
Shoulder Belt Height Adjuster
The vehicle has a shoulder belt
height adjuster for the driver and
right front passenger seating
positions.Adjust the height so the shoulder
portion of the belt is on the shoulder
and not falling off of it. The belt
should be close to, but not
contacting, the neck. Improper
shoulder belt height adjustment
could reduce the effectiveness of
the safety belt in a crash. See
How
to Wear Safety Belts Properly on
page 3-14.Press the release button and move
the height adjuster to the desired
position. The adjuster can be moved
up by pushing the slide/trim up.
After the adjuster is set to the desired position, try to move it down
without pushing the release button
to make sure it has locked into
position.
Automatic Safety Belt
Tightening System
If the vehicle has Adaptive Cruise
Control (ACC), it also has the
Automatic Safety Belt Tightening
System. See
Adaptive Cruise
Control on page 9-37.
Each time the vehicle is started with
the front safety belts buckled, the
system activates once to tighten the
safety belts when the forward
vehicle speed exceeds the
threshold for activation.
The system also activates during
emergency braking and/or sudden
driving maneuvers and releases
when driving conditions return to
normal.
The system will not activate if the
Traction Control/Electronic Stability
Control system is not functioning
properly. See Traction Control/
Page 87 of 400

Black plate (33,1)Cadillac CTS Owner Manual (GMNA-Localizing-U.S./Canada/Mexico-
6081492) - 2014 - CRC 2nd Edition - 11/18/13
Seats and Restraints 3-33
child restraint or child occupant
is on the seat. If the passenger
frontal airbag and passenger
knee airbag are turned on, the
on indicator will be lit.
If the passenger seat gets wet, dry
the seat immediately. If the airbag
readiness light is lit, do not install a
child restraint or allow anyone to
occupy the seat. See Airbag
Readiness Light on page 5-17 for
important safety information.
The on indicator may be lit if an
object, such as a briefcase,
handbag, grocery bag, laptop,
or other electronic device, is put on
an unoccupied seat. If this is not
desired, remove the object from
the seat.
{Warning
Stowing of articles under the
passenger seat or between the
passenger seat cushion and
(Continued)
Warning (Continued)
seatback may interfere with the
proper operation of the passenger
sensing system.
Servicing the
Airbag-Equipped Vehicle
Airbags affect how the vehicle
should be serviced. There are parts
of the airbag system in several
places around the vehicle. Your
dealer and the service manual have
information about servicing the
vehicle and the airbag system. To
purchase a service manual, see
Service Publications Ordering
Information on page 13-11.
{Warning
For up to 10 seconds after the
vehicle is turned off and the
battery is disconnected, an airbag
(Continued)
Warning (Continued)
can still inflate during improper
service. You can be injured if you
are close to an airbag when it
inflates. Avoid yellow connectors.
They are probably part of the
airbag system. Be sure to follow
proper service procedures, and
make sure the person performing
work for you is qualified to do so.
Adding Equipment to the
Airbag-Equipped Vehicle
Adding accessories that change the
vehicle's frame, bumper system,
height, front end, or side sheet
metal, may keep the airbag system
from working properly. The
operation of the airbag system can
also be affected by changing or
moving any parts of the front seats,
safety belts, the airbag sensing and
diagnostic module, steering wheel,
instrument panel, roof-rail airbag
modules, ceiling headliner or pillar
Page 89 of 400

Black plate (35,1)Cadillac CTS Owner Manual (GMNA-Localizing-U.S./Canada/Mexico-
6081492) - 2014 - CRC 2nd Edition - 11/18/13
Seats and Restraints 3-35
Warning (Continued)
protect you and your
passenger(s) in a crash, resulting
in serious injury or even death. To
help make sure the airbag
systems are working properly
after a crash, have them
inspected and any necessary
replacements made as soon as
possible.
If an airbag inflates, you will need to
replace airbag system parts. See
your dealer for service.
If the airbag readiness light stays on
after the vehicle is started or comes
on when you are driving, the airbag
system may not work properly. Have
the vehicle serviced right away. See
Airbag Readiness Light on
page 5-17.
Child Restraints
Older Children
Older children who have outgrown
booster seats should wear the
vehicle safety belts. The manufacturer instructions that
come with the booster seat state the
weight and height limitations for that
booster. Use a booster seat with a
lap-shoulder belt until the child
passes the fit test below:
.Sit all the way back on the seat.
Do the knees bend at the seat
edge? If yes, continue. If no,
return to the booster seat.
.Buckle the lap-shoulder belt.
Does the shoulder belt rest on
the shoulder? If yes, continue.
If no, try using the rear safety
belt comfort guide. See
“Rear
Safety Belt Comfort Guides”
under Lap-Shoulder Belt on
page 3-15. If the shoulder belt
still does not rest on the
shoulder, then return to the
booster seat.
.Does the lap belt fit low and
snug on the hips, touching the
thighs? If yes, continue. If no,
return to the booster seat.
Page 92 of 400

Black plate (38,1)Cadillac CTS Owner Manual (GMNA-Localizing-U.S./Canada/Mexico-
6081492) - 2014 - CRC 2nd Edition - 11/18/13
3-38 Seats and Restraints
{Warning
Children who are up against,
or very close to, any airbag when
it inflates can be seriously injured
or killed. Never put a rear-facing
child restraint in the front
outboard seat. Secure a
rear-facing child restraint in a rear
seat. It is also better to secure a
forward-facing child restraint in a
rear seat. If you must secure a
forward-facing child restraint in(Continued)
Warning (Continued)
the front outboard seat, always
move the front passenger seat as
far back as it will go.
Q: What are the different types ofadd-on child restraints?
A: Add-on child restraints, which
are purchased by the vehicle
owner, are available in four basic
types. Selection of a particular
restraint should take into
consideration not only the child's weight, height, and age but also
whether or not the restraint will
be compatible with the motor
vehicle in which it will be used.
For most basic types of child
restraints, there are many
different models available. When
purchasing a child restraint, be
sure it is designed to be used in
a motor vehicle. If it is, the
restraint will have a label saying
that it meets federal motor
vehicle safety standards.
The restraint manufacturer
instructions that come with the
restraint state the weight and
height limitations for a particular
child restraint. In addition, there
are many kinds of restraints
available for children with
special needs.
Page 148 of 400

Black plate (36,1)Cadillac CTS Owner Manual (GMNA-Localizing-U.S./Canada/Mexico-
6081492) - 2014 - CRC 2nd Edition - 11/18/13
5-36 Instruments and Controls
Care of the HUD
Clean the inside of the windshield to
remove any dirt or film that could
reduce the sharpness or clarity of
the HUD image.
Clean the HUD lens with a soft cloth
sprayed with glass cleaner. Wipe
the lens gently, then dry it.
HUD Troubleshooting
Check that:
.Nothing is covering the
HUD lens.
.HUD brightness setting is not
too dim or too bright.
.HUD is adjusted to the proper
height.
.Polarized sunglasses are
not worn.
.Windshield and HUD lens are
clean.
If the HUD image is not correct,
contact your dealer.
The windshield is part of the HUD
system. If the windshield needs
replacing, see Windshield
Replacement on page 10-29.
Vehicle Messages
Messages displayed on the DIC
indicate the status of the vehicle or
some action that may be needed to
correct a condition. Multiple
messages may display one after the
other.
The messages that do not require
immediate action can be
acknowledged and cleared by
pressing SEL. The messages that
require immediate action cannot be
cleared until that action is
performed. All messages should be
taken seriously and clearing the
messages does not correct the
problem.
The following are some of the
vehicle messages that may be
displayed depending on the vehicle
content.
Page 249 of 400

Black plate (57,1)Cadillac CTS Owner Manual (GMNA-Localizing-U.S./Canada/Mexico-
6081492) - 2014 - CRC 2nd Edition - 11/18/13
Driving and Operating 9-57
Warning (Continued)
check mirrors, glance over your
shoulder, and use the turn
signals.
SBZA Detection Zones
The SBZA sensor covers a zone of
approximately one lane over from
both sides of the vehicle, or 3.5 m
(11 ft). The height of the zone is
approximately between 0.5 m (1.5 ft)
and 2 m (6 ft) off the ground. This zone starts at approximately the
middle of the vehicle and goes back
5 m (16 ft).
How the System Works
The SBZA symbol lights up in the
side mirrors when the system
detects a vehicle in the next lane
over that is in the side blind zone.
This indicates it may be unsafe to
change lanes. Before making a lane
change, check the SBZA display,
check mirrors, glance over your
shoulder, and use the turn signals.
Left Side Mirror
DisplayRight Side Mirror Display
When the vehicle is started, both
outside mirror SBZA displays will
briefly come on to indicate the
system is operating. When the
vehicle is moving forward, the left- or right-side mirror display will light
up if a vehicle is detected in that
blind zone. If the turn signal is
activated in the same direction of a
detected vehicle, this display will
flash as an extra warning not to
change lanes.
SBZA can be disabled through
vehicle personalization. See
“Collision/Detection Systems”
under
Vehicle Personalization on
page 5-48. If SBZA is disabled by
the driver, the SBZA mirror displays
will not light up.
When the System Does Not
Seem to Work Properly
SBZA displays may not come on
when passing a vehicle quickly or
when towing a trailer. The SBZA
detection zones that extend back
from the side of the vehicle do not
move further back when a trailer is
towed. Use caution while changing
lanes when towing a trailer. SBZA
may alert to objects attached to the
vehicle, such as a trailer, bicycle,
or object extending out to either side