warning CADILLAC CTS 2014 Owner's Manual
[x] Cancel search | Manufacturer: CADILLAC, Model Year: 2014, Model line: CTS, Model: CADILLAC CTS 2014Pages: 400, PDF Size: 4.53 MB
Page 289 of 400

Black plate (27,1)Cadillac CTS Owner Manual (GMNA-Localizing-U.S./Canada/Mexico-
6081492) - 2014 - CRC 2nd Edition - 11/18/13
Vehicle Care 10-27
2. Drain Plug
To get an accurate reading, the
vehicle should be on a level
surface.
If the level is below the bottom of
the fill plug hole, on the transfer
case, some lubricant will need to be
added. Add enough lubricant to
raise the level to the bottom of the
fill plug hole. Use care not to
overtighten the fill plug.
What to Use
Refer to the Maintenance Schedule
to determine what kind of lubricant
to use. SeeRecommended Fluids
and Lubricants on page 11-13.
Starter Switch Check
{Warning
When you are doing this
inspection, the vehicle could
move suddenly. If the vehicle
moves, you or others could be
injured. 1. Before starting this check, be
sure there is enough room
around the vehicle.
2. Firmly apply both the parking brake and the regular brake.
See Electric Parking Brake on
page 9-28.
Do not use the accelerator
pedal, and be ready to turn off
the engine immediately if it
starts.
3. Try to start the engine in each gear. The vehicle should start
only in P (Park) or N (Neutral).
If the vehicle starts in any other
position, contact your dealer for
service.
Automatic Transmission
Shift Lock Control
Function Check
{Warning
When you are doing this
inspection, the vehicle could
move suddenly. If the vehicle
moves, you or others could be
injured.
1. Before starting this check, be sure there is enough room
around the vehicle. It should be
parked on a level surface.
2. Firmly apply the parking brake. See Electric Parking Brake on
page 9-28.
Be ready to apply the regular
brake immediately if the vehicle
begins to move.
3. With the engine off, turn the ignition on, but do not start the
engine. Without applying the
regular brake, try to move the
Page 290 of 400

Black plate (28,1)Cadillac CTS Owner Manual (GMNA-Localizing-U.S./Canada/Mexico-
6081492) - 2014 - CRC 2nd Edition - 11/21/13
10-28 Vehicle Care
shift lever out of P (Park) with
normal effort. If the shift lever
moves out of P (Park), contact
your dealer for service.
Park Brake and P (Park)
Mechanism Check
{Warning
When you are doing this check,
the vehicle could begin to move.
You or others could be injured
and property could be damaged.
Make sure there is room in front
of the vehicle in case it begins to
roll. Be ready to apply the regular
brake at once should the vehicle
begin to move.Park on a fairly steep hill, with the
vehicle facing downhill. Keeping
your foot on the regular brake, set
the parking brake.
.To check the parking brake's
holding ability: With the engine
running and the transmission in
N (Neutral), slowly remove foot
pressure from the regular brake
pedal. Do this until the vehicle is
held by the parking brake only.
.To check the P (Park)
mechanism's holding ability:
With the engine running, shift to
P (Park). Then release the
parking brake followed by the
regular brake.
Contact your dealer if service is
required.
Wiper Blade Replacement
Windshield wiper blades should be
inspected for wear and cracking. Replacement blades come in
different types and are removed in
different ways. For proper type and
length, see
Maintenance
Replacement Parts on page 11-14.
{Caution
Allowing the wiper arm to touch
the windshield when no wiper
blade is installed could damage
the windshield. Any damage that
occurs would not be covered by
your warranty. Do not allow the
wiper arm to touch the windshield.
To replace the windshield wiper
blade:
1. Pull the windshield wiper assembly away from the
windshield. The passenger side
wiper arm has limited travel.
Page 291 of 400
Black plate (29,1)Cadillac CTS Owner Manual (GMNA-Localizing-U.S./Canada/Mexico-
6081492) - 2014 - CRC 2nd Edition - 11/18/13
Vehicle Care 10-29
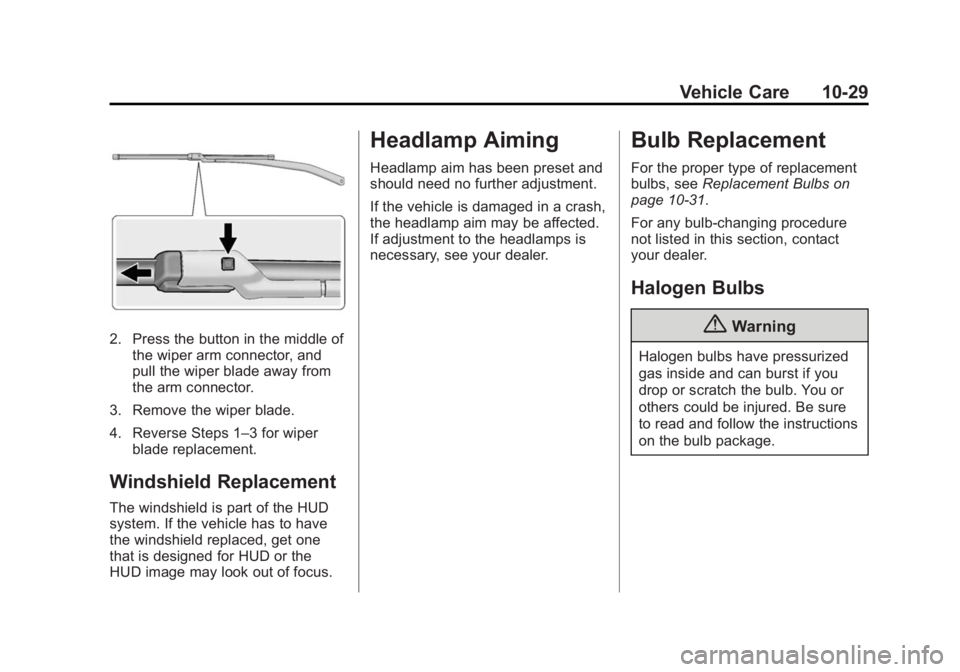
2. Press the button in the middle ofthe wiper arm connector, and
pull the wiper blade away from
the arm connector.
3. Remove the wiper blade.
4. Reverse Steps 1–3 for wiper blade replacement.
Windshield Replacement
The windshield is part of the HUD
system. If the vehicle has to have
the windshield replaced, get one
that is designed for HUD or the
HUD image may look out of focus.
Headlamp Aiming
Headlamp aim has been preset and
should need no further adjustment.
If the vehicle is damaged in a crash,
the headlamp aim may be affected.
If adjustment to the headlamps is
necessary, see your dealer.
Bulb Replacement
For the proper type of replacement
bulbs, see Replacement Bulbs on
page 10-31.
For any bulb‐changing procedure
not listed in this section, contact
your dealer.
Halogen Bulbs
{Warning
Halogen bulbs have pressurized
gas inside and can burst if you
drop or scratch the bulb. You or
others could be injured. Be sure
to read and follow the instructions
on the bulb package.
Page 292 of 400
Black plate (30,1)Cadillac CTS Owner Manual (GMNA-Localizing-U.S./Canada/Mexico-
6081492) - 2014 - CRC 2nd Edition - 11/18/13
10-30 Vehicle Care
High Intensity Discharge
(HID) Lighting
{Warning
The high intensity discharge
lighting system operates at a very
high voltage. If you try to service
any of the system components,
you could be seriously injured.
Have your dealer or a qualified
technician service them.
After an HID headlamp bulb has
been replaced, the beam might be a
slightly different shade than it was
originally. This is normal.
LED Lighting
This vehicle has several LED lamps.
For replacement of any LED lighting
assembly, contact your dealer.
License Plate Lamp
Lamp Assembly
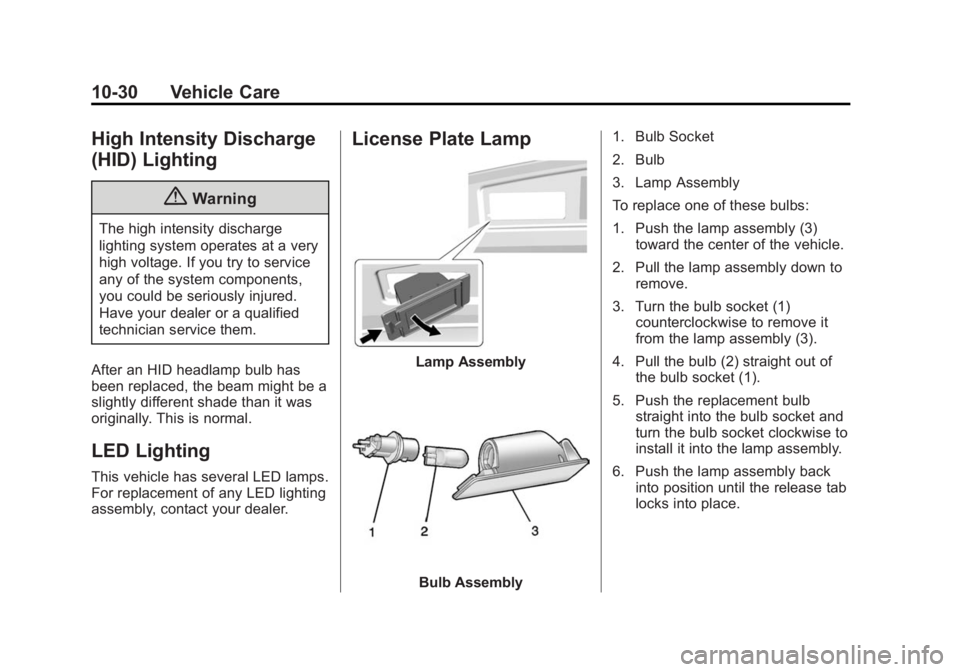
Bulb Assembly 1. Bulb Socket
2. Bulb
3. Lamp Assembly
To replace one of these bulbs:
1. Push the lamp assembly (3)
toward the center of the vehicle.
2. Pull the lamp assembly down to remove.
3. Turn the bulb socket (1) counterclockwise to remove it
from the lamp assembly (3).
4. Pull the bulb (2) straight out of the bulb socket (1).
5. Push the replacement bulb straight into the bulb socket and
turn the bulb socket clockwise to
install it into the lamp assembly.
6. Push the lamp assembly back into position until the release tab
locks into place.
Page 302 of 400
Black plate (40,1)Cadillac CTS Owner Manual (GMNA-Localizing-U.S./Canada/Mexico-
6081492) - 2014 - CRC 2nd Edition - 11/18/13
10-40 Vehicle Care
Number Usage40 Not Used
41 Not Used
*42 Memory Seat Module
43 Body Control Module 3
44 Not Used
45 Battery Regulated Voltage Control
46 Engine Control Module Battery
47 Not Used
48 Not Used
*49 Trailer Module 50 Door Lock Security
51 Rear Closure Release
52 Not Used
53 Not Used
54 Door Lock Security Number Usage
55 Not Used
*56 Fuel Door
* OptionalWheels and Tires
Tires
Every new GM vehicle has
high-quality tires made by a
leading tire manufacturer. See
the warranty manual for
information regarding the tire
warranty and where to get
service. For additional
information refer to the tire
manufacturer.
{Warning
.Poorly maintained and
improperly used tires are
dangerous.
.Overloading the tires can
cause overheating as a
result of too much flexing.
There could be a blowout
(Continued)
Page 303 of 400
Black plate (41,1)Cadillac CTS Owner Manual (GMNA-Localizing-U.S./Canada/Mexico-
6081492) - 2014 - CRC 2nd Edition - 11/18/13
Vehicle Care 10-41
Warning (Continued)
and a serious crash. See
Vehicle Load Limits on
page 9-11.
.Underinflated tires pose
the same danger as
overloaded tires. The
resulting crash could
cause serious injury.
Check all tires frequently
to maintain the
recommended pressure.
Tire pressure should be
checked when the tires
are cold.
.Overinflated tires are more
likely to be cut, punctured,
or broken by a sudden
impact —such as when
hitting a pothole. Keep
tires at the recommended
pressure.
(Continued)
Warning (Continued)
.Worn or old tires can
cause a crash. If the tread
is badly worn,
replace them.
.Replace any tires that
have been damaged by
impacts with potholes,
curbs, etc.
.Improperly repaired tires
can cause a crash. Only
the dealer or an
authorized tire service
center should repair,
replace, dismount, and
mount the tires.
.Do not spin the tires in
excess of 56 km/h
(35 mph) on slippery
surfaces such as snow,
mud, ice, etc. Excessive
spinning may cause the
tires to explode. See
Tire Pressure for
High-Speed Operation on
page 10-50 for inflation pressure
adjustment for high-speed
driving.
All-Season Tires
This vehicle may come with
all-season tires. These tires are
designed to provide good overall
performance on most road surfaces
and weather conditions. Original
equipment tires designed to GM's
specific tire performance criteria
have a TPC specification code
molded onto the sidewall. Original
equipment all-season tires can be
identified by the last two characters
of this TPC code, which will
be “MS.”
Consider installing winter tires on
the vehicle if frequent driving on
snow or ice-covered roads is
expected. All-season tires provide
adequate performance for most
winter driving conditions, but they
may not offer the same level of
Page 304 of 400
Black plate (42,1)Cadillac CTS Owner Manual (GMNA-Localizing-U.S./Canada/Mexico-
6081492) - 2014 - CRC 2nd Edition - 11/18/13
10-42 Vehicle Care
traction or performance as winter
tires on snow or ice-covered roads.
SeeWinter Tires on page 10-42.
Winter Tires
This vehicle was not originally
equipped with winter tires. Winter
tires are designed for increased
traction on snow and ice-covered
roads. Consider installing winter
tires on the vehicle if frequent
driving on ice or snow covered
roads is expected. See your dealer
for details regarding winter tire
availability and proper tire selection.
Also, see Buying New Tires on
page 10-57.
With winter tires, there may be
decreased dry road traction,
increased road noise, and shorter
tread life. After changing to winter
tires, be alert for changes in vehicle
handling and braking.
If using winter tires:
.Use tires of the same brand and
tread type on all four wheel
positions.
.Use only radial ply tires of the
same size, load range, and
speed rating as the original
equipment tires.
Winter tires with the same speed
rating as the original equipment tires
may not be available for H, V, W, Y,
and ZR speed rated tires. If winter
tires with a lower speed rating are
chosen, never exceed the tire's
maximum speed capability.
Run-Flat Tires
This vehicle, when new, had run-flat
tires. There is no spare tire, no tire
changing equipment, and no place
to store a tire in the vehicle.
The vehicle also has a Tire
Pressure Monitor System (TPMS)
that indicates a loss of tire pressure
in any of the tires.
{Warning
If the low tire warning light
displays on the instrument cluster,
the handling capabilities will be
reduced during severe
maneuvers. Driving too fast could
cause loss of control and you or
others could be injured. Do not
drive over 90 km/h (55 mph) when
the low tire warning light is
displayed. Drive cautiously and
check the tire pressures as soon
as possible.
Run-flat tires can be driven on with
no air pressure. There is no need to
stop on the side of the road to
change the tire. Continue driving;
however, do not drive too far or too
fast. Driving on the tire may not be
possible if there is permanent
damage. To prevent permanent
damage, keep speed below 80 km/h
(50 mph). With a light load the
vehicle can be driven up to 100 km
(60 mi); with a moderate load 80 km
Page 312 of 400
Black plate (50,1)Cadillac CTS Owner Manual (GMNA-Localizing-U.S./Canada/Mexico-
6081492) - 2014 - CRC 2nd Edition - 11/18/13
10-50 Vehicle Care
of the tire valve to release air.
Re-check the tire pressure with
the tire gauge.
Return the valve caps on the
valve stems to keep out dirt and
moisture and prevent leaks.
Tire Pressure for
High-Speed Operation
{Warning
Driving at high speeds, 160 km/h
(100 mph) or higher, puts an
additional strain on tires.
Sustained high-speed driving
causes excessive heat buildup
and can cause sudden tire failure.
You could have a crash and you
or others could be killed. Some
high-speed rated tires require
inflation pressure adjustment for
high-speed operation. When
speed limits and road conditions
are such that a vehicle can be(Continued)
Warning (Continued)
driven at high speeds, make sure
the tires are rated for high-speed
operation, in excellent condition,
and set to the correct cold tire
inflation pressure for the
vehicle load.
Vehicles with P245/45R17 95V,
P245/40R18 93V, or 255/
35R19 96V size tires require
inflation pressure adjustment when
driving the vehicle at speeds of
160 km/h (100 mph) or higher. Set
the cold inflation pressure to
280 kPa (41 psi).
Vehicles with 245/40R18 93Y and
275/35R18 95Y size tires require
inflation pressure adjustment when
driving the vehicle at speeds of
160 km/h (100 mph) or higher. Set
the cold inflation pressure to
300 kPa (44 psi). Return the tires to the
recommended cold tire inflation
pressure when high-speed driving
has ended. See
Vehicle Load Limits
on page 9-11 andTire Pressure on
page 10-48.
Tire Pressure Monitor
System
The Tire Pressure Monitor System
(TPMS) uses radio and sensor
technology to check tire pressure
levels. The TPMS sensors monitor
the air pressure in your tires and
transmit tire pressure readings to a
receiver located in the vehicle.
Each tire, including the spare (if
provided), should be checked
monthly when cold and inflated to
the inflation pressure recommended
by the vehicle manufacturer on the
vehicle placard or tire inflation
pressure label. (If your vehicle has
tires of a different size than the size
indicated on the vehicle placard or
Page 314 of 400
Black plate (52,1)Cadillac CTS Owner Manual (GMNA-Localizing-U.S./Canada/Mexico-
6081492) - 2014 - CRC 2nd Edition - 11/18/13
10-52 Vehicle Care
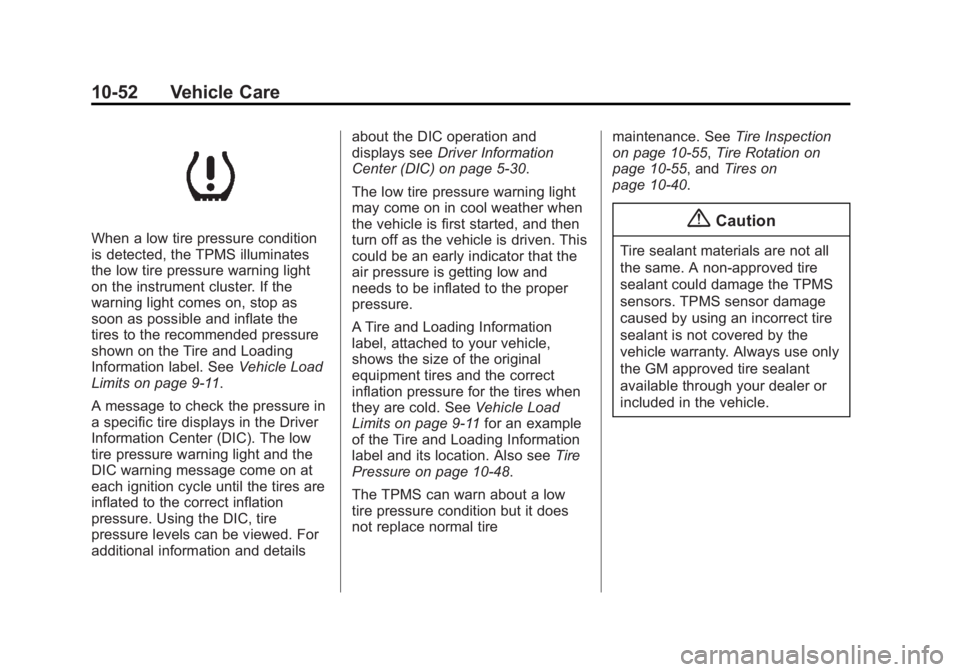
When a low tire pressure condition
is detected, the TPMS illuminates
the low tire pressure warning light
on the instrument cluster. If the
warning light comes on, stop as
soon as possible and inflate the
tires to the recommended pressure
shown on the Tire and Loading
Information label. SeeVehicle Load
Limits on page 9-11.
A message to check the pressure in
a specific tire displays in the Driver
Information Center (DIC). The low
tire pressure warning light and the
DIC warning message come on at
each ignition cycle until the tires are
inflated to the correct inflation
pressure. Using the DIC, tire
pressure levels can be viewed. For
additional information and details about the DIC operation and
displays see
Driver Information
Center (DIC) on page 5-30.
The low tire pressure warning light
may come on in cool weather when
the vehicle is first started, and then
turn off as the vehicle is driven. This
could be an early indicator that the
air pressure is getting low and
needs to be inflated to the proper
pressure.
A Tire and Loading Information
label, attached to your vehicle,
shows the size of the original
equipment tires and the correct
inflation pressure for the tires when
they are cold. See Vehicle Load
Limits on page 9-11 for an example
of the Tire and Loading Information
label and its location. Also see Tire
Pressure on page 10-48.
The TPMS can warn about a low
tire pressure condition but it does
not replace normal tire maintenance. See
Tire Inspection
on page 10-55, Tire Rotation on
page 10-55, and Tires on
page 10-40.{Caution
Tire sealant materials are not all
the same. A non-approved tire
sealant could damage the TPMS
sensors. TPMS sensor damage
caused by using an incorrect tire
sealant is not covered by the
vehicle warranty. Always use only
the GM approved tire sealant
available through your dealer or
included in the vehicle.
Page 315 of 400

Black plate (53,1)Cadillac CTS Owner Manual (GMNA-Localizing-U.S./Canada/Mexico-
6081492) - 2014 - CRC 2nd Edition - 11/18/13
Vehicle Care 10-53
TPMS Malfunction Light and
Message
The TPMS will not function properly
if one or more of the TPMS sensors
are missing or inoperable. When the
system detects a malfunction, the
low tire warning light flashes for
about one minute and then stays on
for the remainder of the ignition
cycle. A DIC warning message also
displays. The malfunction light and
DIC warning message come on at
each ignition cycle until the problem
is corrected. Some of the conditions
that can cause these to come
on are:
.One of the road tires has been
replaced with the spare tire. The
spare tire does not have a
TPMS sensor. The malfunction
light and DIC message should
go off after the road tire is
replaced and the sensor
matching process is performed
successfully. See“TPMS Sensor
Matching Process” later in this
section.
.The TPMS sensor matching
process was not done or not
completed successfully after
rotating the tires. The
malfunction light and the DIC
message should go off after
successfully completing the
sensor matching process. See
"TPMS Sensor Matching
Process" later in this section.
.One or more TPMS sensors are
missing or damaged. The
malfunction light and the DIC
message should go off when the
TPMS sensors are installed and
the sensor matching process is
performed successfully. See
your dealer for service.
.Replacement tires or wheels do
not match the original equipment
tires or wheels. Tires and wheels
other than those recommended
could prevent the TPMS from
functioning properly. See Buying
New Tires on page 10-57.
.Operating electronic devices or
being near facilities using radio
wave frequencies similar to the
TPMS could cause the TPMS
sensors to malfunction.
If the TPMS is not functioning
properly, it cannot detect or signal a
low tire condition. See your dealer
for service if the TPMS malfunction
light and DIC message come on
and stay on.
TPMS Sensor Matching
Process
Each TPMS sensor has a unique
identification code. The identification
code needs to be matched to a new
tire/wheel position after rotating the
vehicle’s tires or replacing one or
more of the TPMS sensors. The
TPMS sensor matching process
should also be performed after
replacing a spare tire with a road
tire containing the TPMS sensor.
The malfunction light and the DIC
message should go off at the next
ignition cycle. The sensors are
matched to the tire/wheel positions,