ignition CADILLAC CTS 2014 User Guide
[x] Cancel search | Manufacturer: CADILLAC, Model Year: 2014, Model line: CTS, Model: CADILLAC CTS 2014Pages: 400, PDF Size: 4.53 MB
Page 48 of 400

Black plate (20,1)Cadillac CTS Owner Manual (GMNA-Localizing-U.S./Canada/Mexico-
6081492) - 2014 - CRC 2nd Edition - 11/18/13
2-20 Keys, Doors, and Windows
Power Mirrors
Controls for the outside power
mirrors are on the driver door.
To adjust each mirror:
1. Press (L) or (R) to select thedriver or passenger side mirror.
2. Press the arrows on the control pad to move the mirror up,
down, right, or left.
3. Adjust each mirror so that a little of the vehicle and the area
behind it can be seen. 4. Press
Oto deselect the mirror.
Memory Mirrors
If equipped, the vehicle may have
memory mirrors. See
Memory Seats
on page 3-6.
Automatic Dimming
If equipped, the driver side mirror
automatically dims to reduce the
glare of the vehicle headlamps from
behind. This feature comes on when
the vehicle is started.
Folding Mirrors
Manual Folding Mirrors
The mirrors can be folded inward
toward the vehicle to prevent
damage when going through an
automatic car wash. Push the mirror
outward to return it to the original
position.
Heated Mirrors
=
(Rear Window Defogger):
If equipped, press to heat the
mirrors.
See Dual Automatic Climate Control
System on page 8-1.
Reverse Tilt Mirrors
The passenger and/or driver mirror
tilt to a preselected position when
the vehicle is in R (Reverse). This
feature allows the driver to view the
curb when parallel parking. The
mirror returns to the original position
when the vehicle is shifted out of
R (Reverse), the ignition is turned
off or to OFF/LOCK, or if the vehicle
is driven in reverse above a
predetermined speed.
Turn this feature on or off through
vehicle personalization. See Vehicle
Personalization on page 5-48.
Page 50 of 400
Black plate (22,1)Cadillac CTS Owner Manual (GMNA-Localizing-U.S./Canada/Mexico-
6081492) - 2014 - CRC 2nd Edition - 11/18/13
2-22 Keys, Doors, and Windows
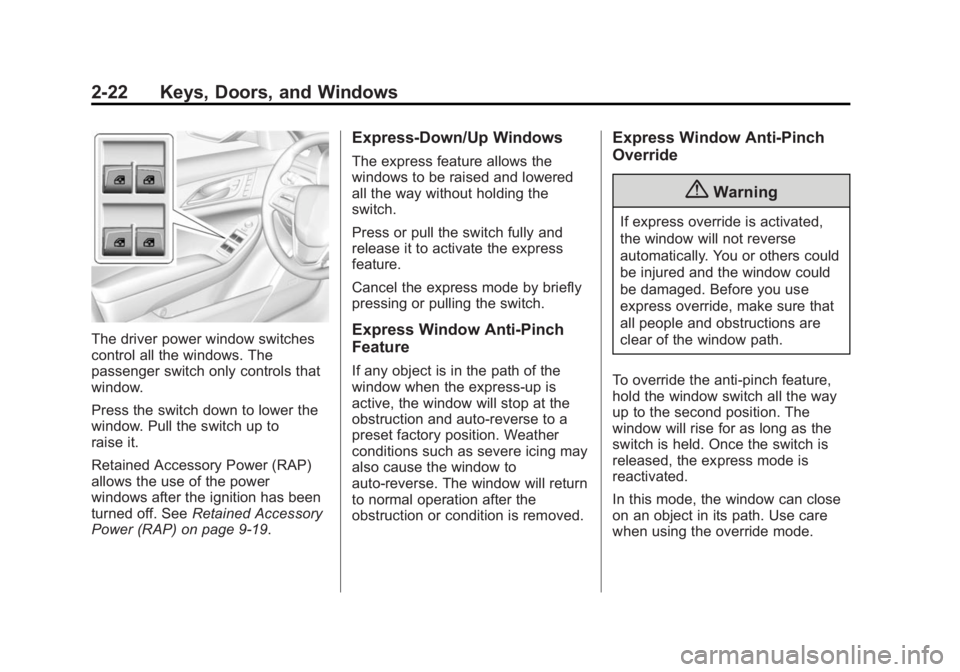
The driver power window switches
control all the windows. The
passenger switch only controls that
window.
Press the switch down to lower the
window. Pull the switch up to
raise it.
Retained Accessory Power (RAP)
allows the use of the power
windows after the ignition has been
turned off. SeeRetained Accessory
Power (RAP) on page 9-19.
Express-Down/Up Windows
The express feature allows the
windows to be raised and lowered
all the way without holding the
switch.
Press or pull the switch fully and
release it to activate the express
feature.
Cancel the express mode by briefly
pressing or pulling the switch.
Express Window Anti-Pinch
Feature
If any object is in the path of the
window when the express-up is
active, the window will stop at the
obstruction and auto-reverse to a
preset factory position. Weather
conditions such as severe icing may
also cause the window to
auto-reverse. The window will return
to normal operation after the
obstruction or condition is removed.
Express Window Anti-Pinch
Override
{Warning
If express override is activated,
the window will not reverse
automatically. You or others could
be injured and the window could
be damaged. Before you use
express override, make sure that
all people and obstructions are
clear of the window path.
To override the anti-pinch feature,
hold the window switch all the way
up to the second position. The
window will rise for as long as the
switch is held. Once the switch is
released, the express mode is
reactivated.
In this mode, the window can close
on an object in its path. Use care
when using the override mode.
Page 51 of 400
Black plate (23,1)Cadillac CTS Owner Manual (GMNA-Localizing-U.S./Canada/Mexico-
6081492) - 2014 - CRC 2nd Edition - 11/18/13
Keys, Doors, and Windows 2-23
Programming the Power
Windows
If the vehicle battery has been
recharged or disconnected, or is not
working, the front power windows
will need to be reprogrammed for
the express-up feature to work.
Before reprogramming, replace or
recharge the vehicle's battery.
To program:
1. With the ignition in ON/RUN orACC/ACCESSORY, or when
Retained Accessory Power
(RAP) is active, close all doors.
2. Press and hold the power window switch until the window
is fully open.
3. Pull the power window switch up until the window is fully closed.
4. Continue holding the switch up for approximately two seconds
after the window is completely
closed. The window is now reprogrammed.
Repeat the process for the other
windows.
Comfort Open
To open the windows remotely,
press and hold
Kon the RKE
transmitter until the windows
fully open.
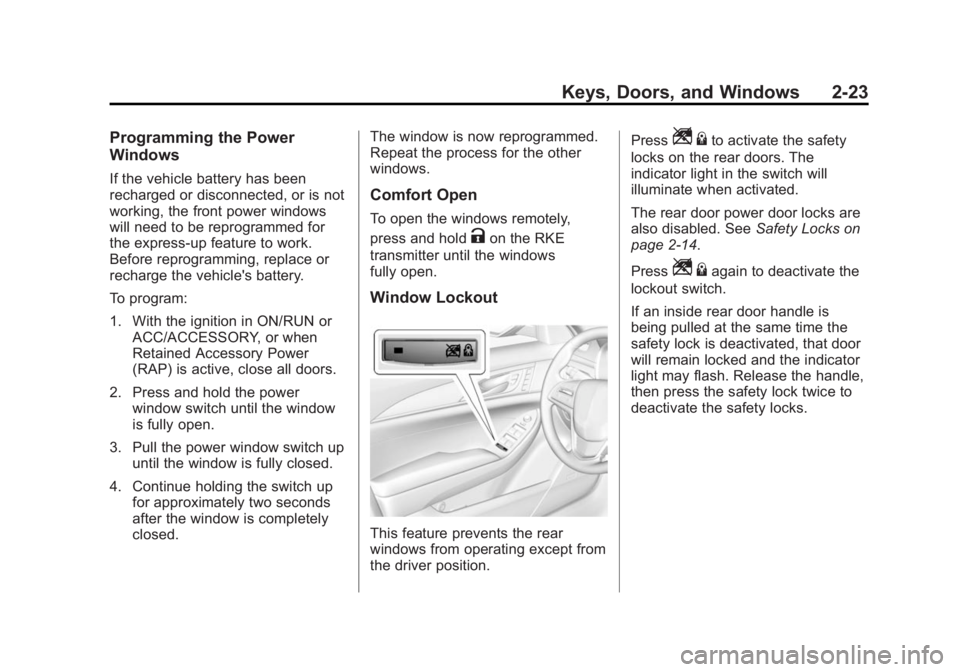
Window Lockout
This feature prevents the rear
windows from operating except from
the driver position. Press
Z
{to activate the safety
locks on the rear doors. The
indicator light in the switch will
illuminate when activated.
The rear door power door locks are
also disabled. See Safety Locks on
page 2-14.
Press
Z {again to deactivate the
lockout switch.
If an inside rear door handle is
being pulled at the same time the
safety lock is deactivated, that door
will remain locked and the indicator
light may flash. Release the handle,
then press the safety lock twice to
deactivate the safety locks.
Page 52 of 400

Black plate (24,1)Cadillac CTS Owner Manual (GMNA-Localizing-U.S./Canada/Mexico-
6081492) - 2014 - CRC 2nd Edition - 11/18/13
2-24 Keys, Doors, and Windows
Sun Visors
Pull the sun visor down to block
glare. If equipped, detach the sun
visor from the center mount to pivot
to the side window or to extend
along the rod.
Rear Window Sunshade
If equipped with a rear window
sunshade, the switch is on the
overhead console. The sunshade
only operates with the ignition in
ON/RUN/START.
To open the sunshade, press and
release the switch. The sunshade
will fully extend. To close the
sunshade, press and release the
switch again. The sunshade will fully
close.If the vehicle is shifted into
R (Reverse) when the sunshade is
extended, it will automatically close.
When the vehicle is shifted into D
(Drive), the sunshade will not
automatically extend. Press and
release the switch to extend the
sunshade.
Rear Passenger Door Sunshades
If equipped, use the handle to pull
the sunshade up and attach to the
holder at the top of the window.
There is also a small shade for the
rear corner of the window.
Page 53 of 400
Black plate (25,1)Cadillac CTS Owner Manual (GMNA-Localizing-U.S./Canada/Mexico-
6081492) - 2014 - CRC 2nd Edition - 11/18/13
Keys, Doors, and Windows 2-25
To close the sunshade, use the
handle to unhook and hold it while it
retracts down.Roof
Sunroof
If equipped, the sunroof will only
operate when the ignition is in ON/
RUN or ACC/ACCESSORY,
or when Retained Accessory Power
(RAP) is active. SeeRetained
Accessory Power (RAP) on
page 9-19.
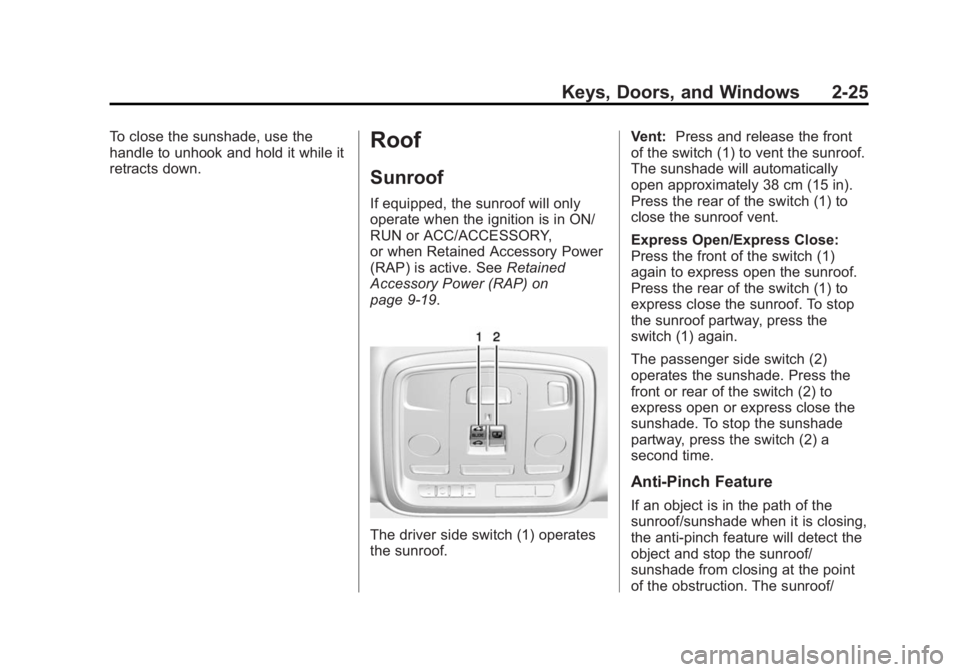
The driver side switch (1) operates
the sunroof. Vent:
Press and release the front
of the switch (1) to vent the sunroof.
The sunshade will automatically
open approximately 38 cm (15 in).
Press the rear of the switch (1) to
close the sunroof vent.
Express Open/Express Close:
Press the front of the switch (1)
again to express open the sunroof.
Press the rear of the switch (1) to
express close the sunroof. To stop
the sunroof partway, press the
switch (1) again.
The passenger side switch (2)
operates the sunshade. Press the
front or rear of the switch (2) to
express open or express close the
sunshade. To stop the sunshade
partway, press the switch (2) a
second time.
Anti-Pinch Feature
If an object is in the path of the
sunroof/sunshade when it is closing,
the anti-pinch feature will detect the
object and stop the sunroof/
sunshade from closing at the point
of the obstruction. The sunroof/
Page 61 of 400

Black plate (7,1)Cadillac CTS Owner Manual (GMNA-Localizing-U.S./Canada/Mexico-
6081492) - 2014 - CRC 2nd Edition - 11/18/13
Seats and Restraints 3-7
Manually Recalling Memory
Positions
If the vehicle is OFF or not in
P (Park), press and hold "1," "2," or
Bto manually recall the previously
stored memory positions. Releasing
"1,” "2," or
Bbefore the stored
positions are reached stops the
recall.
If the vehicle is ON and in P (Park),
press and release “1,” “2,”or
Bto
manually recall the previously
stored memory positions. Placing
the ignition in OFF before the stored
positions are reached stops the
recall.
If something has blocked the driver
seat and/or power tilt and
telescoping steering column (if
equipped) while recalling a memory
position, the recall may stop.
Remove the obstruction; then press
and hold the appropriate manual
control for the memory item that is
not recalling for two seconds. Try
recalling the memory position again
by pressing the appropriate memory button. If the memory position is still
not recalling, see your dealer for
service.
Automatically Recalling Memory
Positions
The Auto (Automatic) Memory
Recall feature automatically recalls
the current driver
’s previously stored
“1” or“2” position when entering the
vehicle.
Depending upon the Auto Memory
Recall feature enabled in the vehicle
personalization menu, memory “1”
or “2” positions are recalled in the
following ways:
To activate the recall when On -
Driver Door Open is selected in the
vehicle personalization menu:
.PressKon the RKE transmitter
and open the driver door.
.PressKon the RKE transmitter
when the driver door is
already open.
.Press the lock/unlock button on
the outside driver door handle
and open the driver door. The
RKE transmitter must be present
for the recall to activate.
To activate the recall when On - At
Ignition On is selected in the vehicle
personalization menu:
.Place the ignition in ON/RUN/
START.
See Vehicle Personalization on
page 5-48.
To stop recall movement, press one
of the memory, power mirror,
or power seat controls; or press the
power tilt and telescoping steering
column control (if equipped). If On -
At Ignition On is selected in the
vehicle personalization menu,
placing the ignition in OFF also
stops the recall.
If something has blocked the driver
seat and/or the power tilt and
telescoping steering column while
recalling a memory position, the
recall may stop. Remove the
obstruction; then press and hold the
Page 63 of 400
Black plate (9,1)Cadillac CTS Owner Manual (GMNA-Localizing-U.S./Canada/Mexico-
6081492) - 2014 - CRC 2nd Edition - 11/18/13
Seats and Restraints 3-9
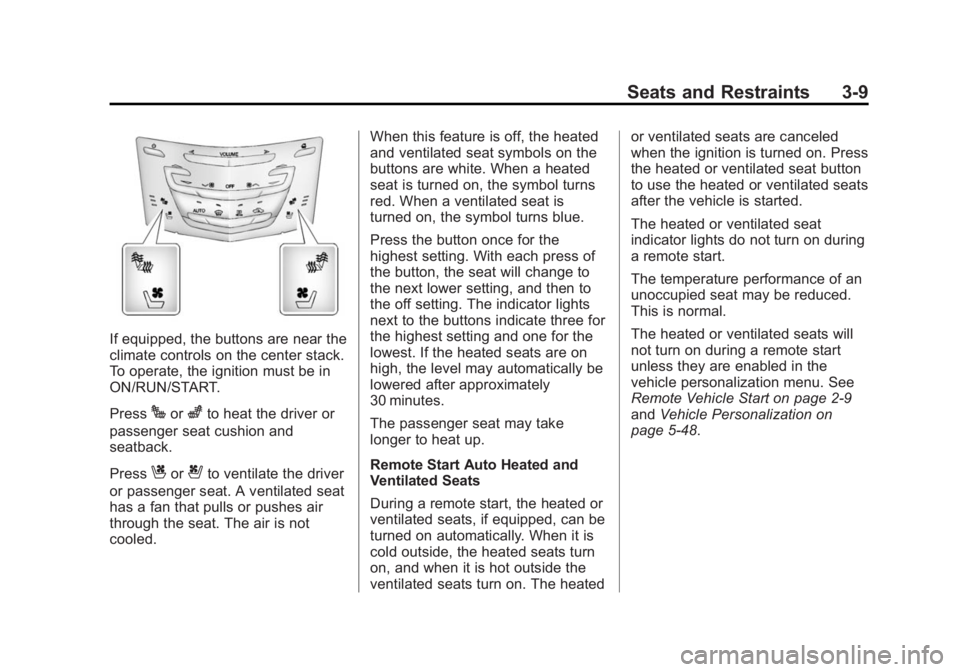
If equipped, the buttons are near the
climate controls on the center stack.
To operate, the ignition must be in
ON/RUN/START.
Press
Jorzto heat the driver or
passenger seat cushion and
seatback.
Press
Cor{to ventilate the driver
or passenger seat. A ventilated seat
has a fan that pulls or pushes air
through the seat. The air is not
cooled. When this feature is off, the heated
and ventilated seat symbols on the
buttons are white. When a heated
seat is turned on, the symbol turns
red. When a ventilated seat is
turned on, the symbol turns blue.
Press the button once for the
highest setting. With each press of
the button, the seat will change to
the next lower setting, and then to
the off setting. The indicator lights
next to the buttons indicate three for
the highest setting and one for the
lowest. If the heated seats are on
high, the level may automatically be
lowered after approximately
30 minutes.
The passenger seat may take
longer to heat up.
Remote Start Auto Heated and
Ventilated Seats
During a remote start, the heated or
ventilated seats, if equipped, can be
turned on automatically. When it is
cold outside, the heated seats turn
on, and when it is hot outside the
ventilated seats turn on. The heatedor ventilated seats are canceled
when the ignition is turned on. Press
the heated or ventilated seat button
to use the heated or ventilated seats
after the vehicle is started.
The heated or ventilated seat
indicator lights do not turn on during
a remote start.
The temperature performance of an
unoccupied seat may be reduced.
This is normal.
The heated or ventilated seats will
not turn on during a remote start
unless they are enabled in the
vehicle personalization menu. See
Remote Vehicle Start on page 2-9
and
Vehicle Personalization on
page 5-48.
Page 66 of 400
Black plate (12,1)Cadillac CTS Owner Manual (GMNA-Localizing-U.S./Canada/Mexico-
6081492) - 2014 - CRC 2nd Edition - 11/18/13
3-12 Seats and Restraints
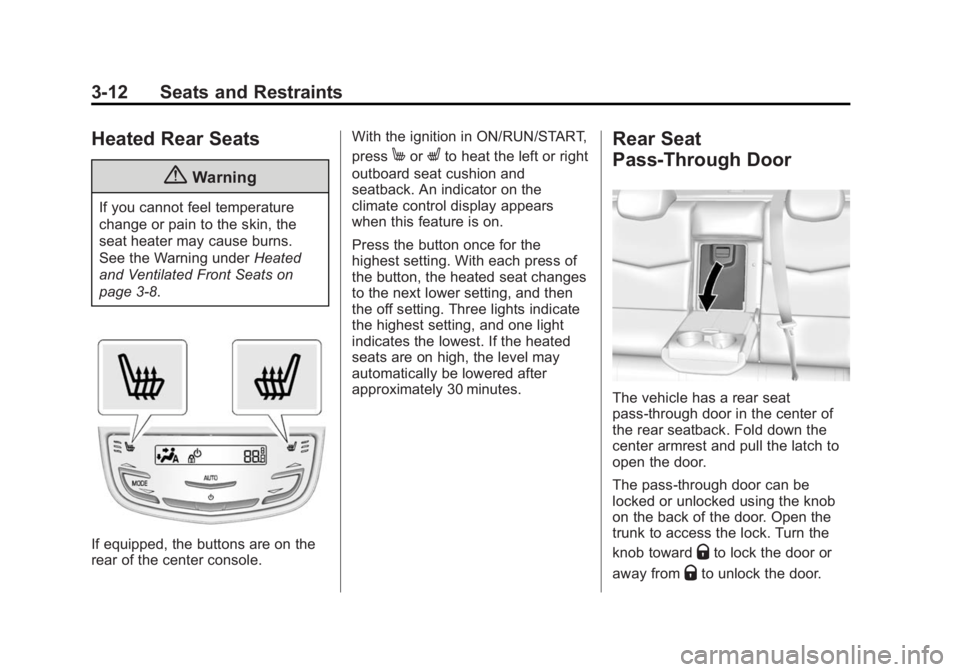
Heated Rear Seats
{Warning
If you cannot feel temperature
change or pain to the skin, the
seat heater may cause burns.
See the Warning underHeated
and Ventilated Front Seats on
page 3-8.
If equipped, the buttons are on the
rear of the center console. With the ignition in ON/RUN/START,
press
MorLto heat the left or right
outboard seat cushion and
seatback. An indicator on the
climate control display appears
when this feature is on.
Press the button once for the
highest setting. With each press of
the button, the heated seat changes
to the next lower setting, and then
the off setting. Three lights indicate
the highest setting, and one light
indicates the lowest. If the heated
seats are on high, the level may
automatically be lowered after
approximately 30 minutes.Rear Seat
Pass-Through Door
The vehicle has a rear seat
pass-through door in the center of
the rear seatback. Fold down the
center armrest and pull the latch to
open the door.
The pass-through door can be
locked or unlocked using the knob
on the back of the door. Open the
trunk to access the lock. Turn the
knob toward
Qto lock the door or
away from
Qto unlock the door.
Page 115 of 400

Black plate (3,1)Cadillac CTS Owner Manual (GMNA-Localizing-U.S./Canada/Mexico-
6081492) - 2014 - CRC 2nd Edition - 11/18/13
Instruments and Controls 5-3
To set the power tilt wheel memory
position, seeMemory Seats on
page 3-6.
Steering Wheel Controls
The infotainment system can be
operated by using the steering
wheel controls. See "Steering
Wheel Controls" in the infotainment
manual.
Heated Steering Wheel
((Heated Steering Wheel, If
Equipped): Press to turn the
heated steering wheel on or off.
A light next to the button displays
when the feature is turned on. The steering wheel takes about
three minutes to be fully heated.
Horn
Pressaon the steering wheel pad
to sound the horn.
Windshield Wiper/Washer
With the ignition in ACC/
ACCESSORY or ON/RUN/START,
move the windshield wiper lever to
select the wiper speed.
HI: Use for fast wipes.
LO: Use for slow wipes.
INT (Intermittent Wipes): Move
the lever up to INT for intermittent
wipes, then turn the
xINT band
up for more frequent wipes or down
for less frequent wipes.
If the windshield wipers are in use
for about six seconds while driving,
the exterior lamps come on
automatically if the exterior lamp
control is in AUTO. See
“Wiper-Activated Headlamps” later
in this section.
OFF: Use to turn the wipers off.
1X (Mist): For a single wipe, briefly
move the wiper lever down. For
several wipes, hold the wiper
lever down.
Page 116 of 400

Black plate (4,1)Cadillac CTS Owner Manual (GMNA-Localizing-U.S./Canada/Mexico-
6081492) - 2014 - CRC 2nd Edition - 11/18/13
5-4 Instruments and Controls
Clear snow and ice from the wiper
blades and windshield before using
them. If frozen to the windshield,
carefully loosen or thaw them.
Damaged blades should be
replaced. SeeWiper Blade
Replacement on page 10-28.
Heavy snow or ice can overload the
wiper motor. See Electrical System
Overload on page 10-31.
Wiper Parking
When using intermittent or
Rainsense™ wipes, the wipers
pause briefly on the windshield.
If the wiper lever is moved to OFF
or if Rainsense and additional wipes
are not required, the wipers may
move to the base of the windshield.
If the ignition is put in OFF while the
wipers are on LO, HI, or INT, they
will immediately stop.
If the windshield wiper lever is then
moved to OFF before the driver
door is opened or within 10 minutes,
the wipers will restart and move to
the base of the windshield. If the ignition is put in OFF while the
wipers are performing wipes due to
windshield washing or Rainsense
wipes, the wipers continue to run
until they reach the base of the
windshield.
Rainsense
If equipped with Rainsense, a
sensor near the top center of the
windshield detects the amount of
water on the windshield and
controls the frequency of the
windshield wiper.
Keep this area of the windshield
clear of debris to allow for best
system performance.
INT (Rainsense Wipe Sensitivity
Control):
Move the windshield
wiper lever to INT. Turn the
xINT
band on the wiper lever to adjust the
sensitivity.
.Turn the band up for more
sensitivity to moisture.
.Turn the band down for less
sensitivity to moisture.
.Move the windshield wiper lever
out of the INT position to
deactivate Rainsense.
This feature can be changed. See
“Comfort and Convenience” under
Vehicle Personalization on
page 5-48.
Wiper Arm Assembly Protection
When using an automatic car wash,
move the windshield wiper lever to
OFF. This disables the automatic
Rainsense windshield wipers.