key CADILLAC CTS 2014 Owner's Guide
[x] Cancel search | Manufacturer: CADILLAC, Model Year: 2014, Model line: CTS, Model: CADILLAC CTS 2014Pages: 400, PDF Size: 4.53 MB
Page 54 of 400

Black plate (26,1)Cadillac CTS Owner Manual (GMNA-Localizing-U.S./Canada/Mexico-
6081492) - 2014 - CRC 2nd Edition - 11/18/13
2-26 Keys, Doors, and Windows
sunshade will then return to the
full-open position. To close the
sunroof/sunshade, see“Express
Open/Express Close.”
Dirt and debris may collect on the
sunroof seal or in the track. This
could cause an issue with sunroof operation or noise. It could also plug
the water drainage system.
Periodically open the sunroof and
remove any obstacles or loose
debris. Wipe the sunroof seal and
roof sealing area using a clean
cloth, mild soap, and water. Do not
remove grease from the sunroof.
If water is seen dripping into the
water drainage system, this is
normal.
Page 64 of 400

Black plate (10,1)Cadillac CTS Owner Manual (GMNA-Localizing-U.S./Canada/Mexico-
6081492) - 2014 - CRC 2nd Edition - 11/18/13
3-10 Seats and Restraints
Rear Seats
Split fold seats are equipped with a
locking latch.
Lock and unlock the seatback using
the vehicle key in the cylinder.
The latch will not open when the
seatback is locked.
Folding the Seatback
{Caution
Folding a rear seat with the safety
belts still fastened may cause
damage to the seat or the safety
belts. Always unbuckle the safety
belts and return them to their
normal stowed position before
folding a rear seat.
If equipped, either side of the
seatback can be folded for more
cargo space. Fold a seatback only
when the vehicle is not moving. To fold the seatback:
1. Disconnect the rear safety belt
mini-latch using a key in the slot
on the mini-buckle, and let the
belt retract.
Page 65 of 400
Black plate (11,1)Cadillac CTS Owner Manual (GMNA-Localizing-U.S./Canada/Mexico-
6081492) - 2014 - CRC 2nd Edition - 11/18/13
Seats and Restraints 3-11
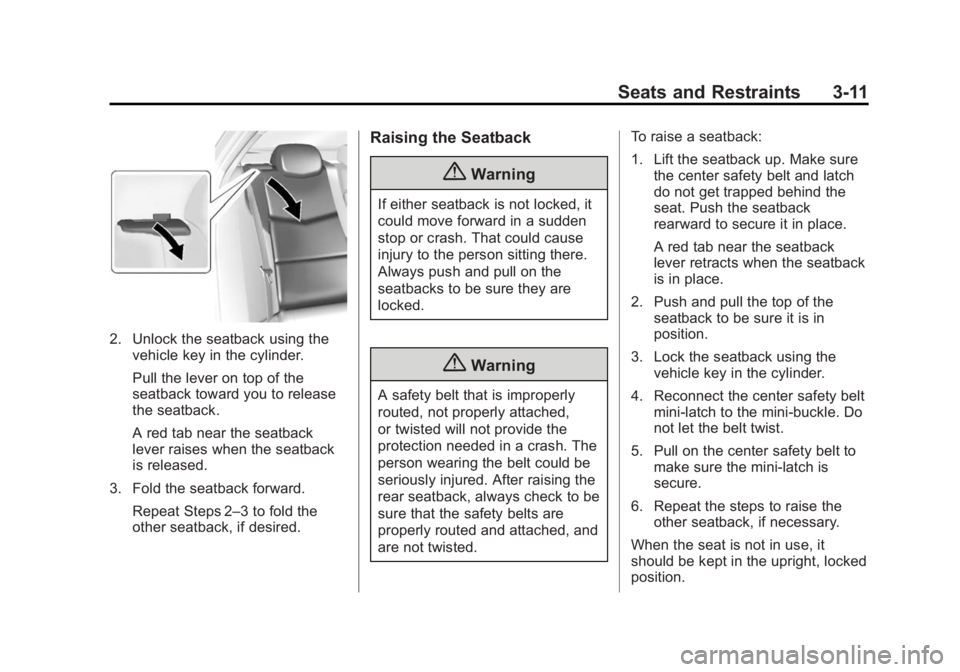
2. Unlock the seatback using thevehicle key in the cylinder.
Pull the lever on top of the
seatback toward you to release
the seatback.
A red tab near the seatback
lever raises when the seatback
is released.
3. Fold the seatback forward. Repeat Steps 2–3 to fold the
other seatback, if desired.
Raising the Seatback
{Warning
If either seatback is not locked, it
could move forward in a sudden
stop or crash. That could cause
injury to the person sitting there.
Always push and pull on the
seatbacks to be sure they are
locked.
{Warning
A safety belt that is improperly
routed, not properly attached,
or twisted will not provide the
protection needed in a crash. The
person wearing the belt could be
seriously injured. After raising the
rear seatback, always check to be
sure that the safety belts are
properly routed and attached, and
are not twisted. To raise a seatback:
1. Lift the seatback up. Make sure
the center safety belt and latch
do not get trapped behind the
seat. Push the seatback
rearward to secure it in place.
A red tab near the seatback
lever retracts when the seatback
is in place.
2. Push and pull the top of the seatback to be sure it is in
position.
3. Lock the seatback using the vehicle key in the cylinder.
4. Reconnect the center safety belt mini-latch to the mini-buckle. Do
not let the belt twist.
5. Pull on the center safety belt to make sure the mini-latch is
secure.
6. Repeat the steps to raise the other seatback, if necessary.
When the seat is not in use, it
should be kept in the upright, locked
position.
Page 74 of 400

Black plate (20,1)Cadillac CTS Owner Manual (GMNA-Localizing-U.S./Canada/Mexico-
6081492) - 2014 - CRC 2nd Edition - 11/18/13
3-20 Seats and Restraints
To remove and store the comfort
guide, squeeze the belt edges
together so that the safety belt can
be removed from the guide. Store
the guide in its storage pocket on
the side of the seatback.
Safety Belt Use During
Pregnancy
Safety belts work for everyone,
including pregnant women. Like all
occupants, they are more likely to
be seriously injured if they do not
wear safety belts.
A pregnant woman should wear a
lap-shoulder belt, and the lap
portion should be worn as low as
possible, below the rounding,
throughout the pregnancy.
The best way to protect the fetus is
to protect the mother. When a safety
belt is worn properly, it is more likely
that the fetus will not be hurt in a
crash. For pregnant women, as for
anyone, the key to making safety
belts effective is wearing them
properly.
Safety Belt Extender
If the vehicle's safety belt will fasten
around you, you should use it.
But if a safety belt is not long
enough, your dealer will order you
an extender. When you go in to
order it, take the heaviest coat you
will wear, so the extender will be
long enough for you. To help avoid
personal injury, do not let someone
else use it, and use it only for the
seat it is made to fit. The extender
has been designed for adults. Neveruse it for securing child seats. To
wear it, attach it to the regular safety
belt. See the instruction sheet that
comes with the extender.
Safety System Check
Now and then, check that the safety
belt reminder light, safety belts,
buckles, latch plates, retractors, and
anchorages are all working properly.
Look for any other loose or
damaged safety belt system parts
that might keep a safety belt system
from doing its job. See your dealer
to have it repaired. Torn or frayed
safety belts may not protect you in a
crash. They can rip apart under
impact forces. If a belt is torn or
frayed, get a new one right away.
Make sure the safety belt reminder
light is working. See
Safety Belt
Reminders on page 5-17.
Keep safety belts clean and dry.
See Safety Belt Care on page 3-21.
Page 113 of 400
Black plate (1,1)Cadillac CTS Owner Manual (GMNA-Localizing-U.S./Canada/Mexico-
6081492) - 2014 - CRC 2nd Edition - 11/18/13
Instruments and Controls 5-1
Instruments and
Controls
Controls
Steering Wheel Adjustment . . . 5-2
Steering Wheel Controls . . . . . . 5-3
Heated Steering Wheel . . . . . . . 5-3
Horn . . . . . . . . . . . . . . . . . . . . . . . . . . 5-3
Windshield Wiper/Washer . . . . . 5-3
Compass . . . . . . . . . . . . . . . . . . . . . 5-5
Clock . . . . . . . . . . . . . . . . . . . . . . . . . 5-5
Power Outlets . . . . . . . . . . . . . . . . . 5-6
Warning Lights, Gauges, and
Indicators
Warning Lights, Gauges, andIndicators . . . . . . . . . . . . . . . . . . . . 5-8
Instrument Cluster . . . . . . . . . . . 5-10
Speedometer . . . . . . . . . . . . . . . . 5-14
Odometer . . . . . . . . . . . . . . . . . . . . 5-14
Trip Odometer . . . . . . . . . . . . . . . 5-14
Tachometer . . . . . . . . . . . . . . . . . . 5-14
Fuel Gauge . . . . . . . . . . . . . . . . . . 5-15
Engine Coolant Temperature Gauge . . . . . . . . . . . . . . . . . . . . . . 5-16
Safety Belt Reminders . . . . . . . 5-17
Airbag Readiness Light . . . . . . 5-17 Passenger Airbag Status
Indicator . . . . . . . . . . . . . . . . . . . . 5-18
Charging System Light . . . . . . 5-19
Malfunction Indicator Lamp . . . . . . . . . . . . . 5-19
Brake System Warning Light . . . . . . . . . . . . . . . . . . . . . . . 5-22
Parking Brake Light . . . . . . . . . . 5-23
Service Electric Parking Brake Light . . . . . . . . . . . . . . . . . . . . . . . 5-23
Antilock Brake System (ABS) Warning Light . . . . . . . . . . . . . . 5-23
Lane Departure Warning (LDW) Light . . . . . . . . . . . . . . . . 5-24
Vehicle Ahead Indicator . . . . . . 5-24
Traction Off Light . . . . . . . . . . . . 5-25
StabiliTrak
®OFF Light . . . . . . . 5-25
Traction Control System (TCS)/StabiliTrak
®Light . . . . 5-25
Engine Coolant Temperature Warning Light . . . . . . . . . . . . . . 5-26
Tire Pressure Light . . . . . . . . . . 5-26
Engine Oil Pressure Light . . . . 5-27
Low Fuel Warning Light . . . . . . 5-27
Security Light . . . . . . . . . . . . . . . . 5-28
High-Beam On Light . . . . . . . . . 5-28
Adaptive Forward Lighting (AFL) Light . . . . . . . . . . . . . . . . . 5-28 Lamps On Reminder . . . . . . . . . 5-29
Cruise Control Light . . . . . . . . . 5-29
Door Ajar Light . . . . . . . . . . . . . . 5-29
Information Displays
Driver Information
Center (DIC) . . . . . . . . . . . . . . . 5-30
Head-Up Display (HUD) . . . . . 5-33
Vehicle Messages
Vehicle Messages . . . . . . . . . . . 5-36
Battery Voltage and Charging Messages . . . . . . . . . . . . . . . . . . 5-37
Brake System Messages . . . . 5-37
Compass Messages . . . . . . . . . 5-37
Cruise Control Messages . . . . 5-38
Door Ajar Messages . . . . . . . . . 5-38
Engine Cooling System Messages . . . . . . . . . . . . . . . . . . 5-39
Engine Oil Messages . . . . . . . . 5-39
Engine Power Messages . . . . 5-40
Fuel System Messages . . . . . . 5-40
Key and Lock Messages . . . . . 5-40
Lamp Messages . . . . . . . . . . . . . 5-41
Object Detection System Messages . . . . . . . . . . . . . . . . . . 5-41
Ride Control System Messages . . . . . . . . . . . . . . . . . . 5-44
Airbag System Messages . . . . 5-45
Page 149 of 400
Black plate (37,1)Cadillac CTS Owner Manual (GMNA-Localizing-U.S./Canada/Mexico-
6081492) - 2014 - CRC 2nd Edition - 11/18/13
Instruments and Controls 5-37
Battery Voltage and
Charging Messages
BATTERY SAVER ACTIVE
This message displays when the
vehicle has detected that the battery
voltage is dropping beyond a
reasonable point. The battery saver
system starts reducing features of
the vehicle that may be noticed. At
the point that features are disabled,
this message displays. Turn off
unnecessary accessories to allow
the battery to recharge.
LOW BATTERY
This message is displayed when the
battery voltage is low. SeeBattery
on page 10-25.
SERVICE BATTERY
CHARGING SYSTEM
This message is displayed when
there is a fault in the battery
charging system. Take the vehicle to
your dealer for service.
TRANSPORT MODE ON
This message is displayed when the
vehicle is in transport mode. Some
features can be disabled while in
this mode, including Remote
Keyless Entry (RKE), remote start,
and the vehicle alarm system. Take
the vehicle to your dealer for service
to turn transport mode off.
Brake System Messages
BRAKE FLUID LOW
This message displays when the
brake fluid level is low. See Brake
Fluid on page 10-24.
RELEASE PARKING BRAKE
This message displays if the electric
parking brake is on while the vehicle
is in motion. Release it before
attempting to drive. See Electric
Parking Brake on page 9-28.
SERVICE BRAKE ASSIST
This message displays when there
is a problem with the brake boost
system. When this message displays, the brake pedal may be
harder to push and the stopping
distance may be longer. Take the
vehicle to your dealer for service.
SERVICE PARKING BRAKE
This message displays when there
is a problem with the parking brake.
Take the vehicle to your dealer for
service.
STEP ON BRAKE TO
RELEASE PARK BRAKE
This message displays when
attempting to release the electric
parking brake without the brake
pedal applied. See
Electric Parking
Brake on page 9-28.
Compass Messages
Dashes may be displayed if the
vehicle temporarily loses
communication with the Global
Positioning System (GPS).
Page 152 of 400

Black plate (40,1)Cadillac CTS Owner Manual (GMNA-Localizing-U.S./Canada/Mexico-
6081492) - 2014 - CRC 2nd Edition - 11/18/13
5-40 Instruments and Controls
message remains on, take the
vehicle to your dealer for service.
SeeEngine Oil on page 10-10.
OIL PRESSURE LOW —STOP
ENGINE
This message displays if low oil
pressure levels occur. Stop the
vehicle as soon as safely possible
and do not operate it until the cause
of the low oil pressure has been
corrected. Check the oil as soon as
possible and have the vehicle
serviced by your dealer.
Engine Power Messages
ENGINE POWER IS REDUCED
This message displays when the
vehicle's engine power is reduced.
Reduced engine power can affect
the vehicle's ability to accelerate.
If this message is on, but there is no
reduction in performance, proceed
to your destination. The
performance may be reduced the
next time the vehicle is driven. The
vehicle may be driven at a reduced speed while this message is on, but
maximum acceleration and speed
may be reduced. Anytime this
message stays on, the vehicle
should be taken to your dealer for
service as soon as possible.
Fuel System Messages
FUEL LEVEL LOW
This message displays when the
vehicle is low on fuel. Refuel as
soon as possible.
Key and Lock Messages
NO REMOTE DETECTED
This message displays when the
transmitter battery may be weak.
See
“Starting the Vehicle with a Low
Transmitter Battery” underRemote
Keyless Entry (RKE) System
Operation on page 2-3.
NO REMOTE KEY WAS
DETECTED PLACE KEY IN
TRANSMITTER POCKET THEN
START YOUR VEHICLE
This message displays when trying
to start the vehicle if an RKE
transmitter is not detected. The
transmitter battery may be weak.
See “Starting the Vehicle with a Low
Transmitter Battery” underRemote
Keyless Entry (RKE) System
Operation on page 2-3.
NO REMOTE PRESS BRAKE
TO RESTART
This message displays when
attempting to turn off the vehicle
and the remote is no longer
detected. Restarting is allowed
without the remote for five minutes.
Press the brake pedal to restart the
vehicle.
Page 153 of 400
Black plate (41,1)Cadillac CTS Owner Manual (GMNA-Localizing-U.S./Canada/Mexico-
6081492) - 2014 - CRC 2nd Edition - 11/18/13
Instruments and Controls 5-41
NUMBER OF KEYS
PROGRAMMED
This message displays when
programming new keys to the
vehicle.
REMOTE LEFT IN VEHICLE
This message displays when
leaving the vehicle with the RKE
transmitter still inside.
REPLACE BATTERY IN
REMOTE KEY
This message displays when the
battery in the RKE transmitter needs
to be replaced.
Lamp Messages
AFL (ADAPTIVE FORWARD
LIGHTING) LAMPS NEED
SERVICE
This message displays when the
AFL system is disabled and needs
service. See your dealer. See
Adaptive Forward Lighting (AFL) on
page 6-5.
AUTOMATIC LIGHT CONTROL
ON/OFF
This message is displayed when the
exterior lamp control is in AUTO and
the lights have turned on or off. See
Automatic Headlamp System on
page 6-4.
XXX TURN INDICATOR
FAILURE
When one of the turn signals is out,
this message displays to show
which bulb needs to be replaced.
SeeBulb Replacement on
page 10-29 andReplacement Bulbs
on page 10-31.
TURN SIGNAL ON
This message is displayed if the
turn signal has been left on. Turn off
the turn signal.
Object Detection System
Messages
24 GHz RADARS OFF
This message displays when driving
in certain areas where there may be
radar interference. Adaptive Cruise
Control (ACC), Forward Collision
Alert (FCA), and the Active
Emergency Braking System may not
work or may not work as well. The
vehicle does not need service.
AUTOMATIC COLLISION
PREP OFF
This message displays when the
Active Emergency Braking System
has been turned off. See Active
Emergency Braking System on
page 9-54.
AUTOMATIC COLLISION PREP
REDUCED
This message displays when the
Active Emergency Braking System
has been set to the Alert setting.
This setting disables most automatic
Page 158 of 400

Black plate (46,1)Cadillac CTS Owner Manual (GMNA-Localizing-U.S./Canada/Mexico-
6081492) - 2014 - CRC 2nd Edition - 11/18/13
5-46 Instruments and Controls
SERVICE VEHICLE SOON
This message displays if there is a
problem with the vehicle. Take the
vehicle to your dealer for service.
Starting the Vehicle
Messages
PRESS BRAKE TO START
VEHICLE
This message is displayed when
attempting to start the vehicle
without first pressing the brake
pedal.
SERVICE KEYLESS START
SYSTEM
This message is displayed if there is
a problem with the pushbutton start
system. Take the vehicle to your
dealer for service.
TURN STEERING WHEEL
START VEHICLE AGAIN
This message may display when
you try to start the vehicle, but the
column remains locked. Try turningthe steering wheel while starting the
vehicle to unlock the steering
column. If the vehicle still does not
start, turn the steering wheel the
other way, and try starting the
vehicle again.
Tire Messages
SERVICE TIRE MONITOR
SYSTEM
This message displays if there is a
problem with the Tire Pressure
Monitor System (TPMS). See
Tire
Pressure Monitor Operation on
page 10-51.
TIRE LEARNING ACTIVE
This message displays when the
system is learning new tires. See
Tire Pressure Monitor Operation on
page 10-51.
TIRE LOW ADD AIR TO TIRE
This message displays when the
pressure in one or more of the tires
is low. This message also displays LEFT
FRONT, RIGHT FRONT, LEFT
REAR, or RIGHT REAR to indicate
the location of the low tire.
The low tire pressure warning light
will also come on. See
Tire
Pressure Light on page 5-26.
If a tire pressure message appears
on the DIC, stop as soon as you
can. Inflate the tires by adding air
until the tire pressure is equal to the
values shown on the Tire and
Loading Information label. See Tires
on page 10-40, Vehicle Load Limits
on page 9-11, and Tire Pressure on
page 10-48.
You can receive more than one tire
pressure message at a time. The
DIC also shows the tire pressure
values. See Driver Information
Center (DIC) on page 5-30.
Page 160 of 400
Black plate (48,1)Cadillac CTS Owner Manual (GMNA-Localizing-U.S./Canada/Mexico-
6081492) - 2014 - CRC 2nd Edition - 11/18/13
5-48 Instruments and Controls
Vehicle
Personalization
Use the audio system controls to
access the personalization menus
for customizing vehicle features.
The following are all possible
personalization features. Depending
on the vehicle, some may not be
available.
Infotainment System Audio
System Controls
To access the
personalization menu:
1. Press SETTINGS on the Homepage on the infotainment system
display.
2. Press the desired feature to display a list of available
options.
3. Press to select the desired feature setting.
4. Press the
[Back screen button
to return to the previous menu. Personalization Menus
The following list of menu items may
be available:
.Time and Date
.Language [Language]
.Valet Mode
.Radio
.Vehicle
.Bluetooth
.Voice
.Display
.Rear Camera
.Return to Factory Settings
.Software Information
Each menu is detailed in the
following information.
Time and Date
Manually set the time and date. See
Clock on page 5-5.
Language [Language]
Select Language, then select from
the available language(s).
The selected language will display
on the system, and voice
recognition will reflect the selected
language.
Valet Mode
This will lock the infotainment
system, the infotainment controls,
and screen storage location.
To turn Valet Mode on and off, enter
a four-digit code on the keypad.
Press Enter to go to the
confirmation screen. Re-enter the
four-digit code. Press LOCK to lock
the system. Enter the four-digit code
to unlock the system. Press the
Back screen button to go back to
the previous menu.
Radio
Press to display the Radio menu
and the following may display:
.Manage Favorites