buttons CADILLAC CTS 2017 3.G CUE Manual
[x] Cancel search | Manufacturer: CADILLAC, Model Year: 2017, Model line: CTS, Model: CADILLAC CTS 2017 3.GPages: 109, PDF Size: 0.69 MB
Page 35 of 109
Cadillac CUE Infotainment System (GMNA-Localizing-MidEast-10260791) -
2017 - crc - 1/13/16
Rear Seat Infotainment 35
Sourcing USB/VCD/HDMI with
Video
This allows for watching videos on
the front screen from devices
plugged into the rear module when
in P (Park).
With the vehicle in P (Park), icons
display:
These features will function the
same as in DVD/BD sources, with
the following exceptions:
.KEYPAD is only available for
VCD in P (Park).
. DISC MENU is only available for
disc sources such as VCD. The
system displays the menu
provided by the disc. Sourcing DVD/BD/USB/VCD/AUX
With the vehicle in D (Drive), the
following icons display along the
bottom of the front screen when one
of these sources is active:
DVD/BD/USB/VCD: All buttons are
available.
HDMI: Only REAR MEDIA and
MENU are available.
Rear Media
Use to select Disc, USB, or HDMI
sources. Both rear screens will be
sourced and will begin playback of
the first available file. The video will
only display on the front screen if
the vehicle is in P (Park). In any
other gear, the front screen displays
the active media source. Previous Track/Next Track
Touch
toruto select the
previous or next track on the current
media.
Play/Pause
Touch
rto play orjto pause,
depending on the current selection.
Menu (DVD/BD/USB/HDMI/VCD)
Only available in D (Drive). Press
MENU to display these options:
. Tone Settings: Use to set bass,
mid, and treble on speakers
only. Once set, tone settings are
for all sources.
. Auto Volume Control: Adjusts
the volume of the audio based
on the speed or ambient noise of
the vehicle. Some vehicles may
be equipped with the Bose
AudioPilot system. In these
cases, the Auto Volume main
menu item is replaced with the
Bose AudioPilot menu item. AVC
or Bose AudioPilot is available to
use with any source mode.
Page 41 of 109
Cadillac CUE Infotainment System (GMNA-Localizing-MidEast-10260791) -
2017 - crc - 1/13/16
Rear Seat Infotainment 41
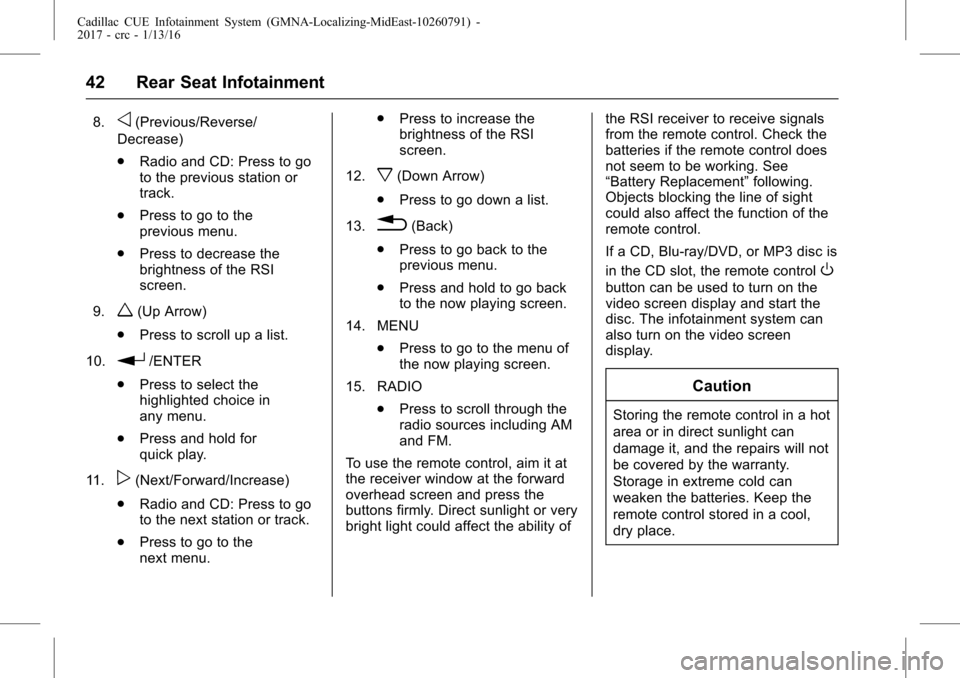
Remote Control Buttons1.
7(Previous/Reverse)
. Radio: Press to seek the
previous radio station.
. CD: Press to seek the
previous track.
. Blu-ray/DVD: Press to seek
the previous chapter.
. Press and hold for fast
reverse.
2. MEDIA .Press to scroll through the
menus including: BD/DVD/
CD, USB 1, USB 2, HDMI.
3.
J(Play/Pause)
. Press to start playing.
Press to pause. Press
again to continue playing.
4.
6(Next/Fast Forward)
. Radio: Press to seek the
next radio station.
. CD: Press to seek the next
track. .
Blu-ray/DVD: Press to seek
the next chapter.
. Press and hold to fast
forward.
5. SCREEN 1 .For single overhead
screens:
Press to change the source
displayed on the overhead
screen to SCREEN 1
selected source. Select
audio sources. Only one
video can be played on the
screen at a time. Audio for
both sources will continue
on the headphones. Once
pressed, all remote control
commands will correspond
to SCREEN 1.
. For dual overhead screens:
Press to select the second
row overhead screen. Once
pressed, all remote control
commands will correspond
to SCREEN 1. 6.
O(Power)
. Press to turn the video
screens on and off.
7. SCREEN 2 .For single overhead
screens:
Press to change the source
displayed on the overhead
screen to SCREEN 2
selected source. Only one
video can be played on the
screen at a time. Audio for
both sources will continue
on the headphones. Once
pressed, all remote control
commands will correspond
to SCREEN 2.
. For dual overhead screens:
Press to select the optional
third row overhead screen.
Once pressed, all remote
control commands will
correspond to SCREEN 2.
Page 42 of 109
Cadillac CUE Infotainment System (GMNA-Localizing-MidEast-10260791) -
2017 - crc - 1/13/16
42 Rear Seat Infotainment
8.o(Previous/Reverse/
Decrease)
. Radio and CD: Press to go
to the previous station or
track.
. Press to go to the
previous menu.
. Press to decrease the
brightness of the RSI
screen.
9.
w(Up Arrow)
. Press to scroll up a list.
10.
r/ENTER
. Press to select the
highlighted choice in
any menu.
. Press and hold for
quick play.
11.
p(Next/Forward/Increase)
. Radio and CD: Press to go
to the next station or track.
. Press to go to the
next menu. .
Press to increase the
brightness of the RSI
screen.
12.
x(Down Arrow)
. Press to go down a list.
13.
0(Back)
. Press to go back to the
previous menu.
. Press and hold to go back
to the now playing screen.
14. MENU .Press to go to the menu of
the now playing screen.
15. RADIO .Press to scroll through the
radio sources including AM
and FM.
To use the remote control, aim it at
the receiver window at the forward
overhead screen and press the
buttons firmly. Direct sunlight or very
bright light could affect the ability of the RSI receiver to receive signals
from the remote control. Check the
batteries if the remote control does
not seem to be working. See
“Battery Replacement”
following.
Objects blocking the line of sight
could also affect the function of the
remote control.
If a CD, Blu-ray/DVD, or MP3 disc is
in the CD slot, the remote control
O
button can be used to turn on the
video screen display and start the
disc. The infotainment system can
also turn on the video screen
display.
Caution
Storing the remote control in a hot
area or in direct sunlight can
damage it, and the repairs will not
be covered by the warranty.
Storage in extreme cold can
weaken the batteries. Keep the
remote control stored in a cool,
dry place.
Page 44 of 109
Cadillac CUE Infotainment System (GMNA-Localizing-MidEast-10260791) -
2017 - crc - 1/13/16
44 Rear Seat Infotainment
Video Distortion
Video distortion can occur when
operating cellular phones, scanners,
CB radios, Global Positioning
Systems (GPSs), two-way radios,
mobile faxes, or walkie talkies.
It might be necessary to turn off the
video player when operating one of
these devices in or near the vehicle.
Rear Seat Infotainment
(RSI) System (Platinum)
Vehicles with the Platinum RSI
system include two head restraint
video display screens with
integrated DVD players, auxiliary
inputs, two wired headphones, and
remote control. This system works
independently from the vehicle's
Overhead DVD RSI system. The
headphones support four channels
of audio and are shared with the
Overhead RSI system.
The vehicle has a feature called
Retained Accessory Power (RAP).
With RAP, the RSI system can beplayed even after the ignition is
turned off. See
“Retained Accessory
Power (RAP)” in the owner manual.
Video Display Screens
The video display screens are on
the back of each head restraint.
Caution
Avoid directly touching the video
screen, as damage can occur.
See“Cleaning the Video Screens”
later in this section.
RSI System Overview
The loading slot for the DVD player
is at the top of the head restraint.
Insert the disc partially into the
loading slot with the printed side
facing the rear of the vehicle. The
DVD player automatically draws the
disc in, “Loading” displays on the
screen along with a disc indicator,
and playback starts. If the disc is
inserted incorrectly, the DVD player
ejects the disc and “No Disc”
displays. Some DVDs do not allow fast
forwarding or skipping of the
copyright information or previews.
If the DVD does not begin playing at
the main title, refer to the on-screen
instructions.
The DVD player can be controlled
by using the buttons below the
video display screen or by using the
buttons on the system’s remote
control. See
“Remote Control” later
in this section.
The following discs are compatible
with the DVD player:
. DVD-Video: A DVD that has
video.
. CD-DA: A CD that has music or
sound content only.
. CD-Video: A CD that has a
movie.
. CD-R/RW: A disc that has audio
files such as CD-R with
downloaded MP3 files, MPEG,
or JPEG files.
Page 45 of 109
Cadillac CUE Infotainment System (GMNA-Localizing-MidEast-10260791) -
2017 - crc - 1/13/16
Rear Seat Infotainment 45
The DVD player and discs are
coded by global region. The DVD
players are set to Region 1. Discs
with other region codes will not work
in the players.
If an error message displays on the
video screen, see“DVD Messages”
later in this section.
While the vehicle is moving,
passengers should not unfasten
their safety belts to make
adjustments to the video screen
control buttons. See “Safety Belts”
in the owner manual. Use the
remote control for any necessary
adjustments. See “Remote Control”
later in this section.
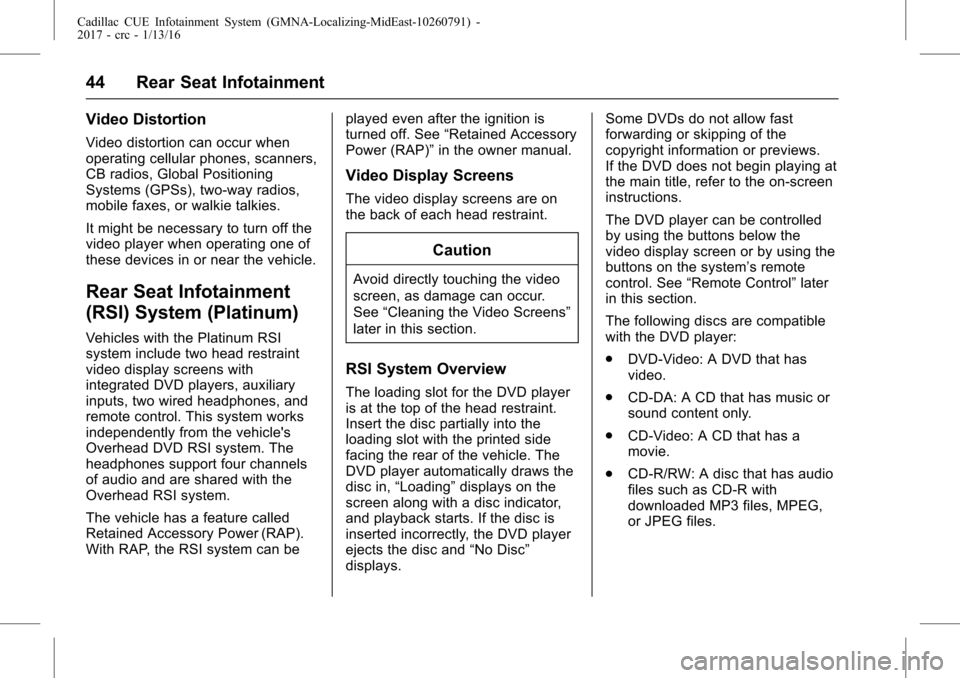
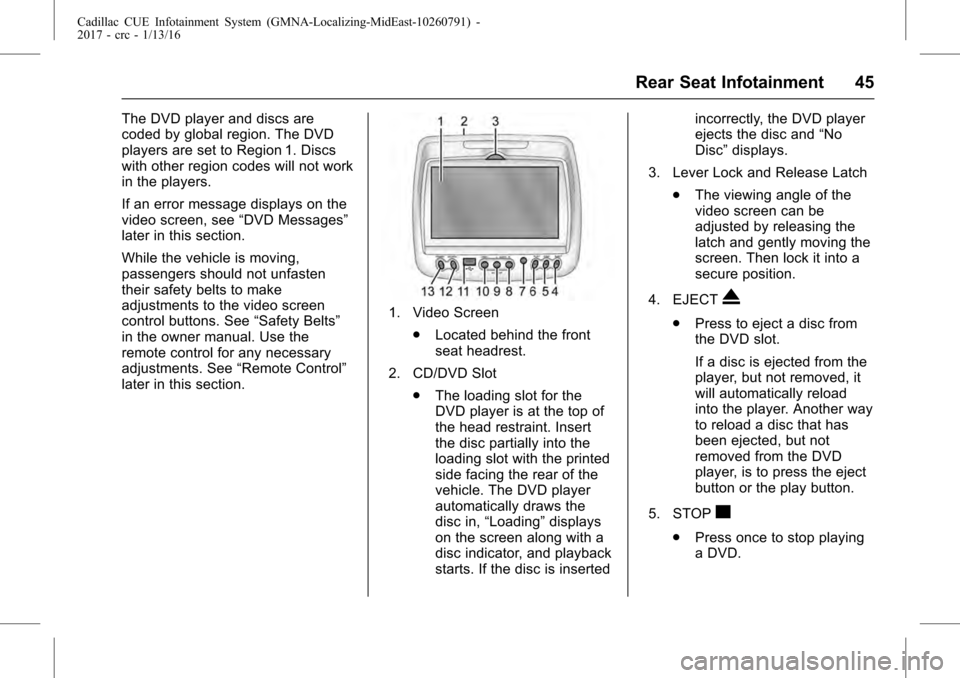
1. Video Screen
.Located behind the front
seat headrest.
2. CD/DVD Slot .The loading slot for the
DVD player is at the top of
the head restraint. Insert
the disc partially into the
loading slot with the printed
side facing the rear of the
vehicle. The DVD player
automatically draws the
disc in, “Loading” displays
on the screen along with a
disc indicator, and playback
starts. If the disc is inserted incorrectly, the DVD player
ejects the disc and
“No
Disc” displays.
3. Lever Lock and Release Latch .The viewing angle of the
video screen can be
adjusted by releasing the
latch and gently moving the
screen. Then lock it into a
secure position.
4. EJECTX
. Press to eject a disc from
the DVD slot.
If a disc is ejected from the
player, but not removed, it
will automatically reload
into the player. Another way
to reload a disc that has
been ejected, but not
removed from the DVD
player, is to press the eject
button or the play button.
5. STOP
c
. Press once to stop playing
a DVD.
Page 49 of 109
Cadillac CUE Infotainment System (GMNA-Localizing-MidEast-10260791) -
2017 - crc - 1/13/16
Rear Seat Infotainment 49
choose On or Off. Press the
left navigation arrow to go back
to the previous menu.
To set the disc menu language: 1. Press SETUP on the remote control.
2. Use the left/right and down navigation arrows on the
remote control to select the
Disc sub-menu under the
Preference Page. Use the left
or right navigation arrows to
select the language. Press the
left navigation arrow to go back
to the previous menu.
To set up the Parental Control: 1. Press SETUP on the remote control.
2. Use the left/right and down navigation arrows on the
remote control to select the
Parental sub-menu under the
Preference Page.
3. Press SETUP, and use the right and up/down navigation
arrows to select any one of the
available Rating settings from
the display menu. The Rating settings are:
.
Kid SAFE (Children)
. G
. PG
. PG 13
. PG R
. R
. NC 17
. ADULT
4. Press the left navigation arrow to confirm the selection.
If a disc is inserted into the DVD
compartment slot and it exceeds the
Parental Setting, the following
message appears on the display:
The Parental Setting of this player
prohibits play. Would you like to
allow this disc to play?
If yes if selected, the six digit
password must be entered for the
disc to play. If the wrong password
is entered, the following message
appears:
This movie will not play due to the
Parental Setting of the player. To create a six digit password, use
the numeric keypad on the remote
control. Press ENTER to confirm.
The default password is 136900.
To change the Parental Control
Password:
1. Press SETUP on the remote control.
2. Navigate to the Password sub-menu under the
Preference Menu and press
ENTER.
3. At the Old Password option, enter the old password or the
default password (136900).
4. At the New Password option, enter the new password (six
digits) using numeric buttons.
5. At the Confirm PWD option, confirm the new password by
entering the new password
again.
6. Scroll to the OK button and press ENTER. The message
“Your password has been
changed” displays.
Page 51 of 109
Cadillac CUE Infotainment System (GMNA-Localizing-MidEast-10260791) -
2017 - crc - 1/13/16
Rear Seat Infotainment 51
Caution
Do not store the headphones in
heat or direct sunlight. This could
damage the headphones and
repairs will not be covered by the
warranty. Storage in extreme cold
can weaken the batteries. Keep
the headphones stored in a cool,
dry place.
Remote Control
To use the remote control, aim at
the remote sensor on top center of
the video display screen and press
the desired button.
Objects blocking the line of sight
can affect the function of the remote
control. Direct or very bright light
can affect the ability of the
transmitter to receive signals from
the remote control. If the remote
control does not seem to be
working, the batteries might need to
be replaced. See“Battery
Replacement” later in this section. The remote control provided with
the Platinum RSI system is not a
universal remote control and will not
control other equipment.
Caution
Storing the remote control in a hot
area or in direct sunlight can
damage it, and the repairs will not
be covered by the warranty.
Storage in extreme cold can
weaken the batteries. Keep the
remote control stored in a cool,
dry place.
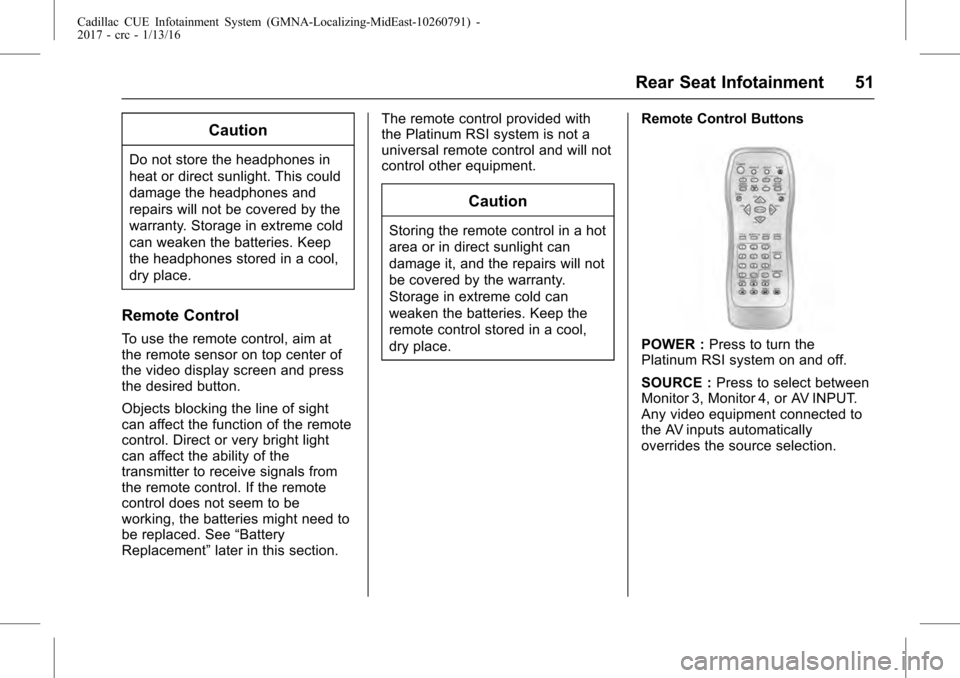
Remote Control Buttons
POWER :
Press to turn the
Platinum RSI system on and off.
SOURCE : Press to select between
Monitor 3, Monitor 4, or AV INPUT.
Any video equipment connected to
the AV inputs automatically
overrides the source selection.
Page 67 of 109
Cadillac CUE Infotainment System (GMNA-Localizing-MidEast-10260791) -
2017 - crc - 1/13/16
Navigation 67
.Audio Feedback: Touch to turn
Audio Feedback On or Off.
Audio feedback is an audible
response to an action that has
occurred while using the
Character Recognition.
. ABC/abc: Select from the touch
screen to view the available
character sets. Select a
character set to change. Multiple
character sets may not be
supported by some regions. This
button also displays the
sentence case of upper or lower
case characters that are
currently active in a mixed case
mode. If only one character set
is available for the desired
region, touching the character
recognition will only open and
close the character recognition
window.
If mixed case character mode is
supported, the last buttons of
character recognition will be
upper and lower case. One-Shot Search
Enter a full or partial Address,
Contact, or POI into the search bar
and the system will search and
display all of the matches.
The contacts that are searched
include both the connected phone’s
contacts list and the vehicle’s
contacts list.
Search Process
The process of prioritizing the
search is to help shorten the length
of time at finding the results. If there
is a 100% match found when a
search type is carried out, the
remaining searches abort.
The system conducts the search in
the following order:
1. Vehicle Contacts List
2. Connected Phone Contacts List
3. POIs
4. Addresses
The Contacts are done first because
the list will be relatively short and
can be done quickly. POIs are done next because the
amount of time it takes to search for
the average POI is consistent. The
less deviation during a search would
mean an average of less time taken.
The Addresses are last because the
standard deviation for an address
search is very large. Some address
searches are very quick, but others
may take very long. Because of this,
the address search would not be
conducted unless a good match
could not be found in either
Contacts or POIs.
Autocomplete
The autocomplete is preloaded with
all recent destinations and POI
category names. Previous POI
name searches are remembered.
If only one type of result is found,
the single type result screen is
shown. Within each group, they are
listed in confidence order. This
means the highest confidence result
will be at the top.
If multiple types of matches are
found, the result list with the highest
confidence match displays.
Page 68 of 109
Cadillac CUE Infotainment System (GMNA-Localizing-MidEast-10260791) -
2017 - crc - 1/13/16
68 Navigation
Address and Contact matches are
shown in full width list format. The
match results will display unique
icons for full addresses, streets,
intersections, cities, states/regions,
and countries.
POIs show in a split list format with
the map on the right displaying the
locations of the matches. The brand
icon or category icon will display for
the match results.
When a list displays, the results for
a particular type can be filtered by
touching the filter buttons along the
top of the screen. If there are no
particular results for a selected type,
a message is indicated in the list.
For example:
.For no addresses: “No
Addresses Found Within
. For no POIs: “No POIs Found
Within<75 km/50 mi/800 km/
500 mi>.” This distance is shown
depending on what radius is
completed and what current
units are selected. .
For no contacts: “No Contacts
Found.”
The system performs partial
searches on contacts, so typing a
first name or last name would find a
match. The entire contact name
does not need to be entered for it to
be found in a search.
Touching a contact listed on the
results list displays the standard
contact details view to select an
item, such as an address to start
routing, or a phone number to place
a call.
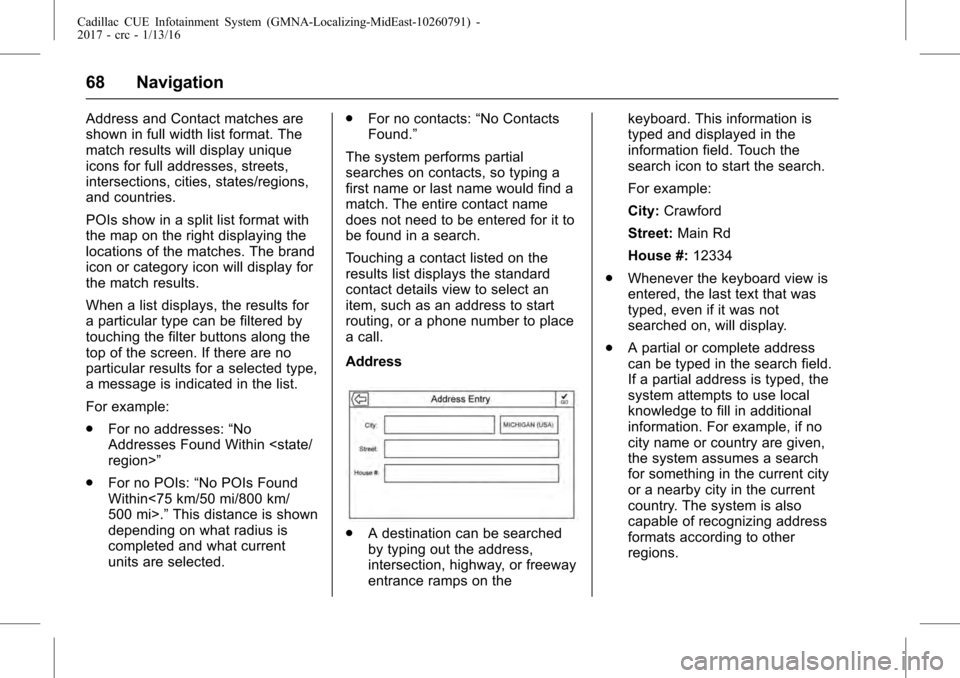
Address
. A destination can be searched
by typing out the address,
intersection, highway, or freeway
entrance ramps on the keyboard. This information is
typed and displayed in the
information field. Touch the
search icon to start the search.
For example:
City:
Crawford
Street: Main Rd
House #: 12334
. Whenever the keyboard view is
entered, the last text that was
typed, even if it was not
searched on, will display.
. A partial or complete address
can be typed in the search field.
If a partial address is typed, the
system attempts to use local
knowledge to fill in additional
information. For example, if no
city name or country are given,
the system assumes a search
for something in the current city
or a nearby city in the current
country. The system is also
capable of recognizing address
formats according to other
regions.
Page 73 of 109
Cadillac CUE Infotainment System (GMNA-Localizing-MidEast-10260791) -
2017 - crc - 1/13/16
Navigation 73
Browsing Downloaded POIs
Access the downloaded POIs by
selecting My POIs under Personal
Data from the Menu list.
Editing My POIs
Downloaded POIs can be edited at
a category level. These POIs can
either be deleted as an entire
category or reassigned as another
category. To edit the categories:
.Select the Edit button at the
main category view to edit the
POIs. Edit buttons display next
to each category name. There is
no POI browsing in this mode;
only edit functions are available.
. Once an action such as deleting
or reassigning has been
selected, the changes are saved
immediately.
Changing POI Categories
POI categories can be assigned to a
different category by using the same
method as assigning a category for
a Contact entry. When editing, the
right side of the screen displays the
current category name. Deleting POI Categories
POI categories can be deleted by
selecting Edit and then Delete.
A pop-up displays to confirm the
deletion.
Saved Destinations
Select a saved destination from the
Contacts or Recent screen.
Contacts
Select the CONTACTS button to
view the vehicle’s contact list or a
connected Bluetooth device. If a
particular contact has a single
address associated with it, that
contact has a Quick Route list item
function button next to it. Contacts
without this Quick Route button
either have multiple addresses or no
address at all. Touch the Quick
Route button to go to the
Destination Details view.
Touch on an address, either from
the Quick Route on the contact list
or a specific address from the
contact detail list, to go to the
destination view showing that
address on the map.
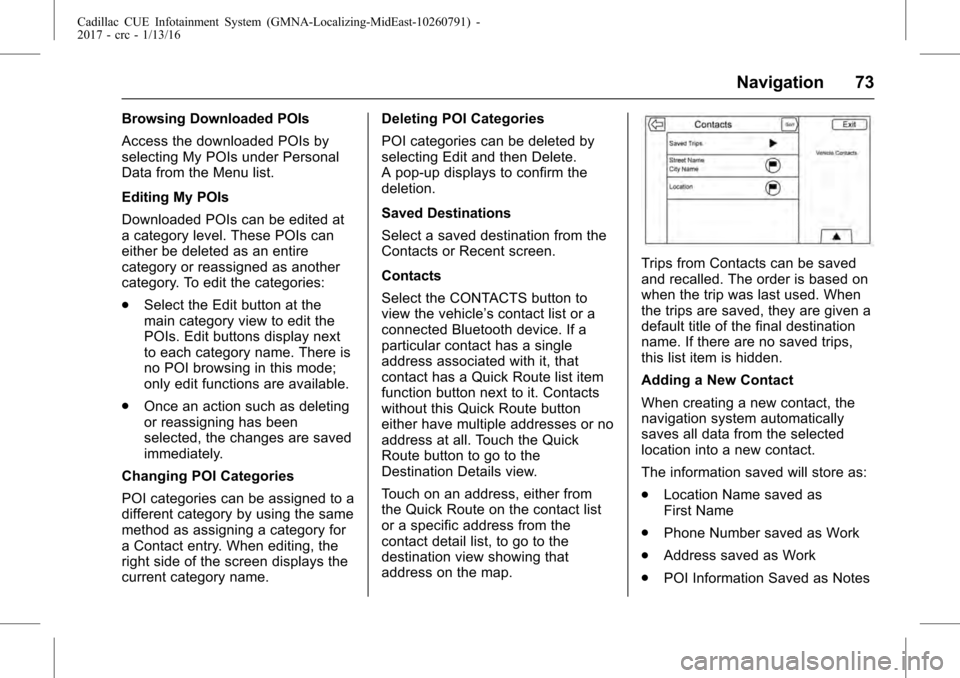
Trips from Contacts can be saved
and recalled. The order is based on
when the trip was last used. When
the trips are saved, they are given a
default title of the final destination
name. If there are no saved trips,
this list item is hidden.
Adding a New Contact
When creating a new contact, the
navigation system automatically
saves all data from the selected
location into a new contact.
The information saved will store as:
.
Location Name saved as
First Name
. Phone Number saved as Work
. Address saved as Work
. POI Information Saved as Notes