run CADILLAC CTS 2019 Repair Manual
[x] Cancel search | Manufacturer: CADILLAC, Model Year: 2019, Model line: CTS, Model: CADILLAC CTS 2019Pages: 401, PDF Size: 6.85 MB
Page 288 of 401
Cadillac CTS/CTS-V Owner Manual (GMNA-Localizing-U.S./Canada/Mexico-
12460273) - 2019 - CRC - 5/16/18
VEHICLE CARE 287
2. Press the button in the middle ofthe wiper arm connector, and
pull the wiper blade away from
the arm connector.
3. Remove the wiper blade.
4. Reverse Steps 1–3 for wiper blade replacement.
Windshield Replacement
HUD System
The windshield is part of the HUD
system. If the windshield needs to be
replaced, be sure to get one that is
designed for HUD or the HUD image
may look out of focus.
Driver Assistance Systems
If the windshield needs to be replaced
and the vehicle is equipped with a
front camera sensor for the Driver
Assistance Systems, a GM
replacement windshield is
recommended. The replacement
windshield must be installed
according to GM specifications for
proper alignment. If it is not, these
systems may not work properly, they may display messages, or they may
not work at all. See your dealer for
proper windshield replacement.
Acoustic Windshield
The vehicle is equipped with an
acoustic windshield. If the windshield
needs to be replaced be sure to get an
acoustic windshield so you will
continue to have the benefits an
acoustic windshield can provide.
Gas Strut(s)
This vehicle is equipped with gas
strut(s) to provide assistance in lifting
and holding open the hood/trunk/
liftgate system in full open position.
{Warning
If the gas struts that hold open the
hood, trunk, and/or liftgate fail, you
or others could be seriously injured.
Take the vehicle to your dealer for
service immediately. Visually
inspect the gas struts for signs of
wear, cracks, or other damage
(Continued)
Warning (Continued)
periodically. Check to make sure the
hood/trunk/liftgate is held open
with enough force. If struts are
failing to hold the hood/trunk/
liftgate, do not operate. Have the
vehicle serviced.
Caution
Do not apply tape or hang any
objects from gas struts. Also do not
push down or pull on gas struts.
This may cause damage to the
vehicle.
See Maintenance Schedule 0345.
Page 289 of 401

Cadillac CTS/CTS-V Owner Manual (GMNA-Localizing-U.S./Canada/Mexico-
12460273) - 2019 - CRC - 5/16/18
288 VEHICLE CARE
Hood
Trunk
Liftgate
Headlamp Aiming
Headlamp aim has been preset and
should need no further adjustment.
If the vehicle is damaged in a crash,
the headlamp aim may be affected.
If adjustment to the headlamps is
necessary, see your dealer.
Page 296 of 401
Cadillac CTS/CTS-V Owner Manual (GMNA-Localizing-U.S./Canada/Mexico-
12460273) - 2019 - CRC - 5/16/18
VEHICLE CARE 295
RelaysUsage
25 Engine control module
46 Rear washer
47 Front washer
54 Coolant pump
57 Low-beam headlamp relay
58 High-beam headlamp
59 Run/Crank
60 Starter 2
61 Vacuum pump
62 Starter 1
63 Air conditioning control
70 HornInstrument Panel Fuse
Block
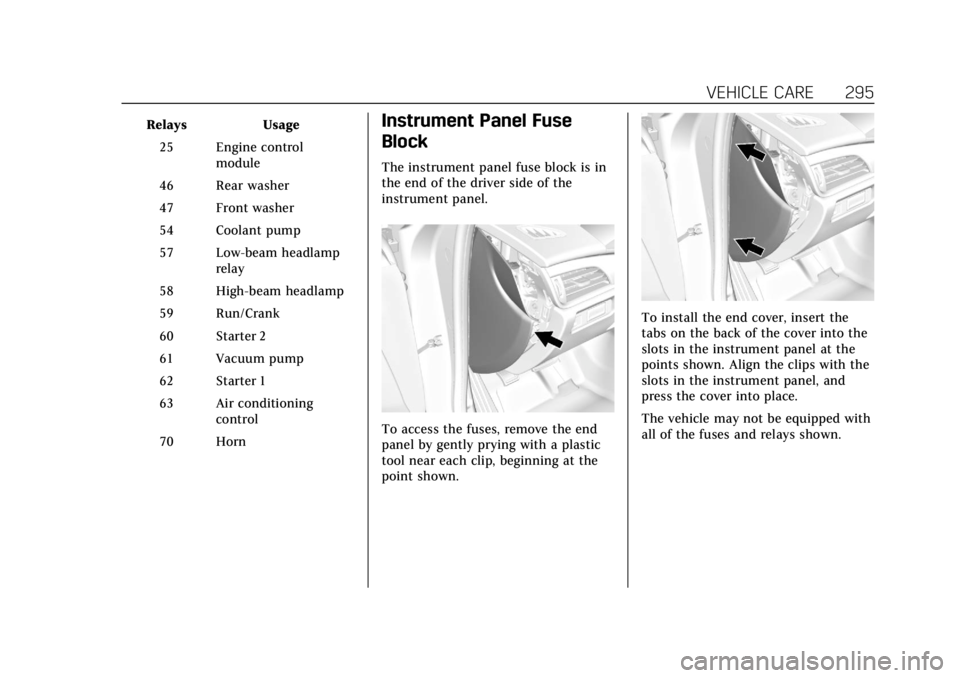
The instrument panel fuse block is in
the end of the driver side of the
instrument panel.
To access the fuses, remove the end
panel by gently prying with a plastic
tool near each clip, beginning at the
point shown.
To install the end cover, insert the
tabs on the back of the cover into the
slots in the instrument panel at the
points shown. Align the clips with the
slots in the instrument panel, and
press the cover into place.
The vehicle may not be equipped with
all of the fuses and relays shown.
Page 299 of 401

Cadillac CTS/CTS-V Owner Manual (GMNA-Localizing-U.S./Canada/Mexico-
12460273) - 2019 - CRC - 5/16/18
298 VEHICLE CARE
FusesUsage
1 Rear driver control module/DC DC transformer Fuses
Usage
2 Left window
3 Body control module 8 Fuses
Usage
4 Alternate current inverter
5 Passive entry/Passive start/ Battery 1
6 Body control module 4
7 Heated mirrors
8 Amplifier
9 Rear window defogger
10 Glass break
11 Trailer connector
12 OnStar (if equipped)
13 Right window
14 Electric parking brake
15 –
16 Trunk release
19 Logistics
21 Mirror window module
22 –
23 Canister vent
24 Body control module 2
25 Rear vision camera
Page 300 of 401

Cadillac CTS/CTS-V Owner Manual (GMNA-Localizing-U.S./Canada/Mexico-
12460273) - 2019 - CRC - 5/16/18
VEHICLE CARE 299
FusesUsage
26 Front ventilated seats
27 Side blind zone alert/Lane departure warning/External
object calculating module
28 Trailer/Sunshade
29 Rear heated seats
30 Semi-active damping system
31 Transfer case control module/Rear control drive
module
32 Theft module/Universal garage door opener/Rain
sensor
33 Ultrasonic parking assist
34 Radio/DVD
35 –/Exhaust valve (V-series)
36 Trailer
37 Fuel system control module
38 Fuel pump prime/Exhaust valve (V-series) Fuses
Usage
39 –
42 Memory seat module
43 Body control module 3
44 –
45 Battery regulated voltage control
46 Engine control module/ Battery
47 –
48 –
49 Trailer module
53 –
55 –
Relays Usage
17 Trailer
18 Logistics
20 Rear window defogger
40 Run crank 2 (V-series) Relays
Usage
41 Fuel pump prime/ Run crank 2
50 Child door lock security
51 Rear closure
52 Rear closure 2
54 Door lock security
56 Fuel door
Page 302 of 401
Cadillac CTS/CTS-V Owner Manual (GMNA-Localizing-U.S./Canada/Mexico-
12460273) - 2019 - CRC - 5/16/18
VEHICLE CARE 301
All-Season Tires
This vehicle may come with all-season
tires. These tires are designed to
provide good overall performance on
most road surfaces and weather
conditions. Original equipment tires
designed to GM's specific tire
performance criteria have a TPC
specification code molded onto the
sidewall. Original equipment
all-season tires can be identified by
the last two characters of this TPC
code, which will be“MS.”
Consider installing winter tires on the
vehicle if frequent driving on snow or
ice-covered roads is expected.
All-season tires provide adequate
performance for most winter driving
conditions, but they may not offer the
same level of traction or performance
as winter tires on snow or ice-covered
roads. See Winter Tires 0301.
Winter Tires
This vehicle was not originally
equipped with winter tires. Winter
tires are designed for increased
traction on snow and ice-covered roads. Consider installing winter tires
on the vehicle if frequent driving on
ice or snow covered roads is expected.
See your dealer for details regarding
winter tire availability and proper tire
selection. Also, see
Buying New Tires
0 315.
With winter tires, there may be
decreased dry road traction, increased
road noise, and shorter tread life.
After changing to winter tires, be alert
for changes in vehicle handling and
braking.
If using winter tires:
. Use tires of the same brand and
tread type on all four wheel
positions.
. Use only radial ply tires of the
same size, load range, and speed
rating as the original equipment
tires.
Winter tires with the same speed
rating as the original equipment tires
may not be available for H, V, W, Y,
and ZR speed rated tires. If winter
tires with a lower speed rating are
chosen, never exceed the tire's
maximum speed capability.
Run-Flat Tires
This vehicle, when new, may have had
run-flat tires. There is no spare tire,
no tire changing equipment, and no
place to store a tire in the vehicle.
The vehicle also has a Tire Pressure
Monitor System (TPMS) that indicates
a loss of tire pressure in any of the
tires.
{Warning
If the low tire warning light displays
on the instrument cluster, the
handling capabilities will be
reduced during severe maneuvers.
Driving too fast could cause loss of
control and you or others could be
injured. Do not drive over 90 km/h
(55 mph) when the low tire warning
light is displayed. Drive cautiously
and check the tire pressures as
soon as possible.
Run-flat tires can be driven on with
no air pressure. There is no need to
stop on the side of the road to change
the tire. Continue driving; however, do
Page 303 of 401

Cadillac CTS/CTS-V Owner Manual (GMNA-Localizing-U.S./Canada/Mexico-
12460273) - 2019 - CRC - 5/16/18
302 VEHICLE CARE
not drive too far or too fast. Driving
on the tire may not be possible if
there is permanent damage. To
prevent permanent damage, keep
speed below 80 km/h (50 mph). With
a light load the vehicle can be driven
up to 100 km (60 mi); with a
moderate load 80 km (50 mi); and a
heavy load 45 km (25 mi). As soon as
possible, contact the nearest
authorized GM or run-flat servicing
facility for inspection and repair or
replacement.
When driving on a deflated run-flat
tire, avoid potholes and other road
hazards that could damage the tire
and/or wheel beyond repair. When a
tire has been damaged, or driven any
distance while deflated, check with an
authorized run-flat tire service center
to determine whether the tire can be
repaired or should be replaced. To
maintain the run-flat feature, all
replacement tires must be run-flat
tires.
To locate the nearest GM or run-flat
servicing facility, call Customer
Assistance.The valve stems on run-flat tires have
sensors that are part of the TPMS. See
Tire Pressure Monitor System
0309.
These sensors contain batteries that
are designed to last for 10 years under
normal driving conditions. See your
dealer for wheel or sensor
replacement.
Caution
Using liquid sealants can damage
the tire valves and tire pressure
monitor sensors in the run-flat
tires. This damage is not covered by
the vehicle warranty. Do not use
liquid sealants in run-flat tires.
Low-Profile Tires
If the vehicle has 255/35R19,
265/35ZR19, or 295/30ZR19 size
tires, they are classified as
low-profile tires. Caution
Low-profile tires are more
susceptible to damage from road
hazards or curb impact than
standard profile tires. Tire and/or
wheel assembly damage can occur
when coming into contact with
road hazards like potholes, or sharp
edged objects, or when sliding into
a curb. The warranty does not cover
this type of damage. Keep tires set
to the correct inflation pressure and
when possible, avoid contact with
curbs, potholes, and other road
hazards.
Summer Tires
High Performance Summer Tires
This vehicle may come with
245/40R18 (front) and 275/35R18
(rear) or 265/35ZR19 (front) and
295/30ZR19 (rear) high performance
summer tires. These tires have a
special tread and compound that are
optimized for maximum dry and wet
road performance. This special tread
Page 321 of 401

Cadillac CTS/CTS-V Owner Manual (GMNA-Localizing-U.S./Canada/Mexico-
12460273) - 2019 - CRC - 5/16/18
320 VEHICLE CARE
Warning (Continued)
and road conditions. Follow that
manufacturer's instructions. To
avoid vehicle damage, drive slow
and readjust or remove the traction
device if it contacts the vehicle. Do
not spin the wheels. If traction
devices are used, install them on
the rear tires.
Caution
If the vehicle is equipped with a tire
size other than P245/40R18, 245/
40R18, 275/35R18, 255/35R19, 265/
35ZR19, or 295/30ZR19 use tire
chains only where legal and only
when necessary. Use low profile
chains that add no more than
12 mm thickness to the tire tread
and inner sidewall. Use chains that
are the proper size for the tires.
Install them on the tires of the rear
axle. Don't use chains on the tires(Continued)
Caution (Continued)
of the front axle. Tighten them as
tightly as possible with the ends
securely fastened. Drive slowly and
follow the chain manufacturer's
instructions. If the chains contact
the vehicle, stop and retighten
them. If the contact continues, slow
down until it stops. Driving too fast
or spinning the wheels with chains
on will damage the vehicle.
If a Tire Goes Flat
If the vehicle has run-flat tires, there
is no need to stop on the side of the
road to change a flat tire. See Run-Flat
Tires 0301.
{Warning
Special tools and procedures are
required to service a run-flat tire.
If these special tools and
procedures are not used, injury or
vehicle damage may occur. Always
(Continued)
Warning (Continued)
be sure the proper tools and
procedures, as described in the
service manual, are used.
It is unusual for a tire to blow out
while driving, especially if the tires are
maintained properly. See Tires0300.
If air goes out of a tire, it is much
more likely to leak out slowly. But if
there is ever a blowout, here are a few
tips about what to expect and what
to do:
If a front tire fails, the flat tire creates
a drag that pulls the vehicle toward
that side. Take your foot off the
accelerator pedal and grip the steering
wheel firmly. Steer to maintain lane
position, and then gently brake to a
stop, well off the road, if possible.
A rear blowout, particularly on a
curve, acts much like a skid and may
require the same correction as used in
a skid. Stop pressing the accelerator
pedal and steer to straighten the
Page 322 of 401

Cadillac CTS/CTS-V Owner Manual (GMNA-Localizing-U.S./Canada/Mexico-
12460273) - 2019 - CRC - 5/16/18
VEHICLE CARE 321
vehicle. It may be very bumpy and
noisy. Gently brake to a stop, well off
the road, if possible.
{Warning
Lifting a vehicle and getting under
it to do maintenance or repairs is
dangerous without the appropriate
safety equipment and training. If a
jack is provided with the vehicle, it
is designed only for changing a flat
tire. If it is used for anything else,
you or others could be badly injured
or killed if the vehicle slips off the
jack. If a jack is provided with the
vehicle, only use it for changing a
flat tire.
If this vehicle does not have run-flat
tires and a tire goes flat, avoid further
tire and wheel damage by driving
slowly to a level place, well off the
road, if possible. 1. Turn on the hazard warning flashers. See Hazard Warning
Flashers 0158.
2. Set the parking brake firmly. 3. Put an automatic transmission in
P (Park) or a manual
transmission in 1 (First) or
R (Reverse).
4. Turn off the ignition.
5. Inspect the flat tire.
{Warning
Driving on a flat tire will cause
permanent damage to the tire.
Re-inflating a tire after it has been
driven on while severely
underinflated or flat may cause a
blowout and a serious crash. Never
attempt to re-inflate a tire that has
been driven on while severely
underinflated or flat. Have your
dealer or an authorized tire service
center repair or replace the flat tire
as soon as possible.
If this vehicle has a tire sealant kit
and the tire has been separated from
the wheel, has damaged sidewalls,
or has a puncture larger than
6 mm (0.25 in), the tire is too severely
damaged for the tire sealant and compressor kit to be effective. If the
tire has a puncture less than
6 mm (0.25 in) in the tread area of the
tire, see
Tire Sealant and Compressor
Kit 0321.
Tire Sealant and
Compressor Kit
{Warning
Idling a vehicle in an enclosed area
with poor ventilation is dangerous.
Engine exhaust may enter the
vehicle. Engine exhaust contains
carbon monoxide (CO) which
cannot be seen or smelled. It can
cause unconsciousness and even
death. Never run the engine in an
enclosed area that has no fresh air
ventilation. For more information,
see Engine Exhaust 0200.
Page 325 of 401
Cadillac CTS/CTS-V Owner Manual (GMNA-Localizing-U.S./Canada/Mexico-
12460273) - 2019 - CRC - 5/16/18
324 VEHICLE CARE
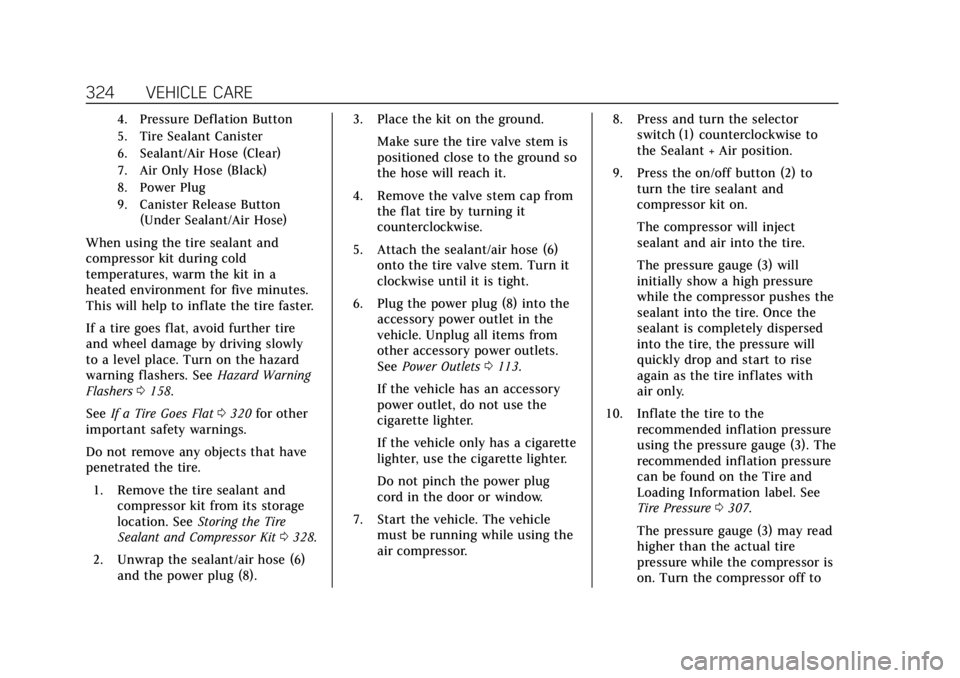
4. Pressure Deflation Button
5. Tire Sealant Canister
6. Sealant/Air Hose (Clear)
7. Air Only Hose (Black)
8. Power Plug
9. Canister Release Button(Under Sealant/Air Hose)
When using the tire sealant and
compressor kit during cold
temperatures, warm the kit in a
heated environment for five minutes.
This will help to inflate the tire faster.
If a tire goes flat, avoid further tire
and wheel damage by driving slowly
to a level place. Turn on the hazard
warning flashers. See Hazard Warning
Flashers 0158.
See If a Tire Goes Flat 0320 for other
important safety warnings.
Do not remove any objects that have
penetrated the tire.
1. Remove the tire sealant and compressor kit from its storage
location. See Storing the Tire
Sealant and Compressor Kit 0328.
2. Unwrap the sealant/air hose (6) and the power plug (8). 3. Place the kit on the ground.
Make sure the tire valve stem is
positioned close to the ground so
the hose will reach it.
4. Remove the valve stem cap from the flat tire by turning it
counterclockwise.
5. Attach the sealant/air hose (6) onto the tire valve stem. Turn it
clockwise until it is tight.
6. Plug the power plug (8) into the accessory power outlet in the
vehicle. Unplug all items from
other accessory power outlets.
See Power Outlets 0113.
If the vehicle has an accessory
power outlet, do not use the
cigarette lighter.
If the vehicle only has a cigarette
lighter, use the cigarette lighter.
Do not pinch the power plug
cord in the door or window.
7. Start the vehicle. The vehicle must be running while using the
air compressor. 8. Press and turn the selector
switch (1) counterclockwise to
the Sealant + Air position.
9. Press the on/off button (2) to turn the tire sealant and
compressor kit on.
The compressor will inject
sealant and air into the tire.
The pressure gauge (3) will
initially show a high pressure
while the compressor pushes the
sealant into the tire. Once the
sealant is completely dispersed
into the tire, the pressure will
quickly drop and start to rise
again as the tire inflates with
air only.
10. Inflate the tire to the recommended inflation pressure
using the pressure gauge (3). The
recommended inflation pressure
can be found on the Tire and
Loading Information label. See
Tire Pressure 0307.
The pressure gauge (3) may read
higher than the actual tire
pressure while the compressor is
on. Turn the compressor off to