instrument panel CADILLAC CTS V 2005 1.G Owner's Manual
[x] Cancel search | Manufacturer: CADILLAC, Model Year: 2005, Model line: CTS V, Model: CADILLAC CTS V 2005 1.GPages: 432, PDF Size: 2.52 MB
Page 143 of 432

Setting Cruise Control
{CAUTION:
If you leave your cruise control on when you
are not using cruise, you might hit a button
and go into cruise when you do not want to.
You could be startled and even lose control.
Keep the cruise control switch off until you
want to use cruise control.
1. Press the cruise control on/off button to turn cruise
control on. An indicator light on the button will come
on to show that the cruise control is on.
2. Accelerate to the speed you want.
3. Press the set button and release it. This will set the
cruise control.
4. Remove your foot from the accelerator pedal.This light on the instrument
panel cluster will come on
when cruise control is
on. It will go out when
cruise control is turned off.
Resuming a Set Speed
Suppose you set your cruise control at a desired speed
and then you apply the brake. This shuts off the
cruise control. But you don’t need to reset it.
Once the vehicle is traveling approximately 25 mph
(40 km/h) or more, you can press the plus
(resume/accelerate) button to return to your
desired preset speed. The cruise control light will be
displayed again.
The vehicle will return to and stay at your preset speed.
If you press and hold the plus (resume/accelerate)
button, the vehicle speed will increase until you release
the button or apply the brake. Unless you want to go
faster, do not press and hold the plus
(resume/accelerate) button.
3-17
Page 146 of 432
;(Parking Lamps):Turn the control to this
position to turn on the parking lamps together with
the following:
Sidemarker Lamps
Taillamps
License Plate Lamps
Instrument Panel Lights
5(Headlamps):Turn the control to this position to
turn on the headlamps, together with the previously
listed lamps and lights.
CTS-V
The exterior lamp control for the CTS-V has the
following four positions:
9(Off):Turning the control to this position turns off
all lamps except the Daytime Running Lamps (DRL).
;(Parking Lamps):Turning the control to this
position turns on the parking lamps together with
the following:
Sidemarker Lamps
Taillamps
License Plate Lamps
Instrument Panel Lights
5(Headlamps):Turning the control to this position
turns on the headlamps, together with the previously
listed lamps and lights.
AUTO (Automatic):Turning the control to this position
puts the headlamps in automatic mode. AUTO mode
will turn the exterior lamps on and off depending
upon how much light is available outside of the vehicle.
Wiper Activated Headlamps
This feature activates the headlamps and parking lamps
after the windshield wipers have been in use for
about six seconds. For this feature to work, the exterior
lamp control must be in AUTO.
When the exterior lamp control is off or in the parking
lamp position and the windshield wiper control is in any
position except off, the Headlamps Suggested
message will appear on the DIC display. See
“Headlamps Suggested Message” underDIC Warnings
and Messages on page 3-65for more information.
When the ignition is turned to OFF, the wiper-activated
headlamps will immediately turn off. They will also
turn off if the windshield wiper control is turned off.
3-20
Page 147 of 432
Headlamps on Reminder
A warning chime will sound if the exterior lamp control
is left on in either the headlamp or parking lamp position
and the driver’s door is opened with the ignition off.
SeeLights On Reminder on page 3-49for additional
information.
Daytime Running Lamps (DRL)
Daytime Running Lamps (DRL) can make it easier for
others to see the front of your vehicle during the
day. DRL can be helpful in many different driving
conditions, but they can be especially helpful in the short
periods after dawn and before sunset. Fully functional
daytime running lamps are required on all vehicles
rst sold in Canada.
The DRL system will make the turn signal lamps come
on when the following conditions are met:
It is still daylight and the ignition is in ON
or START,
the exterior lamp control is in off or AUTO with the
headlamps off, and
an automatic transmission is not in PARK (P) or the
parking brake is not set on a manual transmission.When DRL are on, only your front turn signal lamps will
be on. No other exterior lamps will be on when the
DRL are being used. Your instrument panel won’t be lit
up either.
When the exterior lamp control is in AUTO and it’s dark
enough outside, the DRL will turn off and the low-beam
headlamps will turn on. When it’s bright enough
outside, the low-beam headlamps will go off, and the
DRL will turn back on. If you start your vehicle in a dark
garage, the automatic headlamp system will come on
immediately. Once you leave the garage, it will take
about one minute for the automatic headlamp system to
change to DRL if it is light outside. During that delay,
your instrument panel cluster may not be as bright
as usual. Make sure your instrument panel brightness
lever is in the full bright position. SeeInstrument
Panel Brightness on page 3-24.
3-21
Page 148 of 432

If it’s dark enough outside and the exterior lamp control
is off, a Headlamps Suggested message will appear
on the Driver’s Information Center (DIC) display.
This message informs the driver that turning on the
exterior lamps is recommended even though the DRL
are still illuminated. Turning the exterior lamp control to
AUTO or to the low-beam headlamp position will
turn off the DRL and cancel the Headlamps Suggested
message. If the parking lamps or the fog lamps were
turned on instead, the DRL will still turn off and the
Headlamps Suggested message will be displayed. You
can turn it off by pressing the OK button if you have
the Navigation audio system or the CLR button if
you have the Base audio system.
To operate your vehicle with the DRL off, turn the
exterior lamp control off. Then turn on the fog lamps or
parking lamps, and the DRL will turn off. The
Headlamps Suggested message will appear on the DIC
display. This will work regardless of gear position
and whether or not the parking brake is set.
As with any vehicle, you should turn on the regular
headlamp system when you need it.Light Sensor
The light sensor for the DRL and AUTO headlamp
feature is located on top of the instrument panel. If you
cover the sensor, it will read dark, and the exterior
lamps or the Headlamps Suggested message will
appear on the DIC whenever the ignition is on.
3-22
Page 150 of 432
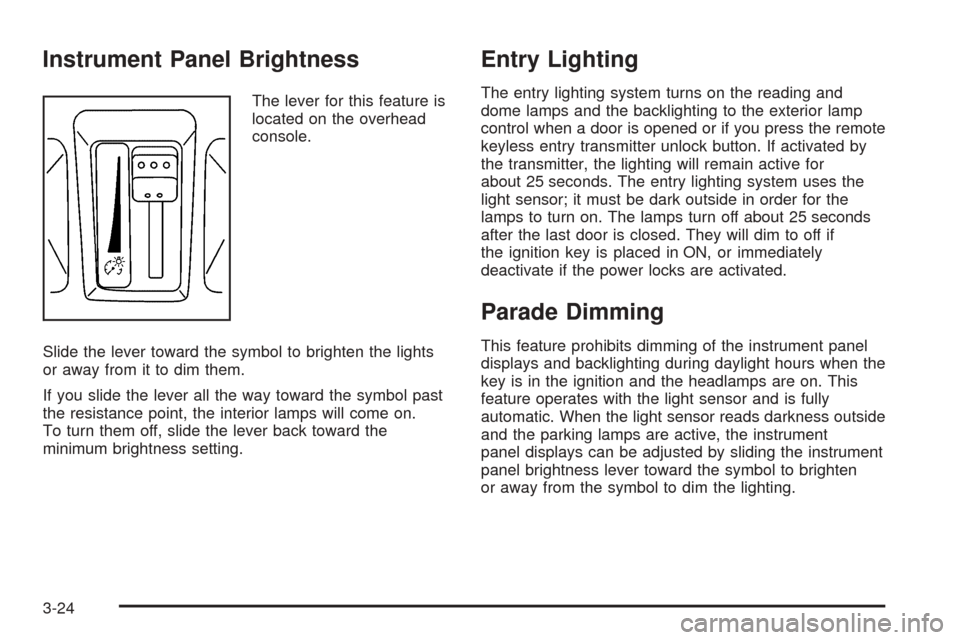
Instrument Panel Brightness
The lever for this feature is
located on the overhead
console.
Slide the lever toward the symbol to brighten the lights
or away from it to dim them.
If you slide the lever all the way toward the symbol past
the resistance point, the interior lamps will come on.
To turn them off, slide the lever back toward the
minimum brightness setting.
Entry Lighting
The entry lighting system turns on the reading and
dome lamps and the backlighting to the exterior lamp
control when a door is opened or if you press the remote
keyless entry transmitter unlock button. If activated by
the transmitter, the lighting will remain active for
about 25 seconds. The entry lighting system uses the
light sensor; it must be dark outside in order for the
lamps to turn on. The lamps turn off about 25 seconds
after the last door is closed. They will dim to off if
the ignition key is placed in ON, or immediately
deactivate if the power locks are activated.
Parade Dimming
This feature prohibits dimming of the instrument panel
displays and backlighting during daylight hours when the
key is in the ignition and the headlamps are on. This
feature operates with the light sensor and is fully
automatic. When the light sensor reads darkness outside
and the parking lamps are active, the instrument
panel displays can be adjusted by sliding the instrument
panel brightness lever toward the symbol to brighten
or away from the symbol to dim the lighting.
3-24
Page 151 of 432

Reading Lamps
The reading lamps are located on the overhead
console. These lamps come on automatically when
any door is opened.
For manual operation, press the button next to each
lamp to turn it on. Press it again to turn the lamp off.
If the reading lamps are left on, they automatically shut
off 10 minutes after the ignition has been turned off.
Accessory Power Outlets
With accessory power outlets, you can plug in auxiliary
electrical equipment such as a cellular telephone or
CB radio.
The front accessory power outlet is located in the
ashtray on the instrument panel below the climate
control system. The outlet will have a cigarette lighter if
your vehicle has this option. Remove the cigarette
lighter to access the outlet.
The rear accessory power outlet is located on the back
of the center console.
The power outlets can be set to be powered all of the
time or to turn off 10 minutes after your vehicle is
shut off. If you desire a change from this setting, see
your dealer for a fuse adjustment.Your vehicle may have a small cap that must be
removed to access the accessory power outlet. If it
does, when not using the outlet be sure to cover it with
the protective cap.
Notice:Leaving electrical equipment on for
extended periods will drain the battery. Always turn
off electrical equipment when not in use and do
not plug in equipment that exceeds the maximum
amperage rating.
Certain electrical accessories may not be compatible
with the accessory power outlet and could result
in blown vehicle or adapter fuses. If you experience a
problem see your dealer for additional information
on accessory power outlets.
Notice:Adding any electrical equipment to your
vehicle may damage it or keep other components
from working as they should. The repairs would not
be covered by your warranty. Check with your
dealer before adding electrical equipment.
When adding electrical equipment, be sure to follow the
proper installation instructions included with the
electrical equipment you install.
Notice:Improper use of the power outlet can cause
damage not covered by your warranty. Do not
hang any type of accessory or accessory bracket
from the plug because the power outlets are
designed for accessory power plugs only.
3-25
Page 154 of 432
The air-conditioning system removes moisture from the
air, so you may sometimes notice a small amount of
water dripping underneath your vehicle while idling
or after turning off the engine. This is normal.
Do not cover the solar sensor located in the center of
the instrument panel, near the windshield. For more
information on the solar sensor, see “Sensors” later in
this section.
Manual Operation
yNz(Mode):Pressing the mode switch and
changing the mode cancels automatic operation and
places the system in manual mode. Press AUTO
to return to automatic operation.
The outboard air outlets will always receive
airow regardless of the mode selected. SeeOutlet
Adjustment on page 3-31to change this airow from the
outboard outlets.
To change the current mode, select one of the following:
Y(Vent):This mode directs air to the instrument
panel outlets.
\(Bi-Level):This mode directs approximately half of
the air to the instrument panel outlets, and then
directs most of the remaining air to the oor outlets.
Some air may be directed toward the windshield.
In automatic operation, cooler air is directed to the upper
outlets and warmer air to the oor outlets.
[(Floor):This mode directs most of the air to the
oor outlets with some air directed to the outboard
outlets (for the side windows), and a little air directed to
the windshield.
The mode switch can also be used to select the defog
mode. Information on defogging and defrosting can
be found later in this section.
yAz(Fan):Press this switch to increase or
decrease the fan speed. Pressing this switch cancels
automatic operation and places the system in manual
mode. Press AUTO to return to automatic operation.
If the airow seems low when the fan speed is at
the highest setting, the passenger compartment air lter
may need to be replaced. For more information, see
Passenger Compartment Air Filter on page 3-32
andScheduled Maintenance on page 6-4.
h(Recirculation):This mode keeps outside air
from coming in the vehicle. It can be used to prevent
outside air and odors from entering your vehicle or to help
heat or cool the air inside your vehicle more quickly.
Press this button to turn the recirculation mode on or off.
The air-conditioning compressor also comes on.
Recirculation is not available in the defrost mode and will
automatically turn off after 10 minutes when defog is
selected.
3-28
Page 155 of 432

Using recirculation for long periods of time may cause the
air inside your vehicle to become too dry or stuffy. To
prevent this from happening, after the air in your vehicle
has cooled, turn the recirculation mode off.
QPWRR(Power/Driver’s Temperature):Press the
PWR button located on the driver’s side of the
climate control panel to turn the entire climate control
system on or off. Press the up or down arrow on
the switch to increase or decrease the temperature
inside your vehicle.
QPWRR(Power/Passenger’s Temperature):Press
the PWR button located on the passenger’s side of
the climate control panel to allow the passenger’s
climate control setting to be different than the driver’s.
Press the up or down arrow on the switch to increase or
decrease the temperature for the front passenger.
A/C OFF (Air Conditioning):Press this button to
manually turn off the air conditioning compressor. Press
AUTO to return to automatic operation or press the
A/C OFF button again.
Sensors
There is a solar sensor located on the instrument panel,
near the windshield.
3-29
Page 156 of 432

There is also an interior
temperature sensor
located to the right of the
steering wheel on the
instrument panel.
These sensors monitor the solar radiation and the air
inside your vehicle, then use the information to maintain
the selected temperature by initiating needed
adjustments to the temperature, the fan speed and the
air delivery system. The system may also supply
cooler air to the side of the vehicle facing the sun. The
recirculation mode will also be activated, as necessary.
Do not cover the sensors or the automatic climate
control system will not work properly.Defogging and Defrosting
Fog on the inside of windows is a result of high humidity
(moisture) condensing on the cool window glass. This
can be minimized if the climate control system is
used properly. There are two modes to clear fog from
your windshield. Use the defog mode to clear the
windows of fog or moisture and warm the passengers.
Use the defrost mode to remove fog or frost from
the windshield more quickly.
yNz(Mode):Press this button until defog appears
on the display.
-(Defog):This mode directs the air between the
windshield, oor outlets and side windows. When you
select this mode, the system turns off recirculation
and runs the air-conditioning compressor unless
the outside temperature is at or below freezing. The
recirculation mode is cancelled when you enter defog
mode. If you select recirculation while in defog mode, it
will be cancelled after 10 minutes.
If you have fogging on the side windows, turn the
thumbwheel on the outboard outlets to the side window
defog position. SeeOutlet Adjustment on page 3-31
for more information.
3-30
Page 161 of 432

Instrument Panel Cluster
The instrument panel cluster is designed to let you know at a glance how your vehicle is running. You’ll know how
fast you’re going, how much fuel you’re using and many of the other things you’ll need to know to drive safely
and economically.
CTS (United States version shown, Canada similar)
3-35