inflation pressure CADILLAC CTS V 2017 3.G User Guide
[x] Cancel search | Manufacturer: CADILLAC, Model Year: 2017, Model line: CTS V, Model: CADILLAC CTS V 2017 3.GPages: 352, PDF Size: 3.99 MB
Page 297 of 352

Cadillac CTS/CTS-V Owner Manual (GMNA-Localizing-MidEast-10293089) -
2017 - crc - 6/22/16
296 VEHICLE CARE
Tire Inspection
We recommend that the tires,
including the spare tire, if the
vehicle has one, be inspected for
signs of wear or damage at least
once a month.
Replace the tire if:
.The indicators at three or more
places around the tire can
be seen.
.There is cord or fabric showing
through the tire's rubber.
.The tread or sidewall is
cracked, cut, or snagged deep
enough to show cord or fabric.
.The tire has a bump, bulge,
or split.
.The tire has a puncture, cut,
or other damage that cannot
be repaired well because of the
size or location of the damage.
Tire Rotation
If the vehicle has non-directional
tires, they should be rotated at the
intervals specified in the
Maintenance Schedule. See
Maintenance Schedule0324.
Tires are rotated to achieve a
uniform wear for all tires. The first
rotation is the most important.
Anytime unusual wear is noticed,
rotate the tires as soon as
possible, check for proper tire
inflation pressure, and check for
damaged tires or wheels. If the
unusual wear continues after the
rotation, check the wheel
alignment. See When It Is Time for
New Tires 0297 and Wheel
Replacement 0300.
Directional tires should not be
rotated. Each tire and wheel
should be used only in the
position it is in. Directional tires
will have an arrow on the tire indicating the proper direction of
rotation or will have
“left”or
“right ”molded on the sidewall.
Use this rotation pattern if the
vehicle has different size tires on
the front and rear and they are
non-directional.
Different tire sizes should not be
rotated front to rear.
Page 298 of 352

Cadillac CTS/CTS-V Owner Manual (GMNA-Localizing-MidEast-10293089) -
2017 - crc - 6/22/16
VEHICLE CARE 297
Use this rotation pattern when
rotating tires of the same size
installed on all four wheel
positions.
If the vehicle has a compact spare
tire, do not include it in the tire
rotation.
Adjust the front and rear tires to
the recommended inflation
pressure on the Tire and Loading
Information label after the tires
have been rotated. SeeTire
Pressure 0290 and Vehicle Load
Limits 0192. Reset the Tire Pressure Monitor
System. See
Tire Pressure Monitor
Operation 0293.
Check that all wheel nuts are
properly tightened. See “Wheel
Nut Torque ”under Capacities and
Specifications 0336.
{Warning
Rust or dirt on a wheel, or on the
parts to which it is fastened, can
make wheel nuts become loose
after time. The wheel could come
off and cause an accident. When
changing a wheel, remove any rust
or dirt from places where the wheel
attaches to the vehicle. In an
emergency, a cloth or a paper towel
can be used; however, use a scraper
or wire brush later to remove all
rust or dirt.
Lightly coat the center of the
wheel hub with wheel bearing
grease after a wheel change or tire
rotation to prevent corrosion or
rust build-up. Do not get grease on the flat wheel mounting
surface or on the wheel nuts or
bolts.
When It Is Time for New
Tires
Factors such as maintenance,
temperatures, driving speeds, vehicle
loading, and road conditions affect the
wear rate of the tires.
Treadwear indicators are one way to
tell when it is time for new tires.
Treadwear indicators appear when the
tires have only 1.6 mm (1/16 in) or
Page 299 of 352

Cadillac CTS/CTS-V Owner Manual (GMNA-Localizing-MidEast-10293089) -
2017 - crc - 6/22/16
298 VEHICLE CARE
less of tread remaining. SeeTire
Inspection 0296 and Tire
Rotation 0296.
The rubber in tires ages over time.
This also applies to the spare tire,
if the vehicle has one, even if it is
never used. Multiple factors including
temperatures, loading conditions, and
inflation pressure maintenance affect
how fast aging takes place. GM
recommends that tires, including the
spare if equipped, be replaced after six
years, regardless of tread wear. The
tire manufacture date is the last four
digits of the DOT Tire Identification
Number (TIN) which is molded into
one side of the tire sidewall. The first
two digits represent the week (01–52)
and the last two digits, the year. For
example, the third week of the year
2010 would have a four-digit DOT
date of 0310.
Vehicle Storage
Tires age when stored normally
mounted on a parked vehicle. Park a
vehicle that will be stored for at least
a month in a cool, dry, clean area
away from direct sunlight to slow aging. This area should be free of
grease, gasoline, or other substances
that can deteriorate rubber.
Parking for an extended period can
cause flat spots on the tires that may
result in vibrations while driving.
When storing a vehicle for at least a
month, remove the tires or raise the
vehicle to reduce the weight from the
tires.
Buying New Tires
GM has developed and matched
specific tires for the vehicle. The
original equipment tires installed
were designed to meet General
Motors Tire Performance Criteria
Specification (TPC Spec) system
rating. When replacement tires are
needed, GM strongly recommends
buying tires with the same TPC
Spec rating.
GM's exclusive TPC Spec system
considers over a dozen critical
specifications that impact the
overall performance of the vehicle,
including brake system
performance, ride and handling,
traction control, and tire pressure
monitoring performance. GM's
TPC Spec number is molded onto
the tire's sidewall near the tire
size. If the tires have an all-season
tread design, the TPC Spec
number will be followed by MS for
mud and snow.
GM recommends replacing worn
tires in complete sets of four.
Uniform tread depth on all tires
will help to maintain the
performance of the vehicle.
Braking and handling performance
may be adversely affected if all the
tires are not replaced at the same
time. If proper rotation and
maintenance have been done, all
four tires should wear out at
about the same time. See
Tire
Rotation 0296 for information on
proper tire rotation. However, if it
is necessary to replace only one
axle set of worn tires, place the
new tires on the rear axle.
Page 307 of 352

Cadillac CTS/CTS-V Owner Manual (GMNA-Localizing-MidEast-10293089) -
2017 - crc - 6/22/16
306 VEHICLE CARE
sealant is completely dispersed
into the tire, the pressure will
quickly drop and start to rise
again as the tire inflates with
air only.
10. Inflate the tire to the recommended inflation pressure
using the pressure gauge (3). The
recommended inflation pressure
can be found on the Tire and
Loading Information label. See
Tire Pressure 0290.
The pressure gauge (3) may read
higher than the actual tire
pressure while the compressor is
on. Turn the compressor off to
get an accurate pressure reading.
The compressor may be turned
on/off until the correct pressure
is reached.
Caution
If the recommended pressure
cannot be reached after
approximately 25 minutes, the
vehicle should not be driven farther.
The tire is too severely damaged (Continued)
Caution (Continued)
and the tire sealant and compressor
kit cannot inflate the tire. Remove
the power plug from the accessory
power outlet and unscrew the
inflating hose from the tire valve.
11. Press the on/off button (2) to turn the tire sealant and
compressor kit off.
The tire is not sealed and will
continue to leak air until the
vehicle is driven and the sealant
is distributed in the tire,
therefore, Steps 12–18 must be
done immediately after Step 11.
Be careful while handling the tire
sealant and compressor kit as it
could be warm after usage.
12. Unplug the power plug (8) from the accessory power outlet in the
vehicle.
13. Turn the sealant/air hose (6) counterclockwise to remove it
from the tire valve stem.
14. Replace the tire valve stem cap. 15. Replace the sealant/air hose (6),
and the power plug (8) back in
their original location.
16. If the flat tire was able to inflate
to the recommended inflation
pressure, remove the maximum
speed label from the sealant
canister (5) and place it in a
highly visible location. Do not
exceed the speed on this label
until the damaged tire is repaired
or replaced.
17. Return the equipment to its original storage location in the
vehicle.
18. Immediately drive the vehicle 8 km (5 mi) to distribute the
sealant in the tire.
19. Stop at a safe location and check the tire pressure. Refer to
Steps 1–11 under “Using the Tire
Page 308 of 352
Cadillac CTS/CTS-V Owner Manual (GMNA-Localizing-MidEast-10293089) -
2017 - crc - 6/22/16
VEHICLE CARE 307
Sealant and Compressor Kit
without Sealant to Inflate a Tire
(Not Punctured).”
If the tire pressure has fallen
more than 68 kPa (10 psi) below
the recommended inflation
pressure, stop driving the vehicle.
The tire is too severely damaged
and the tire sealant cannot seal
the tire.
If the tire pressure has not
dropped more than 68 kPa
(10 psi) from the recommended
inflation pressure, inflate the tire
to the recommended inflation
pressure.
20. Wipe off any sealant from the wheel, tire, and vehicle.
21. Dispose of the used sealant canister (5) and sealant/air hose
(6) assembly at a local dealer or
in accordance with local
regulations and practices.
22. Replace with a new canister assembly available from your
dealer. 23. After temporarily sealing the tire
using the tire sealant and
compressor kit, take the vehicle
to an authorized dealer within
161 km (100 mi) of driving to
have the tire repaired or
replaced.
Using the Tire Sealant and
Compressor Kit without Sealant
to Inflate a Tire (Not Punctured)
To use the air compressor to inflate a
tire with air only and not sealant:
If a tire goes flat, avoid further tire
and wheel damage by driving slowly
to a level place. Turn on the hazard
warning flashers. See Hazard Warning
Flashers 0161.
Page 309 of 352

Cadillac CTS/CTS-V Owner Manual (GMNA-Localizing-MidEast-10293089) -
2017 - crc - 6/22/16
308 VEHICLE CARE
SeeIf a Tire Goes Flat 0302 for other
important safety warnings.
1. Remove the tire sealant and compressor kit from its storage
location. See Storing the Tire
Sealant and Compressor Kit 0309.
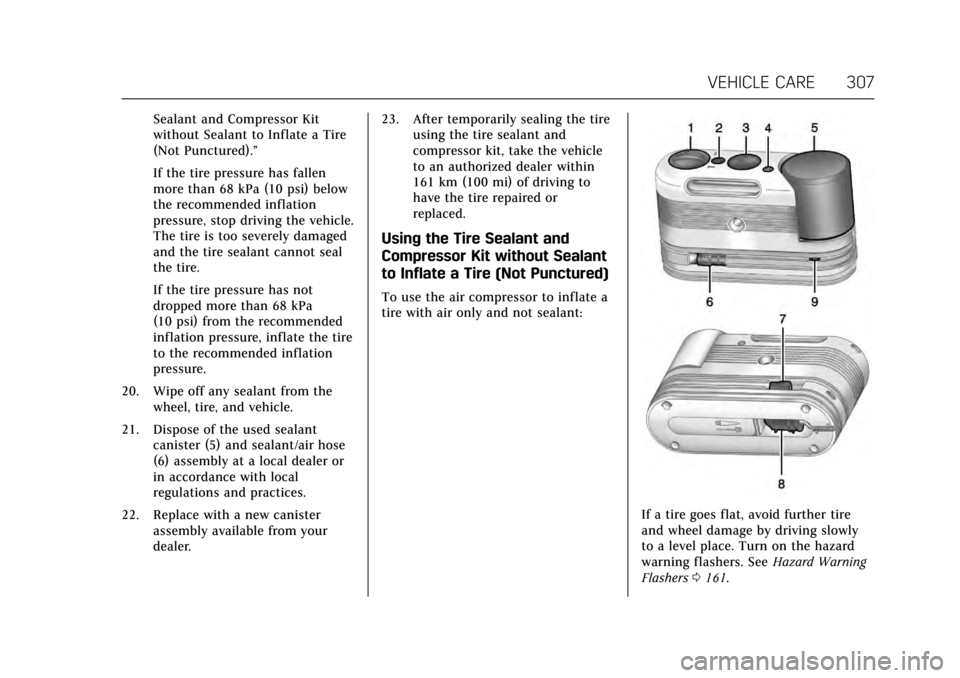
2. Unwrap the air only hose (7) and the power plug (8).
3. Place the kit on the ground.
Make sure the tire valve stem is
positioned close to the ground so
the hose will reach it.
4. Remove the tire valve stem cap from the flat tire by turning it
counterclockwise.
5. Attach the air only hose (7) onto the tire valve stem by turning it
clockwise until it is tight.
6. Plug the power plug (8) into the accessory power outlet in the
vehicle. Unplug all items from
other accessory power outlets.
See Power Outlets 0109.
If the vehicle has an accessory
power outlet, do not use the
cigarette lighter. If the vehicle only has a cigarette
lighter, use the cigarette lighter.
Do not pinch the power plug
cord in the door or window.
7. Start the vehicle. The vehicle must be running while using the
air compressor.
8. Press and turn the selector switch (1) clockwise to the Air
Only position.
9. Press the on/off (2) button to turn the compressor on.
The compressor will inflate the
tire with air only.
10. Inflate the tire to the recommended inflation pressure
using the pressure gauge (3). The
recommended inflation pressure
can be found on the Tire and
Loading Information label. See
Tire Pressure 0290.
The pressure gauge (3) may read
higher than the actual tire
pressure while the compressor is
on. Turn the compressor off to
get an accurate reading. The compressor may be turned on/off
until the correct pressure is
reached.
If you inflate the tire higher than
the recommended pressure you
can adjust the excess pressure by
pressing the pressure deflation
button (4) until the proper
pressure reading is reached. This
option is only functional when
using the air only hose (7).
11. Press the on/off button (2) to turn the tire sealant and
compressor kit off.
Be careful while handling the tire
sealant and compressor kit as it
could be warm after usage.
12. Unplug the power plug (8) from the accessory power outlet in the
vehicle.
13. Disconnect the air only hose (7) from the tire valve stem, by
turning it counterclockwise, and
replace the tire valve stem cap.
14. Replace the air only hose (7) and the power plug (8) and cord back
in its original location.
Page 325 of 352

Cadillac CTS/CTS-V Owner Manual (GMNA-Localizing-MidEast-10293089) -
2017 - crc - 6/22/16
324 SERVICE AND MAINTENANCE
At your dealer, you can be certain that
you will receive the highest level of
service available. Your dealer has
specially trained service technicians,
uses genuine replacement parts, as
well as, up-to-date tools and
equipment to ensure fast and accurate
diagnostics.
The proper replacement parts, fluids,
and lubricants to use are listed in
Recommended Fluids and Lubricants
0331 and Maintenance Replacement
Parts 0332. We recommend the use
of genuine parts from your dealer.
Rotation of New Tires
Tire rotation is not recommended if
the vehicle has different size tires on
the front and rear wheels. If tire
rotation is recommended for the
vehicle, to maintain ride, handling,
and performance of the vehicle, it is
important that the first rotation
service for new tires be performed.
Tires should be rotated every service.
See Tire Rotation 0296.Maintenance Schedule
Owner Checks and Services
At Each Fuel Stop
.
Check the engine oil level. See
Engine Oil 0257.
Once a Month
. Check the tire inflation pressures.
See Tire Pressure 0290.
. Inspect the tires for wear. See Tire
Inspection 0296.
. Check the windshield washer fluid
level. See Washer Fluid 0269.
Engine Oil Change
Change the engine oil and filter when
the CHANGE ENGINE OIL SOON
message displays, 12 000 km/7,500 mi,
or at one year, whichever comes first.
If driven under the best conditions,
the engine oil life system may not
indicate the need for vehicle service
for up to a year. The engine oil and
filter must be changed at least once a
year and the oil life system must be
reset. Your trained dealer technician
can perform this work. If the engine oil life system is reset accidentally,
service the vehicle within 5 000 km/
3,000 mi since the last service. Reset
the oil life system when the oil is
changed. See
Engine Oil Life
System 0259.
Tire Rotation and Required
Services Every 12 000 km/
7,500 mi
Rotate the tires, if recommended for
the vehicle, and perform the following
services. See Tire Rotation0296.
. Check engine oil level and oil
life percentage. If needed, change
engine oil and filter, and reset oil
life system. See Engine Oil0257
and Engine Oil Life System 0259.
. Check engine coolant level. See
Engine Coolant 0264.
. Check windshield washer fluid
level. See Washer Fluid 0269.
. Visually inspect windshield wiper
blades for wear, cracking,
or contamination. See Exterior
Care 0315. Replace worn or
damaged wiper blades. See Wiper
Blade Replacement 0274.
Page 326 of 352
Cadillac CTS/CTS-V Owner Manual (GMNA-Localizing-MidEast-10293089) -
2017 - crc - 6/22/16
SERVICE AND MAINTENANCE 325
.Check tire inflation pressures. See
Tire Pressure 0290.
. Inspect tire wear. See Tire
Inspection 0296.
. Visually check for fluid leaks.
. Inspect engine air cleaner filter.
See Engine Air Cleaner/Filter 0261.
. Inspect brake system. See Exterior
Care 0315.
. Visually inspect steering,
suspension, and chassis
components for damaged, loose,
or missing parts or signs of wear.
See Exterior Care 0315.
. Check restraint system
components. See Safety System
Check 070.
. Visually inspect fuel system for
damage or leaks.
. Visually inspect exhaust system
and nearby heat shields for loose
or damaged parts.
. Lubricate body components. See
Exterior Care 0315.
. Check starter switch. See Starter
Switch Check 0273. .
Check automatic transmission
shift lock control function. See
Automatic Transmission Shift Lock
Control Function Check 0273.
. Check parking brake and
automatic transmission park
mechanism. See Park Brake and
P (Park) Mechanism Check 0274.
. Check accelerator pedal for
damage, high effort, or binding.
Replace if needed.
. Visually inspect gas strut for signs
of wear, cracks, or other damage.
Check the hold open ability of the
strut. See your dealer if service is
required.
. Inspect sunroof track and seal,
if equipped. See Sunroof050.