Battery CADILLAC DEVILLE 1999 7.G User Guide
[x] Cancel search | Manufacturer: CADILLAC, Model Year: 1999, Model line: DEVILLE, Model: CADILLAC DEVILLE 1999 7.GPages: 368, PDF Size: 2.61 MB
Page 106 of 368
yellowblue
2-46
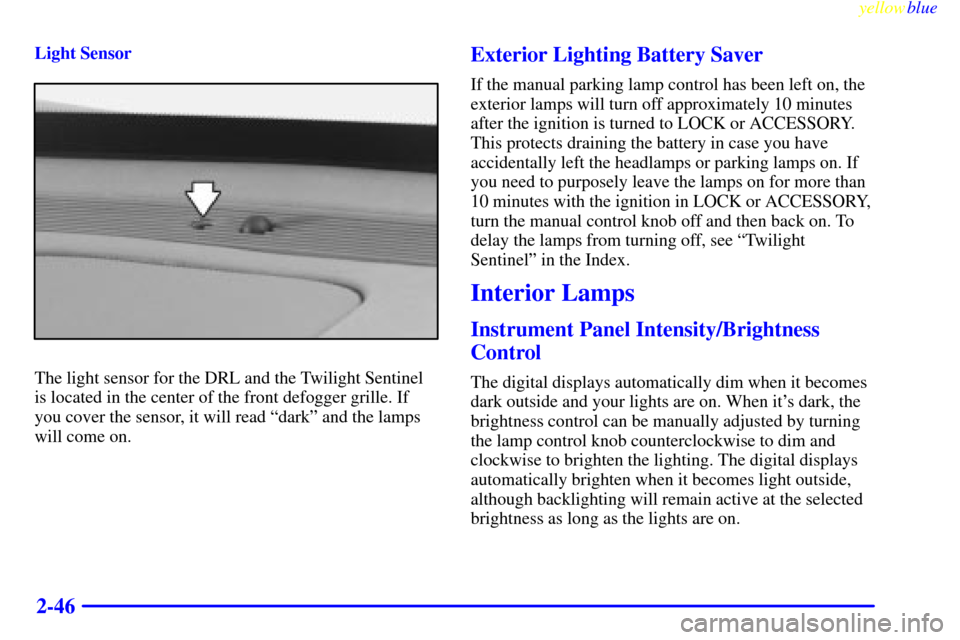
Light Sensor
The light sensor for the DRL and the Twilight Sentinel
is located in the center of the front defogger grille. If
you cover the sensor, it will read ªdarkº and the lamps
will come on.
Exterior Lighting Battery Saver
If the manual parking lamp control has been left on, the
exterior lamps will turn off approximately 10 minutes
after the ignition is turned to LOCK or ACCESSORY.
This protects draining the battery in case you have
accidentally left the headlamps or parking lamps on. If
you need to purposely leave the lamps on for more than
10 minutes with the ignition in LOCK or ACCESSORY,
turn the manual control knob off and then back on. To
delay the lamps from turning off, see ªTwilight
Sentinelº in the Index.
Interior Lamps
Instrument Panel Intensity/Brightness
Control
The digital displays automatically dim when it becomes
dark outside and your lights are on. When it's dark, the
brightness control can be manually adjusted by turning
the lamp control knob counterclockwise to dim and
clockwise to brighten the lighting. The digital displays
automatically brighten when it becomes light outside,
although backlighting will remain active at the selected
brightness as long as the lights are on.
Page 108 of 368
yellowblue
2-48 Map Lamps
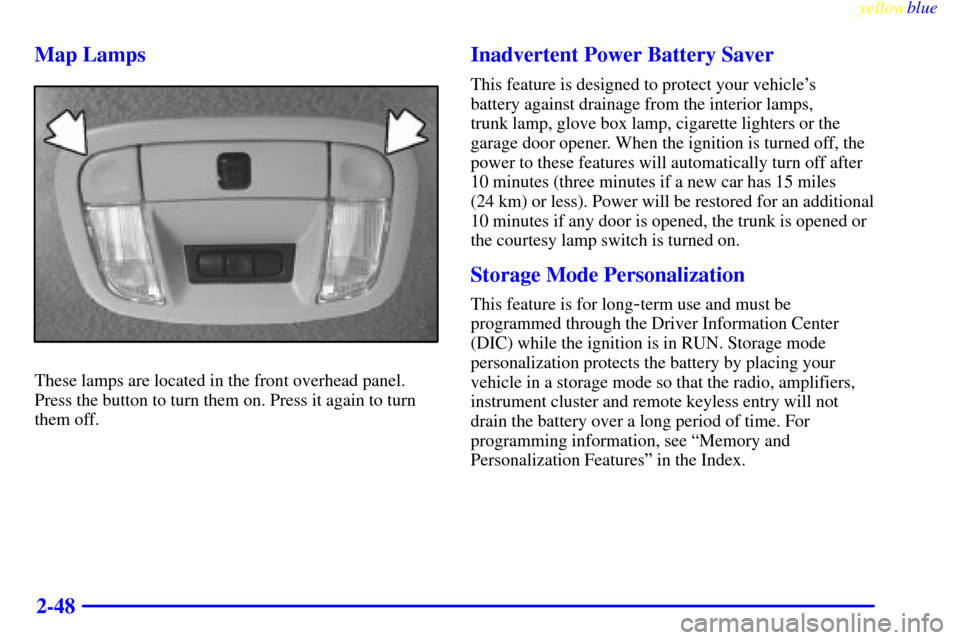
These lamps are located in the front overhead panel.
Press the button to turn them on. Press it again to turn
them off.
Inadvertent Power Battery Saver
This feature is designed to protect your vehicle's
battery against drainage from the interior lamps,
trunk lamp, glove box lamp, cigarette lighters or the
garage door opener. When the ignition is turned off, the
power to these features will automatically turn off after
10 minutes (three minutes if a new car has 15 miles
(24 km) or less). Power will be restored for an additional
10 minutes if any door is opened, the trunk is opened or
the courtesy lamp switch is turned on.
Storage Mode Personalization
This feature is for long-term use and must be
programmed through the Driver Information Center
(DIC) while the ignition is in RUN. Storage mode
personalization protects the battery by placing your
vehicle in a storage mode so that the radio, amplifiers,
instrument cluster and remote keyless entry will not
drain the battery over a long period of time. For
programming information, see ªMemory and
Personalization Featuresº in the Index.
Page 115 of 368
yellowblue
2-55 Rear Ashtray
To use the rear ashtray, lift the lid.
Cigarette Lighter
The cigarette lighter is located near the ashtray. Press it
all the way in and release. It will pop back by itself
when it's ready to light. You may also have a lighter
located at the rear seat air outlet.
Note: Power to the cigarette lighter will shut off
10 minutes after the ignition is turned off. This helps
to prevent battery drainage. For more information, see
ªInadvertent Battery Saverº in the Index.
NOTICE:
Don't hold a cigarette lighter in with your hand
while it is heating. If you do, it won't be able to
back away from the heating element when it's
ready. That can make it overheat, damaging the
lighter and the heating element.
Sun Visors
Swing down the visor to block out glare. It can also be
detached from the center mount and moved to the side
while the auxiliary sunshade remains to block glare
from the front. Pull the front shade from the headliner
and position it to your preference.
The driver's sunshade is also equipped with a storage
flap that can be used for maps or toll tickets.
Lighted Visor Vanity Mirror
Turn the sunshade down and lift the cover to see the
mirror. Move the slide switch up or down to brighten or
dim the lamp.
Lighted Rear Visor Vanity Mirror
(If Equipped)
Turn the sunshade down and lift the cover to see the
mirror. Move the slide switch up or down to brighten or
dim the lamp.
Page 129 of 368
yellowblue
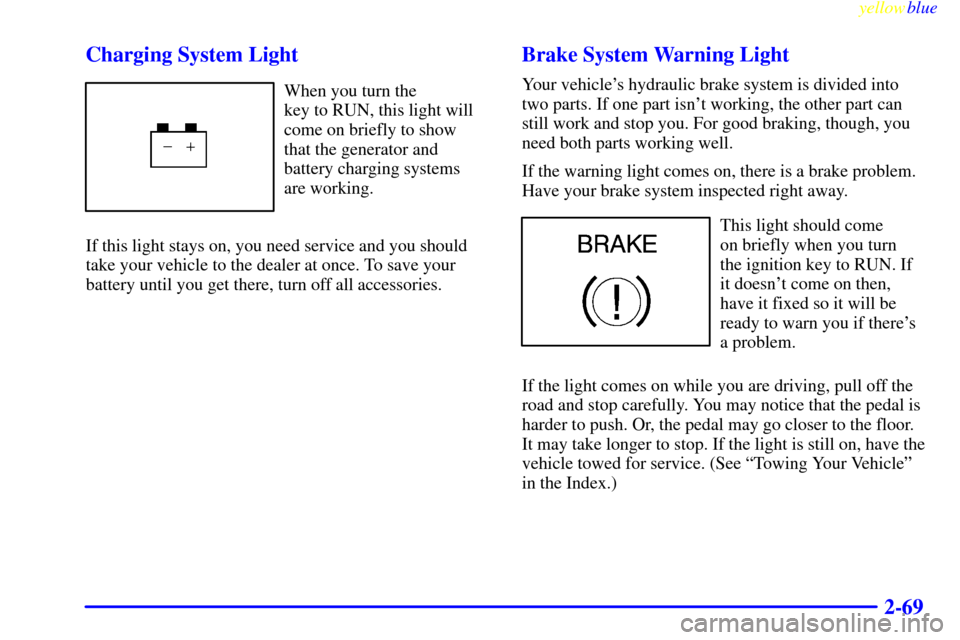
2-69 Charging System Light
When you turn the
key to RUN, this light will
come on briefly to show
that the generator and
battery charging systems
are working.
If this light stays on, you need service and you should
take your vehicle to the dealer at once. To save your
battery until you get there, turn off all accessories.
Brake System Warning Light
Your vehicle's hydraulic brake system is divided into
two parts. If one part isn't working, the other part can
still work and stop you. For good braking, though, you
need both parts working well.
If the warning light comes on, there is a brake problem.
Have your brake system inspected right away.
This light should come
on briefly when you turn
the ignition key to RUN. If
it doesn't come on then,
have it fixed so it will be
ready to warn you if there's
a problem.
If the light comes on while you are driving, pull off the
road and stop carefully. You may notice that the pedal is
harder to push. Or, the pedal may go closer to the floor.
It may take longer to stop. If the light is still on, have the
vehicle towed for service. (See ªTowing Your Vehicleº
in the Index.)
Page 139 of 368
yellowblue
2-79
Driver Information Center (DIC)
This display gives you the status of many of your
vehicle's systems. The DIC is also used to display driver
personalization features and warning/status messages.
DIC Controls and Displays
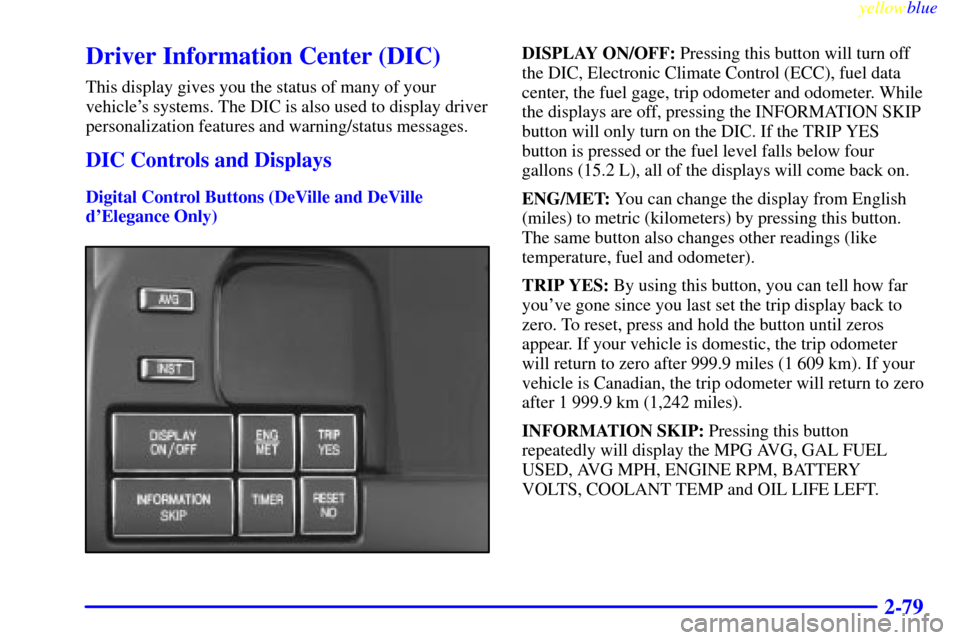
Digital Control Buttons (DeVille and DeVille
d'Elegance Only)
DISPLAY ON/OFF: Pressing this button will turn off
the DIC, Electronic Climate Control (ECC), fuel data
center, the fuel gage, trip odometer and odometer. While
the displays are off, pressing the INFORMATION SKIP
button will only turn on the DIC. If the TRIP YES
button is pressed or the fuel level falls below four
gallons (15.2 L), all of the displays will come back on.
ENG/MET: You can change the display from English
(miles) to metric (kilometers) by pressing this button.
The same button also changes other readings (like
temperature, fuel and odometer).
TRIP YES: By using this button, you can tell how far
you've gone since you last set the trip display back to
zero. To reset, press and hold the button until zeros
appear. If your vehicle is domestic, the trip odometer
will return to zero after 999.9 miles (1 609 km). If your
vehicle is Canadian, the trip odometer will return to zero
after 1 999.9 km (1,242 miles).
INFORMATION SKIP: Pressing this button
repeatedly will display the MPG AVG, GAL FUEL
USED, AVG MPH, ENGINE RPM, BATTERY
VOLTS, COOLANT TEMP and OIL LIFE LEFT.
Page 141 of 368
yellowblue
2-81
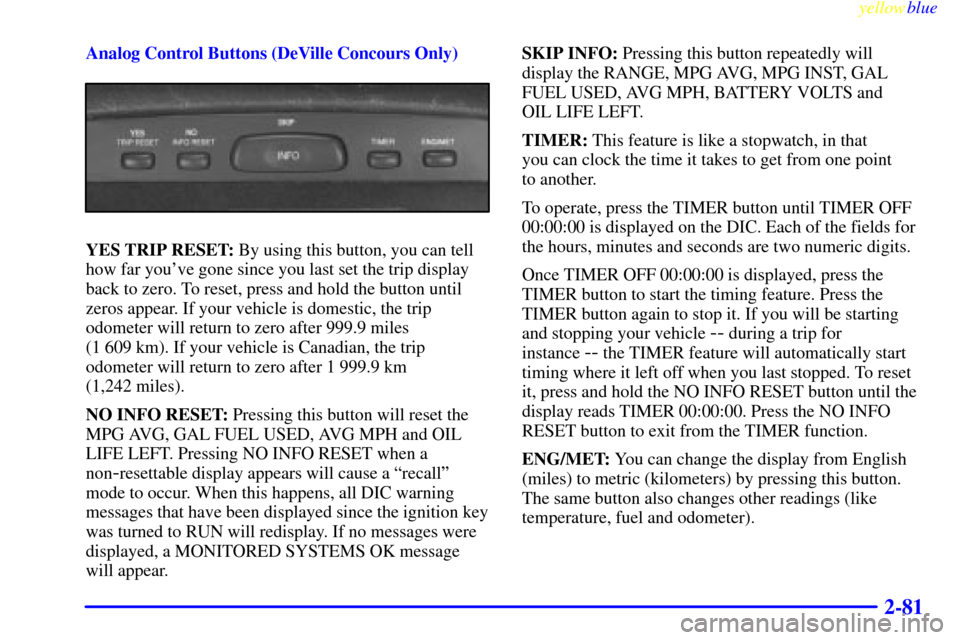
Analog Control Buttons (DeVille Concours Only)
YES TRIP RESET: By using this button, you can tell
how far you've gone since you last set the trip display
back to zero. To reset, press and hold the button until
zeros appear. If your vehicle is domestic, the trip
odometer will return to zero after 999.9 miles
(1 609 km). If your vehicle is Canadian, the trip
odometer will return to zero after 1 999.9 km
(1,242 miles).
NO INFO RESET: Pressing this button will reset the
MPG AVG, GAL FUEL USED, AVG MPH and OIL
LIFE LEFT. Pressing NO INFO RESET when a
non
-resettable display appears will cause a ªrecallº
mode to occur. When this happens, all DIC warning
messages that have been displayed since the ignition key
was turned to RUN will redisplay. If no messages were
displayed, a MONITORED SYSTEMS OK message
will appear.SKIP INFO: Pressing this button repeatedly will
display the RANGE, MPG AVG, MPG INST, GAL
FUEL USED, AVG MPH, BATTERY VOLTS and
OIL LIFE LEFT.
TIMER: This feature is like a stopwatch, in that
you can clock the time it takes to get from one point
to another.
To operate, press the TIMER button until TIMER OFF
00:00:00 is displayed on the DIC. Each of the fields for
the hours, minutes and seconds are two numeric digits.
Once TIMER OFF 00:00:00 is displayed, press the
TIMER button to start the timing feature. Press the
TIMER button again to stop it. If you will be starting
and stopping your vehicle
-- during a trip for
instance
-- the TIMER feature will automatically start
timing where it left off when you last stopped. To reset
it, press and hold the NO INFO RESET button until the
display reads TIMER 00:00:00. Press the NO INFO
RESET button to exit from the TIMER function.
ENG/MET: You can change the display from English
(miles) to metric (kilometers) by pressing this button.
The same button also changes other readings (like
temperature, fuel and odometer).
Page 142 of 368

yellowblue
2-82
MPG AVG (Reset): Press the SKIP INFO button to
display the MPG AVG (Average Fuel Economy), then
press and hold the NO INFO RESET button until
0.0 MPG AVG is displayed.
GAL FUEL USED (Reset): Press the SKIP INFO
button to display the GAL FUEL USED on the DIC,
then press and hold the NO INFO RESET button until
0.0 GAL FUEL USED is displayed.
AVG MPH (Reset): Press the SKIP INFO button to
display the AVG MPH (Average Speed), then press and
hold the NO INFO RESET button until 0.0 AVG MPH
is displayed.
OIL LIFE LEFT (Reset): Press the SKIP INFO button
to display the OIL LIFE LEFT, then press and hold the
NO INFO RESET button until 100% OIL LIFE LEFT is
displayed. (This only needs to be reset after you have
had the oil changed.)DIC Messages
These messages will appear if there is a problem sensed
in one of your vehicle's systems. Vehicles that are first
sold in Canada will have a number after each message.
This number helps to identify the message which is only
displayed in English.
APPLY BRAKE TO SHIFT
- 46: This message will
appear if your vehicle is in PARK (P) for about 15
seconds and the brake is not pressed in. To remove this
message from the DIC display, hold the OFF and the
blue (cooler) buttons on the digital cluster control panel
for about five seconds. On the analog climate control
panel, press the OFF button (next to the MODE button)
and the down arrow on the PASS TEMP button for
about five seconds. Hold the same two buttons to
display the message again.
BATTERY NOT CHARGING
- 7: This message will
appear if the battery is not being charged. Have the
electrical system checked by your dealership at your
earliest convenience.
Page 143 of 368

yellowblue
2-83
BATTERY VOLTAGE HIGH - 8: This message
shows that the electrical charging system is
overcharging (more than 16 volts). To avoid being
stranded, have the electrical system checked by your
dealership. You can reduce the charging overload by
using the accessories. Turn on the lamps and radio, set
the climate control on AUTO and the fan speed on HI,
and turn the rear window defogger on. You can
monitor battery voltage on the DIC by pressing
the INFORMATION SKIP (SKIP INFO) button.
The normal range is 11.5 to 15.5 volts when the engine
is running.
BATTERY VOLTAGE LOW
- 6: This message will
appear when the electrical system is charging less than
10 volts or if the battery has been drained. If this
message appears immediately after starting, it is possible
that the generator can still recharge the battery. The
battery should recharge and may take a few hours to do
so. Consider using an auxiliary charger to boost the
battery after returning home or to a final destination. (Be
sure to follow the manufacturer's instructions when
recharging the battery.)If this message appears while driving or after starting
your vehicle and stays on, have it checked immediately
to determine the cause of this problem. To help the
generator recharge the battery quickly, you can reduce
the load on the electrical system by turning off the
accessories. You can monitor battery voltage on the DIC
by pressing the INFORMATION SKIP (SKIP INFO)
button. The normal range is 11.5 to 15.5 volts.
BRAKE VACUUM PROBLEM
-108: The circuit in
the brake booster vacuum has shorted or is loose when
this message appears. Your vehicle may lose power
brakes but you will still have the use of manual brakes.
The power brakes will not be affected if the problem is
caused by a failed sensor. Have your vehicle serviced
immediately at your dealership.
CHANGE ENGINE OIL
- 82: This means that the life
of the engine oil has expired and it should be changed
within 200 miles (322 km). See ªEngine Oilº and ªFilter
Recommendationsº in the Maintenance Schedule
booklet. After an oil change, the Oil Life Indicator must
be reset. For more information, see ªOil Life Indicator,
How to Resetº in the Index.
Page 154 of 368

yellowblue
2-94
FEATURE ON displays when a yes response is made
and FEATURE OFF shows after a no response. If you
do not want to change the setting of this feature, press
the INFORMATION SKIP (SKIP INFO) button to skip
to the next personalization feature which is Storage
Mode Personalization.
Storage Mode Personalization
Before you begin programming, make sure that your
vehicle's ignition is in RUN. To begin programming,
press the INFORMATION SKIP (SKIP INFO) and
RESET NO (NO INFO RESET) buttons at the same
time for about two seconds. The first message to appear
is DOORS LOCK IN GEAR. Press the INFORMATION
SKIP (SKIP INFO) button after this prompt is displayed
until the STORAGE MODE prompt appears on the DIC.
Press the TRIP YES (YES TRIP RESET) button to
answer ªyesº or press the RESET NO (NO INFO
RESET) button to indicate a ªnoº response.FEATURE ON appears when a yes response is made
and FEATURE OFF shows when a no response is made.
Since this is the last personalization feature available, a
yes or no response will end out of the DIC display.
Once the battery guard has been programmed, your
vehicle will enter the storage mode about 20 minutes
after the ignition key has been turned off.
Your vehicle will stay in the storage mode until the
ignition key is turned out of LOCK. The system will
ªwake
-upº when the door key is inserted into the door,
however, your vehicle will remain in the storage mode.
The ignition must be out of LOCK before the battery
guard is disabled.
Comfort Controls and Radio System
Personalization
These features allow both drivers to personalize their
own climate control settings as well as their radio
settings. For more information, see ªClimate
Control Personalizationº and ªRadio Personalizationº
in the Index.
Page 171 of 368

yellowblue
3-15
Finding a Station
BAND: Press this button to select AM, FM1 or FM2.
SEEK
-TUNE: Press and release this button to seek to the
next higher or lower radio station. Pressing and holding
this button until a chime sounds puts the radio in a tune
mode. In this mode, higher or lower radio stations are
advanced to in small increments until the SEEK
-TUNE
button is released. Tuning stops when you release this
button. If you press and hold the SEEK
-TUNE button
again within five seconds of being in the tune mode,
tuning will continue. Waiting longer than five seconds
places the radio back in the seek mode.
SCAN: Press this button and SCAN will appear on the
display. Use SCAN to listen to stations for a few
seconds. The radio will go to a station, stop for a few
seconds, then go on to the next station. Press this button
again to stop scanning.
PUSHBUTTONS: The six numbered pushbuttons let
you return to your favorite stations. You can set up to
18 stations (six AM, six FM1 and six FM2). Just:
1. Turn the radio on.2. Press BAND to select AM, FM1 or FM2.
3. Tune in the desired station.
4. Press and hold one of the six numbered buttons for
more than two seconds until you hear a beep.
Whenever you press that numbered button for less
than two seconds, the station you set will return.
5. Repeat the steps for each pushbutton.
When battery power is removed and later applied, you
will not have to reset your radio presets because the
radio remembers them.
PRESET SCAN: Press and hold SCAN for two to
three seconds until PRESET SCAN appears on the
display to listen to each of your preset stations for a
few seconds (factory presets which have not been
reprogrammed with your stations will be ignored). The
radio will go to the first preset station stored on your
pushbuttons, stop for a few seconds, then go on to the
next preset station. Press SCAN again to stop scanning.
If a preset station has weak reception, the radio will not
stop at the preset station.