clock CADILLAC DTS 2007 1.G Owner's Manual
[x] Cancel search | Manufacturer: CADILLAC, Model Year: 2007, Model line: DTS, Model: CADILLAC DTS 2007 1.GPages: 518, PDF Size: 2.77 MB
Page 360 of 518

While refueling, hang the tethered fuel cap from
the hook on the fuel door.
{CAUTION:
Fuel can spray out on you if you open the
fuel cap too quickly. If you spill fuel and
then something ignites it, you could be
badly burned. This spray can happen if
your tank is nearly full, and is more likely
in hot weather. Open the fuel cap slowly
and wait for any hiss noise to stop. Then
unscrew the cap all the way.
Be careful not to spill fuel. Do not top off or over�ll
the tank and wait a few seconds after you have
�nished pumping before removing the nozzle.
Clean fuel from painted surfaces as soon
as possible. SeeWashing Your Vehicle on
page 444.When replacing the fuel cap, turn it clockwise until
it clicks. Make sure the cap is fully installed.
The diagnostic system can determine if the fuel
cap has been left off or improperly installed.
This would allow fuel to evaporate into the
atmosphere. SeeMalfunction Indicator Lamp on
page 234.
The TIGHTEN GAS CAP message will be
displayed on the Driver Information Center (DIC) if
the fuel cap is not properly installed. SeeDIC
Warnings and Messages on page 246for more
information.
360
Page 366 of 518

When to Add Engine Oil
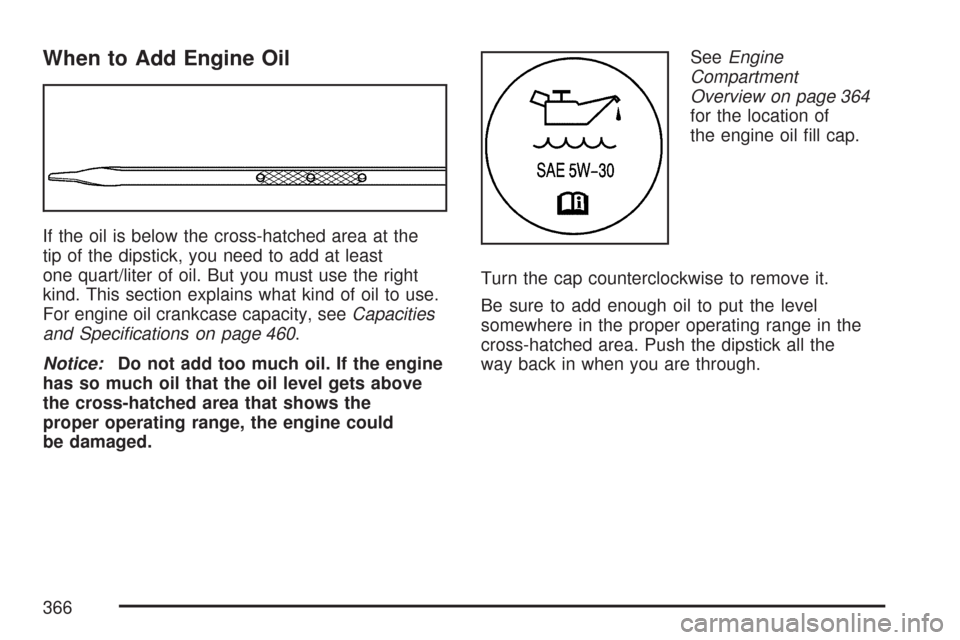
If the oil is below the cross-hatched area at the
tip of the dipstick, you need to add at least
one quart/liter of oil. But you must use the right
kind. This section explains what kind of oil to use.
For engine oil crankcase capacity, seeCapacities
and Speci�cations on page 460.
Notice:Do not add too much oil. If the engine
has so much oil that the oil level gets above
the cross-hatched area that shows the
proper operating range, the engine could
be damaged.SeeEngine
Compartment
Overview on page 364
for the location of
the engine oil �ll cap.
Turn the cap counterclockwise to remove it.
Be sure to add enough oil to put the level
somewhere in the proper operating range in the
cross-hatched area. Push the dipstick all the
way back in when you are through.
366
Page 373 of 518

Checking the Fluid Level
Prepare you vehicle as follows:
1. Park your vehicle on a level place. Keep the
engine running.
2. With the parking brake applied, place the shift
lever in PARK (P).
3. With your foot on the brake pedal, move the
shift lever through each gear range, pausing
for about three seconds in each range.
Then, position the shift lever in PARK (P).
4. Let the engine run at idle for three to
�ve minutes.
Then, without shutting off the engine, follow
these steps:
The transaxle �uid cap is located next to the
radiator hose and below the engine air
cleaner/�lter assembly on the driver’s side of the
vehicle, and is marked TRANS FLUID. SeeEngine
Compartment Overview on page 364for more
information on location.
1. After removing the engine air cleaner/�lter
assembly to reach the transaxle �uid cap,
turn the cap counterclockwise to remove. Pull
out the dipstick and wipe it with a clean
rag or paper towel.2. Push it back in all the way, wait
three seconds, and then pull it back
out again.
3. Check both sides of the dipstick, and read the
lower level. The �uid level must be in the
cross-hatched area.
4. If the �uid level is in the acceptable range,
push the dipstick back in all the way and
turn the handle clockwise. Reinstall the engine
air cleaner/�lter assembly.
373
Page 374 of 518

How to Add Automatic Transaxle Fluid
Refer to the Maintenance Schedule to determine
what kind of transaxle �uid to use. See
Recommended Fluids and Lubricants on page 475.
If the �uid level is low, add only enough of the
proper �uid to bring the level into the
cross-hatched area on the dipstick.
1. Pull out the dipstick.
2. Using a long-neck funnel, add enough �uid at
the dipstick hole to bring it to the proper level.
It does not take much �uid, generally less
than one pint (0.5 L). Do not over�ll.
Notice:Use of the incorrect automatic
transaxle �uid may damage your vehicle, and
the damages may not be covered by your
warranty. Always use the automatic transaxle
�uid listed inRecommended Fluids and
Lubricants on page 475.
3. After adding �uid, recheck the �uid level as
described under “How to Check Automatic
Transaxle Fluid,” earlier in this section.
4. When the correct �uid level is obtained, push
the dipstick back in all the way and turn the
handle clockwise.
Engine Coolant
The cooling system in your vehicle is �lled with
DEX-COOL®engine coolant. This coolant is
designed to remain in your vehicle for �ve years or
150,000 miles (240 000 km), whichever occurs
�rst, if you add only DEX-COOL
®extended
life coolant.
The following explains your cooling system and
how to add coolant when it is low. If you have
a problem with engine overheating, seeEngine
Overheating on page 377.
A 50/50 mixture of clean, drinkable water and
DEX-COOL
®coolant will:
Giving freezing protection down to
−34°F (−37°C).
Give boiling protection up to 265°F (129°C).
Protect against rust and corrosion.
Help keep the proper engine temperature.
Let the warning lights and gages work as
they should.
374
Page 383 of 518

{CAUTION:
Adding only plain water to your cooling
system can be dangerous. Plain water, or
some other liquid such as alcohol, can
boil before the proper coolant mixture will.
Your vehicle’s coolant warning system is
set for the proper coolant mixture. With
plain water or the wrong mixture, your
engine could get too hot but you would
not get the overheat warning. Your engine
could catch �re and you or others could
be burned. Use a 50/50 mixture of clean,
drinkable water and DEX-COOL
®coolant.
Notice:In cold weather, water can freeze and
crack the engine, radiator, heater core and
other parts. Use the recommended coolant and
the proper coolant mixture.
{CAUTION:
You can be burned if you spill coolant on
hot engine parts. Coolant contains
ethylene glycol and it will burn if the
engine parts are hot enough. Do not spill
coolant on a hot engine.
1. You can remove the
coolant surge tank
pressure cap when
the cooling system,
including the coolant
surge tank pressure
cap and upper
radiator hose, is no
longer hot.
Turn the pressure cap slowly counterclockwise.
If you hear a hiss, wait for that to stop. A hiss
means there is still some pressure left.
2. Then keep turning the cap and remove it.
383
Page 399 of 518

7. Locate the vertical headlamp aiming screws.
They are located under the hood near each
headlamp assembly. First lift the �ap to
access either of them. Each one is the top
outboard screw by the “V” on the cover panel
next to the aiming �ap.
The adjustment screw can be turned with a
6 mm hex wrench.8. Turn the vertical aiming screw until the
headlamp beam is aimed to the horizontal tape
line. Turn it clockwise or counterclockwise to
raise or lower the angle of the beam.
The top edge of the cut-off should be
positioned at the bottom edge of the horizontal
tape line.
9. Make sure that the light from the headlamp is
positioned at the bottom edge of the horizontal
tape line. The lamp on the left (A) shows
the correct headlamp aim. The lamp on the
right (B) shows the incorrect headlamp aim.
10. Repeat Steps 7 through 9 for the opposite
headlamp.
399
Page 433 of 518

Notice:If you position the jack under the
rocker molding and attempt to raise the
vehicle, you could break the molding and/or
cause other damage to your vehicle. Always
position the jack so that when the jack head is
raised, it will �t �rmly in the notch located
inboard from the rocker molding.
5. Turn the jack handle counterclockwise to
lower the jack lift head until the jack �ts
under the vehicle.
6. Raise the jack until the metal �ange �ts �rmly
into the channel of the jack head.7. Put the spare tire near you.
8. Raise the vehicle by turning the jack handle
clockwise. Raise the vehicle far enough off
the ground for the spare tire to �t under
the vehicle.
9. Remove all wheel nuts and the �at tire.
433
Page 435 of 518

12. Put the wheel nuts
back on with the
rounded end of the
nuts toward the
wheel. Tighten each
nut by hand until the
wheel is held against
the hub.
13. Lower the vehicle by turning the jack handle
counterclockwise. Lower the jack completely.
435
Page 503 of 518

A
Accessories and Modi�cations..................... 353
Adaptive Cruise Control............................... 179
Adding Equipment to Your
Airbag-Equipped Vehicle............................ 87
Additives, Fuel............................................ 357
Add-On Electrical Equipment....................... 451
Air Cleaner/Filter, Engine............................. 370
Air Conditioning........................................... 210
Airbag
Passenger Status Indicator....................... 227
Readiness Light....................................... 226
Airbag System............................................... 70
What Will You See After an
Airbag In�ates?...................................... 80
When Should an Airbag In�ate?................. 77
Where Are the Airbags?............................. 73
Airbag Systems
Adding Equipment to Your
Airbag-Equipped Vehicle......................... 87
How Does an Airbag Restrain?.................. 79
Passenger Sensing System....................... 81
Servicing Your Airbag-Equipped Vehicle..... 86
What Makes an Airbag In�ate?.................. 79
Analog Clock............................................... 210
Antenna, Backglass..................................... 300Antenna, XM™ Satellite Radio Antenna
System.................................................... 300
Anti-Lock Brake System.............................. 307
Anti-Lock Brake, System Warning Light....... 230
Appearance Care
Aluminum or Chrome-Plated Wheels........ 446
Care of Safety Belts................................ 443
Chemical Paint Spotting........................... 448
Cleaning Exterior Lamps/Lenses.............. 444
Cleaning the Inside of Your Vehicle.......... 440
Fabric/Carpet........................................... 441
Finish Care.............................................. 444
Finish Damage......................................... 447
Instrument Panel, Vinyl, and
Other Plastic Surfaces.......................... 443
Leather.................................................... 442
Sheet Metal Damage............................... 447
Speaker Covers....................................... 443
Tires........................................................ 447
Underbody Maintenance........................... 448
Vehicle Care/Appearance Materials.......... 449
Washing Your Vehicle.............................. 444
Weatherstrips........................................... 444
Windshield and Wiper Blades................... 445
Wood Panels........................................... 443
Ashtray....................................................... 209
503
Page 505 of 518

CD, MP3 ..................................................... 287
Center Console Storage Area...................... 155
Center Flex Storage Unit............................. 156
Center Front Passenger Position,
Safety Belts............................................... 35
Center Seat.................................................. 17
Chains, Tire................................................. 426
Charging System Light................................ 229
Check
Engine Light............................................ 234
Checking Things Under the Hood................ 362
Chemical Paint Spotting.............................. 448
Child Restraints
Child Restraint Systems............................. 49
Infants and Young Children........................ 45
Lower Anchors and Tethers
for Children............................................ 55
Older Children........................................... 42
Securing a Child Restraint in a
Rear Seat Position................................. 63
Securing a Child Restraint in the
Center Front Seat Position..................... 65
Securing a Child Restraint in the
Right Front Seat Position........................ 66
Where to Put the Restraint........................ 54
Cigarette Lighter.......................................... 209Cleaning
Aluminum or Chrome-Plated Wheels........ 446
Exterior Lamps/Lenses............................. 444
Fabric/Carpet........................................... 441
Finish Care.............................................. 444
Inside of Your Vehicle.............................. 440
Instrument Panel, Vinyl, and
Other Plastic Surfaces.......................... 443
Leather.................................................... 442
Speaker Covers....................................... 443
Tires........................................................ 447
Underbody Maintenance........................... 448
Washing Your Vehicle.............................. 444
Weatherstrips........................................... 444
Windshield and Wiper Blades................... 445
Wood Panels........................................... 443
Climate Control System
Air Filter, Passenger Compartment ........... 220
Dual......................................................... 210
Outlet Adjustment..................................... 217
Rear........................................................ 218
Clock..................................................210, 269
Coinholder(s)............................................... 155
Collision Damage Repair............................. 493
Comfort Guides, Rear
Safety Belt................................................. 39
505