key CADILLAC DTS 2009 1.G Owners Manual
[x] Cancel search | Manufacturer: CADILLAC, Model Year: 2009, Model line: DTS, Model: CADILLAC DTS 2009 1.GPages: 462, PDF Size: 2.46 MB
Page 1 of 462
Seats and Restraint System............................. 1-1
Head Restraints
......................................... 1-2
Front Seats
............................................... 1-3
Rear Seats
..............................................1-10
Safety Belts
.............................................1-12
Child Restraints
.......................................1-33
Airbag System
.........................................1-55
Restraint System Check
............................1-70
Features and Controls..................................... 2-1
Keys
........................................................ 2-3
Doors and Locks
......................................2-10
Windows
.................................................2-15
Theft-Deterrent Systems
............................2-20
Starting and Operating Your Vehicle
...........2-24
Mirrors
....................................................2-38
Object Detection Systems
..........................2-42
OnStar
®System
......................................2-51
Universal Home Remote System
................2-55
Storage Areas
.........................................2-62
Sunroof
..................................................2-64
Instrument Panel............................................. 3-1
Instrument Panel Overview
.......................... 3-4
Climate Controls
......................................3-40
Warning Lights, Gages, and Indicators
........3-50Driver Information Center (DIC)
..................3-67
Audio System(s)
.......................................3-95
Driving Your Vehicle....................................... 4-1
Your Driving, the Road, and the Vehicle
....... 4-2
Towing
...................................................4-26
Service and Appearance Care.......................... 5-1
Service
..................................................... 5-3
Fuel
......................................................... 5-5
Checking Things Under the Hood
...............5-10
Headlamp Aiming
.....................................5-43
Bulb Replacement
....................................5-46
Windshield Wiper Blade Replacement
.........5-46
Tires
......................................................5-48
Appearance Care
.....................................5-86
Vehicle Identi�cation
.................................5-94
Electrical System
......................................5-94
Capacities and Speci�cations
...................5-103
Maintenance Schedule..................................... 6-1
Maintenance Schedule
................................ 6-2
Customer Assistance Information.................... 7-1
Customer Assistance and Information
........... 7-2
Reporting Safety Defects
...........................7-15
Vehicle Data Recording and Privacy
...........7-17
Index................................................................ 1
2009 Cadillac DTS Owner ManualM
Page 9 of 462
Heated and Cooled Seats
The vehicle may have heated and cooled front seats.
To operate the heated or cooled seats, the ignition
must be on.
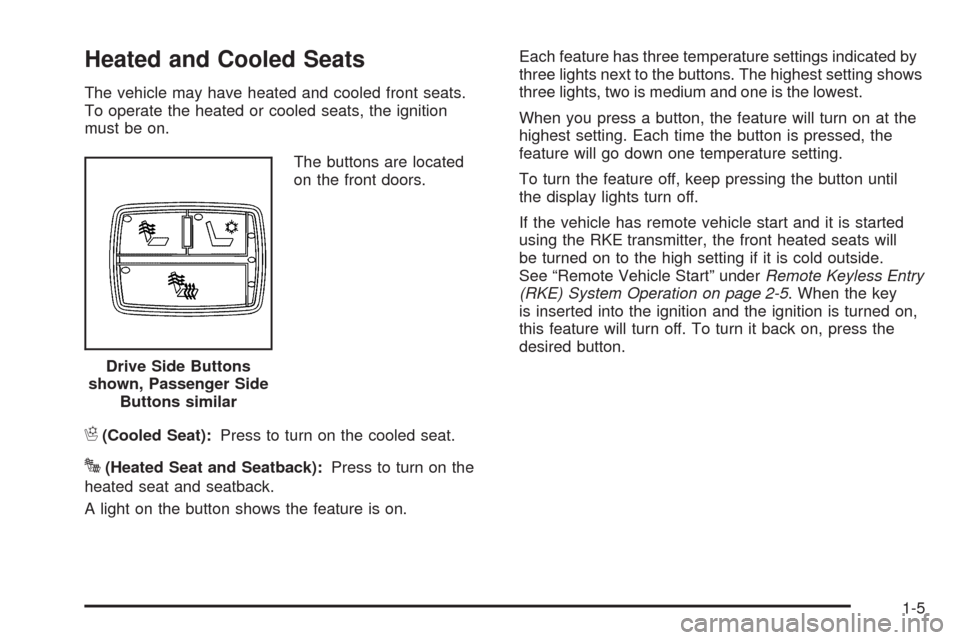
The buttons are located
on the front doors.
H(Cooled Seat):Press to turn on the cooled seat.
J(Heated Seat and Seatback):Press to turn on the
heated seat and seatback.
A light on the button shows the feature is on.Each feature has three temperature settings indicated by
three lights next to the buttons. The highest setting shows
three lights, two is medium and one is the lowest.
When you press a button, the feature will turn on at the
highest setting. Each time the button is pressed, the
feature will go down one temperature setting.
To turn the feature off, keep pressing the button until
the display lights turn off.
If the vehicle has remote vehicle start and it is started
using the RKE transmitter, the front heated seats will
be turned on to the high setting if it is cold outside.
See “Remote Vehicle Start” underRemote Keyless Entry
(RKE) System Operation on page 2-5. When the key
is inserted into the ignition and the ignition is turned on,
this feature will turn off. To turn it back on, press the
desired button.
Drive Side Buttons
shown, Passenger Side
Buttons similar
1-5
Page 12 of 462
Easy Exit Recall
The control for this feature is located on the driver door
panel between buttons 1 and 2.
With the vehicle in P (Park), the exit position can be
recalled by pressing the exit button. You will hear
a single beep. The driver seat will move back, and if the
vehicle has the power tilt wheel and telescopic steering
feature, the power telescopic steering column will
move up and forward.
If the easy exit seat feature is on in the DIC, automatic
seat and power telescopic steering column movement
will occur when the key is removed from the ignition.
See “EASY EXIT RECALL” underDIC Vehicle
Customization on page 3-86for more information.
Further programming for automatic seat and steering
wheel movement can be done using the Driver
Information Center (DIC). You can select or not
select the following:
The easy exit recall feature
The memory seat recall feature
For programming information, seeDIC Vehicle
Customization on page 3-86.
Power Reclining Seatbacks
The seats have power
reclining seatbacks. Use
the vertical power seat
control located on the
outboard side of the seat.
Press the control toward the rear of the vehicle to
recline the seatback.
Press the control toward the front of the vehicle to
raise the seatback.
1-8
Page 35 of 462

Safety Belt Use During Pregnancy
Safety belts work for everyone, including pregnant
women. Like all occupants, they are more likely to be
seriously injured if they do not wear safety belts.
A pregnant woman should wear a lap-shoulder belt,
and the lap portion should be worn as low as possible,
below the rounding, throughout the pregnancy.
The best way to protect the fetus is to protect the
mother. When a safety belt is worn properly, it is
more likely that the fetus will not be hurt in a crash.
For pregnant women, as for anyone, the key to making
safety belts effective is wearing them properly.
Lap Belt
This part is only for the lap belt. To learn how to wear a
lap-shoulder belt, seeLap-Shoulder Belt on page 1-26.
You vehicle may have a center seating position.
When you sit in the center front seating position, you
have a lap safety belt, which has no retractor.
To make the belt longer, tilt the latch plate and pull it
along the belt.
Buckle, position and release it the same way as the lap
part of a lap-shoulder belt.
1-31
Page 77 of 462
Keys...............................................................2-3
Remote Keyless Entry (RKE) System................2-4
Remote Keyless Entry (RKE) System
Operation...................................................2-5
Remote Vehicle Start......................................2-7
Doors and Locks............................................2-10
Door Locks..................................................2-10
Central Door Unlocking System......................2-11
Power Door Locks........................................2-11
Programmable Automatic Door Locks..............2-11
Rear Door Security Locks..............................2-12
Lockout Protection........................................2-12
Trunk..........................................................2-13
Windows........................................................2-15
Power Windows............................................2-16
Sun Visors...................................................2-19
Theft-Deterrent Systems..................................2-20
Valet Lockout Switch.....................................2-20
Content Theft-Deterrent.................................2-21
PASS-Key
®III+ Electronic Immobilizer.............2-22
PASS-Key®III+ Electronic Immobilizer
Operation.................................................2-23Starting and Operating Your Vehicle................2-24
New Vehicle Break-In....................................2-24
Ignition Positions..........................................2-25
Retained Accessory Power (RAP)...................2-26
Starting the Engine.......................................2-26
Engine Coolant Heater..................................2-28
Automatic Transmission Operation...................2-29
Performance Shifting.....................................2-32
Parking Brake..............................................2-32
Shifting Into Park..........................................2-33
Shifting Out of Park......................................2-34
Parking Over Things That Burn.......................2-35
Engine Exhaust............................................2-36
Running the Vehicle While Parked..................2-37
Mirrors...........................................................2-38
Automatic Dimming Rearview Mirror................2-38
Compass.....................................................2-38
Outside Power Foldaway Mirrors.....................2-40
Outside Automatic Dimming Mirror..................2-40
Park Tilt Mirrors............................................2-41
Outside Convex Mirror...................................2-41
Outside Heated Mirrors..................................2-41
Section 2 Features and Controls
2-1
Page 79 of 462

Keys
{CAUTION:
Leaving children in a vehicle with the ignition key
is dangerous for many reasons, children or others
could be badly injured or even killed. They could
operate the power windows or other controls or
even make the vehicle move. The windows will
function with the keys in the ignition and children
could be seriously injured or killed if caught in the
path of a closing window. Do not leave the keys in
a vehicle with children.
The master key is used for the driver door, ignition, and
glove box.
The valet key is used for the driver door and ignition.
Notice:If you ever lock your keys in the vehicle,
you may have to damage the vehicle to get in.
Be sure you have spare keys.
In an emergency, contact Roadside Assistance.
SeeRoadside Service on page 7-7.
2-3
Page 80 of 462

Remote Keyless Entry (RKE)
System
The Remote Keyless Entry (RKE) system operates on a
radio frequency subject to Federal Communications
Commission (FCC) Rules and with Industry Canada.
This device complies with Part 15 of the FCC Rules.
Operation is subject to the following two conditions:
1. This device may not cause interference.
2. This device must accept any interference received,
including interference that may cause undesired
operation of the device.
This device complies with RSS-210 of Industry Canada.
Operation is subject to the following two conditions:
1. This device may not cause interference.
2. This device must accept any interference received,
including interference that may cause undesired
operation of the device.Changes or modi�cations to this system by other than
an authorized service facility could void authorization to
use this equipment.
If there is a decrease in the RKE operating range,
try this:
Check the distance. The transmitter may be too far
from the vehicle. Stand closer during rainy or
snowy weather.
Check the location. Other vehicles or objects may
be blocking the signal. Take a few steps to the
left or right, hold the transmitter higher, and
try again.
Check the transmitter’s battery. See “Battery
Replacement” later in this section.
If the transmitter is still not working correctly,
see your dealer/retailer or a quali�ed technician for
service.
2-4
Page 81 of 462

Remote Keyless Entry (RKE)
System Operation
The Remote Keyless Entry (RKE) transmitter functions
work up to 195 feet (60 m) away from the vehicle.
There are other conditions which can affect the
performance of the transmitter. SeeRemote Keyless
Entry (RKE) System on page 2-4.
/(Remote Vehicle Start):Press to start the engine
from outside the vehicle using the RKE transmitter.
SeeRemote Vehicle Start on page 2-7for additional
information.
Q(Lock):Press to lock all the doors. If enabled
through the Driver Information Center (DIC), the parking
lamps may �ash once to indicate locking has occurred.
The horn may chirp when
Qis pressed again within
�ve seconds. SeeDIC Vehicle Customization on
page 3-86for additional information.
Pressing
Qmay arm the content theft-deterrent system.
SeeContent Theft-Deterrent on page 2-21.
K(Unlock):Press once to unlock the driver door.
If
Kis pressed again within �ve seconds, all remaining
doors unlock. The interior lamps come on and stay
on for 20 seconds or until the ignition is turned on.
If enabled through the DIC, the parking lamps �ash twice
to indicate unlocking has occurred. SeeDIC Vehicle
Customization on page 3-86. Pressing
Kmay disarm
the content theft-deterrent system. SeeContent
Theft-Deterrent on page 2-21. With Remote Start
(Without Remote
Start Similar)
2-5
Page 82 of 462
V(Remote Trunk Release):Press and hold for
about one second to unlock the trunk. The transmission
must be in P (Park).
L(Vehicle Locator/Panic Alarm):Press and release
to locate the vehicle. The turn signal lamps �ash and
the horn sounds three times.
Press and hold
Lfor more than two seconds to
activate the panic alarm. The turn signal lamps �ash
and the horn sounds repeatedly for 30 seconds.
The alarm turns off when the ignition is moved to
ON/RUN or
Lis pressed again. The ignition must
be in LOCK/OFF for the panic alarm to work.
The vehicle comes with two transmitters.
Each transmitter will have a number on top of it,
“1” or “2”. These numbers correspond to the driver
of the vehicle. For example, the memory seat position
for driver 1 will be recalled when using the transmitter
labeled “1”, if enabled through the DIC. SeeMemory
Seat, Mirrors and Steering Wheel on page 1-6and
DIC Vehicle Customization on page 3-86for more
information.
Programming Transmitters to the
Vehicle
Only RKE transmitters programmed to the vehicle will
work. If a transmitter is lost or stolen, a replacement
can be purchased and programmed through your
dealer/retailer. When the replacement transmitter is
programmed to the vehicle, all remaining transmitters
must also be programmed. Any lost or stolen
transmitters no longer work once the new transmitter
is programmed. Each vehicle can have up to
eight transmitters programmed to it. See RELEARN
REMOTE KEY underDIC Operation and Displays
on page 3-68.
Battery Replacement
Replace the battery if the REPLACE BATTERY
IN REMOTE KEY message displays in the DIC.
See “REPLACE BATTERY IN REMOTE KEY” under
DIC Warnings and Messages on page 3-73for additional
information.
Notice:When replacing the battery, do not touch
any of the circuitry on the transmitter. Static
from your body could damage the transmitter.
2-6
Page 83 of 462

To replace the battery:
1. Separate the transmitter with a �at, thin object
inserted into the notch, located above the
metal base.
2. Remove the old battery. Do not use a metal object.
3. Insert the new battery, positive side facing up.
Replace with a CR2032 or equivalent battery.
4. Reassemble the transmitter.
Remote Vehicle Start
The remote vehicle starting feature allows you to start
the engine from outside of the vehicle. It also starts
up the vehicle’s automatic climate control system.
When the remote start system is active, the climate
control system will heat and cool the inside of the
vehicle according to the previous settings of the
system before turning the vehicle off. The rear window
defogger will be turned on by the climate control
system when it is cold outside. If the vehicle has heated
seats, they will also turn on when it is cold outside.
SeeHeated and Cooled Seats on page 1-5for additional
information. Cooled seats are not activated during a
remote start. Normal operation of the climate control
system will return after the key is turned to ON/RUN.
SeeDual Climate Control System on page 3-40.
Laws in some communities may restrict the use of
remote starters. For example, some laws may require
a person using remote start to have the vehicle in
view when doing so. Check local regulations for
any requirements on remote starting of vehicles.
Do not use the remote start feature if your vehicle is
low on fuel. Your vehicle may run out of fuel.
2-7