tow CADILLAC DTS 2009 1.G User Guide
[x] Cancel search | Manufacturer: CADILLAC, Model Year: 2009, Model line: DTS, Model: CADILLAC DTS 2009 1.GPages: 462, PDF Size: 2.46 MB
Page 106 of 462

R (Reverse):Use this gear to back up.
Notice:Shifting to R (Reverse) while the vehicle is
moving forward could damage the transmission.
The repairs would not be covered by the vehicle
warranty. Shift to R (Reverse) only after the vehicle
is stopped.
Also use this gear to rock the vehicle back and forth to
get out of snow, ice or sand without damaging the
transmission. SeeIf Your Vehicle is Stuck in Sand, Mud,
Ice, or Snow on page 4-18for additional information.
N (Neutral):In this position, the engine does not
connect with the wheels. To restart when you are
already moving, use N (Neutral) only. Also, use
N (Neutral) when the vehicle is being towed.
{CAUTION:
Shifting into a drive gear while the engine is
running at high speed is dangerous. Unless your
foot is �rmly on the brake pedal, the vehicle could
move very rapidly. You could lose control and hit
people or objects. Do not shift into a drive gear
while the engine is running at high speed.Notice:Shifting out of P (Park) or N (Neutral) with
the engine running at high speed may damage
the transmission. The repairs would not be covered
by the vehicle warranty. Be sure the engine is
not running at high speed when shifting the vehicle.
D (Drive):This position is for normal driving. It provides
the best fuel economy for the vehicle. If you need
more power for passing, and you are:
Going less than 35 mph (55 km/h), push the
accelerator pedal about halfway down.
Going about 35 mph (55 km/h) or more, push the
accelerator all the way down.
The transmission will shift down to the next gear and
have more power.
Downshifting the transmission in slippery road conditions
could result in skidding, see Skidding underLoss of
Control on page 4-10.
2-30
Page 107 of 462

Notice:Driving the vehicle if you notice that it is
moving slowly or not shifting gears as you increase
speed may damage the transmission. Have the
vehicle serviced right away. You can drive in
2 (Second) when you are driving less than 35 mph
(55 km/h) and D (Drive) for higher speeds until then.
D (Drive) can be used for towing. You may want to
shift the transmission to 3 (Third) or, if necessary, to a
lower gear if the transmission shifts too often under
heavy loads and/or hilly conditions.
SeeTowing a Trailer on page 4-28for more information.
3 (Third):This position is also used for normal
driving. However, it reduces vehicle speed more than
D (Drive) without using the brakes. You might choose
3 (Third) instead of D (Drive) when driving on hilly,
winding roads, when towing a trailer, so there is less
shifting between gears and when going down a
steep hill.2 (Second):This position reduces vehicle speed more
than 3 (Third) without using the brakes. You can use
2 (Second) on hills. It can help control vehicle speed
as you go down steep mountain roads, but then
you would also want to use the brakes off and on.
Notice:Do not shift into 2 (Second) unless you are
going slower than 65 mph (105 km/h), or you can
damage the engine and/or transmission.
1 (First):This position reduces vehicle speed even
more than 2 (Second) without using the brakes. You can
use it on very steep hills, or in deep snow or mud.
If the shift lever is put in 1 (First) while the vehicle is
moving forward, the transmission will not shift into �rst
gear until the vehicle is going slowly enough.
Notice:Spinning the tires or holding the vehicle
in one place on a hill using only the accelerator
pedal may damage the transmission. The repair will
not be covered by the vehicle warranty. If you are
stuck, do not spin the tires. When stopping on a hill,
use the brakes to hold the vehicle in place.
2-31
Page 108 of 462

Performance Shifting
If the vehicle has this feature, it can detect a change in
driving patterns. If you make an aggressive driving
maneuver, the vehicle’s transmission automatically
shifts to the lowest possible gear to maximize vehicle
performance. The vehicle will automatically return
to normal operation when you return to normal driving
patterns.
Parking Brake
The parking brake pedal is
located to the left of the
regular brake pedal,
near the driver door.
To set the parking brake, hold the regular brake pedal
down, then push the parking brake pedal down.If the ignition is on, the brake system warning light on
the instrument panel cluster should come on. If it
does not, you need to have the vehicle serviced.
A warning chime will sound if the parking brake is set, the
ignition is on, and the vehicle speed is greater than 5 mph
(8 km/h). The brake light will come on and stay on until
the parking brake is released. SeeBrake System
Warning Light on page 3-56for more information.
To release the parking brake, hold the regular brake
pedal down, then push the parking brake pedal down.
When you lift your foot off the parking brake pedal,
the pedal will follow your foot to the released position.
Notice:Driving with the parking brake on can
overheat the brake system and cause premature
wear or damage to brake system parts. Make sure
that the parking brake is fully released and the brake
warning light is off before driving.
If you are towing a trailer and are parking on any hill,
seeTowing a Trailer on page 4-28.
2-32
Page 109 of 462

Shifting Into Park
{CAUTION:
It can be dangerous to get out of the vehicle if the
shift lever is not fully in P (Park) with the parking
brake �rmly set. The vehicle can roll. If you have
left the engine running, the vehicle can move
suddenly. You or others could be injured. To be
sure the vehicle will not move, even when you are
on fairly level ground, use the steps that follow.
If you are pulling a trailer, seeTowing a Trailer on
page 4-28.
Steering Column Shift Lever
If the vehicle has a steering column shift lever, use this
procedure to shift the vehicle into P (Park):
1. Hold the brake pedal down.
2. Move the shift lever into P (Park) by pulling the shift
lever toward you and moving it up as far as it will go.3. With your foot still holding the brake pedal down,
set the parking brake. SeeParking Brake on
page 2-32for more information.
4. Turn the ignition key to LOCK/OFF.
5. Remove the key and take it with you. If you can
leave the vehicle with the ignition key in your
hand, the vehicle is in P (Park).
Console Shift Lever
If the vehicle is equipped with a console shift lever,
use this procedure to shift the vehicle into P (Park):
1. Hold the brake pedal down.
2. Move the shift lever into P (Park) by pushing the
lever all the way toward the front of the vehicle
and then to the left.
3. While keeping the brake pedal applied, set the
parking brake. SeeParking Brake on page 2-32
for more information.
4. Turn the ignition key to LOCK/OFF.
5. Remove the key and take it with you. If you can
leave the vehicle with the ignition key in your
hand, the vehicle is in P (Park).
2-33
Page 111 of 462

The shift lock is always functional except in the case
of a an uncharged or low voltage (less than 9 volt)
battery.
If the vehicle has an uncharged battery or a battery with
low voltage, try charging or jump starting the battery.
SeeJump Starting on page 5-38.
Console Shift
If the console shift cannot be moved out of P (Park)
1. Apply the regular brakes.
2. Turn the ignition to ON/RUN or ACC/ACCESSORY
position. SeeIgnition Positions on page 2-25for
more information.
3. Push the shift lever all the way into P (Park).
4. Then, shift into the desired gear.
If you still cannot move the shift lever from P (Park),
consult your dealer/retailer or a professional towing
service.
Column Shift
If the column shift cannot be moved out of P (Park)
1. Apply the regular brakes.
2. Turn the ignition key to the ON/RUN or
ACC/ACCESSORY position. SeeIgnition
Positions on page 2-25for more information.
3. Shift out of the P (Park) position to the
N (Neutral) position.
4. Move the column shift to the desired gear.
If you still cannot move the shift lever from P (Park),
consult your dealer/retailer or a professional towing
service.
Parking Over Things That Burn
{CAUTION:
Things that can burn could touch hot exhaust
parts under the vehicle and ignite. Do not park
over papers, leaves, dry grass, or other things that
can burn.
2-35
Page 113 of 462

Running the Vehicle While Parked
It is better not to park with the engine running. But if you
ever have to, here are some things to know.
{CAUTION:
Idling a vehicle in an enclosed area with poor
ventilation is dangerous. Engine exhaust may
enter the vehicle. Engine exhaust contains Carbon
Monoxide (CO) which cannot be seen or smelled.
It can cause unconsciousness and even death.
Never run the engine in an enclosed area that has
no fresh air ventilation. For more information,
seeEngine Exhaust on page 2-36.
{CAUTION:
It can be dangerous to get out of the vehicle if the
automatic transmission shift lever is not fully in
P (Park) with the parking brake �rmly set.
The vehicle can roll. Do not leave the vehicle
when the engine is running unless you have to.
If you have left the engine running, the vehicle can
move suddenly. You or others could be injured.
To be sure the vehicle will not move, even when
you are on fairly level ground, always set the
parking brake after you move the shift lever
to P (Park).
Follow the proper steps to be sure the vehicle will not
move. SeeShifting Into Park on page 2-33.
If parking on a hill and pulling a trailer, seeTowing a
Trailer on page 4-28.
2-37
Page 114 of 462

Mirrors
Automatic Dimming Rearview Mirror
The vehicle has an automatic dimming inside rearview
mirror with a compass display. The mirror may also
have OnStar
®controls and Intellibeam™. For more
information on Intellibeam™, see “Intellibeam Intelligent
High-Beam Headlamp Control System” underExterior
Lamps on page 3-29. For more information about
OnStar
®, seeOnStar®System on page 2-51.
Automatic Dimming Mirror Operation
Automatic dimming reduces the glare of lights from
behind the vehicle. The dimming feature comes on and
the indicator light illuminates each time the vehicle is
started.
O(On/Off):Press and holdOfor about three seconds
to turn the dimming feature and compass display on
or off.
AUTO
3(Vehicles with Intellibeam™):Press and
hold for approximately three seconds to turn the
compass display on or off.
Cleaning the Mirror
Do not spray glass cleaner directly on the mirror.
Use a soft towel dampened with water.
Compass
Compass Operation
PressOor AUTO3, depending on the vehicle,
to turn the compass on or off.
When the ignition and the compass feature are on, after
a few seconds, the mirror will display the compass
heading. The compass automatically calibrates as the
vehicle is driven.
Compass Calibration
If after a few seconds, the display does not show the
correct direction, (for example, N for North), there
may be a strong magnetic �eld interfering with the
compass. Interference can be caused by a magnetic
antenna mount, magnetic note pad holder or a
similar magnetic item.
2-38
Page 121 of 462

When the System Does Not Seem to
Work Properly
If the URPA system will not activate due to a temporary
condition, the message PARK ASSIST OFF will be
displayed on the DIC and a red light will be shown on
the rear URPA display when the shift lever is moved into
R (Reverse). This occurs under the following conditions:
The driver disables the system.
The ultrasonic sensors are not clean. Keep the
vehicle’s rear bumper free of mud, dirt, snow,
ice and slush. For cleaning instructions, see
Washing Your Vehicle on page 5-90.
A trailer was attached to the vehicle, or a bicycle or
an object was hanging out of the trunk during the
last drive cycle, the red light may illuminate in
the rear display. Once the attached object is
removed, URPA will return to normal operation.
A tow bar is attached to the vehicle.
The vehicle’s bumper is damaged. Take the vehicle
to your dealer/retailer to repair the system.
Other conditions may affect system performance,
such as vibrations from a jackhammer or the
compression of air brakes on a very large truck.
If the system is still disabled after driving forward at
least 15 mph (25 km/h), take the vehicle to your
dealer/retailer.
Side Blind Zone Alert (SBZA)
The vehicle may have a Side Blind Zone Alert (SBZA)
system. Read this entire section before using the system.
The SBZA system operates on a radio frequency
subject to Federal Communications Commission (FCC)
Rules and with Industry Canada.
This device complies with Part 15 of the FCC Rules.
Operation is subject to the following two conditions:
1. This device may not cause harmful interference.
2. This device must accept any interference received,
including interference that may cause undesired
operation.
This device complies with RSS-310 of Industry Canada.
Operation is subject to the following two conditions:
1. This device may not cause harmful interference.
2. This device must accept any interference received,
including interference that may cause undesired
operation.
Frequency of operation: 24.05GHz – 24.25GHz
Field Strength: Not greater than 2.5V/m peak (0.25V/m
average) at a distance of 3m
2-45
Page 122 of 462

The manufacturer is not responsible for any radio or
TV interference caused by unauthorized modi�cations
to this equipment. Such modi�cations could void
the user’s authority to operate the equipment.
{CAUTION:
SBZA is only a lane changing aid and does not
replace driver vision. SBZA does not detect:
Vehicles outside the side blind zones which
may be rapidly approaching.
Pedestrians, bicyclists, or animals.
Failure to use proper care when changing lanes
may result in damage to the vehicle, injury, or
death. Always check the outside and rearview
mirrors, glance over your shoulder, and use the
turn signal before changing lanes.
When the system detects a vehicle in the side blind
zone, amber SBZA displays will light up in the side
mirrors. This indicates that it may be unsafe to change
lanes. Before making a lane change, always check
the SBZA display, check the outside and rearview
mirrors, look over your shoulder for vehicles and
hazards, and use the turn signal.
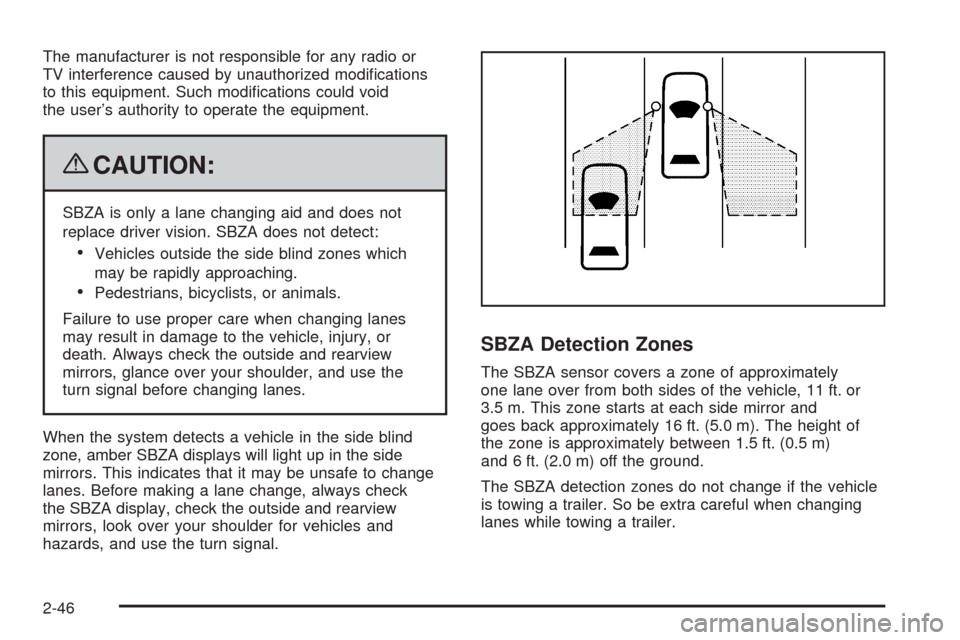
SBZA Detection Zones
The SBZA sensor covers a zone of approximately
one lane over from both sides of the vehicle, 11 ft. or
3.5 m. This zone starts at each side mirror and
goes back approximately 16 ft. (5.0 m). The height of
the zone is approximately between 1.5 ft. (0.5 m)
and 6 ft. (2.0 m) off the ground.
The SBZA detection zones do not change if the vehicle
is towing a trailer. So be extra careful when changing
lanes while towing a trailer.
2-46
Page 147 of 462

Power Tilt Wheel and Telescopic
Steering Column
If the vehicle has this
feature, the power tilt and
telescope wheel control is
located on the outboard
side of the steering column.
Press the control up or down to tilt the steering wheel
up or down.
Press the control forward or rearward and the steering
wheel moves toward the front or rear of the vehicle.
To set the memory position, seeDIC Vehicle
Customization on page 3-86andMemory Seat,
Mirrors and Steering Wheel on page 1-6.
Heated Steering Wheel
The vehicle may have a heated steering wheel.
The button for this feature
is located on the steering
wheel.
Press to turn the heated steering wheel on or off. A light
on the button displays while the feature is turned on.
Heating will begin in about three minutes.
3-7