CADILLAC DTS 2010 1.G Owners Manual
DTS 2010 1.G
CADILLAC
CADILLAC
https://www.carmanualsonline.info/img/23/7894/w960_7894-0.png
CADILLAC DTS 2010 1.G Owners Manual
Trending: alternator, pairing phone, remote control, lumbar support, transmission fluid, interior lights, cooling
Page 421 of 480

Power Windows and Other Power
Options
Circuit breakers in the fuse block protect the powerwindows and other power accessories. When the currentload is too heavy, the circuit breaker opens andcloses, protecting the circuit until the problem is fixed orgoes away.
Fuses and Circuit Breakers
The wiring circuits in the vehicle are protected fromshort circuits by a combination of fuses and circuitbreakers. This greatly reduces the chance of firescaused by electrical problems.
Look at the silver-colored band inside the fuse. If theband is broken or melted, replace the fuse. Be sure youreplace a bad fuse with a new one of the identicalsize and rating.
If you ever have a problem on the road and don’t havea spare fuse, you can borrow one that has the sameamperage. Just pick some feature of the vehicle that youcan get along without — like the radio or cigarettelighter — and use its fuse, if it is the correct amperage.Replace it as soon as you can.
Underhood Fuse Block
The underhood fuse block is located on the passengerside of the engine compartment. Remove the fusecover and secondary service cover to access thefuse block.
Notice:Spilling liquid on any electrical componentson the vehicle may damage it. Always keep thecovers on any electrical component.
6-101
Page 422 of 480
FusesUsage
1Engine Control Module (ECM), Crank
2Fuel Injectors Odd
3Fuel Injectors Even
4Air Conditioning Clutch
FusesUsage
5Air Injection Reactor (AIR) Solenoid
6Oxygen Sensor
7Emission Device
8Transmission, Ignition 1
6-102
Page 423 of 480
FusesUsage
9Engine Control Module (ECM),Powertrain Control Module (PCM)
10Climate Control System, InstrumentPanel Cluster Ignition 1
11Airbag System
12Horn
13Windshield Wiper
14Fog Lamps
15Right High-Beam Headlamp
16Left High-Beam Headlamp
17Left Low-Beam Headlamp
18Right Low-Beam Headlamp
19Windshield Washer Pump Motor
20Left Front Cornering Lamp
21Right Front Cornering Lamp
22Air Pump (J-Case)
23Antilock Brake System (ABS)(J-Case)
FusesUsage
24Starter (J-Case)
25Antilock Brake System (ABS)Motor (J-Case)
26Cooling Fan 2 (J-Case)
27Cooling Fan 1 (J-Case)
RelaysUsage
29Powertrain
30Starter
31Cooling Fan 2
32Cooling Fan 3
33Cooling Fan 1
34Air Conditioning Clutch
35Air Injection Reactor (AIR) Solenoid
36Ignition
37Air Pump
6-103
Page 424 of 480
Rear Underseat Fuse Block
The rear fuse block is located under the rear seat onthe driver side. The rear seat cushion must be removedto access the rear fuse block.
Removing the Rear Seat Cushion
Notice:If you touch the exposed wires with themetal on the seat cushion, you could cause ashort that could damage the battery and or wires.Avoid contact between the rear seat and thefuse center whenever you remove or reinstall therear seat. Do not remove covers from any ofthe covered parts, and do not store anything underthe seats.
To remove the rear seat cushion, do the following:
1. Pull up on the front of the cushion to release thefront hooks.
2. Pull the cushion up and out toward the front ofthe vehicle.
To access the fuse block, pull out and lift up on thecover latch, located at the end of the fuse block, nearthe battery cable.
6-104
Page 425 of 480

To reinstall the rear seat cushion, do the following:
{WARNING:
A safety belt that is not properly routed through
the seat cushion or is twisted will not provide the
protection needed in a crash. If the safety belt has
WARNING: (Continued)
WARNING: (Continued)
not been routed through the seat cushion at all, it
will not be there to work for the next passenger.
The person sitting in that position could be badly
injured. After reinstalling the seat cushion, always
check to be sure that the safety belts are properly
routed and are not twisted.
1. Buckle the center passenger position safety belt,then route the safety belts through the proper slotsin the seat cushion. Do not let the safety beltsget twisted.
2. Slide the rear of the cushion up and under theseatback so the rear-locating guides hook intothe wire loops on the back frame.
3. With the seat cushion lowered, push rearward andthen press down on the seat cushion until thespring locks on both ends engage.
4. Check to make sure the safety belts are properlyrouted and that no portion of any safety belt istrapped under the seat. Also make sure the seatcushion is secured.
6-105
Page 426 of 480
FusesUsage
1Fuel Pump
2Left Park Lamp
3Run 3 - Rear Blower
4Right Park Lamp
FusesUsage
5Engine Control Module(ECM)/Transmission ControlModule (TCM)
6Memory Module
7Right Park Lamp (optional)
6-106
Page 427 of 480

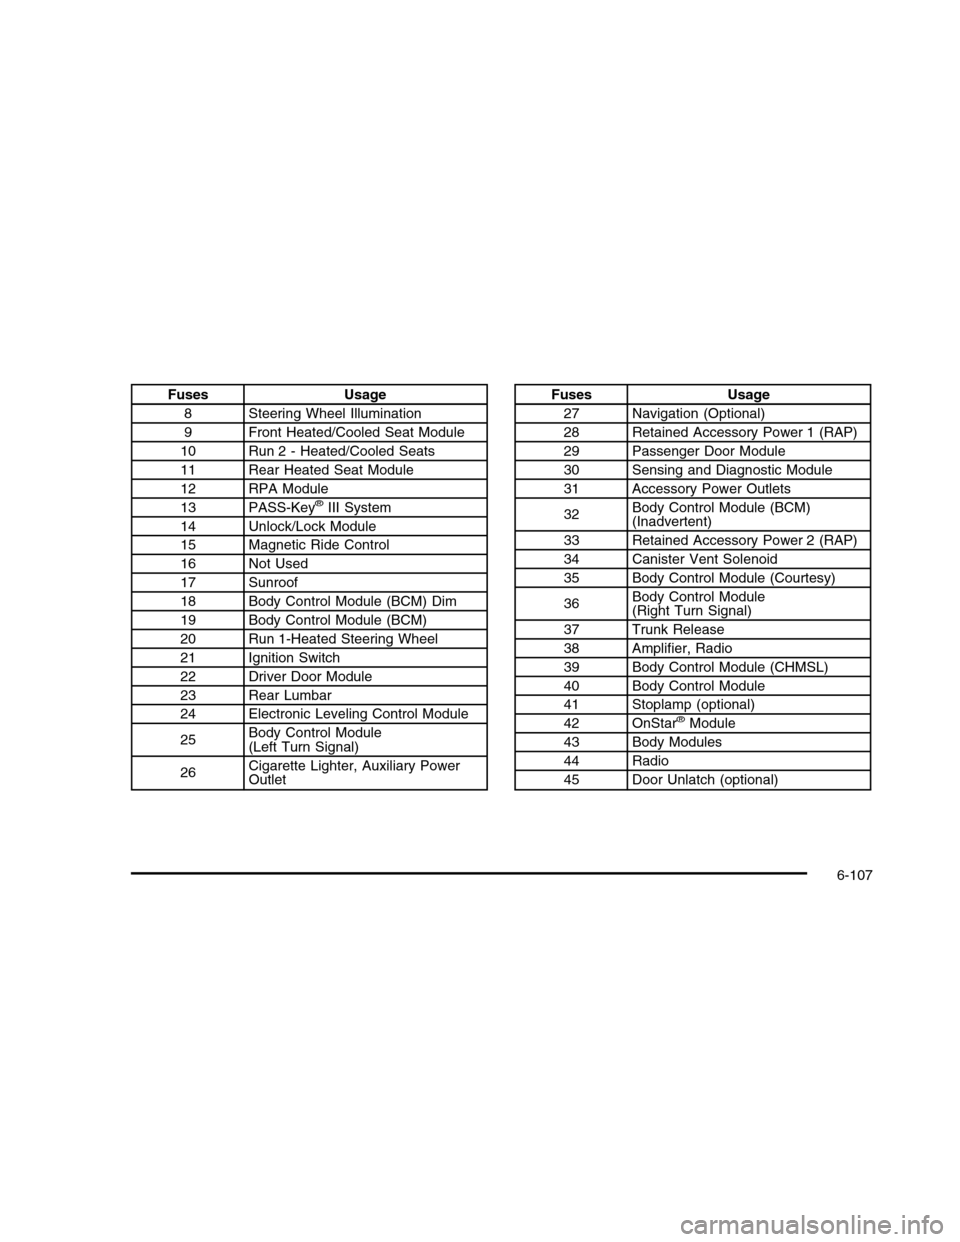
FusesUsage
8Steering Wheel Illumination
9Front Heated/Cooled Seat Module
10Run 2 - Heated/Cooled Seats
11Rear Heated Seat Module
12RPA Module
13PASS-Key®III System
14Unlock/Lock Module
15Magnetic Ride Control
16Not Used
17Sunroof
18Body Control Module (BCM) Dim
19Body Control Module (BCM)
20Run 1-Heated Steering Wheel
21Ignition Switch
22Driver Door Module
23Rear Lumbar
24Electronic Leveling Control Module
25Body Control Module(Left Turn Signal)
26Cigarette Lighter, Auxiliary PowerOutlet
FusesUsage
27Navigation (Optional)
28Retained Accessory Power 1 (RAP)
29Passenger Door Module
30Sensing and Diagnostic Module
31Accessory Power Outlets
32Body Control Module (BCM)(Inadvertent)
33Retained Accessory Power 2 (RAP)
34Canister Vent Solenoid
35Body Control Module (Courtesy)
36Body Control Module(Right Turn Signal)
37Trunk Release
38Amplifier, Radio
39Body Control Module (CHMSL)
40Body Control Module
41Stoplamp (optional)
42OnStar®Module
43Body Modules
44Radio
45Door Unlatch (optional)
6-107
Page 428 of 480
FusesUsage
46Rear Defogger (J-Case)
47Electronic Leveling ControlCompressor (J-Case)
48Blower (J-Case) (optional)
49Blower (J-Case) (optional)
ResistorUsage
50Terminating Resistor
RelaysUsage
51Front Blower (optional)
52Rear Defogger
53Electronic Leveling ControlCompressor
58Park Lamps
59Fuel Pump
60License Plate Lamp (optional)
61Right Park Lamp (optional)
RelaysUsage
62Unlock
63Lock
64Run
65Not Used
66Door Unlatch (optional)
67Trunk Release
68Stoplamp (optional)
69Overhead Lamps (optional)
70Retained Accessory Power (RAP)
CircuitBreakersUsage
54Right Front Seat
55Left Front Power Seat
56Power Windows
57Power Tilt Steering Wheel
6-108
Page 429 of 480
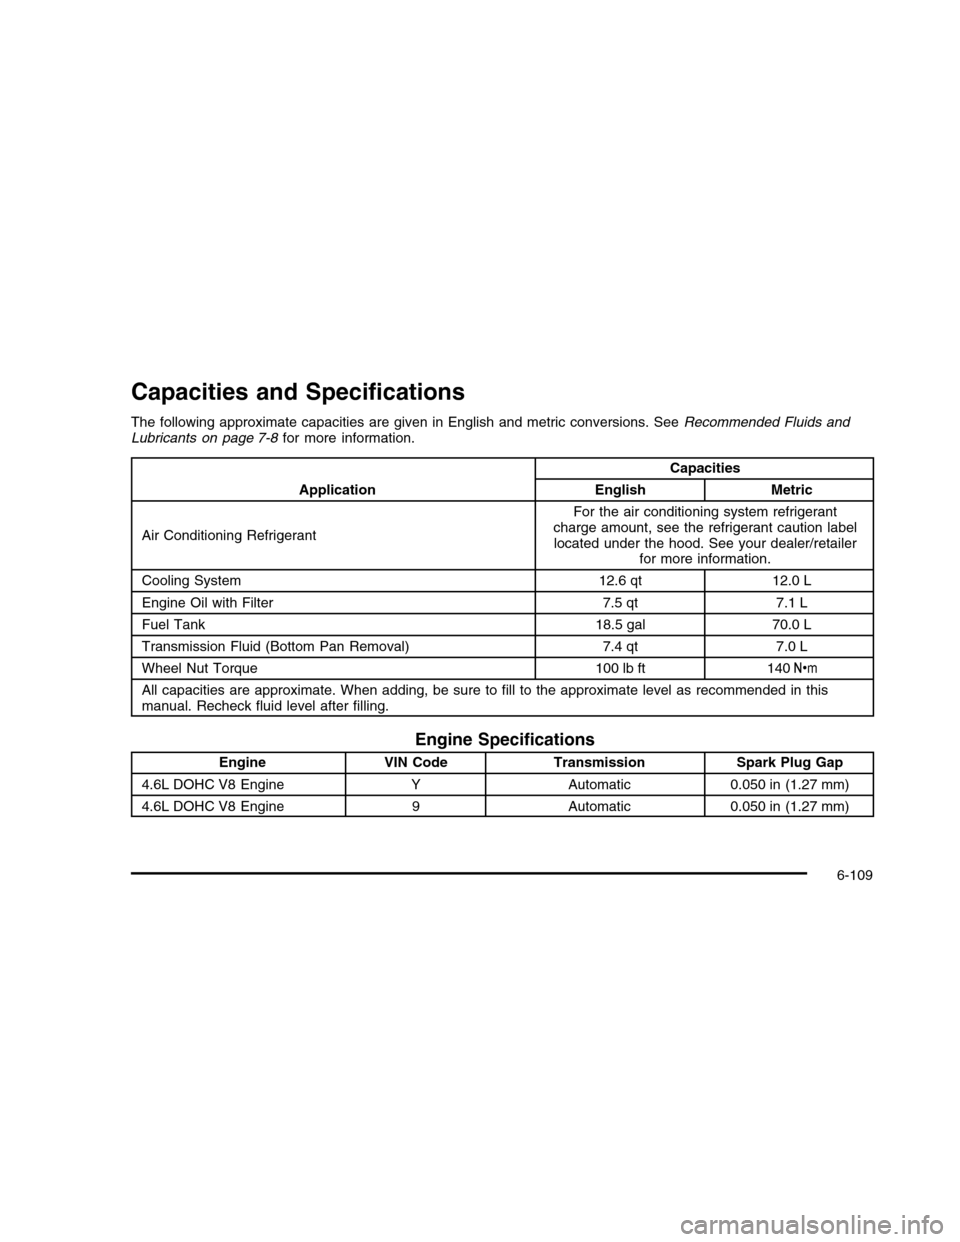
Capacities and Specifications
The following approximate capacities are given in English and metric conversions. SeeRecommended Fluids andLubricants on page 7-8for more information.
Application
Capacities
EnglishMetric
Air Conditioning Refrigerant
For the air conditioning system refrigerantcharge amount, see the refrigerant caution labellocated under the hood. See your dealer/retailerfor more information.
Cooling System12.6 qt12.0 L
Engine Oil with Filter7.5 qt7.1 L
Fuel Tank18.5 gal70.0 L
Transmission Fluid (Bottom Pan Removal)7.4 qt7.0 L
Wheel Nut Torque100 lb ft140Y
All capacities are approximate. When adding, be sure to fill to the approximate level as recommended in thismanual. Recheck fluid level after filling.
Engine Specifications
EngineVIN CodeTransmissionSpark Plug Gap
4.6L DOHC V8 EngineYAutomatic0.050 in (1.27 mm)
4.6L DOHC V8 Engine9Automatic0.050 in (1.27 mm)
6-109
Page 430 of 480
Trending: washer fluid, brake pads, oil reset, fuel pump, battery, sat nav, lock


