maintenance schedule CADILLAC ESCALADE 2010 3.G User Guide
[x] Cancel search | Manufacturer: CADILLAC, Model Year: 2010, Model line: ESCALADE, Model: CADILLAC ESCALADE 2010 3.GPages: 616, PDF Size: 39.41 MB
Page 486 of 616

Brakes
Brake Fluid
The brake master cylinderreservoir is filled with DOT3 brake fluid. SeeEngineCompartment Overviewon page 7!16for thelocation of the reservoir.
There are only two reasons why the brake fluid level inthe reservoir might go down:
.The brake fluid level goes down because ofnormal brake lining wear. When new linings areinstalled, the fluid level goes back up.
.A fluid leak in the brake hydraulic system can alsocause a low fluid level. Have the brake hydraulicsystem fixed, since a leak means that sooner orlater the brakes will not work well.
Do not top off the brake fluid. Adding fluid does notcorrect a leak. If fluid is added when the linings areworn, there will be too much fluid when new brakelinings are installed. Add or remove brake fluid, asnecessary, only when work is done on the brakehydraulic system.
{WARNING:
If too much brake fluid is added, it can spill on the
engine and burn, if the engine is hot enough. You
or others could be burned, and the vehicle could
be damaged. Add brake fluid only when work is
done on the brake hydraulic system. See
“Checking Brake Fluid”in this section.
When the brake fluid falls to a low level, the brakewarning light comes on. SeeBrake System WarningLight on page 4!33.
Refer to the Maintenance Schedule to determine whento check the brake fluid. SeeScheduled Maintenanceo n p a g e 8!3.
7-40
Page 495 of 616
3. Disconnect the red positive (+) cable from thevehicle with the good battery.
4. Disconnect the red positive (+) cable from theother vehicle.
5. Return the remote positive (+) terminal cover,if the vehicle has one, to its original position.
All-Wheel Drive
Transfer Case
If your vehicle is equipped with All-Wheel Drive, be sureto perform the lubricant checks described in thissection. There are two additional systems that needlubrication.
When to Check Lubricant
Refer to the Maintenance Schedule to determine howoften to check the lubricant. SeeScheduledMaintenance on page 8!3.
How to Check Lubricant
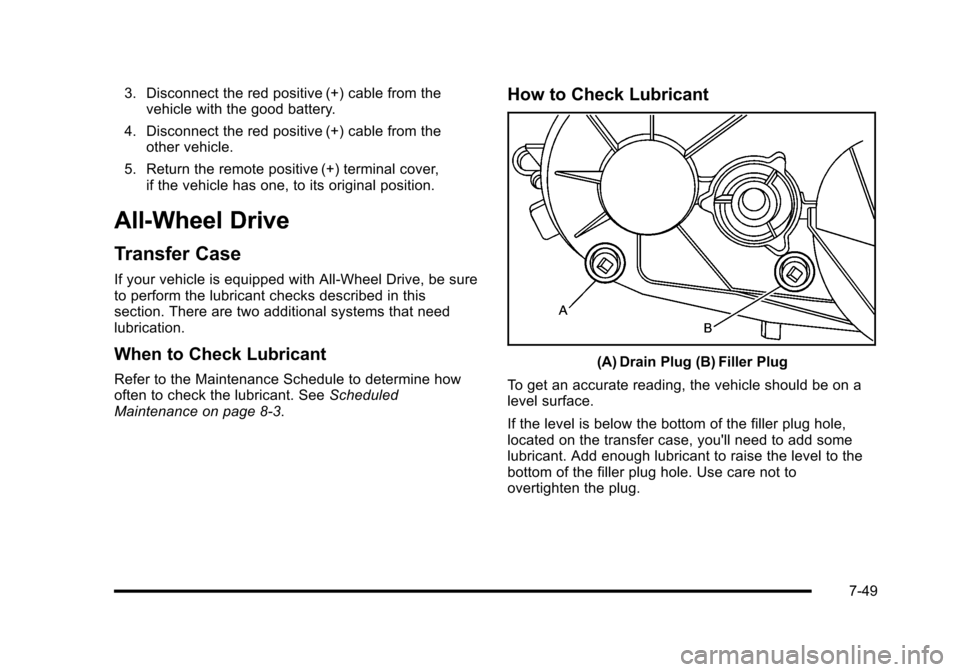
(A) Drain Plug (B) Filler Plug
To get an accurate reading, the vehicle should be on alevel surface.
If the level is below the bottom of the filler plug hole,located on the transfer case, you'll need to add somelubricant. Add enough lubricant to raise the level to thebottom of the filler plug hole. Use care not toovertighten the plug.
7-49
Page 496 of 616
What to Use
Refer to the Maintenance Schedule to determine whatkind of lubricant to use. SeeRecommended Fluids andLubricants on page 8!10.
Rear Axle
When to Check Lubricant
It is not necessary to regularly check rear axle fluidunless you suspect there is a leak or you hear anunusual noise. A fluid loss could indicate a problem.Have it inspected and repaired.
All axle assemblies are filled by volume of fluid duringproduction. They are not filled to reach a certain level.When checking the fluid level on any axle, variations inthe readings can be caused by factory fill differencesbetween the minimum and the maximum fluid volume.Also, if a vehicle has just been driven before checkingthe fluid level, it may appear lower than normal becausefluid has traveled out along the axle tubes and has notdrained back to the sump area. Therefore, a readingtaken five minutes after the vehicle has been driven willappear to have a lower fluid level than a vehicle thathas been stationary for an hour or two. Remember thatthe rear axle assembly must be supported to get a truereading.
How to Check Lubricant
To get an accurate reading, the vehicle should be on alevel surface.
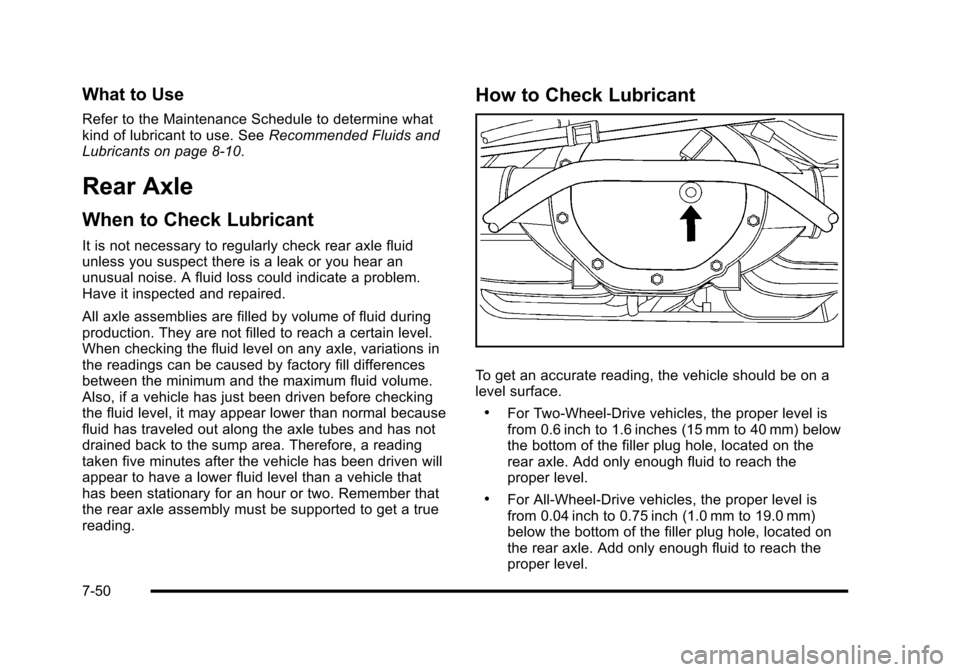
.For Two-Wheel-Drive vehicles, the proper level isfrom 0.6 inch to 1.6 inches (15 mm to 40 mm) belowthe bottom of the filler plug hole, located on therear axle. Add only enough fluid to reach theproper level.
.For All-Wheel-Drive vehicles, the proper level isfrom 0.04 inch to 0.75 inch (1.0 mm to 19.0 mm)below the bottom of the filler plug hole, located onthe rear axle. Add only enough fluid to reach theproper level.
7-50
Page 497 of 616
What to Use
Refer to the Maintenance Schedule to determine whatkind of lubricant to use. SeeRecommended Fluids andLubricants on page 8!10.
Front Axle
When to Check and Change Lubricant
It is not necessary to regularly check front axle fluidunless you suspect there is a leak or you hear anunusual noise. A fluid loss could indicate a problem.Have it inspected and repaired.
How to Check Lubricant
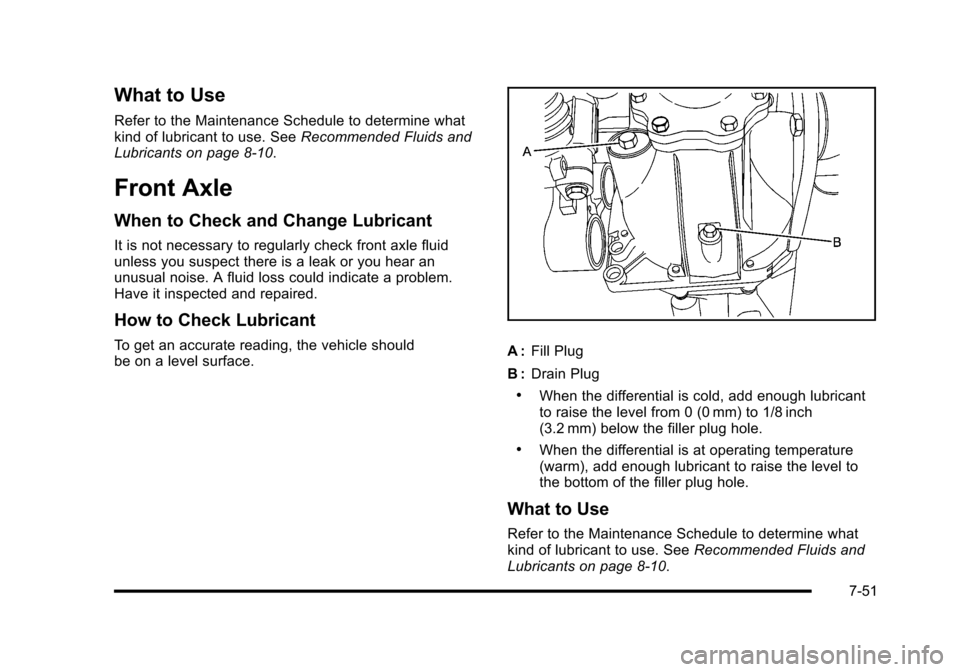
To get an accurate reading, the vehicle shouldbe on a level surface.A:Fill Plug
B:Drain Plug
.When the differential is cold, add enough lubricantto raise the level from 0 (0 mm) to 1/8 inch(3.2 mm) below the filler plug hole.
.When the differential is at operating temperature(warm), add enough lubricant to raise the level tothe bottom of the filler plug hole.
What to Use
Refer to the Maintenance Schedule to determine whatkind of lubricant to use. SeeRecommended Fluids andLubricants on page 8!10.
7-51
Page 503 of 616
Windshield Wiper Blade
Replacement
Windshield wiper blades should be inspected for wearor cracking. SeeScheduled Maintenance on page 8!3.
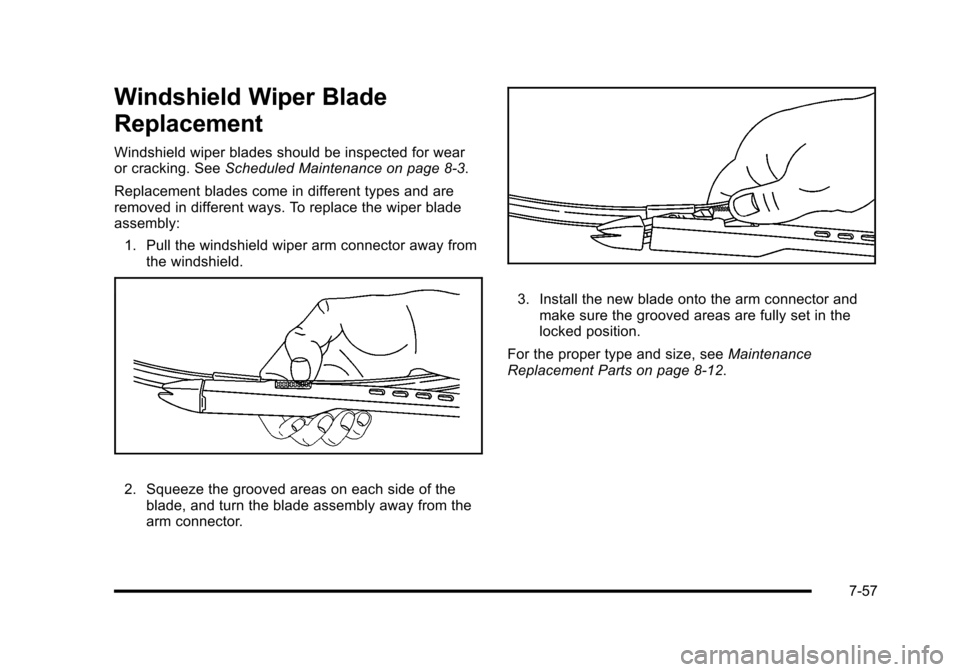
Replacement blades come in different types and areremoved in different ways. To replace the wiper bladeassembly:
1. Pull the windshield wiper arm connector away fromthe windshield.
2. Squeeze the grooved areas on each side of theblade, and turn the blade assembly away from thearm connector.
3. Install the new blade onto the arm connector andmake sure the grooved areas are fully set in thelocked position.
For the proper type and size, seeMaintenanceReplacement Parts on page 8!12.
7-57
Page 517 of 616
5. Remove the valve cap from the valve cap stem.Activate the TPMS sensor by increasing ordecreasing the tire's air pressure for five seconds,or until a horn chirp sounds. The horn chirp, whichmay take up to 30 seconds to sound, confirms thatthe sensor identification code has been matched tothis tire and wheel position.
6. Proceed to the passenger side front tire, andrepeat the procedure in Step 5.
7. Proceed to the passenger side rear tire, and repeatthe procedure in Step 5.
8. Proceed to the driver side rear tire, and repeat theprocedure in Step 5. The horn sounds two times toindicate the sensor identification code has beenmatched to the driver side rear tire, and the TPMSsensor matching process is no longer active. TheTIRE LEARNING ACTIVE message on the DICdisplay screen goes off.
9. Turn the ignition switch to LOCK/OFF.
10. Set all four tires to the recommended air pressurelevel as indicated on the Tire and LoadingInformation label.
11. Put the valve caps back on the valve stems.
Tire Inspection and Rotation
We recommend that you regularly inspect your
vehicle's tires, including the spare tire, for signs of
wear or damage. SeeWhen It Is Time for New
Tireson page 7!73for more information.
Tires should be rotated every 5,000 to 8,000 miles
(8 000 to 13 000 km). SeeScheduled Maintenance
on page 8!3.
The purpose of a regular tire rotation is to achieve
a uniform wear for all tires on the vehicle. This will
ensure that your vehicle continues to perform
most like it did when the tires were new.
7-71
Page 563 of 616

Section 8 Maintenance Schedule
Maintenance Schedule. . . . . . . . . . . . . . . . . . . . . . . . . . . . 8-2Introduction . . . . . . . . . . . . . . . . . . . . . . . . . . . . . . . . . . . . . 8-2Scheduled Maintenance . . . . . . . . . . . . . . . . . . . . . . . . 8-3Owner Checks and Services . . . . . . . . . . . . . . . . . . . . 8-8
Recommended Fluids and Lubricants . . . . . . . . . . 8-10Maintenance Replacement Parts . . . . . . . . . . . . . . 8-12Engine Drive Belt Routing . . . . . . . . . . . . . . . . . . . . . 8-13Maintenance Record . . . . . . . . . . . . . . . . . . . . . . . . . . . 8-14
8-1
Page 564 of 616
Maintenance Schedule
Introduction
Notice:Maintenance intervals, checks, inspections,recommended fluids, and lubricants are necessaryto keep this vehicle in good working condition.Damage caused by failure to follow scheduledmaintenance might not be covered by the vehiclewarranty.
Proper vehicle maintenance helps to keep the vehicle ingood working condition, improves fuel economy, andreduces vehicle emissions for better air quality.
Because of all the different ways people use vehicles,maintenance needs vary. The vehicle might need morefrequent checks and services. Please read theinformation under Scheduled Maintenance. To keep thevehicle in good condition, see your dealer/retailer.
The maintenance schedule is for vehicles that:
.carry passengers and cargo within recommendedlimits on the Tire and Loading Information label.SeeLoading the Vehicle on page 6!32.
.are driven on reasonable road surfaces within legaldriving limits.
.are driven off!road in the recommended manner.SeeOff-Road Driving on page 6!13.
.use the recommended fuel. SeeGasoline Octaneo n p a g e 7!8.
{WARNING:
Performing maintenance work on a vehicle can be
dangerous. In trying to do some jobs, you can be
seriously injured. Do your own maintenance work
only if you have the required know-how and the
proper tools and equipment for the job. If you
have any doubt, see your dealer/retailer to have a
qualified technician do the work. SeeDoing Your
Own Service Work on page 7!6.
8-2
Page 565 of 616

At your General Motors dealer/retailer, you can becertain that you will receive the highest level of serviceavailable. Your dealer/retailer has specially trainedservice technicians, uses genuine GM replacementparts, as well as, up to date tools and equipment toensure fast and accurate diagnostics.
The proper replacement parts, fluids, and lubricants touse are listed inRecommended Fluids and Lubricantson page 8!10andMaintenance Replacement Partsonpage 8!12. We recommend the use of genuine partsfrom your dealer/retailer.
Rotation of New Tires
To maintain ride, handling, and performance of thevehicle, it is important that the first rotation service fornew tires be performed when they have 8 000 to13 000 km (5,000 to 8,000 miles). SeeTire Inspectionand Rotation on page 7!71.
Scheduled Maintenance
When the Change Engine Oil Soon
Message Displays
Change engine oil and filter. SeeEngine Oilonpage 7!17.An Emission Control Service.
When the Change Engine Oil Soon message displays,service is required for the vehicle as soon as possible,within the next 1 000 km/600 miles. If driving under thebest conditions, the engine oil life system might notindicate the need for vehicle service for more than ayear. The engine oil and filter must be changed at leastonce a year and the oil life system must be reset. Yourdealer/retailer has trained service technicians who willperform this work and reset the system. If the engine oillife system is reset accidentally, service the vehiclewithin 5 000 km/3,000 miles since the last service. Resetthe oil life system whenever the oil is changed. SeeEngine Oil Life System on page 7!20.
When the Change Engine Oil Soon message displays,certain services, checks, and inspections are required.
8-3
Page 576 of 616
Maintenance Record
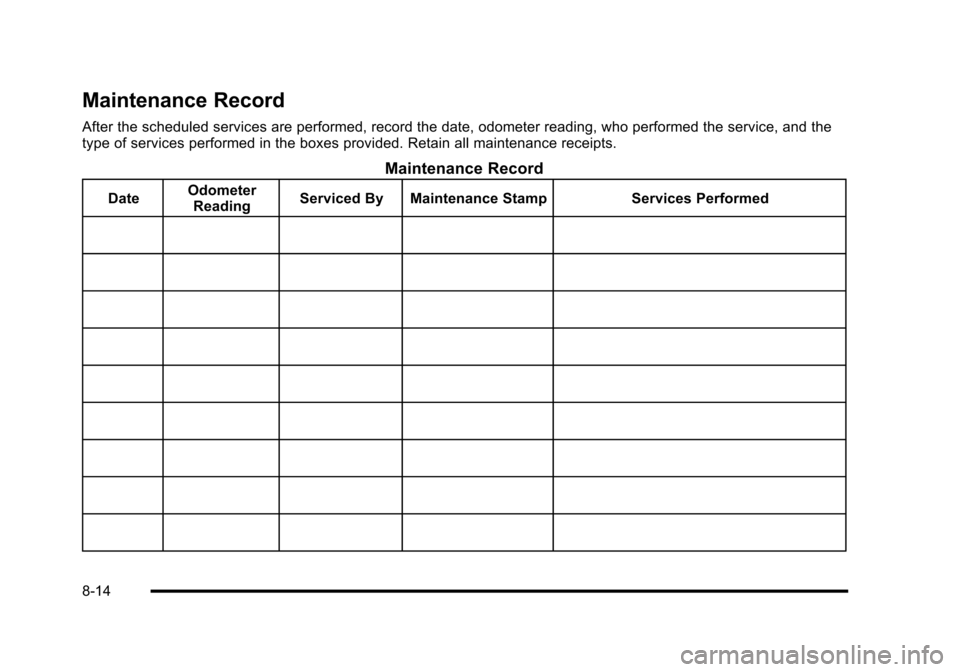
After the scheduled services are performed, record the date, odometer reading, who performed the service, and thetype of services performed in the boxes provided. Retain all maintenance receipts.
Maintenance Record
DateOdometerReadingServiced By Maintenance StampServices Performed
8-14