steering CADILLAC ESCALADE 2010 3.G Owner's Guide
[x] Cancel search | Manufacturer: CADILLAC, Model Year: 2010, Model line: ESCALADE, Model: CADILLAC ESCALADE 2010 3.GPages: 616, PDF Size: 39.41 MB
Page 203 of 616
Exterior Lamps
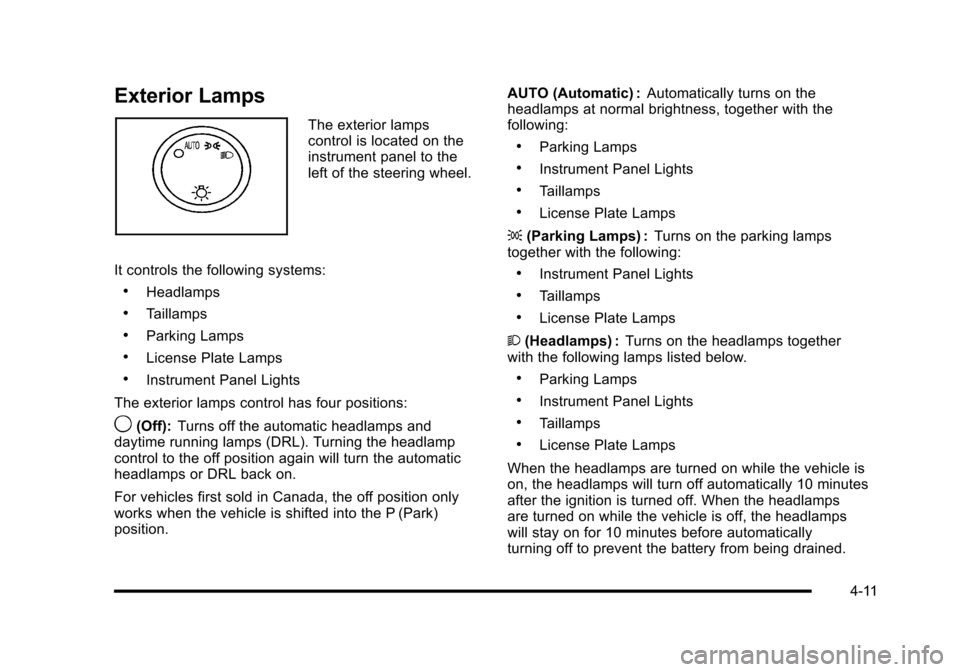
The exterior lampscontrol is located on theinstrument panel to theleft of the steering wheel.
It controls the following systems:
.Headlamps
.Taillamps
.Parking Lamps
.License Plate Lamps
.Instrument Panel Lights
The exterior lamps control has four positions:
9(Off):Turns off the automatic headlamps anddaytime running lamps (DRL). Turning the headlampcontrol to the off position again will turn the automaticheadlamps or DRL back on.
For vehicles first sold in Canada, the off position onlyworks when the vehicle is shifted into the P (Park)position.
AUTO (Automatic) :Automatically turns on theheadlamps at normal brightness, together with thefollowing:
.Parking Lamps
.Instrument Panel Lights
.Taillamps
.License Plate Lamps
;(Parking Lamps) :Turns on the parking lampstogether with the following:
.Instrument Panel Lights
.Taillamps
.License Plate Lamps
2(Headlamps) :Turns on the headlamps togetherwith the following lamps listed below.
.Parking Lamps
.Instrument Panel Lights
.Taillamps
.License Plate Lamps
When the headlamps are turned on while the vehicle ison, the headlamps will turn off automatically 10 minutesafter the ignition is turned off. When the headlampsare turned on while the vehicle is off, the headlampswill stay on for 10 minutes before automaticallyturning off to prevent the battery from being drained.
4-11
Page 208 of 616
There is a delay in the transition between the daytimeand nighttime operation of the Daytime Running Lamps(DRL) and the automatic headlamp systems so thatdriving under bridges or bright overhead street lightsdoes not affect the system. The DRL and automaticheadlamp system is only affected when the light sensordetects a change in lighting lasting longer than thedelay.
If the vehicle is started in a dark garage, the automaticheadlamp system will come on immediately. Once thevehicle leaves the garage, it takes approximatelyone minute for the automatic headlamp system tochange to DRL if it is bright enough outside. During thatdelay, the instrument panel cluster may not be as brightas usual. Make sure the instrument panel brightnesscontrol is in the full bright position. SeeInstrumentPanel Brightness on page 4!16.
To idle the vehicle with the automatic headlamp systemoff, turn the control to the off position.
The headlamps will also stay on after you exit thevehicle. This feature can be programmed using theDriver Information Center (DIC). SeeDIC VehicleCustomization on page 4!57.
The regular headlamp system can be turned on whenneeded.
Fog Lamps
For vehicles with fog lamps, the control is located nextto the exterior lamps control on the instrument panel tothe left of the steering column.
#(Fog Lamps):Press the button to turn the fog lampson or off. A indicator light comes on in the instrumentpanel cluster. The ignition must be in the ON/RUNposition for the fog lamps to come on.
When the fog lamps are turned on, the headlampsautomatically turn on.
When the headlamps are changed to high-beam, thefog lamps also go off. When the high-beam headlampsgo off, the fog lamps will come on again.
Some localities have laws that require the headlamps tobe on along with the fog lamps.
Instrument Panel Brightness
D(Instrument Panel Brightness) :This featurecontrols the brightness of the instrument panel lightsand is located next to the exterior lamp control.
Push the knob to extend out and then it can be turned.
Turn the knob clockwise or counterclockwise to brightenor dim the instrument panel lights. Turning the knob tothe farthest clockwise position turns on the dome lamps.
4-16
Page 209 of 616
Dome Lamps
The dome lamps come on when any door is opened.They turn off after all the doors are closed.
The dome lamps can also be turned on by turning theinstrument panel brightness knob, located on theinstrument panel to the left of the steering column,clockwise to the farthest position. In this position, thedome lamps remain on whether a door is opened orclosed.
Dome Lamp Override
The dome lamp override button is located next to theexterior lamps control.
k(Dome Off):Press the button in and the domelamps remain off when a door is opened. Press thebutton again to return it to the extended position so thatthe dome lamps come on when a door is opened.
Entry Lighting
The vehicle has an illuminated entry feature.
When the doors are opened, the dome lamps will comeon if the dome override button is in the extendedposition. If the dome override button is pressed in, thelamps will not come on.
Exit Lighting
The interior lamps come on when the key is removedfrom the ignition. They turn off automatically in20 seconds. The lights do not come on if the domeoverride button is pressed in.
Reading Lamps
If the vehicle has front reading lamps, press the buttonlocated next to the lamp to turn it on or off.
The vehicle may also have reading lamps in otherlocations. The lamps cannot be adjusted.
4-17
Page 233 of 616
Here are some situations owners may experience withthe fuel gage. None of these indicate a problem with thefuel gage.
.At the gas station, the fuel pump shuts off beforethe gage reads full.
.It takes a little more or less fuel to fill up than thefuel gage indicated. For example, the gage mayhave indicated the tank was half full, but it actuallytook a little more or less than half the tank'scapacity to fill the tank.
.The gage goes back to empty when the ignition isturned off.
Driver Information Center (DIC)
Your vehicle has a Driver Information Center (DIC).
The DIC displays information about your vehicle. It alsodisplays warning messages if a system problem isdetected. The DIC also allows some features to becustomized. SeeDIC Vehicle Customizationonpage 4!57for more information.
All messages will appear in the DIC display located inthe center of the instrument panel cluster.
The DIC comes on when the ignition is on. After a shortdelay, the DIC will display the information that was lastdisplayed before the engine was turned off.
SeeDIC Operation and Displayson page 4!41andDIC Vehicle Customizationon page 4!57for thedisplays available.
DIC Operation and Displays
The DIC has different displays which can be accessedby pressing the DIC buttons located on the instrumentpanel, next to the steering wheel.
The DIC displays trip, fuel, and vehicle systeminformation, and warning messages if a system problemis detected. A digital speedometer also appears at thebottom of the DIC display. The digital speedometercan be enabled or disabled. See“DISPLAY DIGITALSPEED”underDIC Vehicle Customizationonpage 4!57for more information.
4-41
Page 256 of 616
EASY EXIT RECALL
If your vehicle has this feature, it allows you to selectyour preference for the automatic easy exit seat feature.SeeMemory Featureso n p a g e 2!6for moreinformation.
Press the customization button until EASY EXITRECALL appears on the DIC display. Press the set/reset button once to access the settings for this feature.Then press the customization button to scroll throughthe following settings:
DOOR BUTTON ONLY :No automatic seat exit recallwill occur. The recall will only occur after pressing theeasy exit seat button.
BUTTON AND KEY OUT (default) :If the features areenabled through the EASY EXIT SETUP menu, thedriver's seat will move back, and if the vehicle has thepower tilt wheel feature, the power steering column willmove up when the key is removed from the ignition orafter pressing the easy exit seat button.
The automatic easy exit seat movement will only occurone time after the key is removed from the ignition.If the automatic movement has already occurred, andyou put the key back in the ignition and remove it again,the seat and steering column will stay in the original exitposition, unless a memory recall took place prior toremoving the key again.
NO CHANGE :No change will be made to this feature.The current setting will remain.
To select a setting, press the set/reset button while thedesired setting is displayed on the DIC.
EASY EXIT SETUP
If your vehicle has this feature, it allows you to selectwhich areas will recall with the automatic easy exit seatfeature. It also allows you to turn off the automatic easyexit feature. SeeMemory Featureso n p a g e 2!6and“EASY EXIT RECALL”earlier for more information.
Press the customization button until EASY EXIT SETUPappears on the DIC display. Press the set/reset buttononce to access the settings for this feature. Then pressthe menu up/down button to scroll through the followingsettings:
OFF :No automatic seat exit will recall.
SEAT ONLY :The driver's seat will recall.
TILT ONLY :The steering wheel tilt feature will recall.
SEAT & TILT (default) :The driver's seat and thesteering wheel tilt feature will recall.
NO CHANGE :No change will be made to this feature.The current setting will remain.
To select a setting, press the set/reset button while thedesired setting is displayed on the DIC.
4-64
Page 260 of 616

Voice Recognition
The Bluetooth system uses voice recognition tointerpret voice commands to dial phone numbers andname tags.
Noise :Keep interior noise levels to a minimum. Thesystem may not recognize voice commands if there istoo much background noise.
When to Speak :A short tone sounds after the systemresponds indicating when it is waiting for a voicecommand. Wait until the tone and then speak.
How to Speak :Speak clearly in a calm and naturalvoice.
Audio System
When using the in!vehicle Bluetooth system, soundcomes through the vehicle's front audio systemspeakers and overrides the audio system. Use theaudio system volume knob, during a call, to change thevolume level. The adjusted volume level remains inmemory for later calls. To prevent missed calls, aminimum volume level is used if the volume is turneddown too low.
Bluetooth Controls
Use the buttons located on the steering wheel tooperate the in!vehicle Bluetooth system. SeeAudioSteering Wheel Controlson page 4!105for moreinformation.
bg(Push To Talk) :Press to answer incoming calls,to confirm system information, and to start speechrecognition.
cx(Phone On Hook):Press to end a call, reject acall, or to cancel an operation.
Pairing
A Bluetooth enabled cell phone must be pairedto the in!vehicle Bluetooth system first and thenconnected to the vehicle before it can be used. See thecell phone manufacturers user guide for Bluetoothfunctions before pairing the cell phone. If a Bluetoothphone is not connected, calls will be made usingOnStar®Hands!Free Calling, if available. Refer to theOnStar owner's guide for more information.
Pairing Information:
.Up to five cell phones can be paired to thein!vehicle Bluetooth system.
.The pairing process is disabled when the vehicle ismoving.
4-68
Page 297 of 616
PROG (Program) :Press this button to go to the nextpreset radio station or channel set on the main radio.This function is inactive, with some radios, if the frontseat passengers are listening to the radio.
When a CD or DVD audio disc is playing, press thisbutton to go to the beginning of the CD or DVD audio.This function is inactive, with some radios, if the frontseat passengers are listening to the disc.
When a disc is playing in the CD or DVD changer, pressthis button to select the next disc, if multiple discs areloaded. This function is inactive, with some radios, if thefront seat passengers are listening to the disc.
When a DVD video menu is being displayed, press thePROG button to perform the menu function, enter.
Theft-Deterrent Feature
THEFTLOCK®is designed to discourage theft of thevehicle's radio by learning a portion of the VehicleIdentification Number (VIN). The radio does not operateif it is stolen or moved to a different vehicle.
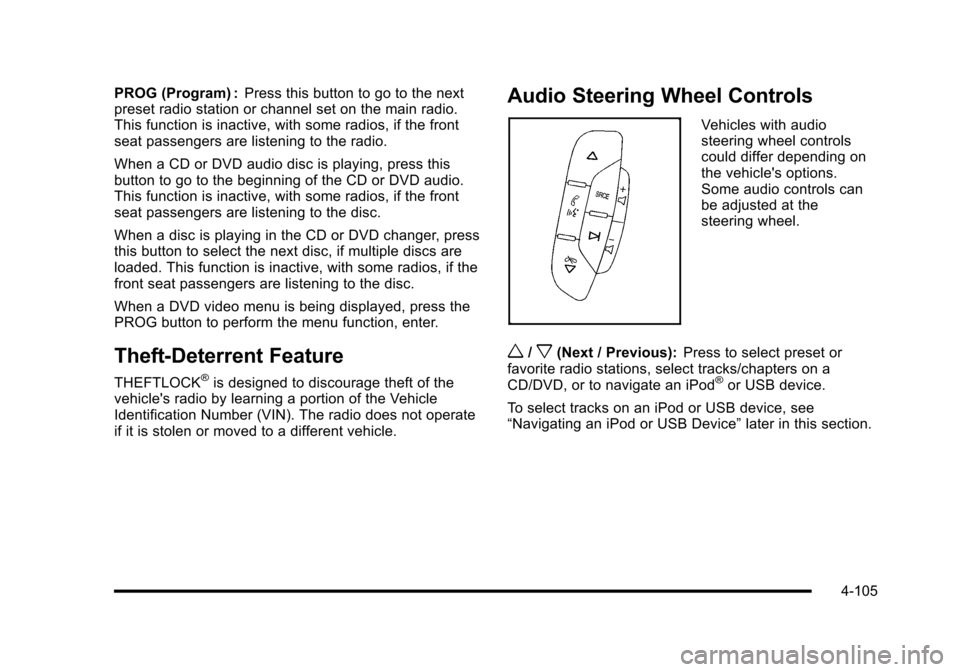
Audio Steering Wheel Controls
Vehicles with audiosteering wheel controlscould differ depending onthe vehicle's options.Some audio controls canbe adjusted at thesteering wheel.
w/x(Next / Previous):Press to select preset orfavorite radio stations, select tracks/chapters on aCD/DVD, or to navigate an iPod®or USB device.
To select tracks on an iPod or USB device, see“Navigating an iPod or USB Device”later in this section.
4-105
Page 298 of 616
Radio
To select preset or favorite radio stations:
Press and releaseworxto go to the next or previous
radio station stored as a preset or favorite.
CD/DVD
To select tracks/chapters on a CD/DVD:
Press and releaseworxto go to the next or previous
track/chapter.
bg(Mute/Push to Talk):Press to silence the vehiclespeakers only. Press again to turn the sound on.
For vehicles with Bluetooth or OnStar®systems, pressand hold for longer than two seconds to interact withthose systems. SeeBluetooth®on page 4!67and theOnStar Owner's Guide for more information.
c(End):Press to reject an incoming call, or end acurrent call.
SRCE (Source/Voice Recognition) :Press to switchbetween the radio, CD, DVD, and rear auxiliary,if equipped.
Press and hold this button for longer than one secondto initiate voice recognition. SeeVoice Recognitiononpage 5!86for more information.
¨(Seek):Press to go to the next radio station while inAM, FM, or XM™.
To scan available radio stations:
1. Press and hold¨until a beep is heard, to place
the radio into SCAN mode, a station will play forfive seconds before moving to the next station.
2. To stop the SCAN function, press¨again.
While listening to a CD press and release¨to select
the next disc.
+e!e(Volume):Press to increase or to decrease
the volume.
Navigating an iPod or USB Device
Audio steering wheel controls can be used to navigatean iPod or USB device while on the main audio screenor the music navigator screen.
Main Audio Screen
Press and releaseworxto select the next or
previous track.
Press and holdworxto select the next or previous
category/folder, if available.
Press and release¨to enter the music
navigator menu.
4-106
Page 382 of 616

Using the Navigation Audio System to
Control a USB Storage Device or iPod®
The navigation audio system can control a USB storagedevice or an iPod by using the radio touch screens andsteering wheel controls.
1. Touch the AUX buttton and then the USB button.
2. Press center screen button to enter the musicnavigator main screen.
3. Touch or tap the left or right arrow to selectdesired Category such as: Artist, Album,Genre, etc. A list of that category will display.
4. Select an Artist, Album, or Track from that list.
5. Touch the up or down arrows located on theside of the screen to select one item at a time,or touch the top or bottom arrow to jump10 percent up or down the list.
6. Touch the Back button to go back to theprevious screen.
7. Touch the Exit button to go back to the mainaudio screen.
5-82
Page 386 of 616

3. For the second row display select the Rear AUXscreen button next to Rear Display 1 and for thethird row display select the Rear AUX screenbutton next to Rear Display 2. Each screen worksindependently of the other. The second row screencan watch a DVD while the third row screen canuse the auxiliary device.
The rear seat passengers can also use the remotecontrol to change the functions of the RSE. SeeRearSeat Entertainment (RSE) System (Overhead)onpage 4!77orRear Seat Entertainment (RSE) System(Headrest DVD)on page 4!86for more information.
Voice Recognition
The navigation system's voice recognition allowsfor hands-free operation of the navigation system,audio system, and OnStar®features. The DVD mapdisc must be installed in the navigation system for voicerecognition to work. See“Installing the DVD Map Disc”underMapson page 5!14for more information.
Voice recognition can be used when the ignition is onor when Retained Accessory Power (RAP) is active.See“Retained Accessory Power (RAP)”in the Index ofyour vehicle's owner manual for more information.
To use voice recognition, do the following:
1. Push and hold theSRCE button on thesteering wheel untilyou hear a beep. Theaudio system mutes.
2. Clearly state one of the commands listed on thefollowing pages.
Helpful Hints for Stating Commands
.When a multiple command is available, choose thecommand that works best.
.Words that are in brackets are optional. Forexample, for the command Radio [band] [select]FM, stating Radio FM or Radio select FM are bothvalid commands.
5-86