buttons CADILLAC ESCALADE 2010 3.G Workshop Manual
[x] Cancel search | Manufacturer: CADILLAC, Model Year: 2010, Model line: ESCALADE, Model: CADILLAC ESCALADE 2010 3.GPages: 616, PDF Size: 39.41 MB
Page 354 of 616
Detailed Traffic Event Screens
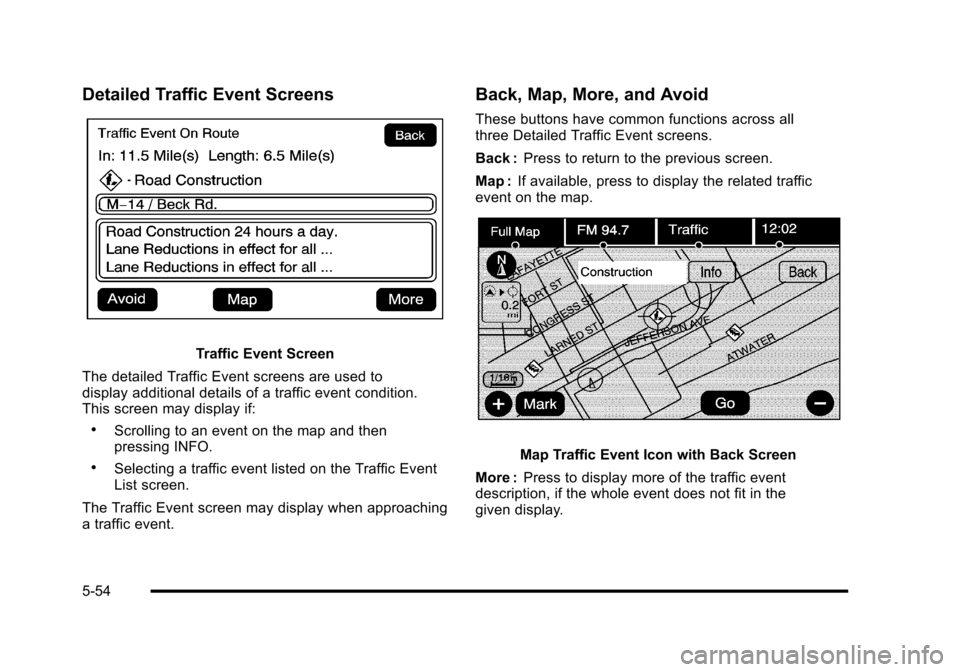
Traffic Event Screen
The detailed Traffic Event screens are used todisplay additional details of a traffic event condition.This screen may display if:
.Scrolling to an event on the map and thenpressing INFO.
.Selecting a traffic event listed on the Traffic EventList screen.
The Traffic Event screen may display when approachinga traffic event.
Back, Map, More, and Avoid
These buttons have common functions across allthree Detailed Traffic Event screens.
Back :Press to return to the previous screen.
Map :If available, press to display the related trafficevent on the map.
Map Traffic Event Icon with Back Screen
More :Press to display more of the traffic eventdescription, if the whole event does not fit in thegiven display.
5-54
Page 356 of 616
:Touch the + (plus) or!(minus) screenbuttons to increase or decrease the brig CADILLAC ESCALADE 2010 3.G Workshop Manual Brightness/Contrast/Mode
Touch this screen button to change the brightness,contrast, and mode of the display.
](Brightness):Touch the + (plus) or!(minus) screenbuttons to increase or decrease the brig](/img/23/7913/w960_7913-355.png)
Brightness/Contrast/Mode
Touch this screen button to change the brightness,contrast, and mode of the display.
](Brightness):Touch the + (plus) or!(minus) screenbuttons to increase or decrease the brightness of thescreen.
_(Contrast):Touch the + (plus) or!(minus) screenbuttons to increase or decrease the contrast of thescreen.
Auto (Automatic) :Touch this screen button for thesystem to automatically adjust the screen backgrounddepending on exterior lighting conditions.
Night :Touch this screen button and the system makesthe map background darker.
Day :Touch this screen button and the system makesthe map background brighter.
Setting the Clock
The navigation system time and the analog clockoperate independently. Changing the time through thenavigation system does not change the time on theanalog clock. SeeAnalog Clockon page 4!20tochange the analog clock time.
Press the CONFIG key to enter the configure menuoptions, then press the CONFIG key repeatedly until thetime is selected or touch the time screen button.
Hours :Press the!(minus) or + (plus) signs todecrease or increase the hours.
Minutes :Press the!(minus) or + (plus) signs todecrease or increase the minutes.
12/24 Format :Select the 12 screen button for standardtime; select the 24 screen button for military time.
5-56
Page 362 of 616
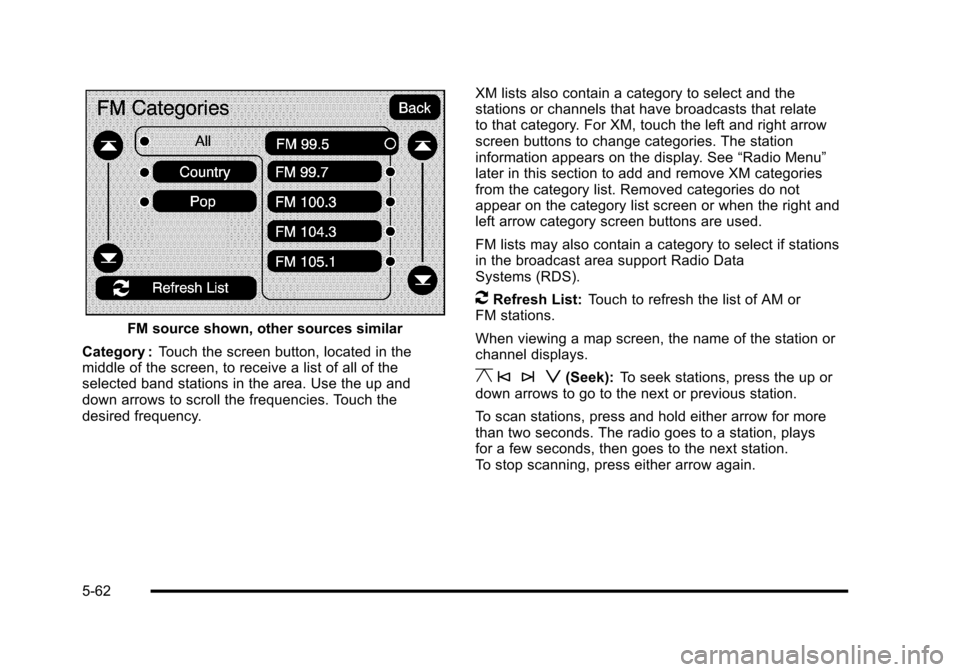
FM source shown, other sources similar
Category :Touch the screen button, located in themiddle of the screen, to receive a list of all of theselected band stations in the area. Use the up anddown arrows to scroll the frequencies. Touch thedesired frequency.
XM lists also contain a category to select and thestations or channels that have broadcasts that relateto that category. For XM, touch the left and right arrowscreen buttons to change categories. The stationinformation appears on the display. See“Radio Menu”later in this section to add and remove XM categoriesfrom the category list. Removed categories do notappear on the category list screen or when the right andleft arrow category screen buttons are used.
FM lists may also contain a category to select if stationsin the broadcast area support Radio DataSystems (RDS).
2Refresh List:Touch to refresh the list of AM orFM stations.
When viewing a map screen, the name of the station orchannel displays.
y © ¨ z(Seek):To seek stations, press the up ordown arrows to go to the next or previous station.
To scan stations, press and hold either arrow for morethan two seconds. The radio goes to a station, playsfor a few seconds, then goes to the next station.To stop scanning, press either arrow again.
5-62
Page 363 of 616
Storing Radio Station Presets
This feature stores a mix of up to 30 AM, FM, andXM (if equipped) preset stations. To store presets:
1. PressOto turn the system on.
2. If viewing a map screen, touch the sourcescreen button, press the AUDIO key, or pressthe FAV (favorite) key.
3. Select the band.
4. Seek, scan, or tune to the desired station, to selectthe station.
5. Press and hold one of the preset screen buttonsfor more than two seconds or until a beep is heard.
6. Repeat the steps for each preset.
Sound Menu
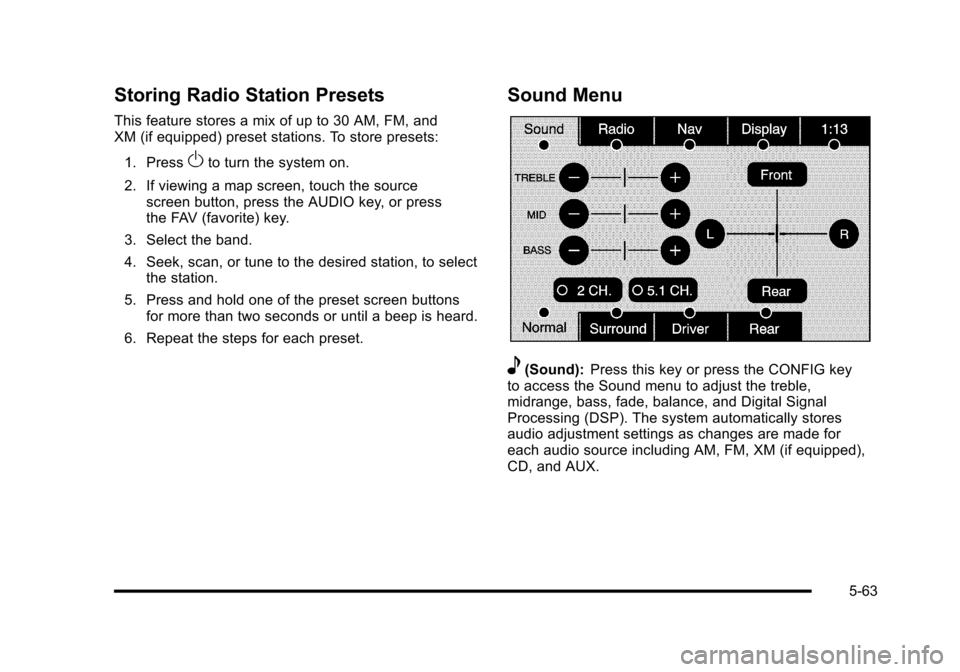
e(Sound):Press this key or press the CONFIG keyto access the Sound menu to adjust the treble,midrange, bass, fade, balance, and Digital SignalProcessing (DSP). The system automatically storesaudio adjustment settings as changes are made foreach audio source including AM, FM, XM (if equipped),CD, and AUX.
5-63
Page 364 of 616
Setting the Tone
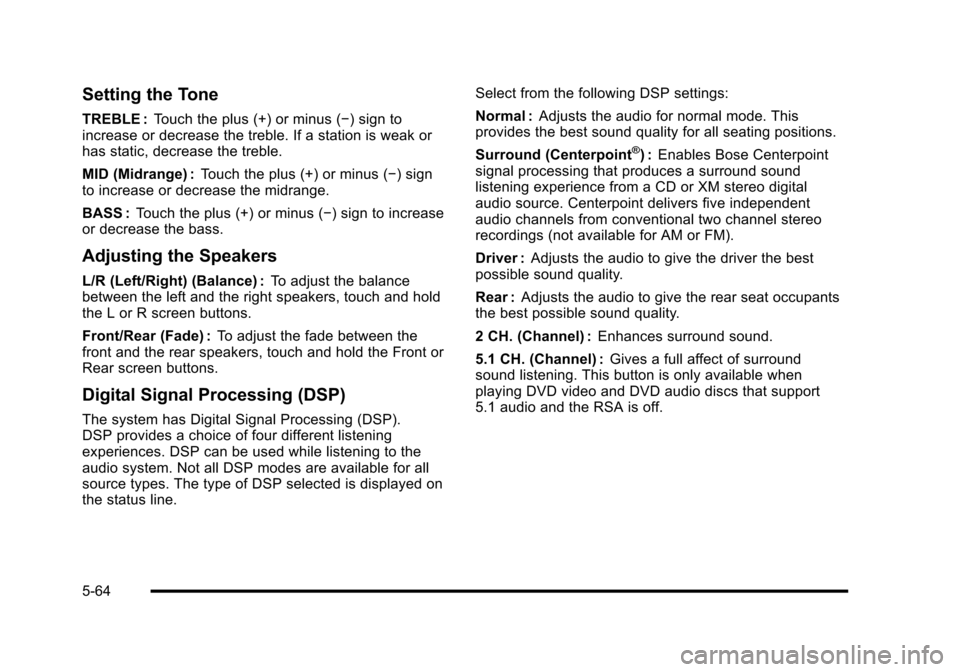
TREBLE :Touch the plus (+) or minus (!) sign toincrease or decrease the treble. If a station is weak orhas static, decrease the treble.
MID (Midrange) :Touch the plus (+) or minus (!) signto increase or decrease the midrange.
BASS :Touch the plus (+) or minus (!) sign to increaseor decrease the bass.
Adjusting the Speakers
L/R (Left/Right) (Balance) :To adjust the balancebetween the left and the right speakers, touch and holdthe L or R screen buttons.
Front/Rear (Fade) :To adjust the fade between thefront and the rear speakers, touch and hold the Front orRear screen buttons.
Digital Signal Processing (DSP)
The system has Digital Signal Processing (DSP).DSP provides a choice of four different listeningexperiences. DSP can be used while listening to theaudio system. Not all DSP modes are available for allsource types. The type of DSP selected is displayed onthe status line.
Select from the following DSP settings:
Normal :Adjusts the audio for normal mode. Thisprovides the best sound quality for all seating positions.
Surround (Centerpoint®):Enables Bose Centerpointsignal processing that produces a surround soundlistening experience from a CD or XM stereo digitalaudio source. Centerpoint delivers five independentaudio channels from conventional two channel stereorecordings (not available for AM or FM).
Driver :Adjusts the audio to give the driver the bestpossible sound quality.
Rear :Adjusts the audio to give the rear seat occupantsthe best possible sound quality.
2 CH. (Channel) :Enhances surround sound.
5.1 CH. (Channel) :Gives a full affect of surroundsound listening. This button is only available whenplaying DVD video and DVD audio discs that support5.1 audio and the RSA is off.
5-64
Page 366 of 616
Bose®AudioPilot®
AudioPilot :The Bose®AudioPilot®noisecompensation technology.
To use AudioPilot®:
1. Press the CONFIG key to enter the menu screen,then press the CONFIG key repeatedly until Radiois selected or touch the Radio screen button
2. Press the Automatic Volume Control screen buttonto access the AudioPilot menu.
3. Press the ON screen button.
To turn it off, touch the OFF screen button. When on,AudioPilot®continuously adjusts the audio systemequalization, to compensate for background noise,so that the music sound is consistent at the setvolume level.
This feature is most effective at lower volume settingswhere background noise can affect how well the musicbeing played is heard through the vehicle's audiosystem. At higher volume settings, where the music ismuch louder than the background noise, there may belittle or no adjustments by AudioPilot®. For moreinformation on AudioPilot®, visit bose.com/audiopilot.
Remove/Add XM Categories
Touch the Remove/Add XM Categories screen buttonto remove or add XM categories when selectingXM categories from the category list screen. The listof XM categories appear on the screen. Use the up anddown arrow screen buttons to scroll through the list. Thecategories to remove are highlighted and the categoriesto add are dark in color. Touch the category to be addedor removed. Touch the Restore All Categories screenbutton to add all categories that have been removed.
Radio Data System (RDS)
The audio system has a Radio Data System (RDS).RDS features are available for use only on FM stationsthat broadcast RDS information. With RDS, the radiocan do the following:
.Receive announcements concerning local andnational emergencies
.Display messages from radio stations
This system relies on receiving specific informationfrom these stations and only works when theinformation is available. In rare cases, a radio stationmay broadcast incorrect information that causes theradio features to work improperly. If this happens,contact the radio station.
5-66
Page 375 of 616

DVD Player
The player can be used for DVD audio and DVD video.
DVD video will not display on the navigation screenunless the vehicle is in PARK (P). It will operate on therear seat entertainment screens while the vehicle ismoving. The Rear Seat Entertainment (RSE) videoscreen will start play of the DVD when a DVD videohas been inserted into the navigation system. TheDVD player can be controlled by the buttons on thenavigation system, the Rear Seat Audio (RSA) system,and the remote control. The DVD player can also beused for the rear seat passengers with the radio off.The rear seat passengers can power on the videoscreen and use the remote control to navigate the disc.See“Rear Seat Entertainment System”in the Index ofyour vehicle's owner manual for more information.
The DVD player is only compatible with DVDs of theappropriate region code that is printed on the jacket ofmost DVDs.
The DVD slot is compatible with most audio CDs,CD-R, CD-RW, DVD-Video, DVD-Audio, DVD-R/RW,DVD+R/RW media along with MP3 and WMA formats.
If an error appears on the display, see“DVD Messages”later in this section.
M(Load):To load one disc, do the following:
1. Press the load hard key and follow the screenmessage displayed.
2. When the system displays“Insert Disc (number)”,insert the disc partway into the slot, label side up.The system will pull it into the first available slotand start playing. The system will display the typeof disc inserted.
To load multiple discs, do the following:
1. Press and hold the load hard key and follow thescreen message displayed.
2. When the system displays“Insert Disc (number)”,insert the disc partway into the slot, label side up.The system will pull it in.
3. Once a disc is loaded, the system will display“Insert Disc (number)”again. Load the next disc.Repeat this procedure for each disc. The playertakes up to six discs, do not try to load more thansix. The system will not display the disc typeswhen loading all, until the discs have been read bythe system.
Once all discs have been inserted, the system willstart playing the last loaded disc.
5-75
Page 376 of 616

Z(Eject):To eject a disc, do the following:
1. Press the eject hard key.
2. The system will display“Ejecting Disc”.
Press the DISC screen button to display the DiscChanger screen. Select the disc to eject. If aselection is not made, the system will eject the discfrom the current slot. If the disc is not removedfrom the slot, the system will pull it back in after10 seconds and start playing it.
To eject all discs at once, press and hold the eject hardkey. The system will display the disc number beingejected.
Playing a DVD
There are three ways to play a DVD:
.Once a DVD is inserted, the system willautomatically start play of the DVD.
.If you are on a map screen, touch theDVD screen button.
.Press the AUDIO hard key, then touchthe DVD screen button.
When a DVD is loaded, the rear seat passengers canpower on the RSE video screen and use the remotecontrol to navigate through the DVD.
O/3(Power/Volume):Press this knob to turn thesystem on and off. Turn the knob to increase ordecrease the volume of the audio system.
Press and hold this knob for more than two seconds toturn off the navigation system, RSE video screen, andRSA. If the vehicle has not been tuned off, the RSE andthe RSA can be turned back on by pressing this knoband will continue play of the last active source.
DVD Menu Options
Once a DVD starts to play, the menu options and cursorscreen buttons will automatically appear. To display themenu Options screen button while a DVD is playing,touch anywhere on the screen.
Options :Select this screen button to view the menuoption screen buttons. Menu options are available whenthey are highlighted. Some menu options are onlyavailable when the DVD is not playing.
Cursor :Touch this button to access the cursor menu.The arrows and other cursor options allow you tonavigate the DVD menu options. The cursor menuoptions are only available if a DVD has a menu.Use the cursor menu to start a DVD video from thedisc main menu.
q,Q,r,R(Arrow Buttons):Use these arrowbuttons to move around the DVD menu.
5-76
Page 377 of 616

Enter :Touch this button to select the highlightedoption.
Return :Touch this button to go back to the previousDVD menu.
Back :Touch this button to go back to the main DVDdisplay screen.
Move :Touch this button to move the cursor buttonsback and forth from the bottom-right corner to thetop-left corner of the screen.
j/r(Pause/Play):Touch this button to pause theDVD. This button will then change to the play button.Touch the play button to play the DVD. Touch thisbutton in a DVD disc main menu to start the movie.
c(Stop):Touch this button to stop play of the DVD.Press the play button to continue playing the DVD fromwhere the DVD was stopped. Press this button twice toreturn to the beginning of the DVD.
DISC :Touch this screen button to view the list ofloaded disc(s). Select the disc to play.
r(Rewind):Touch and release this button to rewindthrough the scene, chapters, and titles. Touch thisbutton again to increase the rewinding speed. Touch theplay button to stop rewinding. This button may not workwhen the DVD is playing the copyright information orthe previews.
[(Forward):Touch and release this button toadvance rapidly through the scene, chapters, and titles.Touch this button again to increase the fast forwardingspeed. Touch the play button to stop fast forwarding.This button may not work when the DVD is playing thecopyright information or the previews.
Hide Options :Press this screen button to remove allmenu options from the display, except Options andCursor.
Top Menu :Touch this button to display the first menuof the DVD. This is not available on all DVDs.
5-77
Page 545 of 616
Notice:Using abrasive cleaners when cleaningglass surfaces on the vehicle, could scratch theglass and/or cause damage to the rear windowdefogger. When cleaning the glass on the vehicle,use only a soft cloth and glass cleaner.
Many cleaners contain solvents that may becomeconcentrated in the vehicle's breathing space. Beforeusing cleaners, read and adhere to all safetyinstructions on the label. While cleaning the vehicle'sinterior, maintain adequate ventilation by opening thevehicle's doors and windows.
Dust may be removed from small buttons and knobsusing a small brush with soft bristles.
Products that remove odors from the vehicle'supholstery and clean the vehicle's glass can beobtained from your dealer/retailer.
Do not clean the vehicle using:
.A knife or any other sharp object to remove a soilfrom any interior surface.
.A stiff brush. It can cause damage to the vehicle'sinterior surfaces.
.Heavy pressure or aggressive rubbing with acleaning cloth. Use of heavy pressure can damagethe interior and does not improve the effectivenessof soil removal.
.Laundry detergents or dishwashing soaps withdegreasers can leave residue that streaks andattracts dirt. For liquid cleaners, about 20 drops pergallon (3.78 L) of water is a good guide. Use onlymild, neutral-pH soaps.
.Too much cleaner that saturates the upholstery.
.Organic solvents such as naptha, alcohol, etc. thatcan damage the vehicle's interior.
Fabric/Carpet
Use a vacuum cleaner with a soft brush attachmentfrequently to remove dust and loose dirt. A canistervacuum with a beater bar in the nozzle may only beused on floor carpet and carpeted floor mats. For anysoil, always try to remove it first with plain water or clubsoda. Before cleaning, gently remove as much of thesoil as possible using one of the following techniques:
.For liquids: gently blot the remaining soil with apaper towel. Allow the soil to absorb into the papertowel until no more can be removed.
.For solid dry soils: remove as much as possibleand then vacuum.
7-99