buttons CADILLAC ESCALADE 2010 3.G User Guide
[x] Cancel search | Manufacturer: CADILLAC, Model Year: 2010, Model line: ESCALADE, Model: CADILLAC ESCALADE 2010 3.GPages: 616, PDF Size: 39.41 MB
Page 42 of 616

Rear Seats
Heated Seats
Driver's Side RSA HeatedSeat Button Only shown
The rear outboard seatshave the heated seatfeature. The buttons usedto control this feature arelocated on the Rear SeatAudio (RSA) panel.
M(Heated Seat):To heat the seat cushion, press thebutton with the heated seat symbol.
A heated seat symbol will be shown in the RSA displayto indicate that the feature is on. Press the button tocycle through the temperature settings of high, medium,and low, and to turn it off. Indicator bars next tothe symbol will designate the level of heat selected:three for high, two for medium, and one for low.
The heated seats will be canceled ten seconds afterthe ignition is turned off. If the vehicle is restarted, theheated seat button will need to be pressed again torestart the feature.
60/40 Split Bench Seat
If your vehicle has a 60/40 split bench, the seat(s) canbe folded for additional cargo space or folded andtumbled for easy entry and exit to the third row seats,if your vehicle has them. These seats will have eitherthe manual fold and tumble feature or the automaticseat release fold and tumble feature.
Manual Fold and Tumble Feature
Folding and Tumbling the Seat(s)
To fold and tumble the seat:
1. Make sure that there is nothing under, in front of,or on the seat.
Notice:Folding a rear seat with the safety beltsstill fastened may cause damage to the seat or thesafety belts. Always unbuckle the safety belts andreturn them to their normal stowed position beforefolding a rear seat.
2-10
Page 74 of 616
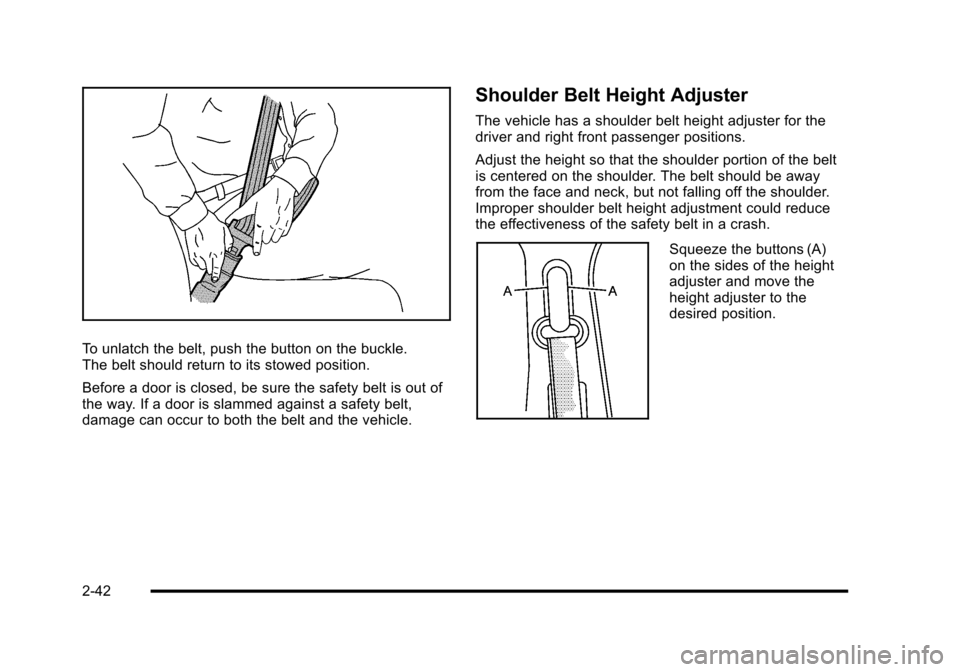
To unlatch the belt, push the button on the buckle.The belt should return to its stowed position.
Before a door is closed, be sure the safety belt is out ofthe way. If a door is slammed against a safety belt,damage can occur to both the belt and the vehicle.
Shoulder Belt Height Adjuster
The vehicle has a shoulder belt height adjuster for thedriver and right front passenger positions.
Adjust the height so that the shoulder portion of the beltis centered on the shoulder. The belt should be awayfrom the face and neck, but not falling off the shoulder.Improper shoulder belt height adjustment could reducethe effectiveness of the safety belt in a crash.
Squeeze the buttons (A)on the sides of the heightadjuster and move theheight adjuster to thedesired position.
2-42
Page 75 of 616
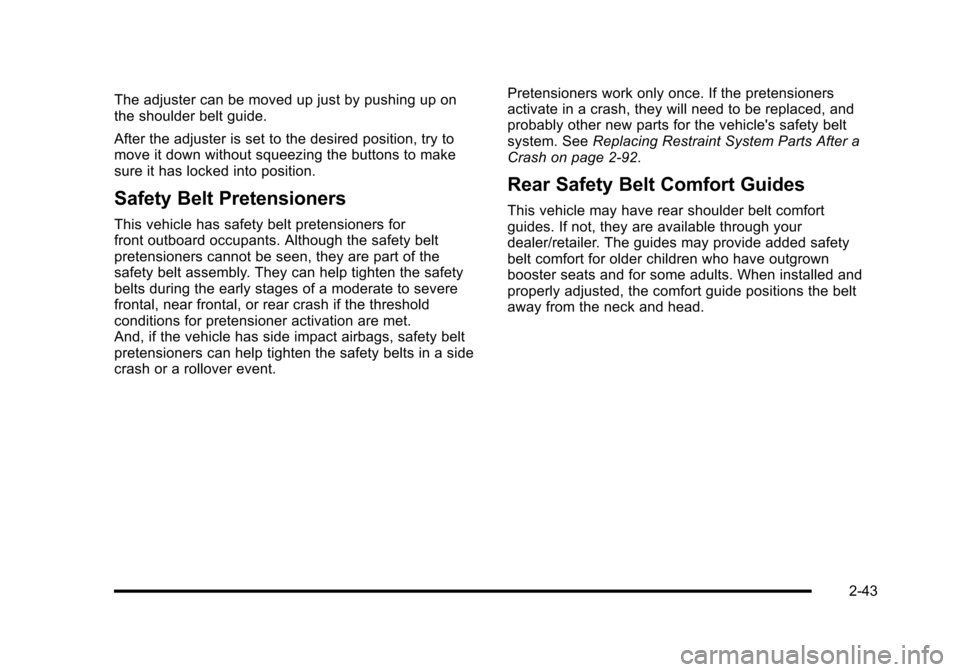
The adjuster can be moved up just by pushing up onthe shoulder belt guide.
After the adjuster is set to the desired position, try tomove it down without squeezing the buttons to makesure it has locked into position.
Safety Belt Pretensioners
This vehicle has safety belt pretensioners forfront outboard occupants. Although the safety beltpretensioners cannot be seen, they are part of thesafety belt assembly. They can help tighten the safetybelts during the early stages of a moderate to severefrontal, near frontal, or rear crash if the thresholdconditions for pretensioner activation are met.And, if the vehicle has side impact airbags, safety beltpretensioners can help tighten the safety belts in a sidecrash or a rollover event.
Pretensioners work only once. If the pretensionersactivate in a crash, they will need to be replaced, andprobably other new parts for the vehicle's safety beltsystem. SeeReplacing Restraint System Parts After aCrash on page 2!92.
Rear Safety Belt Comfort Guides
This vehicle may have rear shoulder belt comfortguides. If not, they are available through yourdealer/retailer. The guides may provide added safetybelt comfort for older children who have outgrownbooster seats and for some adults. When installed andproperly adjusted, the comfort guide positions the beltaway from the neck and head.
2-43
Page 133 of 616
For example, if the lock button and then the remote startbuttons are pressed again after the vehicle has beenrunning for five minutes, 10 minutes are added, allowingthe engine to run for 15 minutes.
The additional ten minutes are considered a secondremote vehicle start.
After your vehicles engine has been started two timesusing the remote vehicle start button, or a single remotestart with one time extension, the vehicle must bestarted with the key.
After the key is removed from the ignition, the vehiclecan be remote started again.
The vehicle cannot be remote started if the key is inthe ignition, the hood is not closed, or if there is anemission control system malfunction and the checkengine light comes on.
Also, the engine will turn off during a remote vehiclestart if the coolant temperature gets too high or if the oilpressure gets low.
Vehicles that have the remote vehicle start feature areshipped from the factory with the remote vehicle startsystem enabled. The system may be enabled ordisabled through the DIC. See“REMOTE START”underDIC Vehicle Customizationon page 4!57foradditional information.
3-9
Page 140 of 616

Pressing the buttons, or touchpad switch a second timewhile the liftgate is moving reverses the direction.
l:The liftgate can also be closed by pressing thepower liftgate button next to the liftgate latch.
Press the button a second time during liftgate operationto reverse that operation.
The power liftgate may be temporarily disabled underextreme temperatures, or under low battery conditions.If this occurs, the liftgate can still be operated manually.
If you shift the transmission out of P (Park) while thepower function is in progress, the liftgate power functionwill continue to completion. If you shift the transmissionout of P (Park) and accelerate before the power liftgatelatches closed, the liftgate may reverse to the openposition. Cargo could fall out of the vehicle. Alwaysmake sure the power liftgate is closed and latchedbefore you drive away.
If you power open the liftgate and the liftgate supportstruts have lost pressure, the lights will flash and achime will sound. The liftgate will stay open temporarily,then slowly close. See your dealer/retailer for servicebefore using the liftgate.
Obstacle Detection Features
If the liftgate encounters an obstacle during a poweropen or close cycle, a warning chime will sound and theliftgate will automatically reverse direction to the fullclosed or open position. After removing the obstruction,the power liftgate operation can be used again. If theliftgate encounters multiple obstacles on the samepower cycle, the power function will deactivate, and youmust manually open or close the liftgate. The REARACCESS OPEN warning message in the DriverInformation Center (DIC) will indicate that the liftgate isopen. After removing the obstructions, manually openthe liftgate to the full open position or close the liftgateto the fully closed and latched position. The liftgate willnow resume normal power operation.
Your vehicle has pinch sensors located on the sideedges of the liftgate. If an object is caught between theliftgate and the body and presses against this sensor,the liftgate will reverse direction and open fully. Theliftgate will remain open until it is activated again orclosed manually. Do not force the liftgate open or closedduring a power cycle.
3-16
Page 176 of 616

The delay that is received after shifting out ofR (Reverse) is approximately 10 seconds. The delaycan be cancelled by performing one of the following:
.Pressing a hard key on the navigation system.
.Shifting in to P (Park).
.Reach a vehicle speed of 7 mph (11 km/h).
There is a message on the rear vision camera screenthat states“Check Surroundings for Safety”.
Adjusting the Brightness and Contrast of
the Screen
To adjust the brightness and contrast of the screen,press the CONFIG hard key while the rear visioncamera image is on the display. Any adjustments madewill only affect the rear vision camera screen.
](Brightness) :Touch the + (plus) or–(minus)screen buttons to increase or decrease the brightnessof the screen.
_(Contrast) :Touch the + (plus) or–(minus) screenbuttons to increase or decrease the contrast ofthe screen.
Symbols
The navigation system may have a feature that lets thedriver view symbols on the navigation screen whileusing the rear vision camera. The Ultrasonic Rear ParkAssist (URPA) system must not be disabled to use thecaution symbols. If URPA has been disabled and thesymbols have been turned on, the Rear Parking AssistSymbols Unavailable error message may display. SeeUltrasonic Rear Parking Assist (URPA) on page 3!46.
The symbols appear when an object has been detectedby the URPA system. The symbol may cover the objectwhen viewing the navigation screen.
To turn the symbols on or off:
1. Make sure that URPA has not been disabled.
2. Shift into P (Park).
3. Press the CONFIG hard key to enter the configuremenu options, then press the CONFIG hard keyrepeatedly until Display is selected or touch theDisplay screen button.
4. Select the Rear Camera Options screen button.The Rear Camera Options screen will display.
5. Touch the Symbols screen button. The screenbutton will be highlighted when on.
3-52
Page 179 of 616
When the System Does Not Seem To
Work Properly
The rear vision camera system might not work properlyor display a clear image if:
.The RVC is turned off. See“Turning the RearCamera System On or Off”earlier in this section.
.It is dark.
.The sun or the beam of headlights is shiningdirectly into the camera lens.
.Ice, snow, mud, or anything else builds up on thecamera lens. Clean the lens, rinse it with water,and wipe it with a soft cloth.
.The back of the vehicle is in an accident, theposition and mounting angle of the camera canchange or the camera can be affected. Be sure tohave the camera and its position and mountingangle checked at your dealer/retailer.
Universal Home Remote
System
SeeRadio Frequency Statementon page 9!20forinformation regarding Part 15 of the FederalCommunications Commission (FCC) Rules andRSS-210/211 of Industry and Science Canada.
Universal Home Remote System
Operation (With Three Round LED)
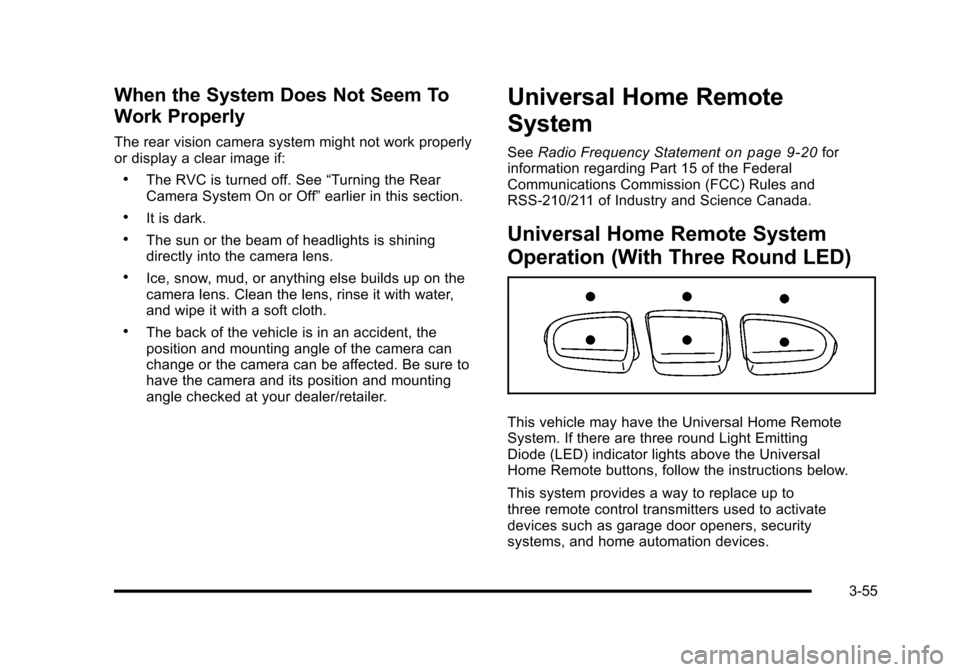
This vehicle may have the Universal Home RemoteSystem. If there are three round Light EmittingDiode (LED) indicator lights above the UniversalHome Remote buttons, follow the instructions below.
This system provides a way to replace up tothree remote control transmitters used to activatedevices such as garage door openers, securitysystems, and home automation devices.
3-55
Page 180 of 616

Do not use this system with any garage door openerthat does not have the stop and reverse feature. Thisincludes any garage door opener model manufacturedbefore April 1, 1982.
Read the instructions completely before attempting toprogram the transmitter. Because of the steps involved,it may be helpful to have another person assist withprogramming the transmitter.
Be sure to keep the original remote control transmitterfor use in other vehicles, as well as, for futureprogramming. Only the original remote controltransmitter is needed for Fixed Code programming.The programmed buttons should be erased when thevehicle is sold or the lease ends. See“ErasingUniversal Home Remote Buttons”later in this section.
Park the vehicle outside of the garage whenprogramming a garage door. Be sure that people andobjects are clear of the garage door or gate that isbeing programmed.
Programming Universal Home
Remote—Rolling Code
For questions or help programming the Universal HomeRemote System, call 1-866-572-2728 or go tolearcar2u.com.
Most garage door openers sold after 1996 areRolling Code units.
Programming a garage door opener involvestime-sensitive actions, so read the entire procedurebefore starting. Otherwise, the device will time out andthe procedure will have to be repeated.
To program up to three devices:
1. From inside the vehicle, press the two outsidebuttons at the same time for one to two seconds,and immediately release them.
3-56
Page 184 of 616
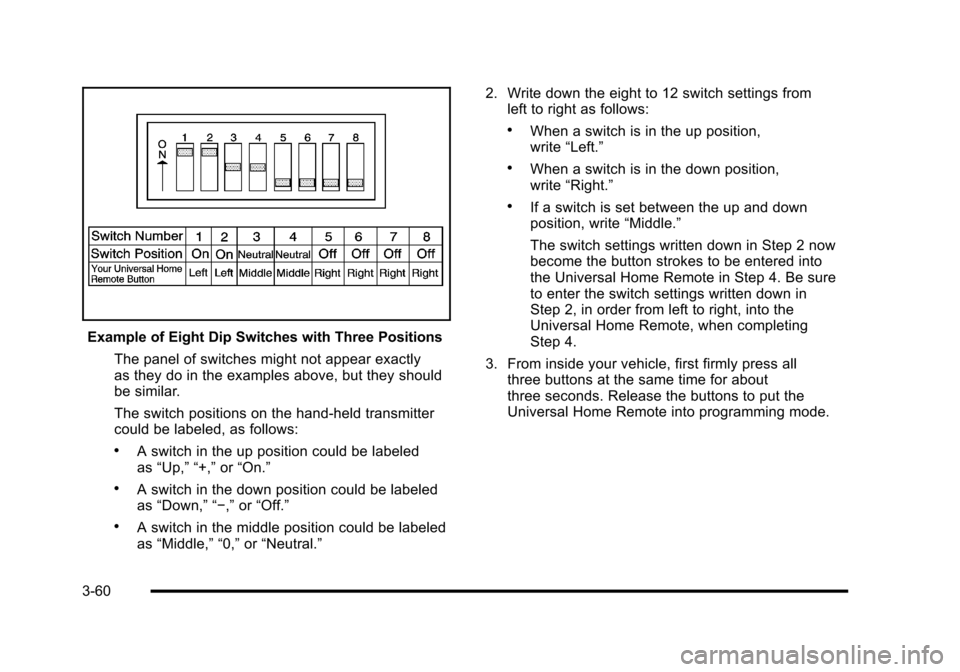
Example of Eight Dip Switches with Three Positions
The panel of switches might not appear exactlyas they do in the examples above, but they shouldbe similar.
The switch positions on the hand-held transmittercould be labeled, as follows:
.A switch in the up position could be labeledas“Up,”“+,”or“On.”
.A switch in the down position could be labeledas“Down,”“!,”or“Off.”
.A switch in the middle position could be labeledas“Middle,”“0,”or“Neutral.”
2. Write down the eight to 12 switch settings fromleft to right as follows:
.When a switch is in the up position,write“Left.”
.When a switch is in the down position,write“Right.”
.If a switch is set between the up and downposition, write“Middle.”
The switch settings written down in Step 2 nowbecome the button strokes to be entered intothe Universal Home Remote in Step 4. Be sureto enter the switch settings written down inStep 2, in order from left to right, into theUniversal Home Remote, when completingStep 4.
3. From inside your vehicle, first firmly press allthree buttons at the same time for aboutthree seconds. Release the buttons to put theUniversal Home Remote into programming mode.
3-60
Page 185 of 616
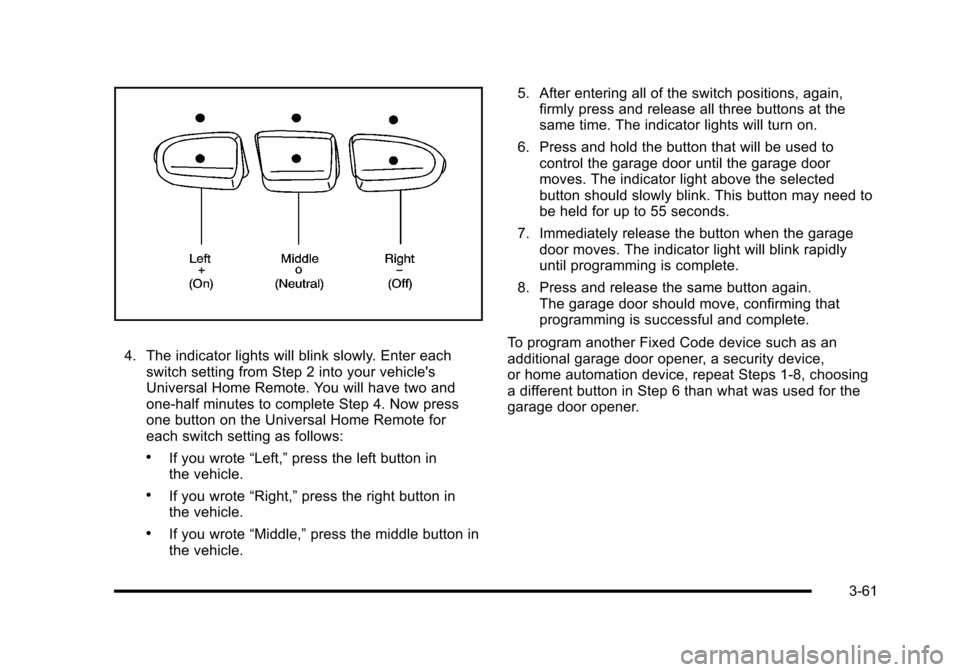
4. The indicator lights will blink slowly. Enter eachswitch setting from Step 2 into your vehicle'sUniversal Home Remote. You will have two andone-half minutes to complete Step 4. Now pressone button on the Universal Home Remote foreach switch setting as follows:
.If you wrote“Left,”press the left button inthe vehicle.
.If you wrote“Right,”press the right button inthe vehicle.
.If you wrote“Middle,”press the middle button inthe vehicle.
5. After entering all of the switch positions, again,firmly press and release all three buttons at thesame time. The indicator lights will turn on.
6. Press and hold the button that will be used tocontrol the garage door until the garage doormoves. The indicator light above the selectedbutton should slowly blink. This button may need tobe held for up to 55 seconds.
7. Immediately release the button when the garagedoor moves. The indicator light will blink rapidlyuntil programming is complete.
8. Press and release the same button again.The garage door should move, confirming thatprogramming is successful and complete.
To program another Fixed Code device such as anadditional garage door opener, a security device,or home automation device, repeat Steps 1-8, choosinga different button in Step 6 than what was used for thegarage door opener.
3-61