CADILLAC ESCALADE 2013 3.G Owners Manual
Manufacturer: CADILLAC, Model Year: 2013, Model line: ESCALADE, Model: CADILLAC ESCALADE 2013 3.GPages: 532, PDF Size: 7.69 MB
Page 111 of 532
Black plate (59,1)Cadillac Escalade/Escalade ESV Owner Manual - 2013 - CRC 2nd Edition - 10/
9/12
Seats and Restraints 3-59
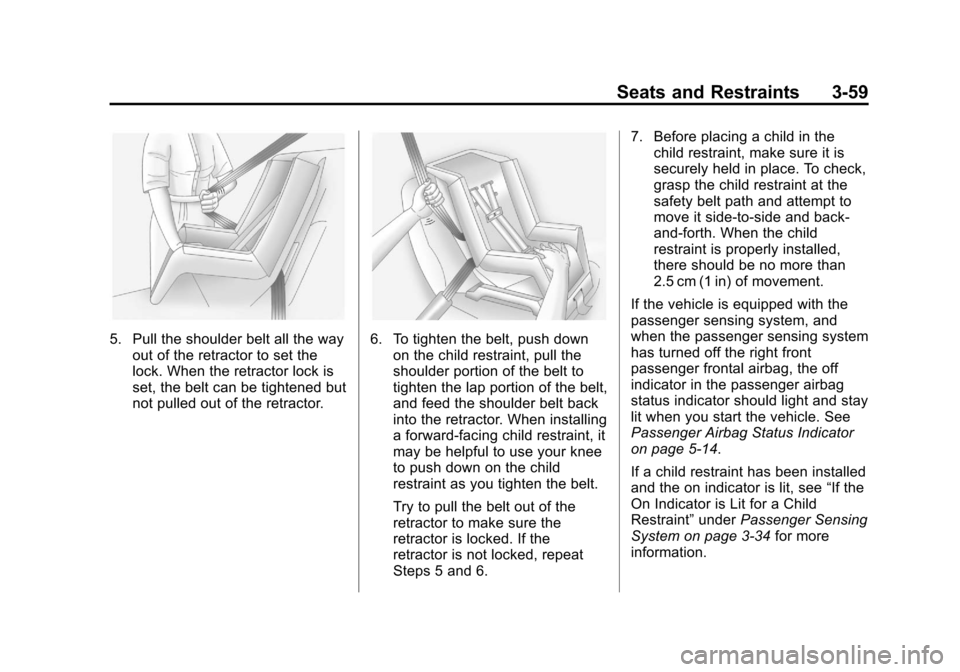
5. Pull the shoulder belt all the wayout of the retractor to set the
lock. When the retractor lock is
set, the belt can be tightened but
not pulled out of the retractor.6. To tighten the belt, push downon the child restraint, pull the
shoulder portion of the belt to
tighten the lap portion of the belt,
and feed the shoulder belt back
into the retractor. When installing
a forward-facing child restraint, it
may be helpful to use your knee
to push down on the child
restraint as you tighten the belt.
Try to pull the belt out of the
retractor to make sure the
retractor is locked. If the
retractor is not locked, repeat
Steps 5 and 6. 7. Before placing a child in the
child restraint, make sure it is
securely held in place. To check,
grasp the child restraint at the
safety belt path and attempt to
move it side‐to‐side and back‐
and‐forth. When the child
restraint is properly installed,
there should be no more than
2.5 cm (1 in) of movement.
If the vehicle is equipped with the
passenger sensing system, and
when the passenger sensing system
has turned off the right front
passenger frontal airbag, the off
indicator in the passenger airbag
status indicator should light and stay
lit when you start the vehicle. See
Passenger Airbag Status Indicator
on page 5‑14.
If a child restraint has been installed
and the on indicator is lit, see “If the
On Indicator is Lit for a Child
Restraint” underPassenger Sensing
System on page 3‑34 for more
information.
Page 112 of 532
Black plate (60,1)Cadillac Escalade/Escalade ESV Owner Manual - 2013 - CRC 2nd Edition - 10/
9/12
3-60 Seats and Restraints
To remove the child restraint,
unbuckle the vehicle safety belt and
let it return to the stowed position.
Securing Child Restraints
(Rear Seat Position)
When securing a child restraint in a
rear seating position, study the
instructions that came with the child
restraint to make sure it is
compatible with this vehicle.
If the child restraint has the LATCH
system, seeLower Anchors and
Tethers for Children (LATCH
System) on page 3‑49 for how and
where to install the child restraint
using LATCH. If a child restraint is
secured in the vehicle using a
safety belt and it uses a top tether,
see Lower Anchors and Tethers for
Children (LATCH System) on
page 3‑49 for top tether anchor
locations.
Do not secure a child seat in a
position without a top tether anchor
if a national or local law requires
that the top tether be anchored, or if the instructions that come with the
child restraint say that the top strap
must be anchored.
In Canada, the law requires that
forward-facing child restraints have
a top tether, and that the tether be
attached.
If the child restraint does not have
the LATCH system, you will be
using the safety belt to secure the
child restraint in this position. Be
sure to follow the instructions that
came with the child restraint. Secure
the child in the child restraint when
and as the instructions say.
If more than one child restraint
needs to be installed in the rear
seat, be sure to read
Where to Put
the Restraint on page 3‑47.
The vehicle's lap-shoulder belts for
the first and second row seating
positions are equipped with
free-falling latch plates. If the
vehicle has a third row, the
lap-shoulder belts have cinching
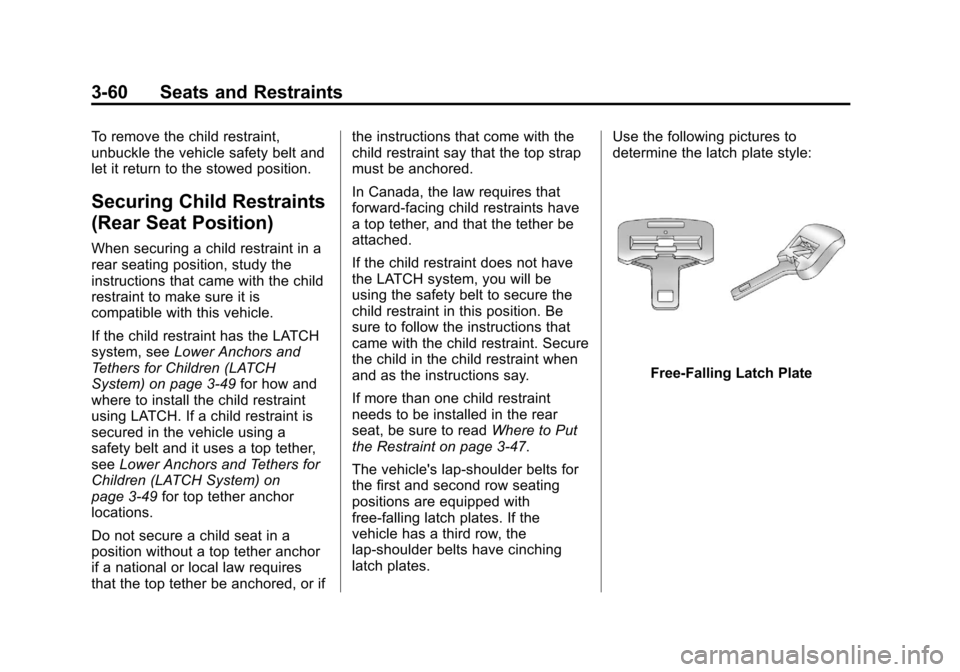
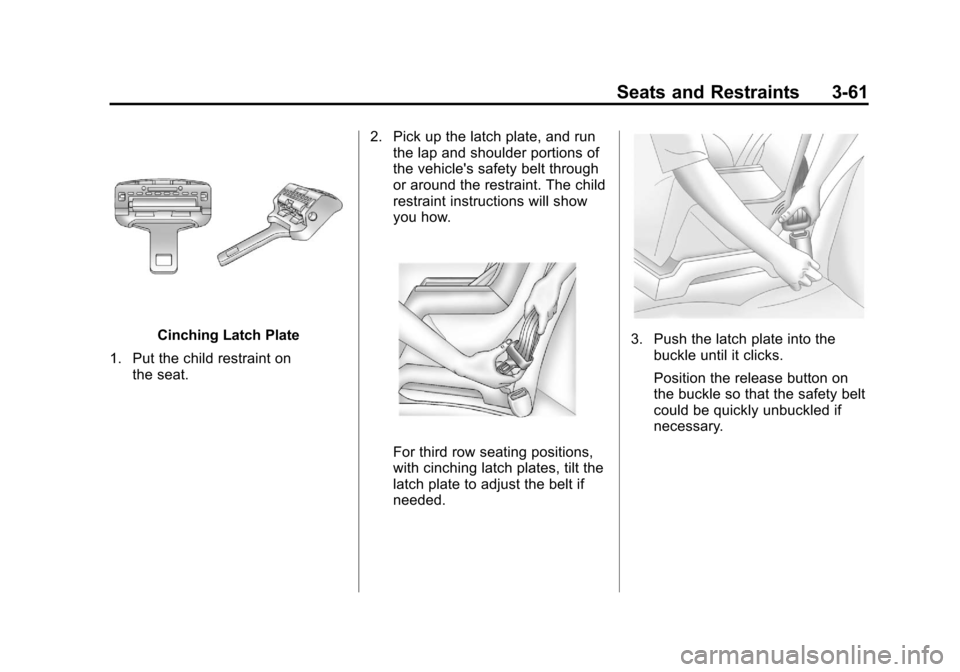
latch plates. Use the following pictures to
determine the latch plate style:
Free-Falling Latch Plate
Page 113 of 532
Black plate (61,1)Cadillac Escalade/Escalade ESV Owner Manual - 2013 - CRC 2nd Edition - 10/
9/12
Seats and Restraints 3-61
Cinching Latch Plate
1. Put the child restraint on the seat. 2. Pick up the latch plate, and run
the lap and shoulder portions of
the vehicle's safety belt through
or around the restraint. The child
restraint instructions will show
you how.
For third row seating positions,
with cinching latch plates, tilt the
latch plate to adjust the belt if
needed.
3. Push the latch plate into the
buckle until it clicks.
Position the release button on
the buckle so that the safety belt
could be quickly unbuckled if
necessary.
Page 114 of 532
Black plate (62,1)Cadillac Escalade/Escalade ESV Owner Manual - 2013 - CRC 2nd Edition - 10/
9/12
3-62 Seats and Restraints
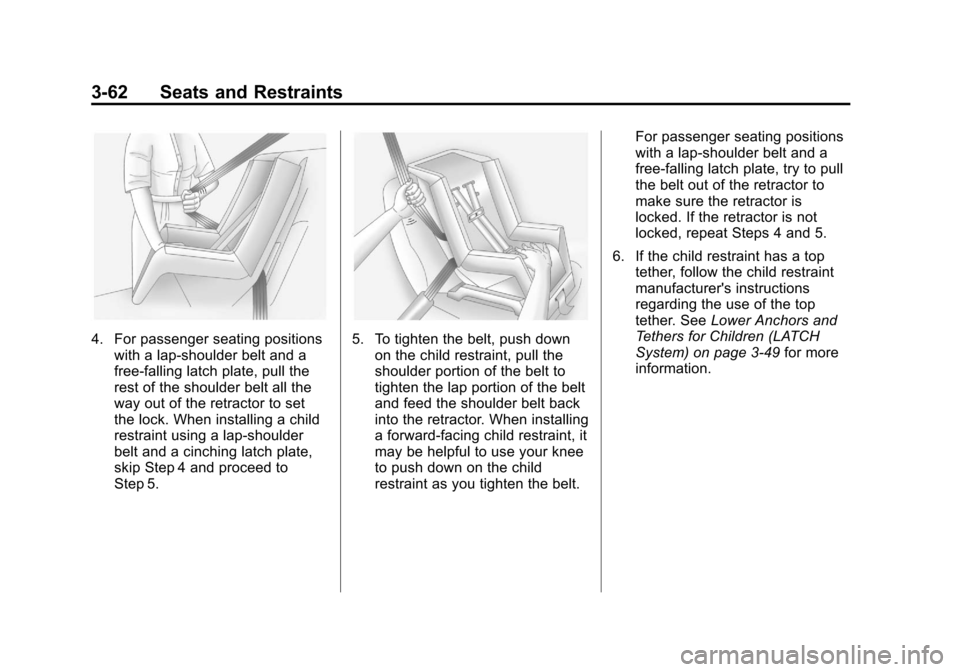
4. For passenger seating positionswith a lap-shoulder belt and a
free-falling latch plate, pull the
rest of the shoulder belt all the
way out of the retractor to set
the lock. When installing a child
restraint using a lap-shoulder
belt and a cinching latch plate,
skip Step 4 and proceed to
Step 5.5. To tighten the belt, push downon the child restraint, pull the
shoulder portion of the belt to
tighten the lap portion of the belt
and feed the shoulder belt back
into the retractor. When installing
a forward-facing child restraint, it
may be helpful to use your knee
to push down on the child
restraint as you tighten the belt. For passenger seating positions
with a lap-shoulder belt and a
free-falling latch plate, try to pull
the belt out of the retractor to
make sure the retractor is
locked. If the retractor is not
locked, repeat Steps 4 and 5.
6. If the child restraint has a top tether, follow the child restraint
manufacturer's instructions
regarding the use of the top
tether. See Lower Anchors and
Tethers for Children (LATCH
System) on page 3‑49 for more
information.
Page 115 of 532
Black plate (63,1)Cadillac Escalade/Escalade ESV Owner Manual - 2013 - CRC 2nd Edition - 10/
9/12
Seats and Restraints 3-63
7. Before placing a child in thechild restraint, make sure it is
securely held in place. To check,
grasp the child restraint at the
safety belt path and attempt to
move it side-to-side and
back-and-forth. When the child
restraint is properly installed,
there should be no more than
2.5 cm (1 in) of movement.
To remove the child restraint,
unbuckle the vehicle safety belt and
let it return to the stowed position.
If the top tether is attached to a top
tether anchor, disconnect it.
Page 116 of 532

Black plate (64,1)Cadillac Escalade/Escalade ESV Owner Manual - 2013 - CRC 2nd Edition - 10/
9/12
3-64 Seats and Restraints
2NOTES
Page 117 of 532
Black plate (1,1)Cadillac Escalade/Escalade ESV Owner Manual - 2013 - CRC 2nd Edition - 10/
9/12
Storage 4-1
Storage
Storage Compartments
Glove Box . . . . . . . . . . . . . . . . . . . . 4-1
Cupholders . . . . . . . . . . . . . . . . . . . 4-1
Armrest Storage . . . . . . . . . . . . . . 4-2
Rear Storage . . . . . . . . . . . . . . . . . 4-2
Center Console Storage . . . . . . 4-3
Roof Rack System
Roof Rack System . . . . . . . . . . . . 4-3
Storage
Compartments
Glove Box
Pull the bottom of the glove box
handle upward to open it. Use the
key to lock and unlock the
glove box.
Cupholders
Cupholders are in the center
console for the front passengers.
Press down on the access door
release to open and use the front
cupholders. Push the door back
down to close it. Push down and
then back on the front cupholder to
remove it for cleaning.
Heated and Cooled
Cupholders
For vehicles with heated and cooled
cupholders, these are located in the
front center console.
Press down on the access door
release button to open the
cupholder door.
To set to cool mode, press and
release the button; the
ishows
blue. Press and release again to
turn it off.
Page 118 of 532
Black plate (2,1)Cadillac Escalade/Escalade ESV Owner Manual - 2013 - CRC 2nd Edition - 10/
9/12
4-2 Storage
To set to heat mode, press and
release the button; the
hshows
red. Press and release again to turn
it off.
Insulated containers will not work
properly. Use only non-insulated
containers.
Notice: When the cuphholder is
turned on, the inside receptacles
are hot or cold. Temperature
variations in the cupholders may
cause condensation. To avoid
damage, do not store electronic
devices or other items here.
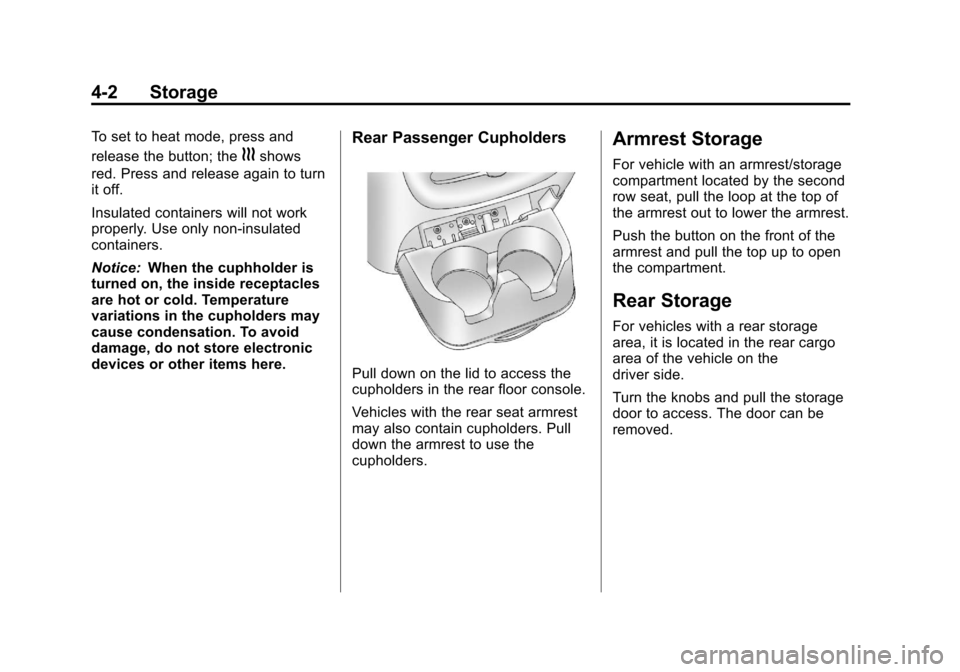
Rear Passenger Cupholders
Pull down on the lid to access the
cupholders in the rear floor console.
Vehicles with the rear seat armrest
may also contain cupholders. Pull
down the armrest to use the
cupholders.
Armrest Storage
For vehicle with an armrest/storage
compartment located by the second
row seat, pull the loop at the top of
the armrest out to lower the armrest.
Push the button on the front of the
armrest and pull the top up to open
the compartment.
Rear Storage
For vehicles with a rear storage
area, it is located in the rear cargo
area of the vehicle on the
driver side.
Turn the knobs and pull the storage
door to access. The door can be
removed.
Page 119 of 532
Black plate (3,1)Cadillac Escalade/Escalade ESV Owner Manual - 2013 - CRC 2nd Edition - 10/
9/12
Storage 4-3
Center Console Storage
A console compartment is located
between the bucket seats.
The console has both an upper and
lower storage bin accessed by lifting
up on the latches located at the
front of the console lid.
The console may have an
accessory power outlet inside. See
Power Outlets on page 5‑7.
The rear of the console also has a
cupholder that swings down for the
rear seat passengers to use.
Roof Rack System
{WARNING
If something is carried on top of
the vehicle that is longer or wider
than the roof rack—like paneling,
plywood, or a mattress —the
wind can catch it while the vehicle
is being driven. The item being
carried could be violently torn off,
and this could cause a collision
and damage the vehicle. Never
carry something longer or wider
than the roof rack on top of the
vehicle unless using a GM
certified accessory carrier.
For vehicles with a roof rack, the
rack can be used to load items. For
roof racks that do not have
crossrails included, GM Certified
crossrails can be purchased as an
accessory. See your dealer for
additional information. For vehicles with crossrails, they
can be moved back and forth to
help secure cargo. To adjust them,
turn the knob located at each end of
the crossrail counterclockwise until
the crossrail can move freely. To
secure the crossrail, turn the knob
located at each end of the crossrail
clockwise until tightened. Tie the
load to the siderails or siderail
supports.
Notice:
Loading cargo on the
roof rack that weighs more than
91 kg (200 lbs) or hangs over the
rear or sides of the vehicle may
damage the vehicle. Load cargo
so that it rests evenly between
the crossrails, making sure to
fasten cargo securely.
To prevent damage or loss of cargo
when driving, check to make sure
crossrails and cargo are securely
fastened. Loading cargo on the roof
rack will make the vehicle’ s center
of gravity higher. Avoid high speeds,
sudden starts, sharp turns, sudden
braking or abrupt maneuvers,
otherwise it may result in loss of
Page 120 of 532
Black plate (4,1)Cadillac Escalade/Escalade ESV Owner Manual - 2013 - CRC 2nd Edition - 10/
9/12
4-4 Storage
control. If driving for a long distance,
on rough roads, or at high speeds,
occasionally stop the vehicle to
make sure the cargo remains in its
place.
Do not exceed the maximum vehicle
capacity when loading the vehicle.
For more information on vehicle
capacity and loading, seeVehicle
Load Limits on page 9‑15.
To prevent damage or loss of cargo,
check now and then to make sure
the luggage and cargo are still
securely fastened. Be sure the cargo is properly
loaded.
.If small heavy objects are placed
on the roof, place the load in the
area over the rear wheels
(behind the rear side door on
extended models). If needed, cut
a piece of 3/8 inch plywood to fit
inside the crossrails and
siderails to spread the load.
If plywood is used, tie it to the
siderail supports.
.Tie the load to the crossrails or
the siderail supports. Use the
crossrails only to keep the load
from sliding. To move the
crossrails, pull out on the latch
release handle at each end.
Slide the crossrail to the desired
position balancing the force side
to side. Push the release handle
back into the latched position
and slide the crossrail back and
forth slightly to be sure the latch
snaps securely into place.
.If needed to carry long items,
move the crossrails as far apart
as they will go. Tie the load to
the crossrails and the siderails
or siderail supports. Also tie the
load to the bumpers. Do not tie
the load so tightly that the
crossrails or siderails are
damaged.
.After moving a crossrail, be sure
it is securely locked into the
siderail.
A Center High-Mounted Stoplamp
(CHMSL) is located above the glass
or above the rear load doors.
If items are loaded on the roof of the
vehicle, care should be taken not to
block or damage the CHMSL unit.