infotainment CADILLAC ESCALADE 2021 Owners Manual
[x] Cancel search | Manufacturer: CADILLAC, Model Year: 2021, Model line: ESCALADE, Model: CADILLAC ESCALADE 2021Pages: 492, PDF Size: 7.92 MB
Page 232 of 492

Cadillac Escalade Owner Manual (GMNA-Localizing-U.S./Canada/Mexico-
13690472) - 2021 - CRC - 8/10/21
DRIVING AND OPERATING 231
.Become familiar with vehicle
features before driving, such as
programming favorite radio stations
and adjusting climate control and
seat settings. Program all trip
information into any navigation
device prior to driving.
.Wait until the vehicle is parked to
retrieve items that have fallen to
the floor.
.Stop or park the vehicle to tend to
children.
.Keep pets in an appropriate carrier
or restraint.
.Avoid stressful conversations while
driving, whether with a passenger or
on a cell phone.
{Warning
Taking your eyes off the road too
long or too often could cause a
crash resulting in injury or death.
Focus your attention on driving.
Refer to the infotainment section for
more information on using that
system and the navigation system,
if equipped, including pairing and
using a cell phone.
Defensive Driving
Defensive driving means “always
expect the unexpected.” The first step
in driving defensively is to wear the
seat belt. See Seat Belts058.
.Assume that other road users
(pedestrians, bicyclists, and other
drivers) are going to be careless and
make mistakes. Anticipate what
they may do and be ready.
.Allow enough following distance
between you and the driver in front
of you.
.Focus on the task of driving.
Impaired Driving
Death and injury associated with
impaired driving is a global tragedy.
{Warning
Drinking alcohol or taking drugs
and then driving is very dangerous.
Your reflexes, perceptions,
attentiveness, and judgment can be
affected by even a small amount of
alcohol or drugs. You can have a
(Continued)
Warning (Continued)
serious—or even fatal —collision
if you drive after drinking or taking
drugs.
Do not drive while under the
influence of alcohol or drugs,
or ride with a driver who has been
drinking or is impaired by drugs.
Find alternate transportation home;
or if you are with a group, designate
a driver who will remain sober.
Control of a Vehicle
Braking, steering, and accelerating are
important factors in helping to control
a vehicle while driving.
Braking
Braking action involves perception
time and reaction time. Deciding to
push the brake pedal is perception
time. Actually doing it is
reaction time.
Average driver reaction time is about
three-quarters of a second. In that
time, a vehicle moving at 100 km/h
Page 249 of 492
Cadillac Escalade Owner Manual (GMNA-Localizing-U.S./Canada/Mexico-
13690472) - 2021 - CRC - 8/10/21
248 DRIVING AND OPERATING
To maintain vehicle performance,
other conditions may cause the engine
to automatically restart before the
brake pedal is released.
Auto Stops may not occur and/or Auto
Starts may occur because:
.The climate control settings require
the engine to be running to cool or
heat the vehicle interior.
.The vehicle battery charge is low.
.The vehicle battery has recently
been disconnected.
.Minimum vehicle speed has not
been reached since the last
Auto Stop.
.The accelerator pedal is pressed.
.The engine or transmission is not at
the required operating temperature.
.The outside temperature is not in
the required operating range.
.The vehicle is shifted out of D
(Drive) to any gear other than
P (Park).
.Certain driver modes have been
selected. SeeDriver Mode Control
0 266 and
Four-Wheel Drive 0256.
.The vehicle is on a steep hill or
grade.
.The driver door has been opened or
the driver seat belt has been
unbuckled.
.The hood has been opened.
.The Auto Stop has reached the
maximum allowed time.
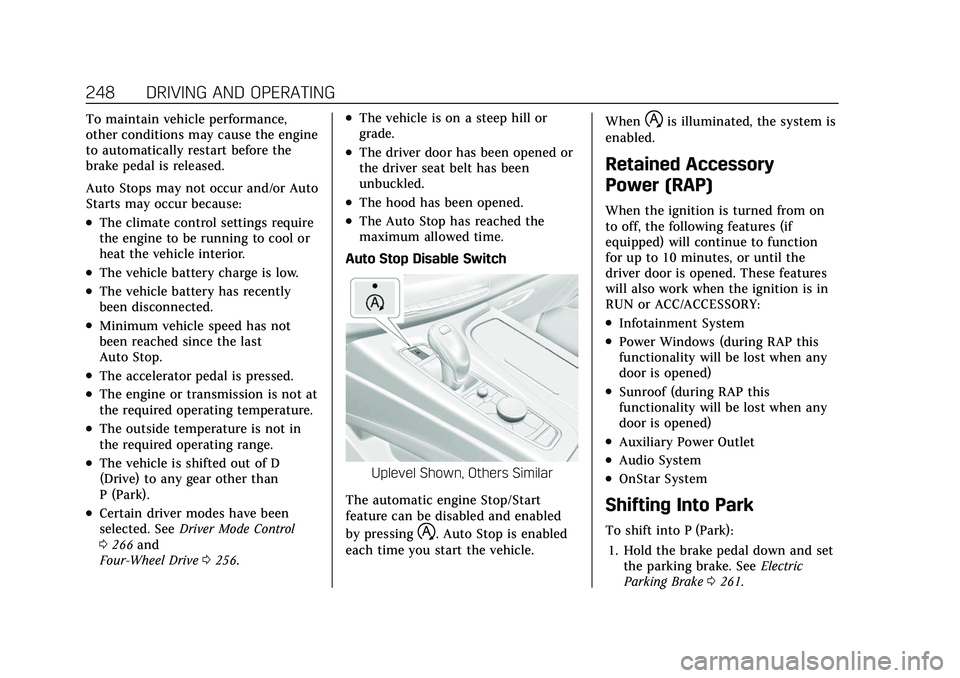
Auto Stop Disable Switch
Uplevel Shown, Others Similar
The automatic engine Stop/Start
feature can be disabled and enabled
by pressing
h. Auto Stop is enabled
each time you start the vehicle. When
his illuminated, the system is
enabled.
Retained Accessory
Power (RAP)
When the ignition is turned from on
to off, the following features (if
equipped) will continue to function
for up to 10 minutes, or until the
driver door is opened. These features
will also work when the ignition is in
RUN or ACC/ACCESSORY:
.Infotainment System
.Power Windows (during RAP this
functionality will be lost when any
door is opened)
.Sunroof (during RAP this
functionality will be lost when any
door is opened)
.Auxiliary Power Outlet
.Audio System
.OnStar System
Shifting Into Park
To shift into P (Park):
1. Hold the brake pedal down and set the parking brake. See Electric
Parking Brake 0261.
Page 266 of 492
Cadillac Escalade Owner Manual (GMNA-Localizing-U.S./Canada/Mexico-
13690472) - 2021 - CRC - 8/10/21
DRIVING AND OPERATING 265
disabled,gcomes on, and the
appropriate message will appear on
the Driver Information Center (DIC).
The indicator light for both systems is
to the right of the center stack and
below the screen. This light will:
.Flash when TCS is limiting
wheel spin
.Flash when StabiliTrak/ESC is
activated
.Turn on and stay on when either
system is not working
See Traction Control System (TCS)/
StabiliTrak Light 0127.
If either system fails to turn on or to
activate, a message displays in the
Driver Information Center (DIC), and
dcomes on and stays on to indicate
that the system is inactive and is not
assisting the driver in maintaining
control. Adjust driving accordingly. If
dcomes on and stays on:
1. Stop the vehicle.
2. Turn the engine off and wait 15 seconds.
3. Start the engine.
Drive the vehicle. If
dcomes on and
stays on, see your dealer as soon as
possible.
Turning the Systems Off and On
Caution
Do not repeatedly brake or
accelerate heavily when TCS is off.
The vehicle driveline could be
damaged.
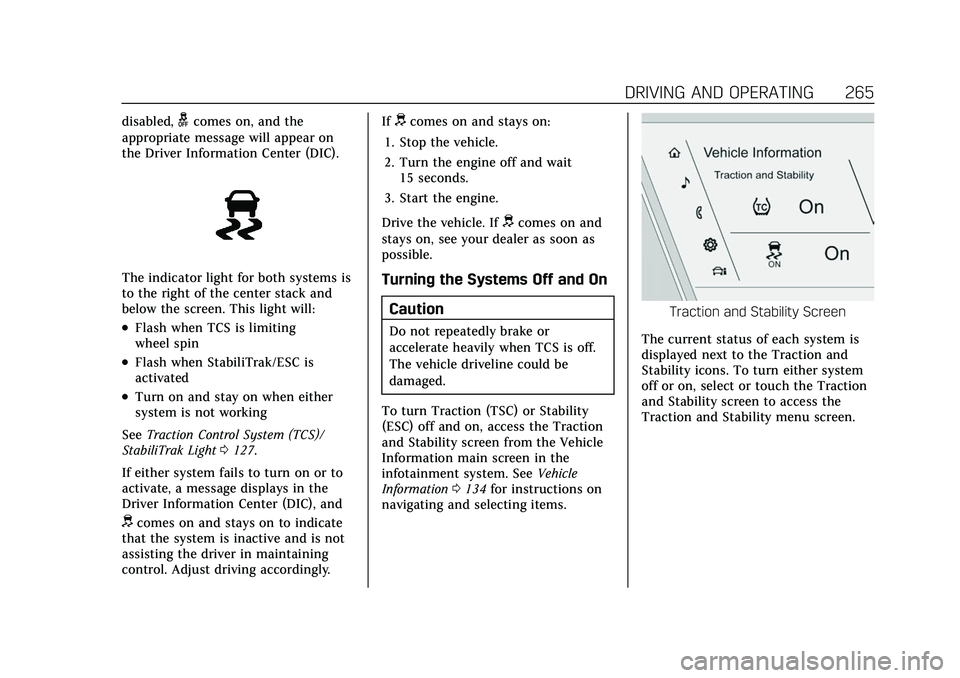
To turn Traction (TSC) or Stability
(ESC) off and on, access the Traction
and Stability screen from the Vehicle
Information main screen in the
infotainment system. See Vehicle
Information 0134 for instructions on
navigating and selecting items.
Traction and Stability Screen
The current status of each system is
displayed next to the Traction and
Stability icons. To turn either system
off or on, select or touch the Traction
and Stability screen to access the
Traction and Stability menu screen.
Page 270 of 492
Cadillac Escalade Owner Manual (GMNA-Localizing-U.S./Canada/Mexico-
13690472) - 2021 - CRC - 8/10/21
DRIVING AND OPERATING 269
{Warning
Heavy loads on the roof rack will
make the vehicle's center of gravity
higher, increasing the possibility of
a rollover. To avoid losing control of
the vehicle, always select the
normal height setting and avoid
high speeds, sudden starts, sharp
turns, sudden braking, or abrupt
maneuvers when carrying cargo on
the roof rack.
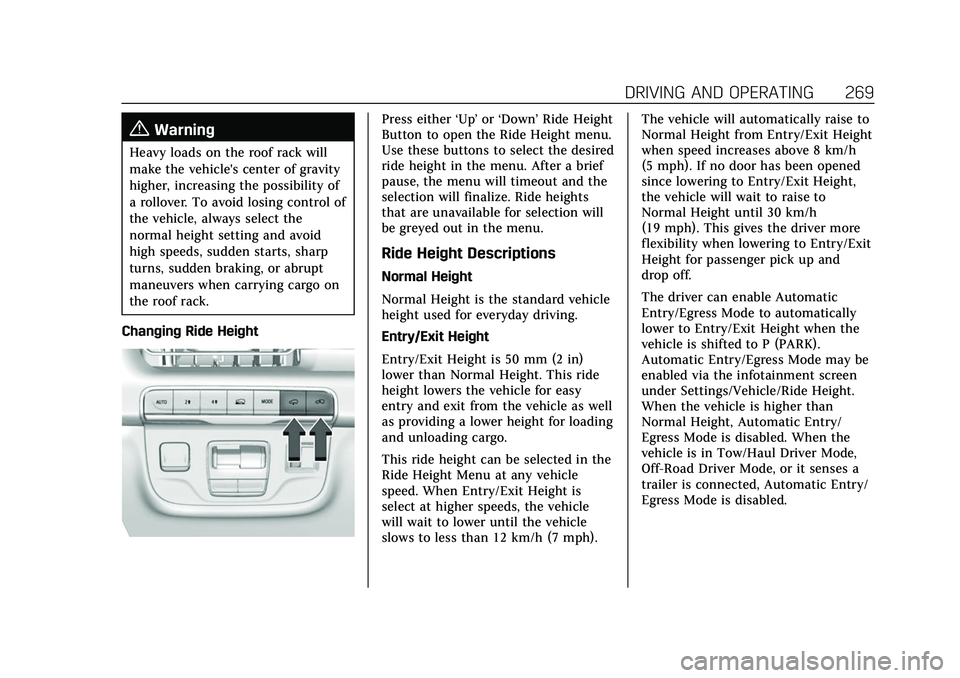
Changing Ride Height
Press either ‘Up’or‘Down’ Ride Height
Button to open the Ride Height menu.
Use these buttons to select the desired
ride height in the menu. After a brief
pause, the menu will timeout and the
selection will finalize. Ride heights
that are unavailable for selection will
be greyed out in the menu.
Ride Height Descriptions
Normal Height
Normal Height is the standard vehicle
height used for everyday driving.
Entry/Exit Height
Entry/Exit Height is 50 mm (2 in)
lower than Normal Height. This ride
height lowers the vehicle for easy
entry and exit from the vehicle as well
as providing a lower height for loading
and unloading cargo.
This ride height can be selected in the
Ride Height Menu at any vehicle
speed. When Entry/Exit Height is
select at higher speeds, the vehicle
will wait to lower until the vehicle
slows to less than 12 km/h (7 mph). The vehicle will automatically raise to
Normal Height from Entry/Exit Height
when speed increases above 8 km/h
(5 mph). If no door has been opened
since lowering to Entry/Exit Height,
the vehicle will wait to raise to
Normal Height until 30 km/h
(19 mph). This gives the driver more
flexibility when lowering to Entry/Exit
Height for passenger pick up and
drop off.
The driver can enable Automatic
Entry/Egress Mode to automatically
lower to Entry/Exit Height when the
vehicle is shifted to P (PARK).
Automatic Entry/Egress Mode may be
enabled via the infotainment screen
under Settings/Vehicle/Ride Height.
When the vehicle is higher than
Normal Height, Automatic Entry/
Egress Mode is disabled. When the
vehicle is in Tow/Haul Driver Mode,
Off-Road Driver Mode, or it senses a
trailer is connected, Automatic Entry/
Egress Mode is disabled.
Page 271 of 492
Cadillac Escalade Owner Manual (GMNA-Localizing-U.S./Canada/Mexico-
13690472) - 2021 - CRC - 8/10/21
270 DRIVING AND OPERATING
Increased Height
Increased Height is 25 mm (1 in)
higher than Normal Height. This ride
height raises the vehicle for off-road
use, allows for higher speeds than
Maximum Height, and is only
available with specific optional
content.
Increased Height can be selected in
the Ride Height Menu while vehicle
speed is less than 80 km/h (50 mph).
If vehicle speed exceeds 80 km/h
(50 mph), the vehicle will
automatically lower to Normal Height.
Off-Road Driver Mode and Terrain
Driver Mode will automatically set
Increased Height when vehicle speed
is less than 80 km/h (50 mph).
If vehicle speed exceeds 80 km/h
(50 mph), the vehicle will lower to
Normal Height. Normal Height will be
maintained until vehicle speed is
slowed to less than 16 km/h (10 mph)
and then the vehicle will
automatically raise back to Increased
Height.The vehicle will automatically lower
from Increased Height to Normal
Height to provide improved stability if
aggressive maneuvers are detected.
Maximum Height
Maximum Height is 50 mm (2 in)
higher than Normal Height. This ride
height raises the vehicle for off-road
use and is only available with specific
optional content.
To raise the vehicle to Maximum
Height, first shift the transfer case to
4
n. Once the transfer case is in 4n
and vehicle speed is less than
48 km/hr (30 mph), select Maximum
Height in the Ride Height Menu.
If vehicle speed exceeds 48 km/h, the
vehicle will automatically lower to
Increased Height.
The vehicle will automatically lower
from Maximum Height to Normal
Height to provide improved stability if
aggressive maneuvers are detected.
Aerodynamic Height
Aerodynamic Height is 20 mm
(0.75 in) lower than Normal Height.
This ride height lowers the vehicle at
higher vehicle speeds to improve
aerodynamics.
The vehicle will lower to Aerodynamic
Height when vehicle speed exceeds
105 km/h (65 mph) for a period of
time. The vehicle will raise to Normal
Height when the vehicle slows to less
than 48 km/h (30 mph).
Aerodynamic Height is automatically
disabled when a trailer is connected to
the vehicle or Tow/Haul Driver Mode
is active.
Suspension Modes
The air suspension has two special
modes, Service Mode and Alignment
Mode, located in the infotainment
screen under Settings/Vehicle/
Suspension.
Page 301 of 492
Cadillac Escalade Owner Manual (GMNA-Localizing-U.S./Canada/Mexico-
13690472) - 2021 - CRC - 8/10/21
300 DRIVING AND OPERATING
(RCTA), and Enhanced Automatic
Parking Assist (APA) may help the
driver park or avoid objects. Always
check around the vehicle when
parking or backing.
Rear Vision Camera (RVC)
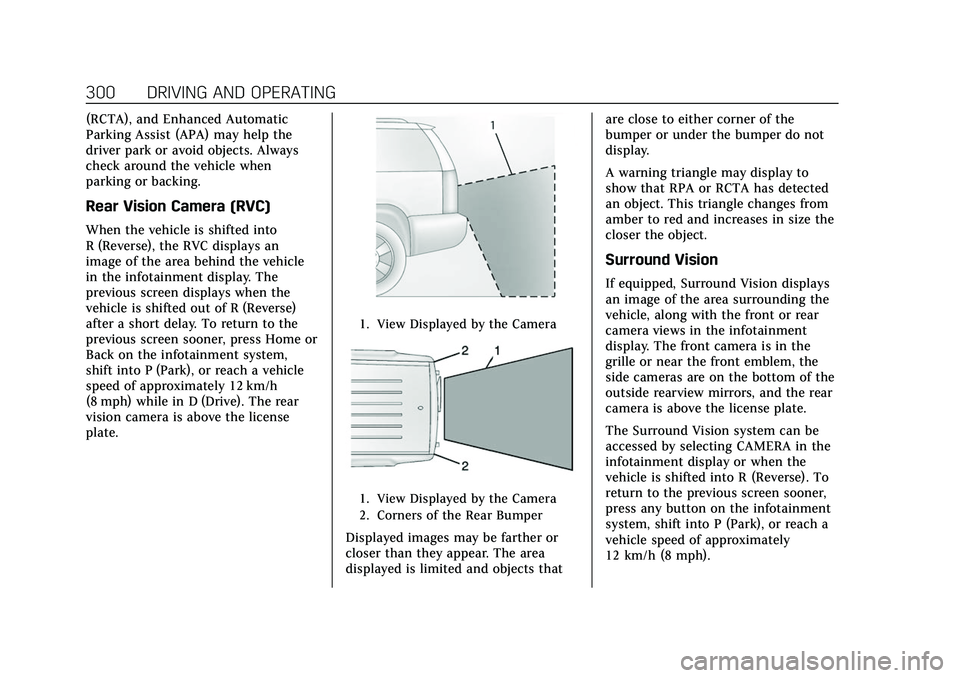
When the vehicle is shifted into
R (Reverse), the RVC displays an
image of the area behind the vehicle
in the infotainment display. The
previous screen displays when the
vehicle is shifted out of R (Reverse)
after a short delay. To return to the
previous screen sooner, press Home or
Back on the infotainment system,
shift into P (Park), or reach a vehicle
speed of approximately 12 km/h
(8 mph) while in D (Drive). The rear
vision camera is above the license
plate.
1. View Displayed by the Camera
1. View Displayed by the Camera
2. Corners of the Rear Bumper
Displayed images may be farther or
closer than they appear. The area
displayed is limited and objects thatare close to either corner of the
bumper or under the bumper do not
display.
A warning triangle may display to
show that RPA or RCTA has detected
an object. This triangle changes from
amber to red and increases in size the
closer the object.
Surround Vision
If equipped, Surround Vision displays
an image of the area surrounding the
vehicle, along with the front or rear
camera views in the infotainment
display. The front camera is in the
grille or near the front emblem, the
side cameras are on the bottom of the
outside rearview mirrors, and the rear
camera is above the license plate.
The Surround Vision system can be
accessed by selecting CAMERA in the
infotainment display or when the
vehicle is shifted into R (Reverse). To
return to the previous screen sooner,
press any button on the infotainment
system, shift into P (Park), or reach a
vehicle speed of approximately
12 km/h (8 mph).
Page 303 of 492
Cadillac Escalade Owner Manual (GMNA-Localizing-U.S./Canada/Mexico-
13690472) - 2021 - CRC - 8/10/21
302 DRIVING AND OPERATING
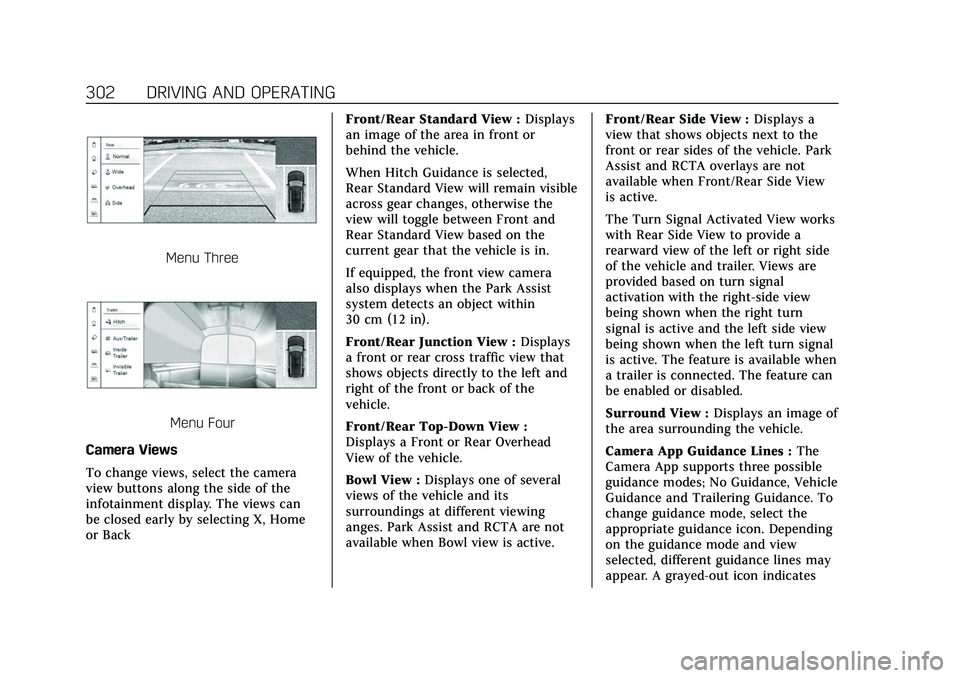
Menu Three
Menu Four
Camera Views
To change views, select the camera
view buttons along the side of the
infotainment display. The views can
be closed early by selecting X, Home
or Back Front/Rear Standard View :
Displays
an image of the area in front or
behind the vehicle.
When Hitch Guidance is selected,
Rear Standard View will remain visible
across gear changes, otherwise the
view will toggle between Front and
Rear Standard View based on the
current gear that the vehicle is in.
If equipped, the front view camera
also displays when the Park Assist
system detects an object within
30 cm (12 in).
Front/Rear Junction View : Displays
a front or rear cross traffic view that
shows objects directly to the left and
right of the front or back of the
vehicle.
Front/Rear Top-Down View :
Displays a Front or Rear Overhead
View of the vehicle.
Bowl View : Displays one of several
views of the vehicle and its
surroundings at different viewing
anges. Park Assist and RCTA are not
available when Bowl view is active. Front/Rear Side View :
Displays a
view that shows objects next to the
front or rear sides of the vehicle. Park
Assist and RCTA overlays are not
available when Front/Rear Side View
is active.
The Turn Signal Activated View works
with Rear Side View to provide a
rearward view of the left or right side
of the vehicle and trailer. Views are
provided based on turn signal
activation with the right-side view
being shown when the right turn
signal is active and the left side view
being shown when the left turn signal
is active. The feature is available when
a trailer is connected. The feature can
be enabled or disabled.
Surround View : Displays an image of
the area surrounding the vehicle.
Camera App Guidance Lines : The
Camera App supports three possible
guidance modes; No Guidance, Vehicle
Guidance and Trailering Guidance. To
change guidance mode, select the
appropriate guidance icon. Depending
on the guidance mode and view
selected, different guidance lines may
appear. A grayed-out icon indicates
Page 304 of 492
Cadillac Escalade Owner Manual (GMNA-Localizing-U.S./Canada/Mexico-
13690472) - 2021 - CRC - 8/10/21
DRIVING AND OPERATING 303
that guidance lines are not available.
Certain views do not support guidance
lines.
.Standard Guidance lines are
available in Front/Rear Standard
Views, Front/Rear Top-Down Views,
and Surround View when the
vehicle guidance mode is selected.
Standard guidance lines show the
current and intended vehicle path.
.Hitch Guidance lines are available
in Rear Standard View when the
Trailering Guidance Mode is
selected. Hitch Guidance displays a
single, centered, guidance line on
the infotainment display to assist
with aligning the vehicle’s hitch
with a trailer coupler by
continuously steering the vehicle to
keep the guidance line centered
with the coupler when backing. Park
Assist overlays will not display
when Hitch Guidance is active.
.Rear Trailer Guidance lines are
available in Rear Trailer View when
Trailering Guidance Mode is
selected, and the rear camera
calibration has been successfully
completed. Rear Trailer Guidance
lines show the intended path(yellow), and the current path (blue)
of the trailer. The current path
guidance lines will converge with
the intended path guidance lines.
Hitch View : Displays a magnified
view of the hitch area to assist with
aligning the vehicle’s hitch ball with
the trailer coupler, and for monitoring
the trailer connection. Shifting into
P (Park) will automatically engage the
Electronic Parking Brake (EPB).
{Warning
Use Hitch Guidance only to help
back the vehicle to a trailer hitch
or, when traveling above 12 km/h
(8 mph), to briefly check the status
of your trailer. Do not use for any
other purpose, such as making lane
change decisions. Before making a
lane change, always check the
mirrors and glance over your
shoulder. Improper use could result
in serious injury to you or others.
Interior Trailer View : Displays a
view of the interior of the trailer. The
feature is available when a trailer is
connected. The feature requires user installation of an accessory trailer
camera on the interior of the trailer
per the accessory trailer camera
installation instructions (see your
dealer for accessory trailer camera(s)
and information).
Rear Trailer View :
Displays a view
of the area behind the trailer when a
trailer is connected. The feature
requires user installation of an
accessory trailer camera on the rear
exterior surface of the trailer per the
accessory trailer camera installation
instructions (see your dealer for
accessory trailer camera(s) and
information).
Aux/Trailer View : Displays a
rearward split view of the left and
right sides of the vehicle and trailer,
when a trailer is connected. The view
will automatically pan to show more
of the left or right side based on the
position of the trailer when a
compatible profile is configured and
selected via the Trailering App.
Picture-in-Picture Side View :
Displays a rearward split view of the
left and right sides of the vehicle and
trailer with an overlay view of the area
Page 305 of 492
Cadillac Escalade Owner Manual (GMNA-Localizing-U.S./Canada/Mexico-
13690472) - 2021 - CRC - 8/10/21
304 DRIVING AND OPERATING
behind the trailer when a trailer is
connected. The feature requires user
installation of an accessory trailer
camera on the rear exterior surface of
the trailer per the accessory trailer
camera installation instructions (see
your dealer for accessory trailer
camera(s) and information).
HD Surround Vision with Trailer
Camera Provisions
If equipped, this system provides
additional views to aid in trailer and
towing. The system shows multiple
views in the infotainment display
using four cameras mounted and the
vehicle, and two additional accessory
cameras. The front camera is under
the front emblem, the side cameras
are on the bottom of the outside
mirrors, and the rear camera is in the
liftgate. Up to two accessory cameras
can be mounted to the rear and/or the
interior of the trailer. See your dealer
for accessory trailer cameras.
To view the Camera App, select
CAMERA on the infotainment screen
or shift to R (Reverse). To return tothe previous screen when not in
reverse, select X or Back on the
infotainment display.
Certain trailer views require a
compatible trailer profile be
configured and selected. A compatible
trailer is a box type trailer (cargo,
camper, etc.) with a conventional
hitch.
Available Camera Views:
.Front/Rear Standard View
.Front/Rear Junction View
.Front/Rear Top-Down View
.Bowl View
.Front/Rear Side View
.Hitch View
.Rear Trailer View
.Aux/Trailer View
.Picture-in-Picture Side View
.Interior Trailer View
.Surround View
.Standard Guidance Lines
.Hitch Guidance
.Rear Guidance Lines
Surround Vision (360 Degrees)
If equipped, the Surround Vision
system can display various views
surrounding the vehicle in the
infotainment display using four
cameras mounted around the vehicle.
The front camera is in the grille under
the front emblem, the side cameras
are on the bottom of the outside
mirrors, and the rear camera is in the
liftgate.
To view the Camera App, select
CAMERA on the infotainment display
or shift to R (Reverse). To return to
the previous screen when not in
reverse, select X or Back on the
infotainment display. To return to the
home screen when not in reverse,
select Home.
Available camera views:
.Front/Rear Standard View
.Front/Rear Junction View
.Front/Rear Top-Down View
.Bowl View
.Front/Rear Side View
.Hitch View (if equipped)
.Surround View
Page 308 of 492

Cadillac Escalade Owner Manual (GMNA-Localizing-U.S./Canada/Mexico-
13690472) - 2021 - CRC - 8/10/21
DRIVING AND OPERATING 307
{Warning
The Park Assist System is no
substitute for careful and attentive
driving. The Park Assist system
does not detect children,
pedestrians, bicyclists, animals,
or objects located below the
bumper or that are too close or too
far from the vehicle. It is not
available at speeds greater than
9 km/h (6 mph). To prevent injury,
death, or vehicle damage, even with
Park Assist, always check the area
around the vehicle and check all
mirrors before moving forward or
backing.
How the System Works
The vehicle may have a Park
Assist amphitheatre-like display on
the cluster with bars that represent
the estimated location of a detected
object and the vehicle’s distance from
the object. As a detected object
becomes closer, more bars light up
and change color from yellow to
amber to red. Vehicles equipped with
RPA will show the amphitheater at the rear of the vehicle, and if
equipped, FRPA will show
the amphitheater at the front and rear.
The system warns the driver with
beeps against potentially hazardous
obstacles in the path of the vehicle.
When an object in the driving path is
first detected in the rear, one beep will
be heard from the rear, or the driver's
seat will pulse two times if equipped
with Safety Alert Seat. When an object
is very close, five beeps will sound
from the front or rear, depending on
the object's location, or the driver's
seat will pulse five times. Beeps for
front are higher pitched than the rear.
The beeps may be muted by pressing
the on screen mute button.
Turning the System On and Off
The Park Assist System can be turned
on or off using the infotainment
system. See
Vehicle Personalization
0 138.
Turning the Park Assist System on or
off also turns the Backing Warning
and Reverse Automatic Braking (RAB)
on or off at the same time.
When the system is off, PARK ASSIST
OFF is shown on the display. This
message disappears after a short
period of time.
If the vehicle has a trailer hitch
attached, select ON - ATTACHED
using the infotainment system menus
to allow Park Assist to function
properly. Park Assist is able to
compensate for a trailer hitch up to
0.3 m (1 ft) in length and width. Park
Assist may not function properly with
larger trailer hitches and provide
inaccurate information of objects in
the rear
Turn off Park Assist when towing a
trailer to prevent unwanted beeps and
when a bike rack is attached to ensure
proper operation.