clock CADILLAC ESCALADE 2023 Owners Manual
[x] Cancel search | Manufacturer: CADILLAC, Model Year: 2023, Model line: ESCALADE, Model: CADILLAC ESCALADE 2023Pages: 461, PDF Size: 7.99 MB
Page 19 of 461
Cadillac Escalade Owner Manual (GMNA-Localizing-U.S./Canada/Mexico-
16417396) - 2023 - CRC - 5/9/22
Keys, Doors, and Windows 17
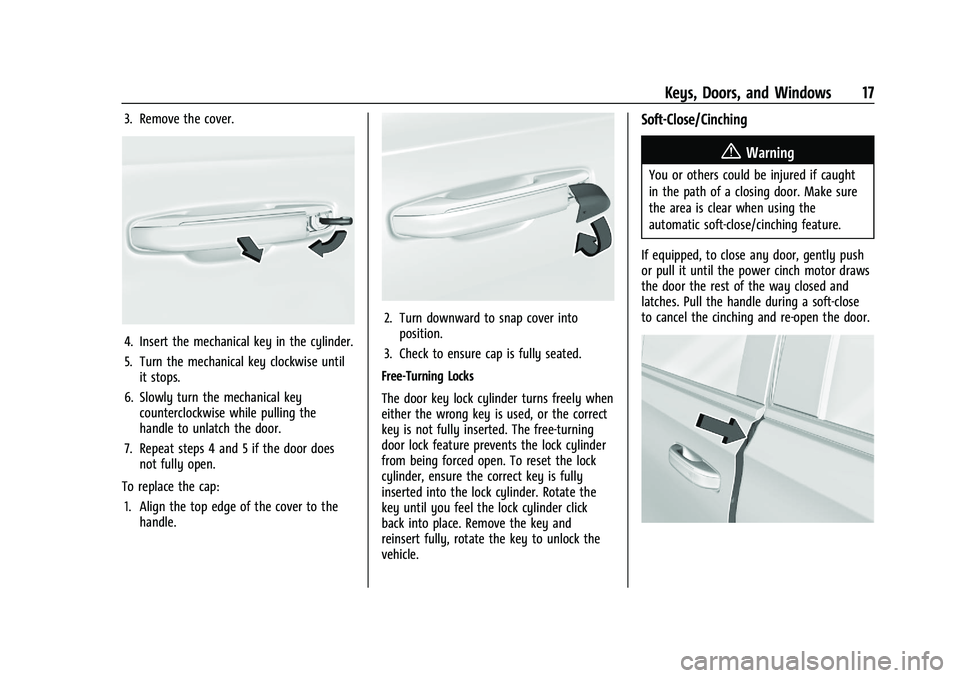
3. Remove the cover.
4. Insert the mechanical key in the cylinder.
5. Turn the mechanical key clockwise untilit stops.
6. Slowly turn the mechanical key counterclockwise while pulling the
handle to unlatch the door.
7. Repeat steps 4 and 5 if the door does not fully open.
To replace the cap: 1. Align the top edge of the cover to the handle.
2. Turn downward to snap cover intoposition.
3. Check to ensure cap is fully seated.
Free-Turning Locks
The door key lock cylinder turns freely when
either the wrong key is used, or the correct
key is not fully inserted. The free-turning
door lock feature prevents the lock cylinder
from being forced open. To reset the lock
cylinder, ensure the correct key is fully
inserted into the lock cylinder. Rotate the
key until you feel the lock cylinder click
back into place. Remove the key and
reinsert fully, rotate the key to unlock the
vehicle.
Soft-Close/Cinching
{Warning
You or others could be injured if caught
in the path of a closing door. Make sure
the area is clear when using the
automatic soft-close/cinching feature.
If equipped, to close any door, gently push
or pull it until the power cinch motor draws
the door the rest of the way closed and
latches. Pull the handle during a soft-close
to cancel the cinching and re-open the door.
Page 99 of 461
Cadillac Escalade Owner Manual (GMNA-Localizing-U.S./Canada/Mexico-
16417396) - 2023 - CRC - 5/9/22
Instruments and Controls 97
Instruments and Controls
Controls
Steering Wheel Adjustment . . . . . . . . . . . . 98
Heated Steering Wheel . . . . . . . . . . . . . . . . . 98
Horn . . . . . . . . . . . . . . . . . . . . . . . . . . . . . . . . . . . 98
Windshield Wiper/Washer . . . . . . . . . . . . . 98
Rear Window Wiper/Washer . . . . . . . . . . 100
Compass . . . . . . . . . . . . . . . . . . . . . . . . . . . . . . . 101
Clock . . . . . . . . . . . . . . . . . . . . . . . . . . . . . . . . . . 102
Power Outlets . . . . . . . . . . . . . . . . . . . . . . . . . 102
Wireless Charging . . . . . . . . . . . . . . . . . . . . . 104
Warning Lights, Gauges, and Indicators
Warning Lights, Gauges, andIndicators . . . . . . . . . . . . . . . . . . . . . . . . . . . . 106
Instrument Cluster . . . . . . . . . . . . . . . . . . . . . 107
Speedometer . . . . . . . . . . . . . . . . . . . . . . . . . . 108
Odometer . . . . . . . . . . . . . . . . . . . . . . . . . . . . . 108
Trip Odometer . . . . . . . . . . . . . . . . . . . . . . . . 108
Tachometer . . . . . . . . . . . . . . . . . . . . . . . . . . . 108
Fuel Gauge . . . . . . . . . . . . . . . . . . . . . . . . . . . . 108
Engine Oil Pressure Gauge . . . . . . . . . . . . 109
Engine Coolant Temperature Gauge . . . . 110
Transmission Temperature Gauge . . . . . . 110
Voltmeter Gauge . . . . . . . . . . . . . . . . . . . . . . . 111
Seat Belt Reminders . . . . . . . . . . . . . . . . . . . . 112
Airbag Readiness Light . . . . . . . . . . . . . . . . . 113
Passenger Airbag Status Indicator . . . . . . 113
Charging System Light . . . . . . . . . . . . . . . . . 114 Malfunction Indicator Lamp (Check
Engine Light) . . . . . . . . . . . . . . . . . . . . . . . . . 114
Brake System Warning Light . . . . . . . . . . . 115
Electric Parking Brake Light . . . . . . . . . . . . 116
Service Electric Parking Brake Light . . . . 116
Antilock Brake System (ABS) Warning Light . . . . . . . . . . . . . . . . . . . . . . . . . . . . . . . . . 117
Four-Wheel-Drive Light . . . . . . . . . . . . . . . . . 117
Automatic Vehicle Hold (AVH) Light . . . . 117
Lane Keep Assist (LKA) Light . . . . . . . . . . . 117
Automatic Emergency Braking (AEB) Disabled Light . . . . . . . . . . . . . . . . . . . . . . . . 118
Vehicle Ahead Indicator . . . . . . . . . . . . . . . . 118
Pedestrian Ahead Indicator . . . . . . . . . . . . . 118
Traction Off Light . . . . . . . . . . . . . . . . . . . . . . 118
StabiliTrak OFF Light . . . . . . . . . . . . . . . . . . . 119
Traction Control System (TCS)/ StabiliTrak Light . . . . . . . . . . . . . . . . . . . . . . 119
Engine Coolant Temperature Warning Light . . . . . . . . . . . . . . . . . . . . . . . . . . . . . . . . . 119
Driver Mode Control Light . . . . . . . . . . . . . 120
Four Corner Air Suspension Light . . . . . . 120
Tire Pressure Light . . . . . . . . . . . . . . . . . . . . . 121
Engine Oil Pressure Light . . . . . . . . . . . . . . 122
Low Fuel Warning Light . . . . . . . . . . . . . . . . 122
Security Light . . . . . . . . . . . . . . . . . . . . . . . . . . 122
High-Beam On Light . . . . . . . . . . . . . . . . . . . 123
Adaptive Forward Lighting (AFL) Light . . . . . . . . . . . . . . . . . . . . . . . . . . . . . . . . . 123
Lamps On Reminder . . . . . . . . . . . . . . . . . . . 123 Cruise Control Light . . . . . . . . . . . . . . . . . . . . 123
Door Ajar Light . . . . . . . . . . . . . . . . . . . . . . . . 124
Information Displays
Driver Information Center (DIC) . . . . . . . . 124
Vehicle Information . . . . . . . . . . . . . . . . . . . . 127
Head-Up Display (HUD) . . . . . . . . . . . . . . . . 127
Vehicle Messages
Vehicle Messages . . . . . . . . . . . . . . . . . . . . . . 130
Engine Power Messages . . . . . . . . . . . . . . . 130
Vehicle Speed Messages . . . . . . . . . . . . . . . 131
Universal Remote System
Universal Remote System . . . . . . . . . . . . . . 131
Universal Remote System
Programming . . . . . . . . . . . . . . . . . . . . . . . . . 131
Universal Remote System Operation . . . 133
Page 104 of 461
Cadillac Escalade Owner Manual (GMNA-Localizing-U.S./Canada/Mexico-
16417396) - 2023 - CRC - 5/9/22
102 Instruments and Controls
satellites. When the compass display shows
CAL, drive the vehicle for a short distance in
an open area where it can receive a GPS
signal. The compass system will
automatically determine when a GPS signal
is restored and provide a heading again.
Clock
Set the time and date using the
infotainment system. See "Time/Date" under
Settings0184.
Power Outlets
Power Outlets 12-Volt Direct Current
Accessory power outlets can be used to plug
in electrical equipment, such as a cell phone
or MP3 player.
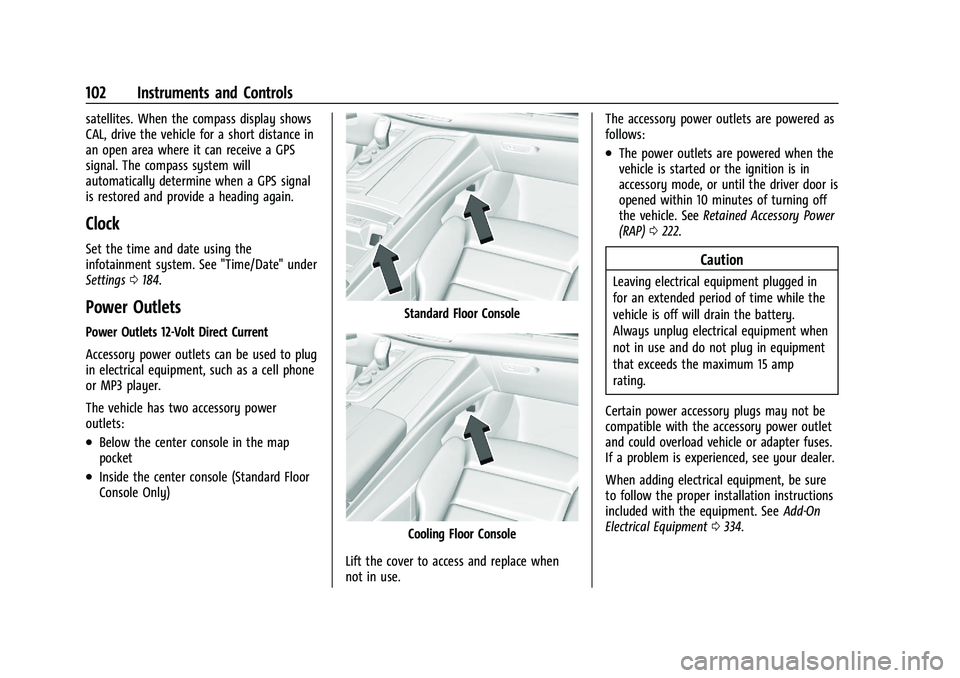
The vehicle has two accessory power
outlets:
.Below the center console in the map
pocket
.Inside the center console (Standard Floor
Console Only)
Standard Floor Console
Cooling Floor Console
Lift the cover to access and replace when
not in use. The accessory power outlets are powered as
follows:
.The power outlets are powered when the
vehicle is started or the ignition is in
accessory mode, or until the driver door is
opened within 10 minutes of turning off
the vehicle. See
Retained Accessory Power
(RAP) 0222.
Caution
Leaving electrical equipment plugged in
for an extended period of time while the
vehicle is off will drain the battery.
Always unplug electrical equipment when
not in use and do not plug in equipment
that exceeds the maximum 15 amp
rating.
Certain power accessory plugs may not be
compatible with the accessory power outlet
and could overload vehicle or adapter fuses.
If a problem is experienced, see your dealer.
When adding electrical equipment, be sure
to follow the proper installation instructions
included with the equipment. See Add-On
Electrical Equipment 0334.
Page 186 of 461
Cadillac Escalade Owner Manual (GMNA-Localizing-U.S./Canada/Mexico-
16417396) - 2023 - CRC - 5/9/22
184 Infotainment System
Google Play, and other marks are
trademarks of Google Inc.; Apple CarPlay is a
trademark of Apple Inc.
Press
{on the center stack to exit Android
Auto or Apple CarPlay. To enter back into
Android Auto or Apple CarPlay, press and
hold
{on the center stack.
Apple CarPlay and Android Auto can be
disabled from the infotainment system. To
do this, touch Home, Settings, and then
phone projection. Use the On/Off toggled to
turn off Apple CarPlay or Android Auto.
Settings
Certain settings can be managed in the
Owner Center sites when an account is
established, and may be modified if other
users have accessed the vehicle or created
accounts. This may result in changes to the
security or functionality of the infotainment
system. Some settings may also be
transferred to a new vehicle, if equipped. For
instructions, in the U.S. see my.cadillac.com
or in Canada see mycadillac.ca or
moncadillac.ca. Refer to the User Terms and Privacy
Statement for important details. To view,
touch the Settings icon on the Home Page
of the infotainment display.
The settings menu is organized into three
categories. Select the desired category by
touching System, Vehicle, or Search.
To access the System menus:
1. Touch the Settings icon on the Home Page of the infotainment display.
2. Touch the desired category to display a list of available options.
3. Touch to select the desired feature setting.
4. Touch the options on the infotainment display to change a setting.
System
The menu may contain the following:
Display
Allows the adjustment of the Head Up
display, instrument cluster, and infotainment
display.
Sounds
Allows adjustment of the infotainment
system sounds. Voice
Allows adjustment of the infotainment voice
recognition features.
Conversation Enhancement
Allows adjustment of the conversation
enhancement features.
Time, Date, and Unit
Allows setting of the clock.
Phone Projection
Allows interacting directly with a mobile
device on the infotainment display. See
Apple CarPlay and Android Auto
0182.
Phones
Adjusts different phone settings.
Wi-Fi Hotspot
Allows adjustment of different Wi-Fi
features.
Networks
Shows connected and available Wi-Fi
networks.
Page 351 of 461

Cadillac Escalade Owner Manual (GMNA-Localizing-U.S./Canada/Mexico-
16417396) - 2023 - CRC - 5/9/22
Vehicle Care 349
Check to see if coolant is visible in the
coolant surge tank. If the coolant inside the
coolant surge tank is boiling, wait until it
cools down. The coolant level should be at
or above the indicated mark. If it is not,
there may be a leak in the cooling system.
If coolant is visible but the coolant level is
not at or above the indicated mark, see the
following sections on how to add coolant to
the coolant surge tank following.
How to Add Coolant to the Coolant
Surge Tank
If the vehicle has a diesel engine, see
“Cooling System”in the Duramax diesel
supplement for the proper coolant fill
procedure.
{Warning
Spilling coolant on hot engine parts can
burn you. Coolant contains ethylene
glycol and it will burn if the engine parts
are hot enough.
{Warning
Plain water, or other liquids such as
alcohol, can boil before the proper
coolant mixture will. With plain water or
the wrong mixture, the engine could get
too hot but there would not be an
overheat warning. The engine could catch
fire and you or others could be burned.
{Warning
Steam and scalding liquids from a hot
cooling system are under pressure.
Turning the pressure cap, even a little,
can cause them to come out at high
speed and you could be burned. Never
turn the cap when the cooling system,
including the pressure cap, is hot. Wait
for the cooling system and pressure cap
to cool.
Caution
Failure to follow the specific coolant fill
procedure could cause the engine to
overheat and could cause system
damage. If coolant is not visible in the
surge tank, contact your dealer.
If no coolant is visible in the surge tank, add
coolant.
1. Remove the coolant surge tank pressure cap when the cooling system, including
the coolant surge tank pressure cap and
upper radiator hose, is no longer hot.
Turn the pressure cap slowly
counterclockwise about one full turn. If a
hiss is heard, wait for that to stop.
A hiss means there is still some
pressure left.
2. Keep turning the pressure cap slowly, and remove it.
3. Fill the coolant surge tank with the proper mixture to the full cold mark.
Page 390 of 461

Cadillac Escalade Owner Manual (GMNA-Localizing-U.S./Canada/Mexico-
16417396) - 2023 - CRC - 5/9/22
388 Vehicle Care
the repair. The spare tire will then replace
the tire/wheel that is removed from the
rear axle.
If equipped with the performance brake
package RPO J49, and the flat tire is on the
front axle, stop after performing all steps in
Removing the Spare Tire and Tools and do
the following. Otherwise, continue with the
procedure:
1. Remove the rear tire and replace it withthe spare tire by performing all steps in
Removing the Flat Tire and Installing the
Spare Tire. 2. Perform all steps in Removing the Flat
Tire and Installing the Spare Tire again
this time replacing the flat front tire
with the rear tire.
3. Proceed to Storing a Flat or Spare Tire and Tools.
Removing the Spare Tire and Tools
The equipment needed to change a flat tire
is stored in the rear of the vehicle. The
jacking tools are under the load floor,
secured with velcro straps. The jack is
behind a door in the trim panel on the
driver side.
1. Pull to open the trim panel door.
The third row driver side seat may
need to be folded to access the trim
panel door.
2. Turn the jack knob counterclockwise to release the jack and wheel blocks from
the bracket. If equipped, remove the
wheel blocks from the jack and place
the wheel blocks on both sides of the
tire at the opposite corner of the tire
being changed. See If a Tire Goes Flat
0 386 for more information on the
placement of the wheel blocks. Place
the jack and wheel blocks near the tire
being changed.
Page 392 of 461

Cadillac Escalade Owner Manual (GMNA-Localizing-U.S./Canada/Mexico-
16417396) - 2023 - CRC - 5/9/22
390 Vehicle Care
1. Open the hoist shaft access cover (3) onthe bumper to access the spare tire
lock (6).
2. To remove the spare tire lock (6), insert the mechanical key, turn it clockwise and
then pull it straight out.3. Assemble the jack handle extensions (4)and wheel wrench (5), as shown.
4. Insert the open end of the extension (7)through the hole in the rear bumper (8)
(hoist shaft access hole).
Be sure the hoist end of the extension
(7) connects to the hoist shaft. The
ribbed square end of the extension is
used to lower the spare tire.
5. Turn the wheel wrench counterclockwise to lower the spare tire to the ground.
Continue to turn the wheel wrench until
the spare tire can be pulled out from
under the vehicle.
6. Pull the spare tire out from under the vehicle.
Page 393 of 461
Cadillac Escalade Owner Manual (GMNA-Localizing-U.S./Canada/Mexico-
16417396) - 2023 - CRC - 5/9/22
Vehicle Care 391
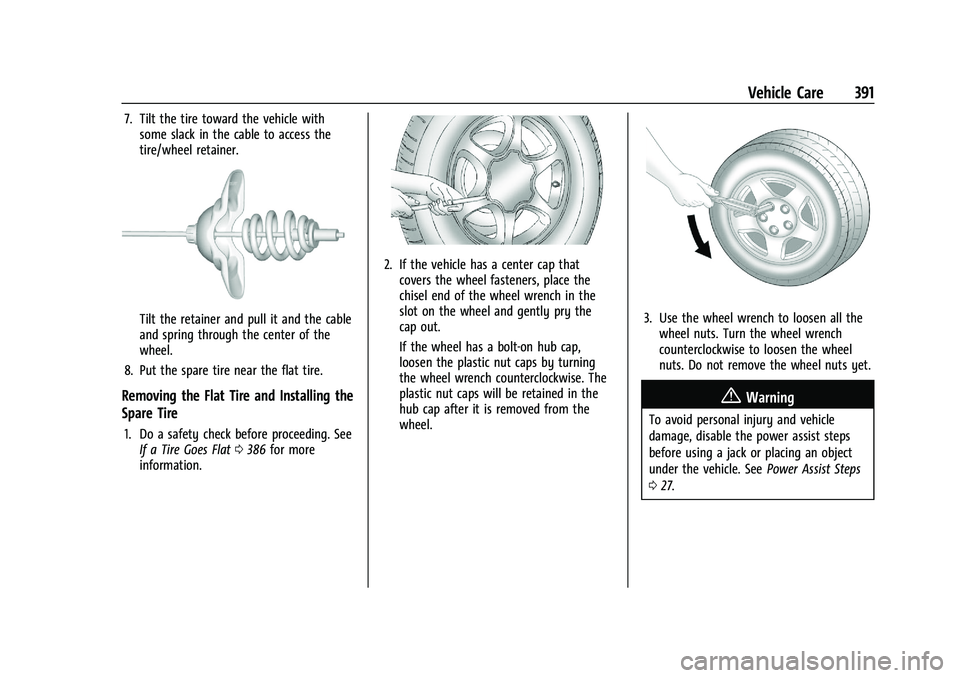
7. Tilt the tire toward the vehicle withsome slack in the cable to access the
tire/wheel retainer.
Tilt the retainer and pull it and the cable
and spring through the center of the
wheel.
8. Put the spare tire near the flat tire.
Removing the Flat Tire and Installing the
Spare Tire
1. Do a safety check before proceeding. See If a Tire Goes Flat 0386 for more
information.
2. If the vehicle has a center cap that covers the wheel fasteners, place the
chisel end of the wheel wrench in the
slot on the wheel and gently pry the
cap out.
If the wheel has a bolt-on hub cap,
loosen the plastic nut caps by turning
the wheel wrench counterclockwise. The
plastic nut caps will be retained in the
hub cap after it is removed from the
wheel.
3. Use the wheel wrench to loosen all thewheel nuts. Turn the wheel wrench
counterclockwise to loosen the wheel
nuts. Do not remove the wheel nuts yet.
{Warning
To avoid personal injury and vehicle
damage, disable the power assist steps
before using a jack or placing an object
under the vehicle. See Power Assist Steps
0 27.
Page 395 of 461

Cadillac Escalade Owner Manual (GMNA-Localizing-U.S./Canada/Mexico-
16417396) - 2023 - CRC - 5/9/22
Vehicle Care 393
{Warning
Getting under a vehicle when it is lifted
on a jack is dangerous. If the vehicle slips
off the jack, you could be badly injured
or killed. Never get under a vehicle when
it is supported only by a jack.
{Warning
Raising the vehicle with the jack
improperly positioned can damage the
vehicle and even make the vehicle fall. To
help avoid personal injury and vehicle
damage, be sure to fit the jack lift head
into the proper location before raising
the vehicle.
{Warning
The jack has a feature to limit its travel
to prevent overextension. When the
height limit is reached, an increase in
resistance if felt when attempting to
raise the jack farther. Raising the jack
past the height limit can damage the jack
pin and cause the jack to lock into an(Continued)
Warning (Continued)
overextended position or not lower fully.
Do not attempt to force the jack higher
once the height limit is reached.
5. Raise the vehicle by turning the wheel wrench clockwise in the jack. Raise the
vehicle far enough off the ground so
there is enough room for the spare tire
to fit under the wheel well.
6. Remove all of the wheel nuts.
7. Remove the flat tire.
{Warning
Rust or dirt on a wheel, or on the
parts to which it is fastened, can
cause wheel nuts to become loose
over time. The wheel could come off
and cause a crash. When changing a
wheel, remove any rust or dirt from
places where the wheel attaches to
the vehicle. In an emergency, a cloth
or paper towel can be used; however,
use a scraper or wire brush later to
remove all rust or dirt.
Page 396 of 461

Cadillac Escalade Owner Manual (GMNA-Localizing-U.S./Canada/Mexico-
16417396) - 2023 - CRC - 5/9/22
394 Vehicle Care
8. Remove any rust or dirt from the wheelbolts, mounting surfaces, and spare
wheel.
9. Place the spare tire on the wheel-mounting surface.
{Warning
Never use oil or grease on bolts or nuts
because the nuts might come loose. The
vehicle's wheel could fall off, causing a
crash.
10. Reinstall the wheel nuts. Tighten each nut by hand. Then use the wheel wrench
to tighten the nuts until the wheel is
held against the hub.
11. Turn the wheel wrench counterclockwise to lower the vehicle. Lower the jack
completely.
12. Tighten the nuts firmly in a crisscrosssequence as shown by turning the wheel
wrench clockwise.
{Warning
Wheel nuts that are improperly or
incorrectly tightened can cause the
wheels to become loose or come off. The
wheel nuts should be tightened with a
torque wrench to the proper torque
specification after replacing. Follow the
torque specification supplied by the
aftermarket manufacturer when using
(Continued)
Warning (Continued)
accessory locking wheel nuts. See
Capacities and Specifications0424 for
original equipment wheel nut torque
specifications.
Caution
Improperly tightened wheel nuts can lead
to brake pulsation and rotor damage. To
avoid expensive brake repairs, evenly
tighten the wheel nuts in the proper
sequence and to the proper torque
specification. See Capacities and
Specifications 0424 for the wheel nut
torque specification.
When reinstalling the regular wheel and tire,
also reinstall either the center cap or the
bolt-on hub cap, depending on which one
the vehicle has.
.For center caps, line up the tab on the
center cap with the slot in the wheel. The
cap only goes in one way. Place the cap
on the wheel and press until it snaps into
place.