clock CADILLAC ESCALADE ESV 2004 2.G User Guide
[x] Cancel search | Manufacturer: CADILLAC, Model Year: 2004, Model line: ESCALADE ESV, Model: CADILLAC ESCALADE ESV 2004 2.GPages: 504, PDF Size: 3.27 MB
Page 362 of 504
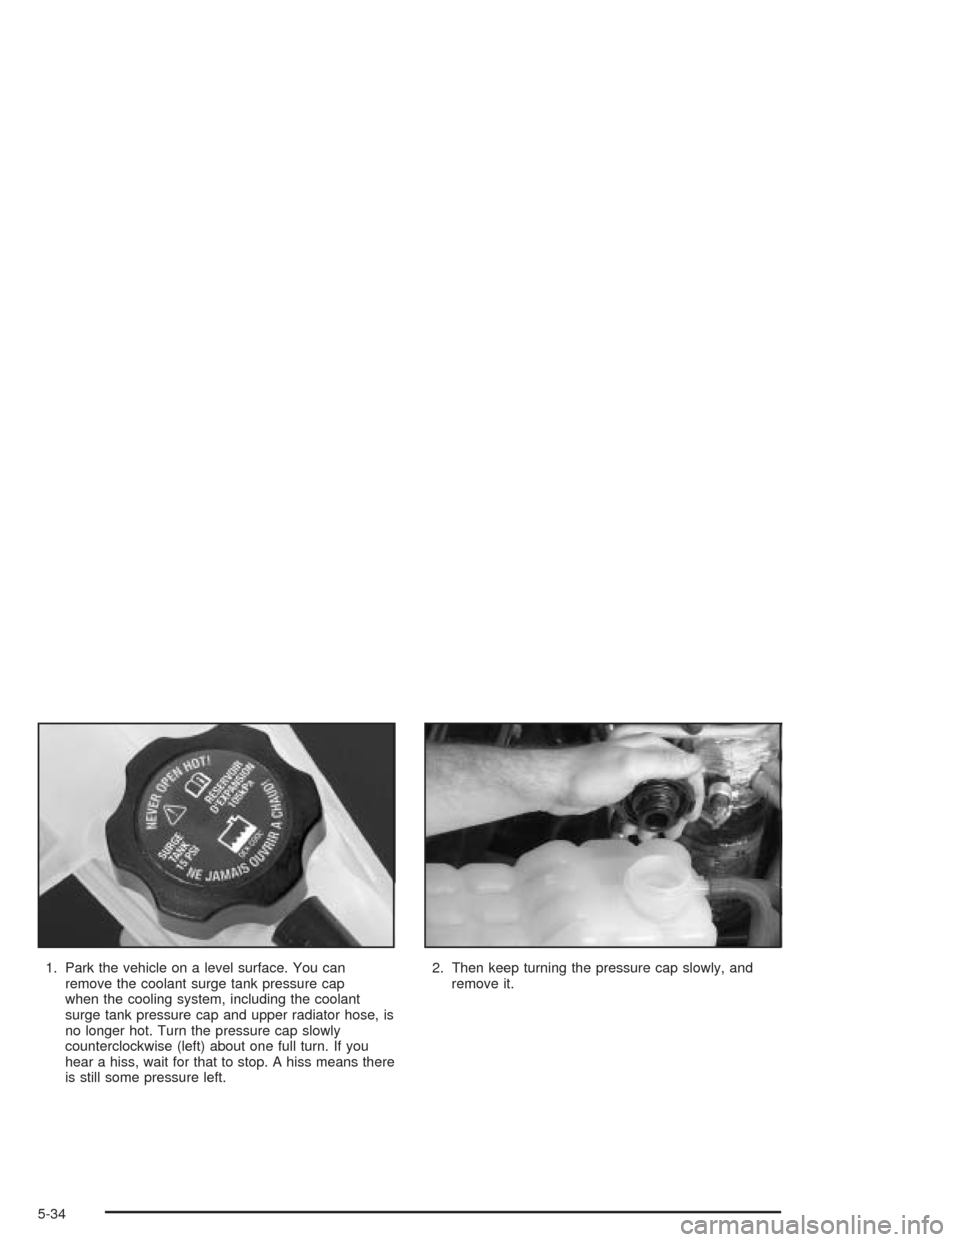
1. Park the vehicle on a level surface. You can
remove the coolant surge tank pressure cap
when the cooling system, including the coolant
surge tank pressure cap and upper radiator hose, is
no longer hot. Turn the pressure cap slowly
counterclockwise (left) about one full turn. If you
hear a hiss, wait for that to stop. A hiss means there
is still some pressure left.2. Then keep turning the pressure cap slowly, and
remove it.
5-34
Page 387 of 504

6. Remove the vertical pin from the headlamp
assembly by turning the end of the pin away from
you until it unsnaps and then pulling it upward.
7. Remove the headlamp assembly by lifting it up and
then pulling it out and away from the front of the
vehicle.
8. Disconnect the electrical connector from the lower
corner of the headlamp assembly. This will give you
better access to the headlamp assembly.9. Remove the rubber,
circular-shaped bulb
cap of the affected bulb
from the headlamp
assembly.
10. Turn the bulb connector counterclockwise and
remove it with the old bulb from the headlamp
assembly.
11. Unplug the electrical connector from the old bulb.
12. Plug in the electrical connector to the new bulb,
using care not to touch the bulb with your hands,
�ngers or anything damp or oily.
13. Place the connector with the new bulb into the
headlamp assembly and turn it clockwise until it
is tight.
5-59
Page 389 of 504

Front Turn Signal, Sidemarker and
Daytime Running Lamps
A. Low-Beam
Headlamp (HID)
B. Daytime Running
Lamp
C. Sidemarker LampD. High-Beam
Headlamp
E. Front Turn Signal
Lamp1. Remove the headlamp assembly as described
previously.
2. Remove the rubber, circular-shaped bulb cap for
the affected bulb from the headlamp assembly.
3. Press the locking release lever, turn the bulb socket
counterclockwise and remove it from the headlamp
assembly. (There is no lock for the sidemarker lamp.)
4. Remove the old bulb from the bulb socket.
5. Put the new bulb into the bulb socket.
6. Put the bulb socket into the turn signal housing and
turn it clockwise until it locks. (There is no lock for
the sidemarker lamp.)
7. Reinstall the rubber, circular-shaped bulb cap to the
headlamp assembly.
8. Put the headlamp assembly back into the vehicle
by reversing the previous mentioned steps.
5-61
Page 390 of 504
Center High-Mounted Stoplamp
(CHMSL)
If your vehicle has this component and it needs
replacement, it is recommended that it be replaced as a
unit by your dealer.
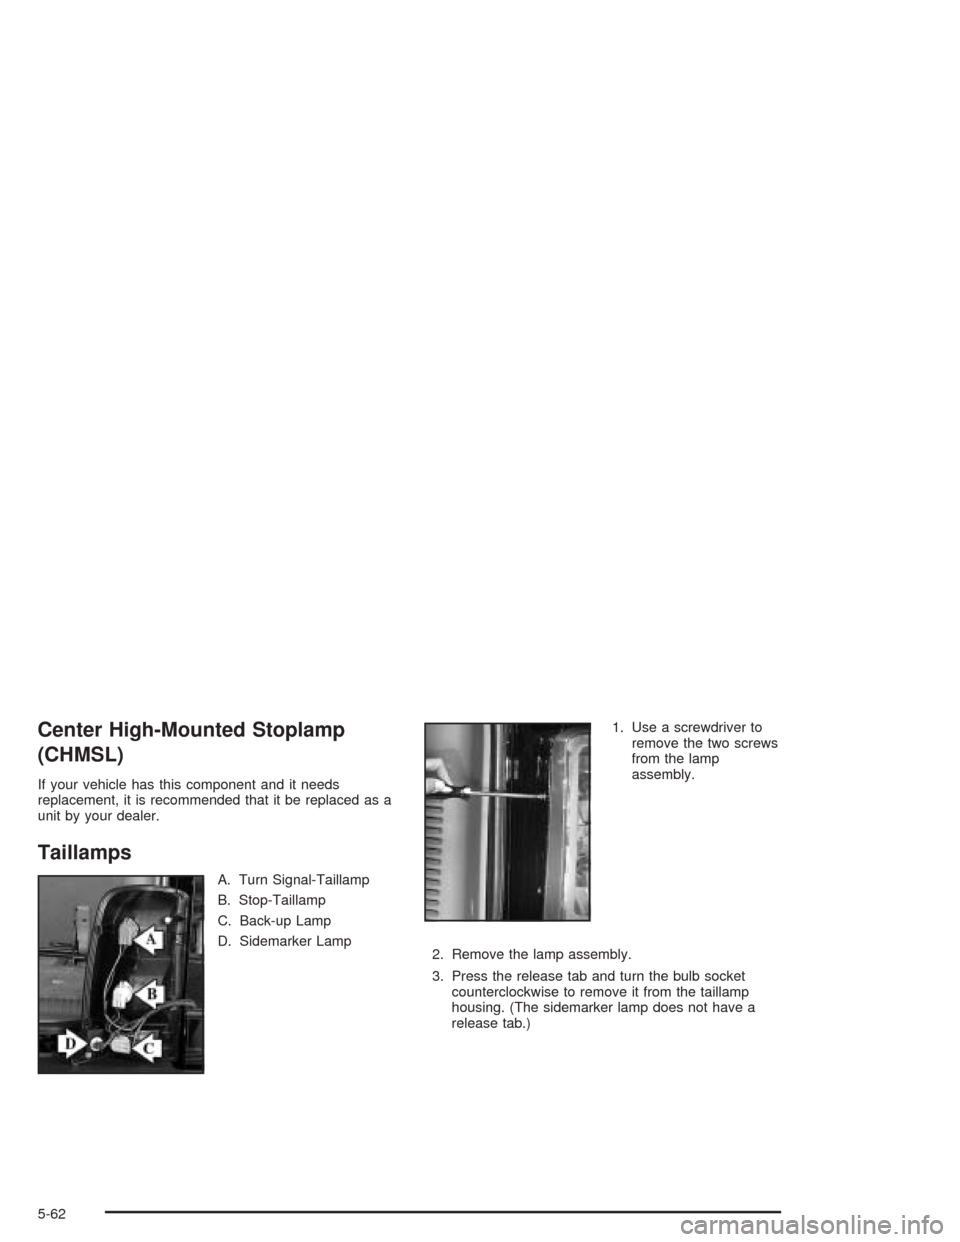
Taillamps
A. Turn Signal-Taillamp
B. Stop-Taillamp
C. Back-up Lamp
D. Sidemarker Lamp1. Use a screwdriver to
remove the two screws
from the lamp
assembly.
2. Remove the lamp assembly.
3. Press the release tab and turn the bulb socket
counterclockwise to remove it from the taillamp
housing. (The sidemarker lamp does not have a
release tab.)
5-62
Page 391 of 504

4. Pull the bulb straight
out from the socket.
5. Press a new bulb into the socket, insert it into the
taillamp housing and turn the socket clockwise into
the taillamp housing until it clicks. The sidemarker
lamp does not have a release tab and therefore will
not click when it is installed.
6. Reinstall the rear lamp assembly and tighten the
screws.Replacement Bulbs
Exterior Lamp Bulb Number
Low-Beam Headlamps (HID) *
High-Beam Headlamps 9005 or 9005 LL
Daytime Running Lamps (DRL) 4114K
Front Marker Lamp 194
Front Parking and Turn Lamp 3157AK
Stop Lamp/Taillamp 3157K
Side Marker Lamp 194
Rear Turn Lamp 3157K
Back-up Lamp 3157K
* For replacement bulbs not listed here, please
consult your dealer.
5-63
Page 416 of 504
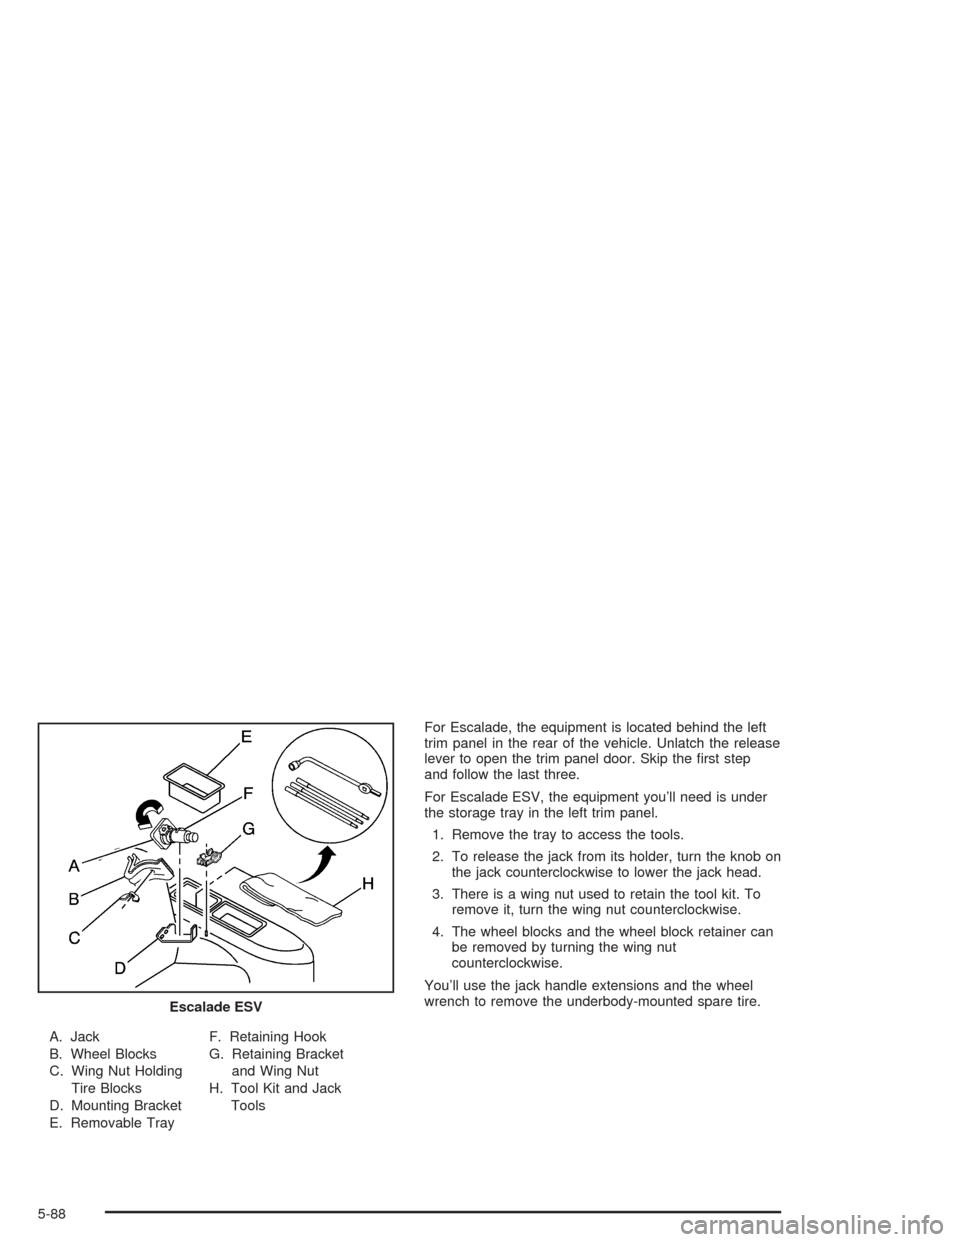
A. Jack
B. Wheel Blocks
C. Wing Nut Holding
Tire Blocks
D. Mounting Bracket
E. Removable TrayF. Retaining Hook
G. Retaining Bracket
and Wing Nut
H. Tool Kit and Jack
ToolsFor Escalade, the equipment is located behind the left
trim panel in the rear of the vehicle. Unlatch the release
lever to open the trim panel door. Skip the �rst step
and follow the last three.
For Escalade ESV, the equipment you’ll need is under
the storage tray in the left trim panel.
1. Remove the tray to access the tools.
2. To release the jack from its holder, turn the knob on
the jack counterclockwise to lower the jack head.
3. There is a wing nut used to retain the tool kit. To
remove it, turn the wing nut counterclockwise.
4. The wheel blocks and the wheel block retainer can
be removed by turning the wing nut
counterclockwise.
You’ll use the jack handle extensions and the wheel
wrench to remove the underbody-mounted spare tire.
Escalade ESV
5-88
Page 418 of 504

3. Insert the hoist end
(open end) (F) of the
extension through
the hole (G) in the rear
bumper.
Be sure the hoist end of the extension connects to
the hoist shaft (E). The ribbed square end of the
extension is used to lower the spare tire.
4. Turn the wheel wrench (H) counterclockwise to
lower the spare tire to the ground. Continue to
turn the wheel wrench until the spare tire can be
pulled out from under the vehicle.
If the spare tire does not lower to the ground, the
secondary latch is engaged and preventing the
tire from lowering. See “Secondary Latch System”
later in this section for instructions on lowering
the spare tire.The wheel wrench has a
hook that allows you to
pull the hoist cable towards
you to assist in reaching
the spare tire.
5. When the tire has been
lowered, tilt the
retainer (D) at the end
of the cable so it
can be pulled up
through the wheel
opening.
6. Put the spare tire near the �at tire.
5-90
Page 420 of 504
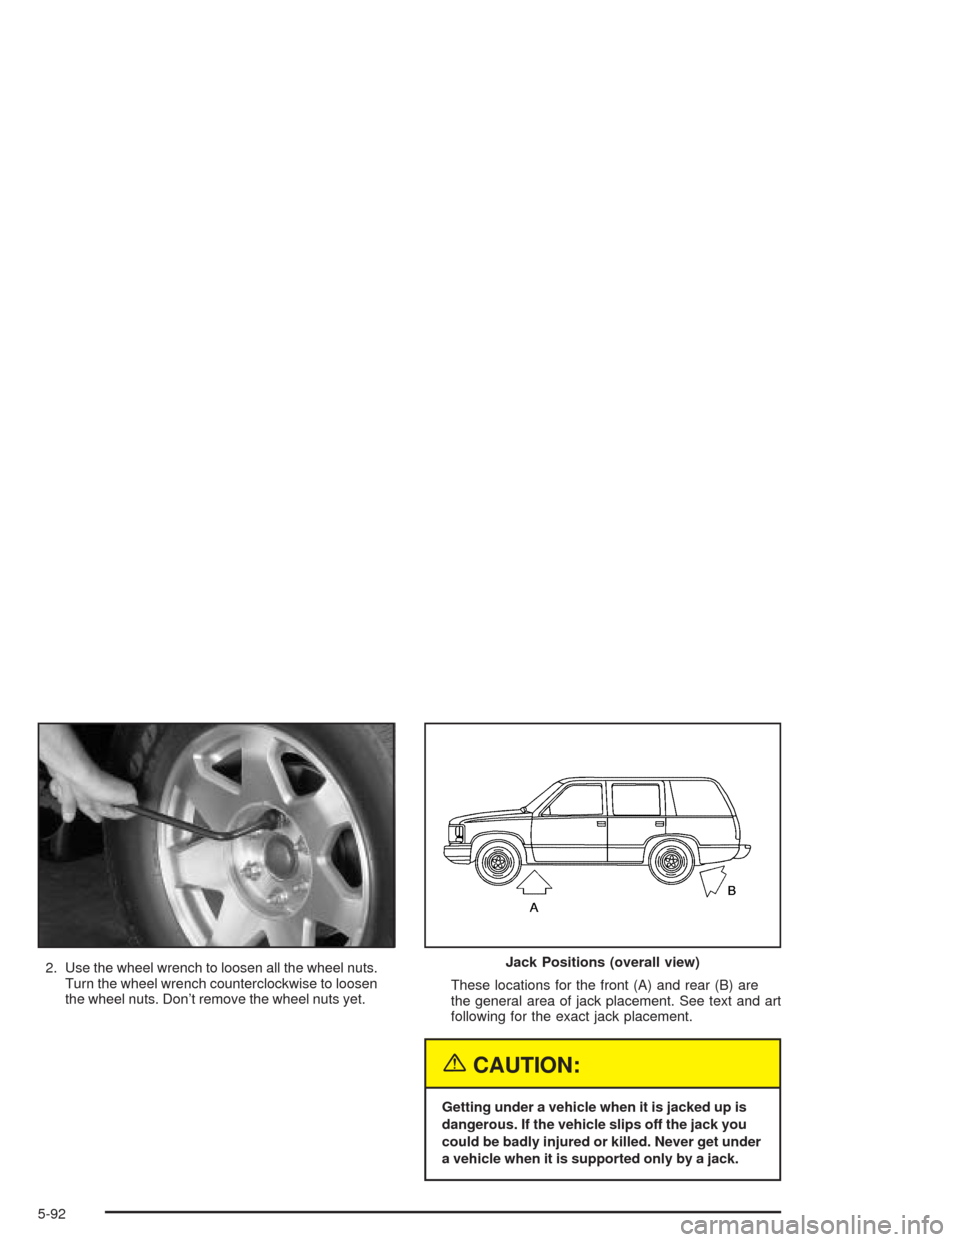
2. Use the wheel wrench to loosen all the wheel nuts.
Turn the wheel wrench counterclockwise to loosen
the wheel nuts. Don’t remove the wheel nuts yet.These locations for the front (A) and rear (B) are
the general area of jack placement. See text and art
following for the exact jack placement.
{CAUTION:
Getting under a vehicle when it is jacked up is
dangerous. If the vehicle slips off the jack you
could be badly injured or killed. Never get under
a vehicle when it is supported only by a jack.
Jack Positions (overall view)
5-92
Page 421 of 504
{CAUTION:
Raising your vehicle with the jack improperly
positioned can damage the vehicle and even
make the vehicle fall. To help avoid personal
injury and vehicle damage, be sure to �t the
jack lift head into the proper location before
raising the vehicle.
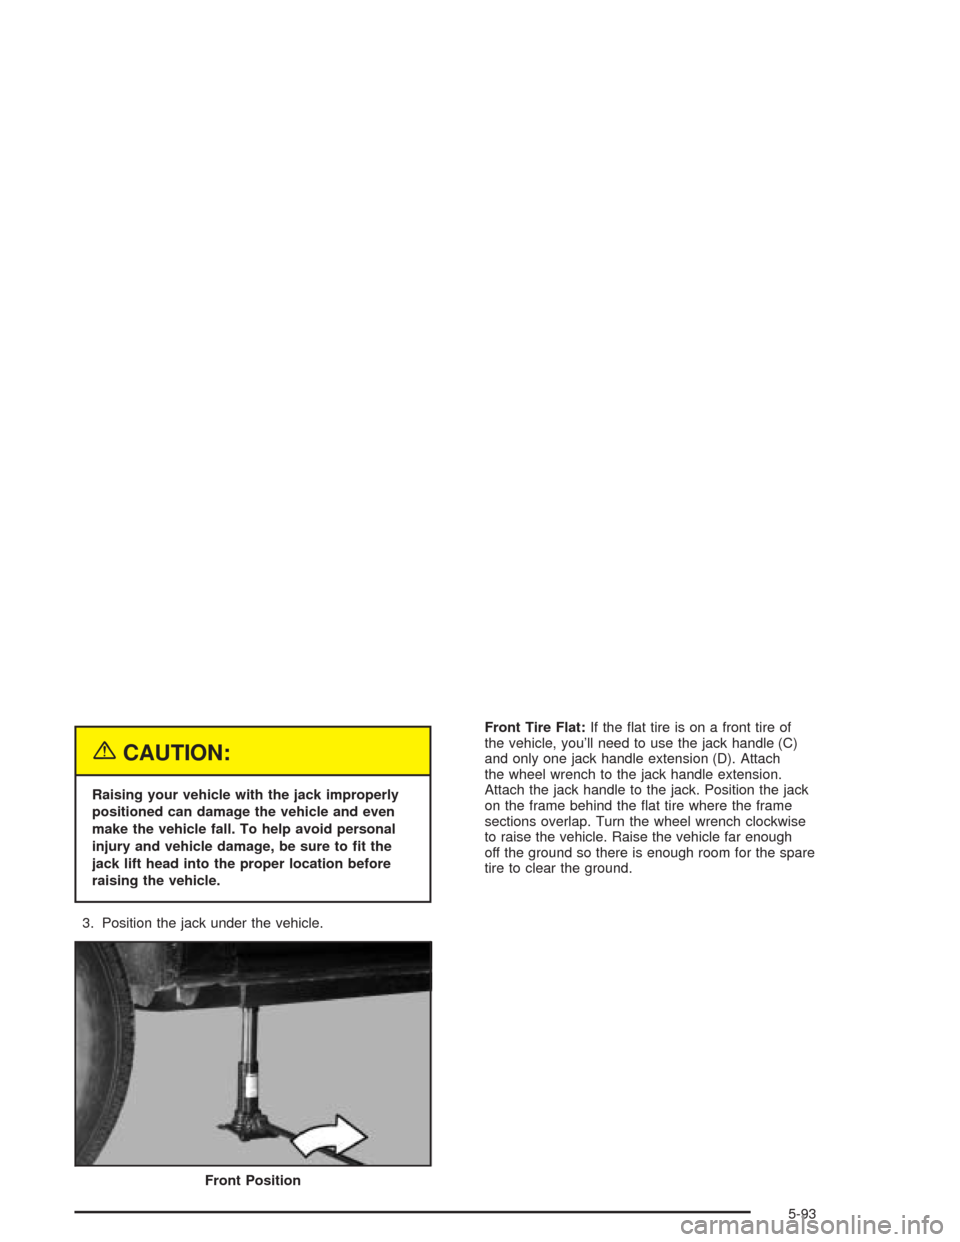
3. Position the jack under the vehicle.Front Tire Flat:If the �at tire is on a front tire of
the vehicle, you’ll need to use the jack handle (C)
and only one jack handle extension (D). Attach
the wheel wrench to the jack handle extension.
Attach the jack handle to the jack. Position the jack
on the frame behind the �at tire where the frame
sections overlap. Turn the wheel wrench clockwise
to raise the vehicle. Raise the vehicle far enough
off the ground so there is enough room for the spare
tire to clear the ground.
Front Position
5-93
Page 422 of 504
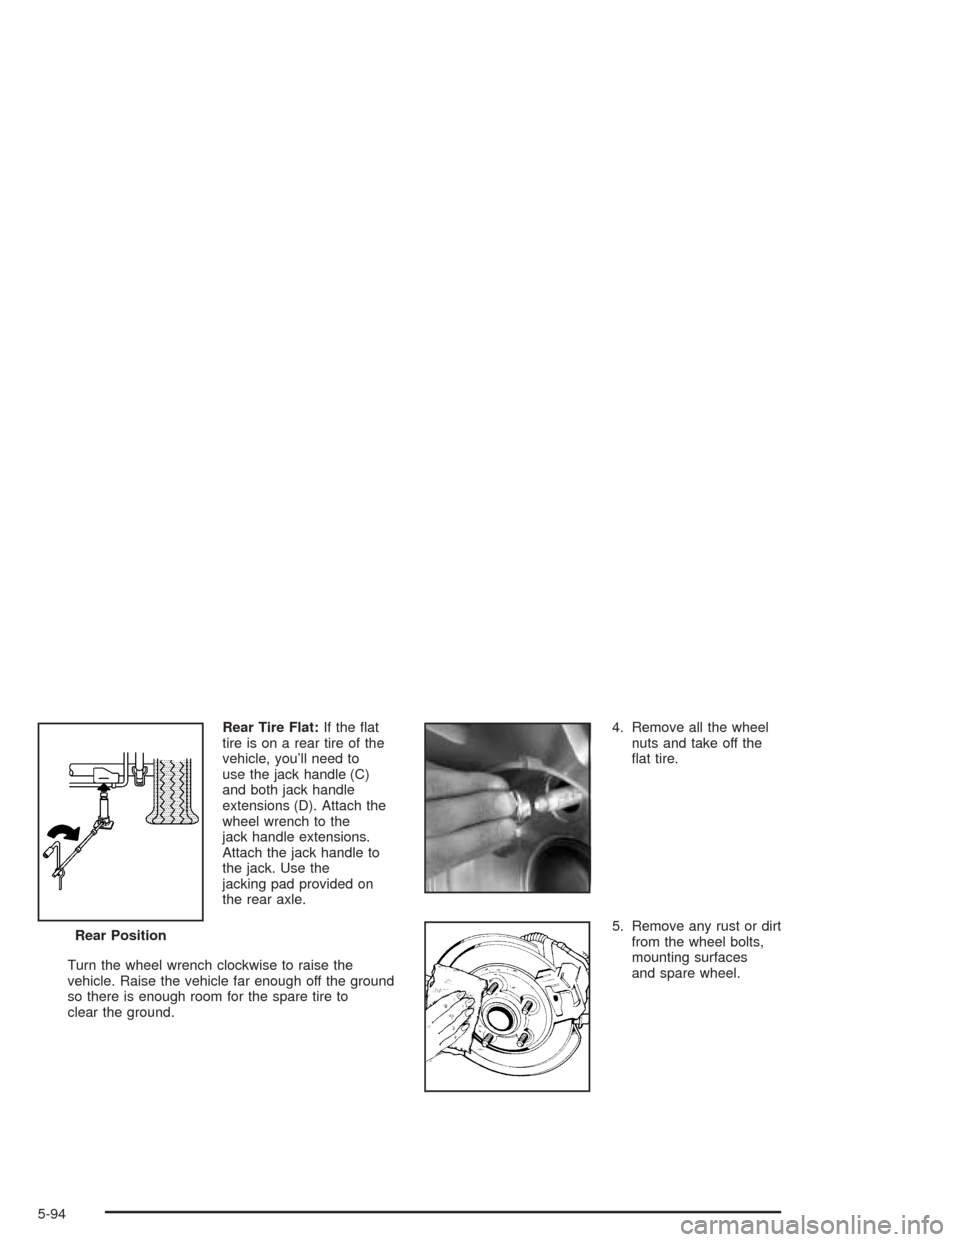
Rear Tire Flat:If the �at
tire is on a rear tire of the
vehicle, you’ll need to
use the jack handle (C)
and both jack handle
extensions (D). Attach the
wheel wrench to the
jack handle extensions.
Attach the jack handle to
the jack. Use the
jacking pad provided on
the rear axle.
Turn the wheel wrench clockwise to raise the
vehicle. Raise the vehicle far enough off the ground
so there is enough room for the spare tire to
clear the ground.4. Remove all the wheel
nuts and take off the
�at tire.
5. Remove any rust or dirt
from the wheel bolts,
mounting surfaces
and spare wheel. Rear Position
5-94