tow CADILLAC ESCALADE ESV 2012 Repair Manual
[x] Cancel search | Manufacturer: CADILLAC, Model Year: 2012, Model line: ESCALADE ESV, Model: CADILLAC ESCALADE ESV 2012Pages: 538, PDF Size: 8.42 MB
Page 382 of 538

Black plate (12,1)Cadillac Escalade/Escalade ESV Owner Manual - 2012 - 2nd CRC - 11/29/11
10-12 Vehicle Care
1. Locate the transmission dipstick
at the rear of the engine
compartment, on the passenger
side of the vehicle.
See Engine Compartment
Overview on page 10 ‑ 6 for more
information.
2. Flip the handle up and then pull
out the dipstick and wipe it with
a clean rag or paper towel.
3. Install the dipstick by pushing it
back in all the way, wait
three seconds, and then pull it
back out again.
4. Check both sides of the dipstick
and read the lower level. Repeat
the check procedure to verify the
reading. 5. If the fluid level is below the
COLD check band, add only
enough fluid as necessary to
bring the level into the COLD
band. It does not take much
fluid, generally less than 0.5 L
(1 pint). Do not overfill.
6. Perform a hot check at the first
opportunity after the
transmission reaches a normal
operating temperature between
71°C to 93°C (160°F to 200°F).
7. If the fluid level is in the
acceptable range, push the
dipstick back in all the way, then
flip the handle down to lock the
dipstick in place. Hot Check Procedure
Use this procedure to check the
transmission fluid level when the
transmission fluid temperature is
between 71°C and 93°C (160°F
and 200°F).
The hot check is the most accurate
method to check the fluid level. The
hot check should be performed at
the first opportunity in order to verify
the cold check. The fluid level rises
as fluid temperature increases,
so it is important to ensure the
transmission temperature is within
range.
1. Locate the transmission dipstick
at the rear of the engine
compartment, on the passenger
side of the vehicle.
Page 383 of 538
Black plate (13,1)Cadillac Escalade/Escalade ESV Owner Manual - 2012 - 2nd CRC - 11/29/11
Vehicle Care 10-13See Engine Compartment
Overview on page 10 ‑ 6 for more
information.
2. Flip the handle up and then pull
out the dipstick and wipe it with
a clean rag or paper towel.
3. Install the dipstick by pushing it
back in all the way, wait
three seconds, and then pull it
back out again.
4. Check both sides of the dipstick
and read the lower level. Repeat
the check procedure to verify the
reading.
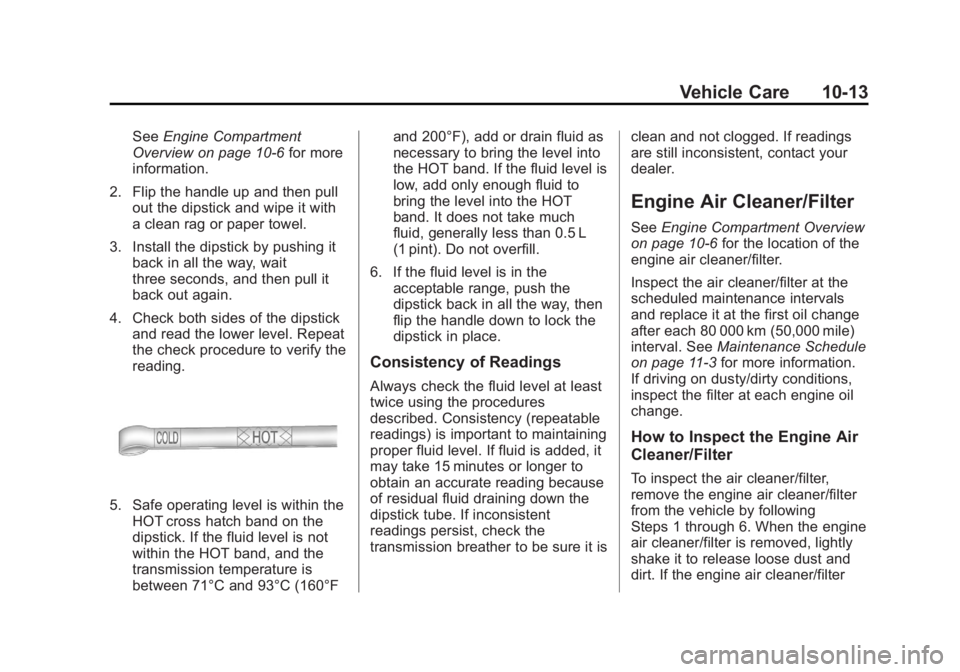
5. Safe operating level is within the
HOT cross hatch band on the
dipstick. If the fluid level is not
within the HOT band, and the
transmission temperature is
between 71°C and 93°C (160°F and 200°F), add or drain fluid as
necessary to bring the level into
the HOT band. If the fluid level is
low, add only enough fluid to
bring the level into the HOT
band. It does not take much
fluid, generally less than 0.5 L
(1 pint). Do not overfill.
6. If the fluid level is in the
acceptable range, push the
dipstick back in all the way, then
flip the handle down to lock the
dipstick in place.
Consistency of Readings Always check the fluid level at least
twice using the procedures
described. Consistency (repeatable
readings) is important to maintaining
proper fluid level. If fluid is added, it
may take 15 minutes or longer to
obtain an accurate reading because
of residual fluid draining down the
dipstick tube. If inconsistent
readings persist, check the
transmission breather to be sure it is clean and not clogged. If readings
are still inconsistent, contact your
dealer.
Engine Air Cleaner/Filter See Engine Compartment Overview
on page 10 ‑ 6 for the location of the
engine air cleaner/filter.
Inspect the air cleaner/filter at the
scheduled maintenance intervals
and replace it at the first oil change
after each 80 000 km (50,000 mile)
interval. See Maintenance Schedule
on page 11 ‑ 3 for more information.
If driving on dusty/dirty conditions,
inspect the filter at each engine oil
change.
How to Inspect the Engine Air
Cleaner/Filter
To inspect the air cleaner/filter,
remove the engine air cleaner/filter
from the vehicle by following
Steps 1 through 6. When the engine
air cleaner/filter is removed, lightly
shake it to release loose dust and
dirt. If the engine air cleaner/filter
Page 391 of 538

Black plate (21,1)Cadillac Escalade/Escalade ESV Owner Manual - 2012 - 2nd CRC - 11/29/11
Vehicle Care 10-21If No Steam Is Coming from
the Engine Compartment The ENGINE OVERHEATED
STOP ENGINE or the ENGINE
OVERHEATED IDLE ENGINE
message, along with a low coolant
condition, can indicate a serious
problem.
If there is an engine overheat
warning, but see or hear no steam,
the problem may not be too serious.
Sometimes the engine can get a
little too hot when the vehicle: .
Climbs a long hill on a hot day. .
Stops after high-speed driving. .
Idles for long periods in traffic. .
Tows a trailer. See Trailer
Towing on page 9 ‑ 61 . If the ENGINE OVERHEATED
STOP ENGINE or the ENGINE
OVERHEATED IDLE ENGINE
message appears with no sign of
steam, try this for a minute or so:
If the overheat warning is displayed
with no sign of steam:
1. Turn the air conditioning off.
2. Turn the heater on to the highest
temperature and to the highest
fan speed. Open the windows as
necessary.
3. In heavy traffic, let the engine
idle in N (Neutral) while stopped.
If it is safe to do so, pull off the
road, shift to P (Park) or
N (Neutral) and let the
engine idle. If the temperature overheat gauge is
no longer in the overheat zone or an
overheat warning no longer
displays, the vehicle can be driven.
Continue to drive the vehicle slowly
for about 10 minutes. Keep a safe
vehicle distance from the vehicle in
front. If the warning does not come
back on, continue to drive normally.
If the warning continues, pull over,
stop, and park the vehicle
right away.
If there is no sign of steam, idle the
engine for five minutes while
parked. If the warning is still
displayed, turn off the engine until it
cools down. Also, see “ Overheated
Engine Protection Operating Mode ”
later in this section.
Page 392 of 538

Black plate (22,1)Cadillac Escalade/Escalade ESV Owner Manual - 2012 - 2nd CRC - 11/29/11
10-22 Vehicle Care
Overheated Engine
Protection
Operating Mode If an overheated engine condition
exists and the ENGINE POWER IS
REDUCED message is displayed,
an overheat protection mode which
alternates firing groups of cylinders
helps prevent engine damage. In
this mode, a loss in power and
engine performance will be noticed.
This operating mode allows the
vehicle to be driven to a safe place
in an emergency. Driving extended
distances and/or towing a trailer in
the overheat protection mode
should be avoided.
Notice: After driving in the
overheated engine protection
operating mode, to avoid engine
damage, allow the engine to cool
before attempting any repair. The
engine oil will be severely
degraded. Repair the cause of
coolant loss, change the oil and
reset the oil life system. See
Engine Oil on page 10 ‑ 7 . Engine Fan The vehicle has electric cooling
fans. The fans spinning at low
speed during most everyday driving
might be heard. The fans can turn
off if no cooling is required. Under
heavy vehicle loading, trailer towing,
and/or high outside temperatures,
or if operating the air conditioning
system, the fans can change to high
speed and an increase in fan noise
might be heard. This is normal and
indicates that the cooling system is
functioning properly. The fans
change to low speed when
additional cooling is no longer
required. Power Steering Fluid
See Engine Compartment Overview
on page 10 ‑ 6 for reservoir location.
When to Check Power Steering
Fluid It is not necessary to regularly
check power steering fluid unless
there is a leak suspected in the
system or an unusual noise is
heard. A fluid loss in this system
could indicate a problem. Have the
system inspected and repaired.
Page 429 of 538
Black plate (59,1)Cadillac Escalade/Escalade ESV Owner Manual - 2012 - 2nd CRC - 11/29/11
Vehicle Care 10-59Reset the Tire Pressure Monitor
System. See Tire Pressure
Monitor Operation on
page 10 ‑ 55 .
Check that all wheel nuts are
properly tightened. See “ Wheel
Nut Torque ” under Capacities
and Specifications on
page 12 ‑ 2 .
{ WARNINGRust or dirt on a wheel, or on the
parts to which it is fastened, can
make wheel nuts become loose
after time. The wheel could come
off and cause an accident. When
changing a wheel, remove any
rust or dirt from places where the
wheel attaches to the vehicle. In
an emergency, a cloth or a paper
towel can be used; however, use
a scraper or wire brush later to
remove all rust or dirt. Lightly coat the center of the
wheel hub with wheel bearing
grease after a wheel change or
tire rotation to prevent corrosion
or rust build-up. Do not get
grease on the flat wheel
mounting surface or on the
wheel nuts or bolts.
When It Is Time for New
Tires Factors, such as maintenance,
temperatures, driving speeds,
vehicle loading, and road conditions
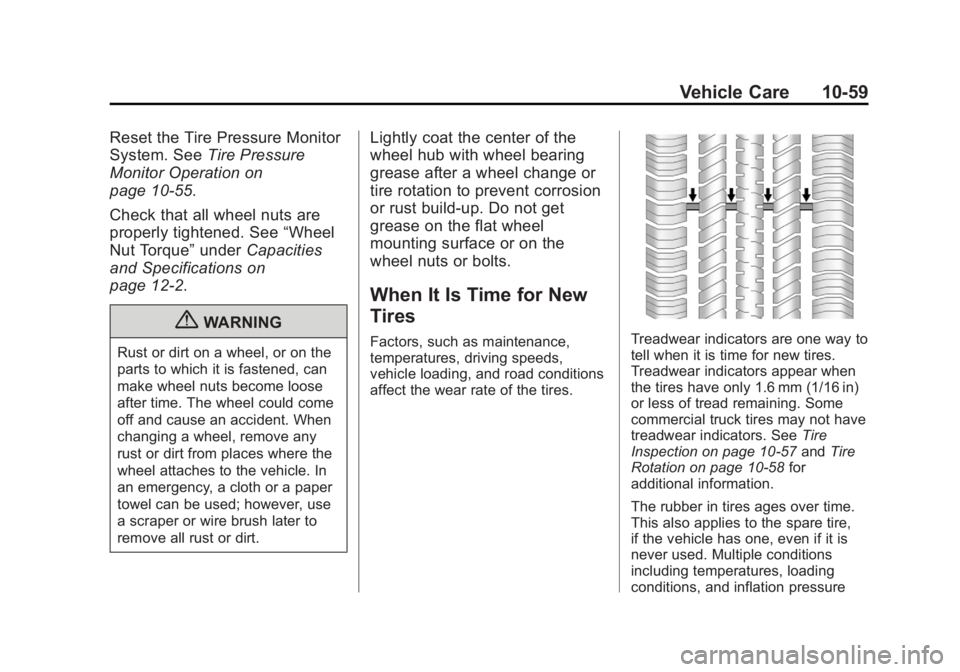
affect the wear rate of the tires. Treadwear indicators are one way to
tell when it is time for new tires.
Treadwear indicators appear when
the tires have only 1.6 mm (1/16 in)
or less of tread remaining. Some
commercial truck tires may not have
treadwear indicators. See Tire
Inspection on page 10 ‑ 57 and Tire
Rotation on page 10 ‑ 58 for
additional information.
The rubber in tires ages over time.
This also applies to the spare tire,
if the vehicle has one, even if it is
never used. Multiple conditions
including temperatures, loading
conditions, and inflation pressure
Page 435 of 538

Black plate (65,1)Cadillac Escalade/Escalade ESV Owner Manual - 2012 - 2nd CRC - 11/29/11
Vehicle Care 10-65
Tire Chains
{ WARNINGDo not use tire chains. There is
not enough clearance. Tire chains
used on a vehicle without the
proper amount of clearance can
cause damage to the brakes,
suspension, or other vehicle
parts. The area damaged by the
tire chains could cause loss of
control and a crash. Use another
type of traction device only if its
manufacturer recommends it for
the vehicle's tire size combination
and road conditions. Follow that
manufacturer's instructions. To
avoid vehicle damage, drive
slowly and readjust or remove the
traction device if it contacts the
vehicle. Do not spin the wheels.
If traction devices are used, install
them on the rear tires. If a Tire Goes Flat It is unusual for a tire to blow out
while driving, especially if the tires
are maintained properly. See Tires
on page 10 ‑ 46 . If air goes out of a
tire, it is much more likely to leak
out slowly. But if there is ever a
blowout, here are a few tips about
what to expect and what to do:
If a front tire fails, the flat tire
creates a drag that pulls the vehicle
toward that side. Take your foot off
the accelerator pedal and grip the
steering wheel firmly. Steer to
maintain lane position, and then
gently brake to a stop, well off the
road, if possible.
A rear blowout, particularly on a
curve, acts much like a skid and
may require the same correction as
used in a skid. Stop pressing the
accelerator pedal and steer to
straighten the vehicle. It may be
very bumpy and noisy. Gently brake
to a stop, well off the road,
if possible. { WARNINGDriving on a flat tire will cause
permanent damage to the tire.
Re-inflating a tire after it has been
driven on while severely
underinflated or flat may cause a
blowout and a serious crash.
Never attempt to re-inflate a tire
that has been driven on while
severely underinflated or flat.
Have your dealer or an authorized
tire service center repair or
replace the flat tire as soon as
possible.
Page 443 of 538

Black plate (73,1)Cadillac Escalade/Escalade ESV Owner Manual - 2012 - 2nd CRC - 11/29/11
Vehicle Care 10-73
4. Turn the tire sealant canister (B)
so the inflator filling hose is
aligned with the slot in the
compressor.
5. Lift the tire sealant canister (B)
from the compressor and
replace with a new sealant
canister. See your dealer for
more information. To install a new sealant canister:
1. Align the sealant/air hose (G)
with the slot in the air
compressor.
2. Push the tire sealant canister (B)
down and turn it clockwise.
3. Wrap the sealant/air hose (G)
around the air compressor
channel to stow it in its original
location.
4. Push the air only hose (F) onto
the sealant canister inlet and
push the lever down. Storing the Tire Sealant
and Compressor Kit The tire sealant and compressor kit
is located under the storage tray on
the driver side trim panel (over the
rear wheelhouse).
To access the tire sealant and
compressor kit:
1. Remove the tray by pulling up
on the finger depression to
access the tire sealant and
compressor kit.
Page 445 of 538
Black plate (75,1)Cadillac Escalade/Escalade ESV Owner Manual - 2012 - 2nd CRC - 11/29/11
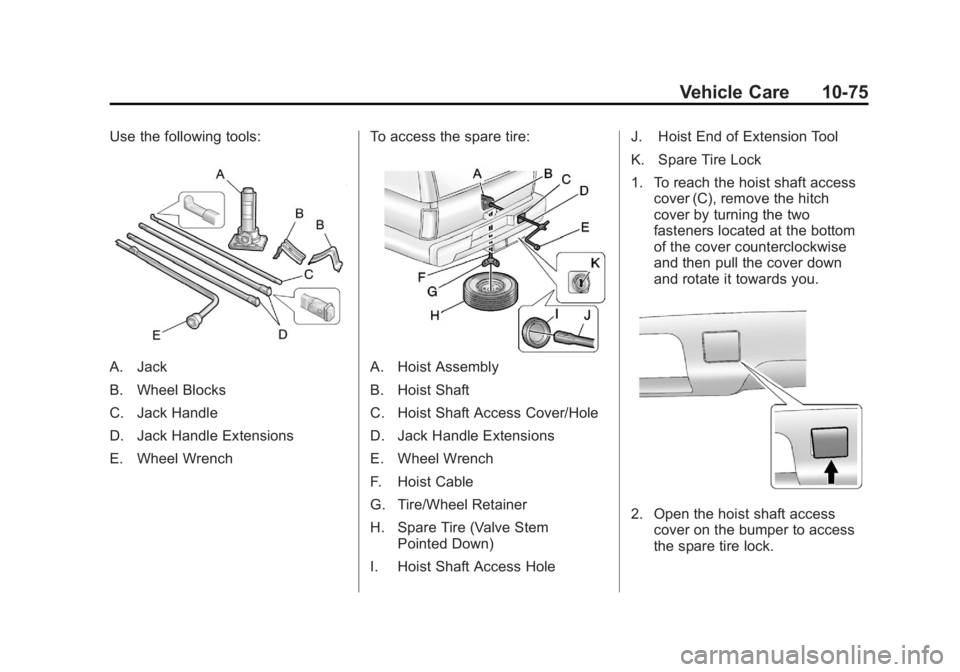
Vehicle Care 10-75Use the following tools:
A. Jack
B. Wheel Blocks
C. Jack Handle
D. Jack Handle Extensions
E. Wheel Wrench To access the spare tire:
A. Hoist Assembly
B. Hoist Shaft
C. Hoist Shaft Access Cover/Hole
D. Jack Handle Extensions
E. Wheel Wrench
F. Hoist Cable
G. Tire/Wheel Retainer
H. Spare Tire (Valve Stem
Pointed Down)
I. Hoist Shaft Access Hole J. Hoist End of Extension Tool
K. Spare Tire Lock
1. To reach the hoist shaft access
cover (C), remove the hitch
cover by turning the two
fasteners located at the bottom
of the cover counterclockwise
and then pull the cover down
and rotate it towards you.
2. Open the hoist shaft access
cover on the bumper to access
the spare tire lock.
Page 447 of 538
Black plate (77,1)Cadillac Escalade/Escalade ESV Owner Manual - 2012 - 2nd CRC - 11/29/11
Vehicle Care 10-77
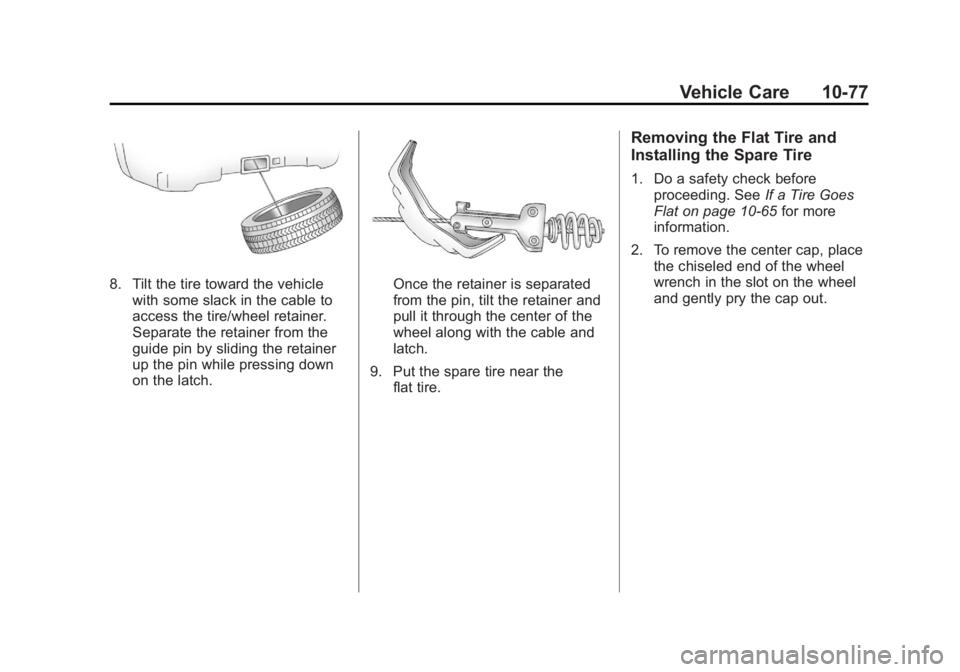
8. Tilt the tire toward the vehicle
with some slack in the cable to
access the tire/wheel retainer.
Separate the retainer from the
guide pin by sliding the retainer
up the pin while pressing down
on the latch. Once the retainer is separated
from the pin, tilt the retainer and
pull it through the center of the
wheel along with the cable and
latch.
9. Put the spare tire near the
flat tire. Removing the Flat Tire and
Installing the Spare Tire 1. Do a safety check before
proceeding. See If a Tire Goes
Flat on page 10 ‑ 65 for more
information.
2. To remove the center cap, place
the chiseled end of the wheel
wrench in the slot on the wheel
and gently pry the cap out.
Page 450 of 538
Black plate (80,1)Cadillac Escalade/Escalade ESV Owner Manual - 2012 - 2nd CRC - 11/29/11
10-80 Vehicle Care
{ WARNINGRust or dirt on a wheel, or on the
parts to which it is fastened, can
make wheel nuts become loose
after time. The wheel could come
off and cause an accident. When
changing a wheel, remove any
rust or dirt from places where the
wheel attaches to the vehicle. In
an emergency, a cloth or a paper
towel can be used; however, use
a scraper or wire brush later to
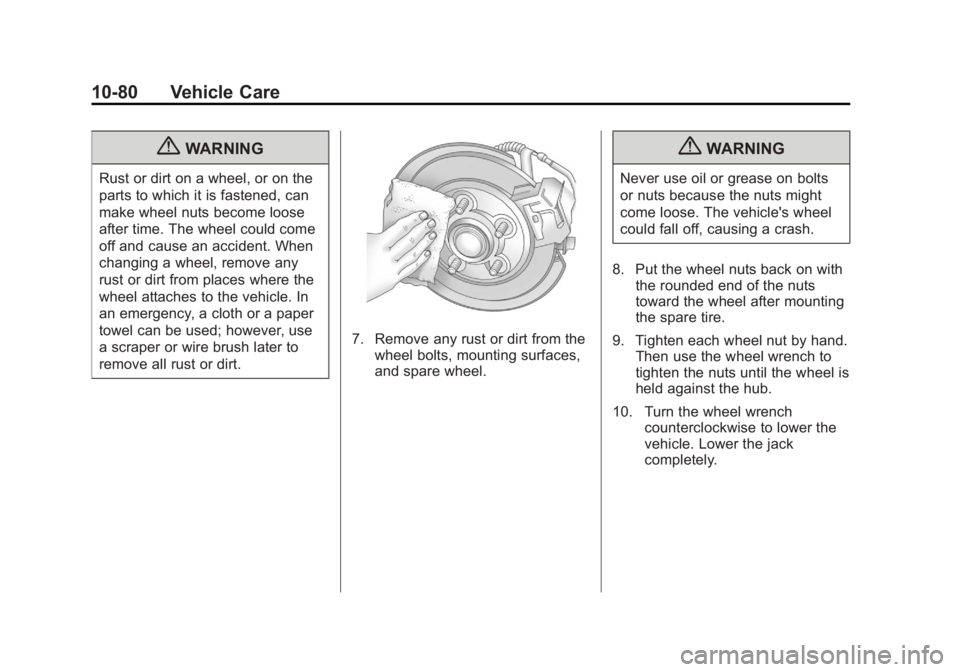
remove all rust or dirt. 7. Remove any rust or dirt from the
wheel bolts, mounting surfaces,
and spare wheel.
{ WARNINGNever use oil or grease on bolts
or nuts because the nuts might
come loose. The vehicle's wheel
could fall off, causing a crash.
8. Put the wheel nuts back on with
the rounded end of the nuts
toward the wheel after mounting
the spare tire.
9. Tighten each wheel nut by hand.
Then use the wheel wrench to
tighten the nuts until the wheel is
held against the hub.
10. Turn the wheel wrench
counterclockwise to lower the
vehicle. Lower the jack
completely.