CADILLAC ESCALADE EXT 2009 3.G Owners Manual
Manufacturer: CADILLAC, Model Year: 2009, Model line: ESCALADE EXT, Model: CADILLAC ESCALADE EXT 2009 3.GPages: 546, PDF Size: 4.43 MB
Page 181 of 546

The accessory power outlets are powered, even when
the ignition is in LOCK/OFF. Continuing to use
power outlets while the ignition is in LOCK/OFF may
cause the vehicle’s battery to run down.
Notice:Adding any electrical equipment to the
vehicle can damage it or keep other components
from working as they should. The repairs would not
be covered by the vehicle warranty. Do not use
equipment exceeding maximum amperage rating of
20 amperes. Check with your dealer/retailer before
adding electrical equipment.
When adding electrical equipment, be sure to follow the
proper installation instructions included with the
electrical equipment you install.
Notice:Improper use of the power outlet can cause
damage not covered by the warranty. Do not hang
any type of accessory or accessory bracket from the
plug because the power outlets are designed for
accessory power plugs only.Ashtray(s) and Cigarette Lighter
The front ashtray and cigarette lighter are located in the
center console near the cupholders, if the vehicle has
them. Press on the access door to open it and use
the ashtray and lighter.
Notice:If papers, pins, or other �ammable items
are put in the ashtray, hot cigarettes or other
smoking materials could ignite them and possibly
damage the vehicle. Never put �ammable items
in the ashtray.
To remove the ashtray, pull it from the center console.
Slide it back in and push down to be sure it is secure.
To use the cigarette lighter, push it in all the way, and let
go. When it is ready, it will pop back out by itself.
Notice:Holding a cigarette lighter in while it is
heating does not let the lighter back away from the
heating element when it is hot. Damage from
overheating can occur to the lighter or heating
element, or a fuse could be blown. Do not hold a
cigarette lighter in while it is heating.
3-21
Page 182 of 546

Analog Clock
The analog clock is located on the instrument panel
above the radio. The clock is not connected with
any other vehicle system and runs by itself. To adjust
the clock:
1. The adjustment button is located in the lower left
corner of the clock.
2. Push and hold the adjustment button to advance
the clock hands. Holding the button down will
cause the clock to advance faster. Release the
button before reaching the desired time.
3. Push and release the button to increase the time
by one minute increments until the desired time is
reached.
Climate Controls
Dual Automatic Climate Control
System
The heating, cooling, and ventilation in the vehicle can
be controlled with this system. The vehicle also has
a �ow-through ventilation system described later in this
section.A. Driver and Passenger
Temperature Controls
B. AUTO
C. Recirculation
D. Air Conditioning
E. Heated and
Cooled SeatsF. Fan Control
G. Defrost
H. Rear Window
Defogger
I. Air Delivery
Mode Control
O(Off):Press the driver side temperature knob to turn
the climate control system off. Outside air still enters the
vehicle, and is directed to the �oor. This direction can be
changed by pressing the mode button. The temperature
can also be adjusted using either temperature knob.Climate Control with Heated and Cooled Seats
shown
3-22
Page 183 of 546

Press the up or down arrows on the fan switch, the
defrost button, the AUTO button, driver side temperature
knob, or the air conditioning button to turn the system on
when it is off.
Driver and Passenger Side
Temperature Knob
The driver and passenger side temperature knobs are
used to adjust the temperature of the air coming through
the system on the driver or passenger’s side of the
vehicle. The temperature can be adjusted even if the
system is turned off. This is possible since outside
air always �ows through the system as the vehicle is
moving forward unless it is set to recirculation
mode. See “Recirculation” later in this section.
Turn the knob clockwise or counterclockwise to increase
or decrease the cabin temperature. The display will
show the temperature setting increasing or decreasing.
Set the passenger’s temperature setting to match
the driver temperature setting by pressing the passenger
power knob.
Automatic Operation
AUTO (Automatic):When automatic operation is
active the system will control the inside temperature, the
air delivery, and the fan speed.
Use the steps below to place the entire system in
automatic mode:
1. Press the AUTO button.
When AUTO is selected, the display will change to
show the current temperature(s) and AUTO will
appear. The current delivery mode and fan
speed will also be displayed for approximately
�ve seconds.
When AUTO is selected, the air conditioning
operation and air inlet will be automatically
controlled. The air conditioning compressor will
run when the outside temperature is over about
40°F (4°C). The air inlet will normally be set
to outside air. If it is hot outside, the air inlet may
automatically switch to recirculate inside air to help
quickly cool down the vehicle. The light on the
button comes on in recirculation.
3-23
Page 184 of 546

2. Set the driver’s and passenger’s temperature.
To �nd your comfort setting, start with a 74°F (23°C)
temperature setting and allow about 20 minutes
for the system to regulate. Use the driver or
passenger temperature buttons to adjust the
temperature setting as necessary. If a temperature
setting of 60°F (15°C) is chosen, the system
remains at the maximum cooling setting. If a
temperature setting of 90°F (32°C) is chosen, the
system remains at the maximum heat setting.
Choosing either maximum setting will not cause the
vehicle to heat or cool any faster.
Do not to cover the sensor located on the top of the
instrument panel near the windshield. This sensor
regulates air temperature based on sun load and also
turns on the headlamps.
To avoid blowing cold air in cold weather, the system
will delay turning on the fan until warm air is available.
The length of delay depends on the engine coolant
temperature. Pressing the fan switch will override this
delay and change the fan to a selected speed.Manual Operation
You may manually adjust the air delivery mode or fan
speed.
y9z(Fan Control): Press the up or down arrows to
increase or decrease the fan speed.
Pressing this button when the system is off will turn the
system on.
Pressing either arrow while using automatic operation
will place the fan in manual operation. The fan
setting will display and the AUTO light will turn off. The
air delivery will remain in automatic operation.
N(Air Delivery Mode Control):Press to change the
direction of the air�ow in the vehicle. Repeatedly
press the button until the desired mode appears on the
display.
When the system is turned off, the display goes blank
after displaying the current status of the system.
H(Vent):Air is directed to the instrument panel
outlets.
3-24
Page 185 of 546

)(Bi-Level):Air is divided between the instrument
panel and �oor outlets. Some air is directed towards the
windshield and side window outlets. Cooler air is
directed to the upper vents and warmer air to the �oor
vents.
6(Floor):Air is directed to the �oor outlets, with
some to the windshield, side window outlets, and
second row �oor outlets. In this mode, the system
automatically selects outside air.
-(Defog):This mode clears the windows of fog or
moisture. Air is directed to the windshield, �oor outlets,
and side window vents. In this mode, the system
turns off recirculation and runs the air conditioning
compressor unless the outside temperature is close to
freezing. The recirculation mode cannot be selected
while in the defog mode.
0(Defrost):This mode removes fog or frost from the
windshield more quickly. Air is directed to the windshield
and side window vents, with some directed to the
�oor vents. In this mode, the system automatically forces
outside air into the vehicle and runs the air conditioning
compressor unless the outside temperature is close
to freezing. The recirculation mode cannot be selected
while in the defrost mode.
Do not drive the vehicle until all the windows are clear.
#(Air Conditioning):Press to turn the air
conditioning (A/C) compressor on and off. An indicator
light comes on to show that the air conditioning
is on.
Pressing this button when the outside temperature is
too cool for air conditioning will make the air conditioning
indicator �ash three times and then turn off indicating
the air conditioning mode is not available. If the air
conditioning is on and the outside temperature drops
below a temperature which is too cool for air
conditioning to be effective, the air conditioning light
turns off to show that the air conditioning mode has
been canceled.
On hot days, open the windows long enough to let hot
inside air escape. This helps to reduce the time it
takes for the vehicle to cool down. It also helps the
system to operate more efficiently.
The air conditioning system removes moisture from the
air, so a small amount of water might drip under the
vehicle while idling or after turning off the engine.
This is normal.
@(Recirculation):Press to turn the recirculation
mode on or off. An indicator light comes on to show that
the recirculation is on.
3-25
Page 186 of 546

This mode recirculates and helps to quickly cool the air
inside the vehicle. It can be used to help prevent
outside air and odors from entering the vehicle.
The recirculation mode cannot be used with �oor, defog,
or defrost modes. If recirculation is selected with one
of those modes, the indicator light �ashes three
times and then turns off. The air conditioning
compressor also comes on when this mode is activated.
While in recirculation mode the windows may fog
when the weather is cold and damp. To clear the fog,
select either the defog or defrost mode and increase the
fan speed.
The recirculation mode can also be turned off by turning
off the ignition.
Rear Window Defogger
The rear window defogger uses a warming grid to
remove fog from the rear window.
<(Rear Window Defogger):Press to turn the rear
window defogger on or off. It automatically turns off after
it has been activated. The defogger can also be
turned off by turning off the engine. Do not drive the
vehicle until all the windows are clear.Notice:Do not use a razor blade or sharp object to
clear the inside rear window. Do not adhere
anything to the defogger grid lines in the rear glass.
These actions may damage the rear defogger.
Repairs would not be covered by your warranty.
Heated Mirrors:For vehicles with heated outside
rearview mirrors, the mirrors heat to help clear fog or
frost from the surface of the mirror when the rear window
defog button is pressed. SeeOutside Heated Mirrors
on page 2-49.
Heated or Cooled Seats:For vehicles with heated
seats or heated and cooled seats, seeHeated Seats on
page 1-5orHeated and Cooled Seats on page 1-6.
Outlet Adjustment
Your vehicle has air outlets located in the center and on
the side of the instrument panel that allow you to
adjust the direction and amount of air�ow inside the
vehicle. There are also air outlets on the rear of
the center console for rear seat passenger use. Move
the louvers up or down. Use the rotary knob next
to or underneath the outlet to close the louvers. For the
most efficient air�ow and temperature control, keep
the outlet in the fully opened position.
3-26
Page 187 of 546

Operation Tips
Keep the hood and front air inlets free of ice, snow,
or any other obstruction, such as leaves. The
heater and defroster will work far better, reducing
the chance of fogging the inside of your windows.
Keep the air path under the front seats clear
of objects. This helps air to circulate throughout your
vehicle.
Adding outside equipment to the front of your
vehicle, such as hood-air de�ectors, etc., may affect
the performance of the heating and air conditioning
system. Check with your dealer before adding
equipment to the outside of your vehicle.
Warning Lights, Gages, and
Indicators
Warning lights and gages can signal that something is
wrong before it becomes serious enough to cause
an expensive repair or replacement. Paying attention to
the warning lights and gages could prevent injury.
Warning lights come on when there may be or is a
problem with one of the vehicle’s functions. Some
warning lights come on brie�y when the engine is started
to indicate they are working.
Gages can indicate when there may be or is a problem
with one of the vehicle’s functions. Often gages and
warning lights work together to indicate a problem with
the vehicle.
When one of the warning lights comes on and stays on
while driving, or when one of the gages shows there
may be a problem, check the section that explains what
to do. Follow this manual’s advice. Waiting to do
repairs can be costly and even dangerous.
3-27
Page 188 of 546

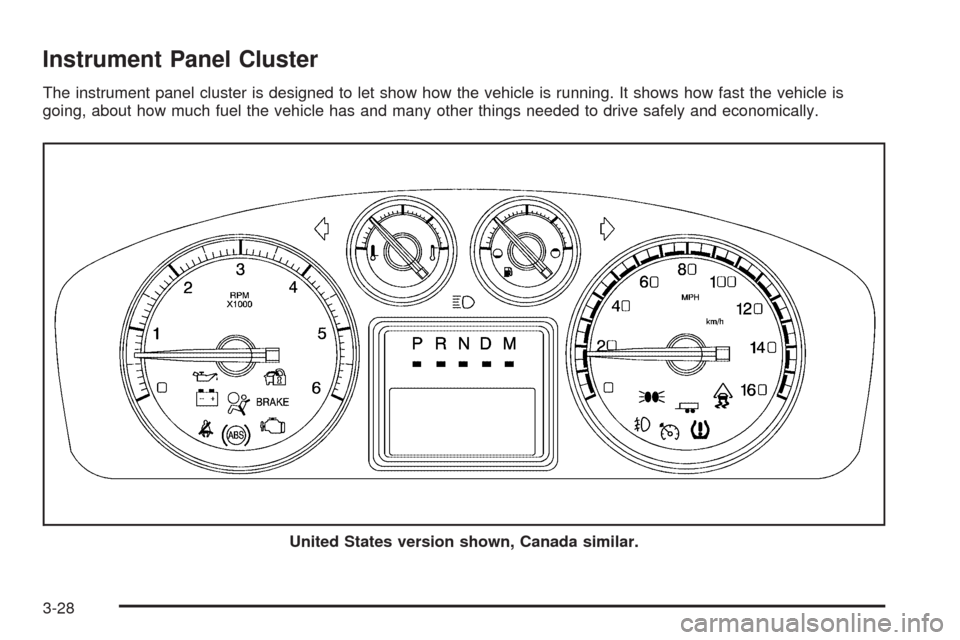
Instrument Panel Cluster
The instrument panel cluster is designed to let show how the vehicle is running. It shows how fast the vehicle is
going, about how much fuel the vehicle has and many other things needed to drive safely and economically.
United States version shown, Canada similar.
3-28
Page 189 of 546

Speedometer and Odometer
The speedometer shows the vehicle’s speed in both
miles per hour (mph) and kilometers per hour (km/h).
The odometer works together with the Driver Information
Center (DIC). Press the Trip/Fuel button on the
instrument panel cluster to check the odometer mileage
while the vehicle is not running. See “Odometer”
underDIC Operation and Displays on page 3-42for
more information.
If the vehicle ever needs a new odometer installed, the
new one will be set to the correct mileage total of
the old odometer.
Trip Odometer
The trip odometer can show how far the vehicle has
been driven since the trip odometer was last set to zero.
For more information see “Trip Odometer” underDIC
Operation and Displays on page 3-42.
Tachometer
The tachometer displays the engine speed in revolutions
per minute (rpm).
Safety Belt Reminders
Safety Belt Reminder Light
When the engine is started, a chime sounds for
several seconds to remind a driver to fasten the safety
belt, unless the driver safety belt is already buckled.
The safety belt light comes
on and stays on for
several seconds, then
�ashes for several more.
This chime and light are repeated if the driver remains
unbuckled and the vehicle is in motion. If the driver
safety belt is already buckled, neither the chime nor the
light comes on.
3-29
Page 190 of 546

Passenger Safety Belt Reminder Light
Several seconds after the engine is started, a chime
sounds for several seconds to remind the front
passenger to buckle their safety belt. This only occurs if
the passenger airbag is enabled. SeePassenger
Sensing System on page 1-61for more information. The
passenger safety belt light, located on the instrument
panel, comes on and stays on for several seconds and
then �ashes for several more.
This chime and light are
repeated if the passenger
remains unbuckled and
the vehicle is in motion.
If the passenger safety belt is buckled, neither the
chime nor the light comes on.
The front passenger safety belt warning light and chime
may turn on if an object is put on the seat such as a
briefcase, handbag, grocery bag, laptop or other
electronic device. To turn off the warning light and or
chime, remove the object from the seat or buckle
the safety belt.
Airbag Readiness Light
The system checks the airbag’s electrical system for
possible malfunctions. If the light stays on it indicates
there is an electrical problem. The system check
includes the airbag sensor, the pretensioners, the airbag
modules, the wiring and the crash sensing and
diagnostic module. For more information on the airbag
system, seeAirbag System on page 1-53.
The airbag readiness light
�ashes for a few seconds
when the engine is
started. If the light does
not come on then, have it
�xed immediately.
3-30