buttons CADILLAC ESCALADE EXT 2010 3.G User Guide
[x] Cancel search | Manufacturer: CADILLAC, Model Year: 2010, Model line: ESCALADE EXT, Model: CADILLAC ESCALADE EXT 2010 3.GPages: 580, PDF Size: 6.23 MB
Page 60 of 580
Shoulder Belt Height Adjuster
The vehicle has a shoulder belt height adjuster for the
driver and right front passenger positions.
Adjust the height so that the shoulder portion of the belt
is centered on the shoulder. The belt should be away
from the face and neck, but not falling off the shoulder.
Improper shoulder belt height adjustment could reduce
the effectiveness of the safety belt in a crash.
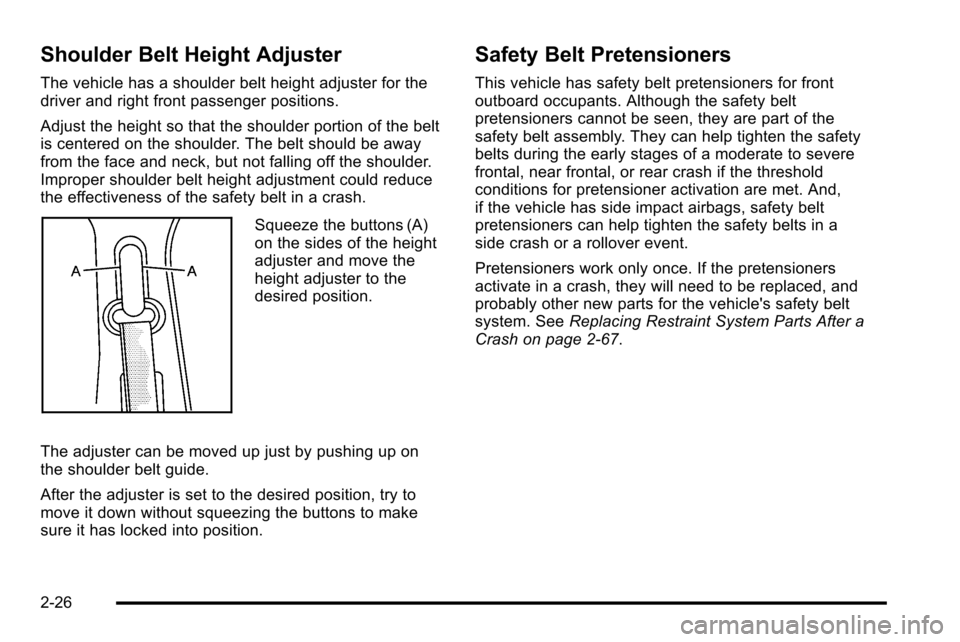
Squeeze the buttons (A)
on the sides of the height
adjuster and move the
height adjuster to the
desired position.
The adjuster can be moved up just by pushing up on
the shoulder belt guide.
After the adjuster is set to the desired position, try to
move it down without squeezing the buttons to make
sure it has locked into position.
Safety Belt Pretensioners
This vehicle has safety belt pretensioners for front
outboard occupants. Although the safety belt
pretensioners cannot be seen, they are part of the
safety belt assembly. They can help tighten the safety
belts during the early stages of a moderate to severe
frontal, near frontal, or rear crash if the threshold
conditions for pretensioner activation are met. And,
if the vehicle has side impact airbags, safety belt
pretensioners can help tighten the safety belts in a
side crash or a rollover event.
Pretensioners work only once. If the pretensioners
activate in a crash, they will need to be replaced, and
probably other new parts for the vehicle's safety belt
system. See Replacing Restraint System Parts After a
Crash on page 2‑67.
2-26
Page 110 of 580
3. If it is the first remote start since the vehicle hasbeen driven, repeat these steps, while the engine
is still running, to extend the engine running time
by 10 minutes. Remote start can be extended
one time.
After entering the vehicle during a remote start, insert
and turn the key to ON/RUN to drive the vehicle.
To manually shut off a remote start, do any of the
following:
.Aim the RKE transmitter at the vehicle and press
the remote start button until the parking lamps
turn off.
.Turn on the hazard warning flashers.
.Turn the ignition switch on and then off.
The vehicle can be remote started two separate times
between driving sequences. The engine will run for
10 minutes after each remote start.
Or, you can extend the engine run time by another
10 minutes within the first 10 minute remote start time
frame, and before the engine stops.
For example, if the lock button and then the remote start
buttons are pressed again after the vehicle has been
running for five minutes, 10 minutes are added, allowing
the engine to run for 15 minutes. The additional ten minutes are considered a second
remote vehicle start.
After your vehicles engine has been started two times
using the remote vehicle start button, or a single remote
start with one time extension, the vehicle must be
started with the key.
After the key is removed from the ignition, the vehicle
can be remote started again.
The vehicle cannot be remote started if the key is in
the ignition, the hood is not closed, or if there is an
emission control system malfunction and the check
engine light comes on.
Also, the engine will turn off during a remote vehicle
start if the coolant temperature gets too high or if the oil
pressure gets low.
Vehicles that have the remote vehicle start feature are
shipped from the factory with the remote vehicle start
system enabled. The system may be enabled or
disabled through the DIC. See
“REMOTE START”
under DIC Vehicle Customization
on page 4‑56for
additional information.
3-8
Page 153 of 580
The delay that is received after shifting out of
R (Reverse) is approximately 10 seconds. The delay
can be cancelled by performing one of the following:
.Pressing a hard key on the navigation system.
.Shifting in to P (Park).
.Reach a vehicle speed of 7 mph (11 km/h).
There is a message on the rear vision camera screen
that states “Check Surroundings for Safety”.
Adjusting the Brightness and Contrast of
the Screen
To adjust the brightness and contrast of the screen,
press the CONFIG hard key while the rear vision
camera image is on the display. Any adjustments made
will only affect the rear vision camera screen.
](Brightness) : Touch the + (plus) or –(minus)
screen buttons to increase or decrease the brightness
of the screen.
_(Contrast) : Touch the + (plus) or –(minus) screen
buttons to increase or decrease the contrast of the
screen.
Symbols
The navigation system may have a feature that lets the
driver view symbols on the navigation screen while
using the rear vision camera. The Ultrasonic Rear Park
Assist (URPA) system must not be disabled to use the caution symbols. If URPA has been disabled and the
symbols have been turned on, the Rear Parking Assist
Symbols Unavailable error message may display. See
Ultrasonic Rear Parking Assist (URPA) on page 3‑48.
The symbols appear when an object has been detected
by the URPA system. The symbol may cover the object
when viewing the navigation screen.
To turn the symbols on or off:
1. Make sure that URPA has not been disabled.
2. Shift into P (Park).
3. Press the CONFIG hard key to enter the configure menu options, then press the CONFIG hard key
repeatedly until Display is selected or touch the
Display screen button.
4. Select the Rear Camera Options screen button. The Rear Camera Options screen will display.
5. Touch the Symbols screen button. The screen button will be highlighted when on.
Rear Vision Camera Error Messages
Service Rear Vision Camera System : This message
can display when the system is not receiving
information it requires from other vehicle systems.
Rear Vision Camera System Unavailable : Displays
when the system is not receiving information it requires
from other vehicle systems.
3-51
Page 156 of 580
Universal Home Remote
System
SeeRadio Frequency Statementon page 9‑20for information regarding Part 15 of the Federal
Communications Commission (FCC) Rules and
RSS-210/211 of Industry and Science Canada.
Universal Home Remote System
Operation (With Three Round LED)
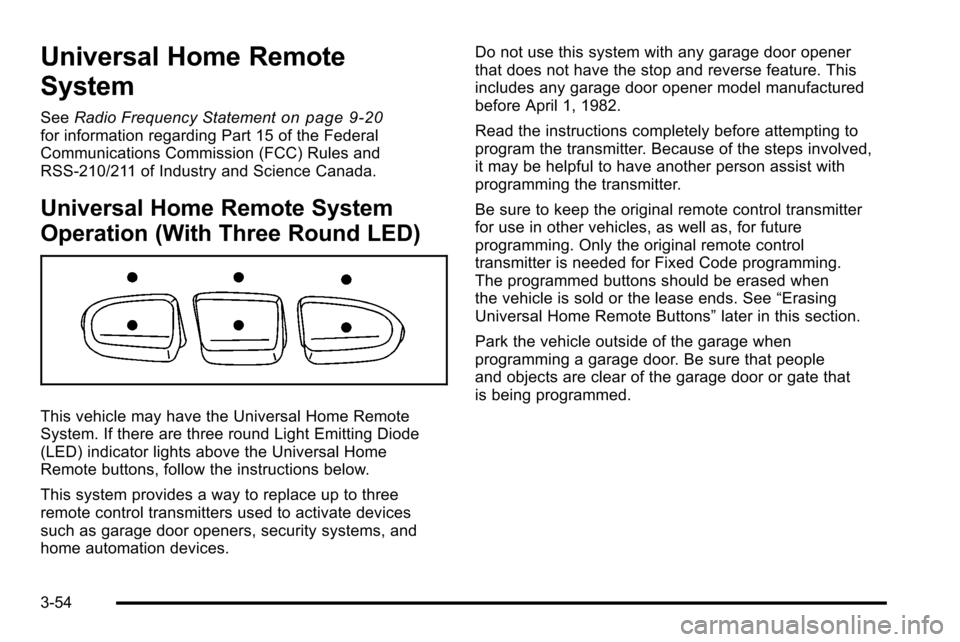
This vehicle may have the Universal Home Remote
System. If there are three round Light Emitting Diode
(LED) indicator lights above the Universal Home
Remote buttons, follow the instructions below.
This system provides a way to replace up to three
remote control transmitters used to activate devices
such as garage door openers, security systems, and
home automation devices. Do not use this system with any garage door opener
that does not have the stop and reverse feature. This
includes any garage door opener model manufactured
before April 1, 1982.
Read the instructions completely before attempting to
program the transmitter. Because of the steps involved,
it may be helpful to have another person assist with
programming the transmitter.
Be sure to keep the original remote control transmitter
for use in other vehicles, as well as, for future
programming. Only the original remote control
transmitter is needed for Fixed Code programming.
The programmed buttons should be erased when
the vehicle is sold or the lease ends. See
“Erasing
Universal Home Remote Buttons” later in this section.
Park the vehicle outside of the garage when
programming a garage door. Be sure that people
and objects are clear of the garage door or gate that
is being programmed.
3-54
Page 157 of 580
Programming Universal Home
Remote—Rolling Code
For questions or help programming the Universal
Home Remote System, call 1-866-572-2728 or go to
learcar2u.com.
Most garage door openers sold after 1996 are Rolling
Code units.
Programming a garage door opener involves
time-sensitive actions, so read the entire procedure
before starting. Otherwise, the device will time out and
the procedure will have to be repeated.
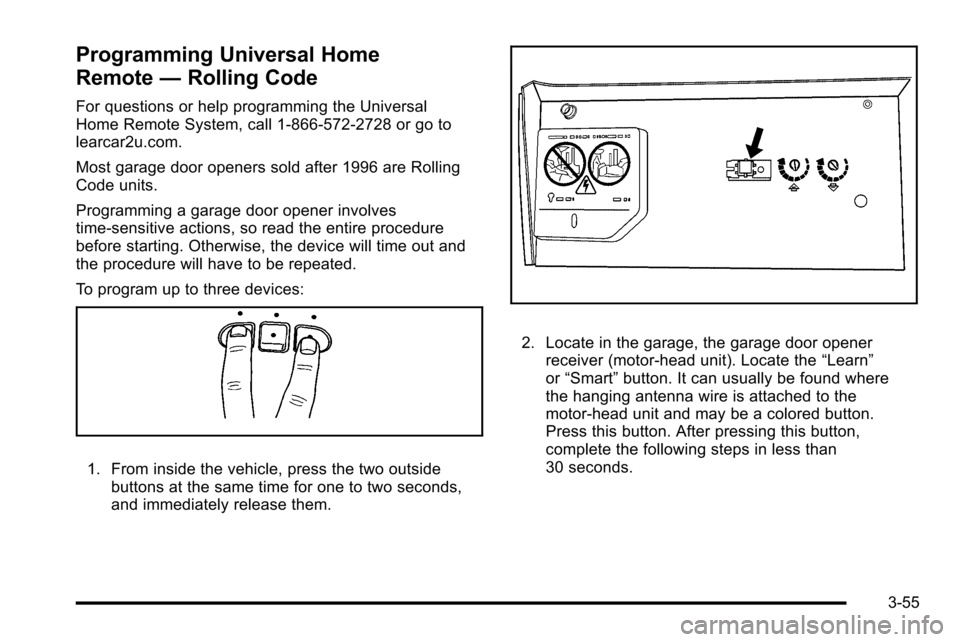
To program up to three devices:
1. From inside the vehicle, press the two outside
buttons at the same time for one to two seconds,
and immediately release them.
2. Locate in the garage, the garage door openerreceiver (motor-head unit). Locate the “Learn”
or “Smart” button. It can usually be found where
the hanging antenna wire is attached to the
motor-head unit and may be a colored button.
Press this button. After pressing this button,
complete the following steps in less than
30 seconds.
3-55
Page 160 of 580

Example of Eight Dip Switches with Three PositionsThe panel of switches might not appear exactly as
they do in the examples above, but they should be
similar.
The switch positions on the hand-held transmitter
could be labeled, as follows:
.A switch in the up position could be labeled as
“Up,” “+,” or“On.”
.A switch in the down position could be labeled
as “Down,” “−,” or“Off.”
.A switch in the middle position could be labeled
as “Middle,” “0,” or“Neutral.” 2. Write down the eight to 12 switch settings from left
to right as follows:
.When a switch is in the up position, write “Left.”
.When a switch is in the down position, write
“Right.”
.If a switch is set between the up and down
position, write“Middle.”
The switch settings written down in Step 2 now
become the button strokes to be entered into
the Universal Home Remote in Step 4. Be sure
to enter the switch settings written down in
Step 2, in order from left to right, into the
Universal Home Remote, when completing
Step 4.
3. From inside your vehicle, first firmly press all three buttons at the same time for about three seconds.
Release the buttons to put the Universal Home
Remote into programming mode.
3-58
Page 161 of 580
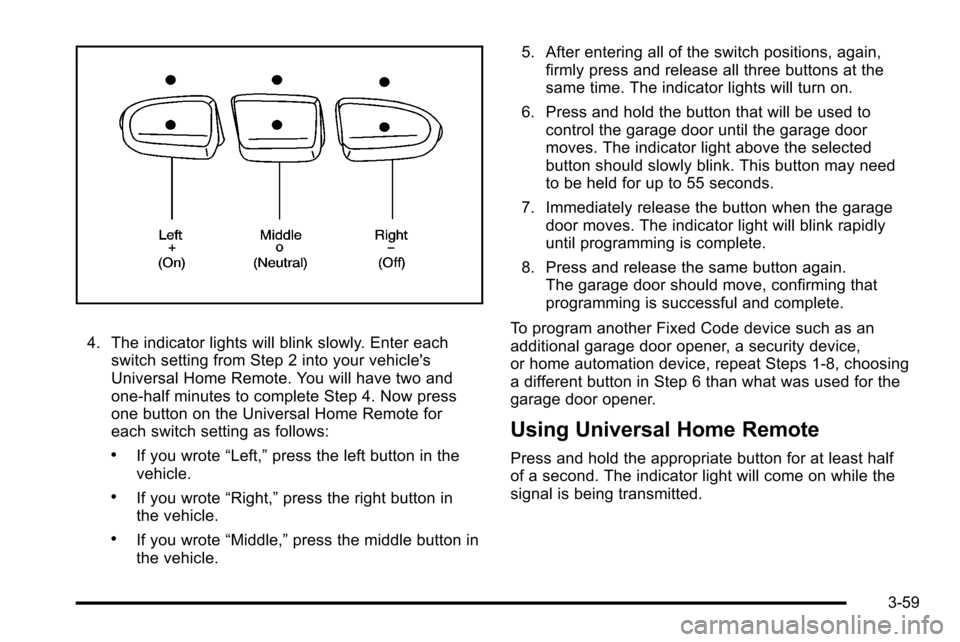
4. The indicator lights will blink slowly. Enter eachswitch setting from Step 2 into your vehicle's
Universal Home Remote. You will have two and
one-half minutes to complete Step 4. Now press
one button on the Universal Home Remote for
each switch setting as follows:
.If you wrote “Left,”press the left button in the
vehicle.
.If you wrote “Right,”press the right button in
the vehicle.
.If you wrote “Middle,”press the middle button in
the vehicle. 5. After entering all of the switch positions, again,
firmly press and release all three buttons at the
same time. The indicator lights will turn on.
6. Press and hold the button that will be used to control the garage door until the garage door
moves. The indicator light above the selected
button should slowly blink. This button may need
to be held for up to 55 seconds.
7. Immediately release the button when the garage door moves. The indicator light will blink rapidly
until programming is complete.
8. Press and release the same button again. The garage door should move, confirming that
programming is successful and complete.
To program another Fixed Code device such as an
additional garage door opener, a security device,
or home automation device, repeat Steps 1-8, choosing
a different button in Step 6 than what was used for the
garage door opener.
Using Universal Home Remote
Press and hold the appropriate button for at least half
of a second. The indicator light will come on while the
signal is being transmitted.
3-59
Page 162 of 580

Reprogramming Universal Home
Remote Buttons
Any of the three buttons can be reprogrammed by
repeating the instructions.
Erasing Universal Home Remote
Buttons
The programmed buttons should be erased when the
vehicle is sold or the lease ends.
To erase either Rolling Code or Fixed Code on the
Universal Home Remote device:1. Press and hold the two outside buttons at the same time for approximately 20 seconds, until the
indicator lights, located directly above the buttons,
begin to blink rapidly.
2. Once the indicator lights begin to blink, release both buttons. The codes from all buttons will be
erased.
For help or information on the Universal Home Remote
System, call the customer assistance phone number
under Customer Assistance Offices on page 9‑6.
Storage Areas
Glove Box
Lift up on the glove box lever to open it.
Cupholders
Cupholders are located in the center console for the
front passengers and on the back of the center console
for the rear passengers.
Press down and release the access door to use the
front cupholders. Push the door back down to close it.
Pull down on the door located on the back of the
console to use the rear cupholders.
Push down and then back to remove the front cupholder
to remove it for cleaning.
Instrument Panel Storage
For vehicles with a front closed storage area, located on
the instrument panel above the compact disc changer,
open it by pressing the bottom of the lid. Press down on
the lid to close the storage area.
3-60
Page 188 of 580

Cruise Control shown withHeated Steering WheelButton (If Equipped)
The cruise control buttons are located on left side of the
steering wheel.
T(On/Off): Turns the system on or off. The indicator
light is on when cruise control is on and turns off when
cruise control is off.
+ RES (Resume/Accelerate) : Press to make the
vehicle accelerate or resume to a previously set speed.
SET −(Set/Coast) : Press to set the speed or make the
vehicle decelerate.
[(Cancel): Press to cancel cruise control without
erasing the set speed from memory.
Setting Cruise Control
Cruise control will not work if the parking brake is set,
or if the master cylinder brake fluid level is low.
The cruise control light on the instrument panel cluster
comes on after the cruise control has been set to the
desired speed.
{WARNING:
If you leave your cruise control on when you are
not using cruise, you might hit a button and go
into cruise when you do not want to. You could be
startled and even lose control. Keep the cruise
control switch off until you want to use cruise
control.
1. Press the
Ibutton.
2. Get up to the desired speed.
3. Press the SET− button located on the steering
wheel and release it.
4. Take your foot off the accelerator.
4-8
Page 202 of 580
2. Set the driver's and passenger's temperature.To find your comfort setting, start with a 23°C
(74°F) temperature setting and allow about
20 minutes for the system to regulate. Use the
driver or passenger temperature buttons to
adjust the temperature setting as necessary. If a
temperature setting of 15°C (60°F) is chosen, the
system remains at the maximum cooling setting.
If a temperature setting of 32°C (90°F) is chosen,
the system remains at the maximum heat setting.
Choosing either maximum setting will not cause
the vehicle to heat or cool any faster.
Do not to cover the sensor located on the top of the
instrument panel near the windshield. This sensor
regulates air temperature based on sun load and also
turns on the headlamps.
To avoid blowing cold air in cold weather, the system
will delay turning on the fan until warm air is available.
The length of delay depends on the engine coolant
temperature. Pressing the fan switch will override this
delay and change the fan to a selected speed.Manual Operation
You may manually adjust the air delivery mode or fan
speed.
y 9 z(Fan Control): Press the up or down arrows
to increase or decrease the fan speed.
Pressing this button when the system is off will turn the
system on.
Pressing either arrow while using automatic operation
will place the fan in manual operation. The fan setting
will display and the AUTO light will turn off. The air
delivery will remain in automatic operation.
N(Air Delivery Mode Control): Press to change the
direction of the airflow in the vehicle. Repeatedly press
the button until the desired mode appears on the
display.
When the system is turned off, the display goes blank
after displaying the current status of the system.
H(Vent): Air is directed to the instrument panel
outlets.
)(Bi-Level): Air is divided between the instrument
panel and floor outlets. Some air is directed towards the
windshield and side window outlets. Cooler air is
directed to the upper vents and warmer air to the floor
vents.
4-22