tow CADILLAC ESCALADE EXT 2010 3.G User Guide
[x] Cancel search | Manufacturer: CADILLAC, Model Year: 2010, Model line: ESCALADE EXT, Model: CADILLAC ESCALADE EXT 2010 3.GPages: 580, PDF Size: 6.23 MB
Page 92 of 580

Rollover capable roof-rail airbags are designed to
help contain the head and chest of occupants in the
outboard seating positions in the first and second rows.
The rollover capable roof-rail airbags are designed to
help reduce the risk of full or partial ejection in rollover
events, although no system can prevent all such
ejections.
But airbags would not help in many types of collisions,
primarily because the occupant's motion is not toward
those airbags. SeeWhen Should an Airbag Inflate?
on
page 2‑56for more information.
Airbags should never be regarded as anything more
than a supplement to safety belts.
What Will You See After an Airbag
Inflates?
After the frontal airbags and seat-mounted side impact
airbags inflate, they quickly deflate, so quickly that
some people may not even realize an airbag inflated.
Roof-rail airbags may still be at least partially inflated
for some time after they deploy. Some components of
the airbag module may be hot for several minutes.
For location of the airbag modules, see What Makes an
Airbag Inflate? on page 2‑57. The parts of the airbag that come into contact with you
may be warm, but not too hot to touch. There may be
some smoke and dust coming from the vents in the
deflated airbags. Airbag inflation does not prevent the
driver from seeing out of the windshield or being able to
steer the vehicle, nor does it prevent people from
leaving the vehicle.
{WARNING:
When an airbag inflates, there may be dust in the
air. This dust could cause breathing problems for
people with a history of asthma or other breathing
trouble. To avoid this, everyone in the vehicle
should get out as soon as it is safe to do so.
If you have breathing problems but cannot get out
of the vehicle after an airbag inflates, then get
fresh air by opening a window or a door. If you
experience breathing problems following an airbag
deployment, you should seek medical attention.
2-58
Page 98 of 580

If the shoulder portion of the belt is pulled out all the
way, the child restraint locking feature will be engaged.
This may unintentionally cause the passenger sensing
system to turn the airbag off for some adult size
occupants. If this happens, let the belt go back all
the way and start again.
A thick layer of additional material, such as a blanket
or cushion, or aftermarket equipment such as seat
covers, seat heaters, and seat massagers can affect
how well the passenger sensing system operates.
We recommend that you not use seat covers or other
aftermarket equipment except when approved by GM
for your specific vehicle. SeeAdding Equipment to Your
Airbag-Equipped Vehicle
on page 2‑65for more
information about modifications that can affect how
the system operates.
The on indicator may be lit if an object, such as a
briefcase, handbag, grocery bag, laptop or other
electronic device, is put on an unoccupied seat.
If this is not desired remove the object from the seat.
{WARNING:
Stowing of articles under the passenger seat or
between the passenger seat cushion and
seatback may interfere with the proper operation
of the passenger sensing system.
Servicing Your Airbag-Equipped
Vehicle
Airbags affect how the vehicle should be serviced.
There are parts of the airbag system in several places
around the vehicle. Your dealer/retailer and the service
manual have information about servicing the vehicle
and the airbag system. To purchase a service manual,
see Service Publications Ordering Information
on
page 9‑17.
{WARNING:
For up to 10 seconds after the ignition is turned off
and the battery is disconnected, an airbag can still
inflate during improper service. You can be injured
if you are close to an airbag when it inflates. Avoid
yellow connectors. They are probably part of the
airbag system. Be sure to follow proper service
procedures, and make sure the person performing
work for you is qualified to do so.
2-64
Page 103 of 580

Section 3 Features and Controls
Keys. . . . . . . . . . . . . . . . . . . . . . . . . . . . . . . . . . . . . . . . . . . . . . . . 3-3
Remote Keyless Entry (RKE) System . . . . . . . . . . . 3-4
Remote Keyless Entry (RKE) System Operation . . . . . . . . . . . . . . . . . . . . . . . . . . . . . . . . . . . . . 3-4
Remote Vehicle Start . . . . . . . . . . . . . . . . . . . . . . . . . . . 3-7
Doors and Locks . . . . . . . . . . . . . . . . . . . . . . . . . . . . . . . . . . 3-9
Door Locks . . . . . . . . . . . . . . . . . . . . . . . . . . . . . . . . . . . . . 3-9
Power Door Locks . . . . . . . . . . . . . . . . . . . . . . . . . . . . . 3-10
Delayed Locking . . . . . . . . . . . . . . . . . . . . . . . . . . . . . . . 3-10
Programmable Automatic Door Locks . . . . . . . . . . 3-10
Rear Door Security Locks . . . . . . . . . . . . . . . . . . . . . 3-10
Lockout Protection . . . . . . . . . . . . . . . . . . . . . . . . . . . . . 3-11
Midgate
®. . . . . . . . . . . . . . . . . . . . . . . . . . . . . . . . . . . . . . 3-12
Tailgate . . . . . . . . . . . . . . . . . . . . . . . . . . . . . . . . . . . . . . . . 3-21
Power Assist Steps . . . . . . . . . . . . . . . . . . . . . . . . . . . . 3-21
Windows . . . . . . . . . . . . . . . . . . . . . . . . . . . . . . . . . . . . . . . . . . 3-22
Power Windows . . . . . . . . . . . . . . . . . . . . . . . . . . . . . . . 3-23
Sun Visors . . . . . . . . . . . . . . . . . . . . . . . . . . . . . . . . . . . . . 3-25
Theft-Deterrent Systems . . . . . . . . . . . . . . . . . . . . . . . . .3-26
Content Theft-Deterrent . . . . . . . . . . . . . . . . . . . . . . . . 3-26
PASS-Key
®III+ Electronic Immobilizer . . . . . . . . . 3-28
PASS-Key®III+ Electronic Immobilizer
Operation . . . . . . . . . . . . . . . . . . . . . . . . . . . . . . . . . . . . 3-28 Starting and Operating Your Vehicle
. . . . . . . . . . . .3-30
New Vehicle Break-In . . . . . . . . . . . . . . . . . . . . . . . . . . 3-30
Ignition Positions . . . . . . . . . . . . . . . . . . . . . . . . . . . . . . 3-31
Retained Accessory Power (RAP) . . . . . . . . . . . . . 3-32
Starting the Engine . . . . . . . . . . . . . . . . . . . . . . . . . . . . 3-32
Adjustable Throttle and Brake Pedal . . . . . . . . . . . 3-34
Engine Coolant Heater . . . . . . . . . . . . . . . . . . . . . . . . . 3-34
Active Fuel Management™ . . . . . . . . . . . . . . . . . . . . 3-35
Automatic Transmission Operation . . . . . . . . . . . . . 3-35
Tow/Haul Mode . . . . . . . . . . . . . . . . . . . . . . . . . . . . . . . . 3-39
Parking Brake . . . . . . . . . . . . . . . . . . . . . . . . . . . . . . . . . 3-40
Shifting Into Park . . . . . . . . . . . . . . . . . . . . . . . . . . . . . . 3-41
Shifting Out of Park . . . . . . . . . . . . . . . . . . . . . . . . . . . . 3-43
Parking Over Things That Burn . . . . . . . . . . . . . . . . 3-43
Engine Exhaust . . . . . . . . . . . . . . . . . . . . . . . . . . . . . . . . 3-44
Running the Vehicle While Parked . . . . . . . . . . . . . 3-44
Mirrors . . . . . . . . . . . . . . . . . . . . . . . . . . . . . . . . . . . . . . . . . . . . 3-45
Manual Rearview Mirror . . . . . . . . . . . . . . . . . . . . . . . . 3-45
Automatic Dimming Rearview Mirror . . . . . . . . . . . 3-45
Outside Power Foldaway Mirrors . . . . . . . . . . . . . . 3-46
Park Tilt Mirrors . . . . . . . . . . . . . . . . . . . . . . . . . . . . . . . . 3-47
Outside Convex Mirror . . . . . . . . . . . . . . . . . . . . . . . . . 3-47
Outside Heated Mirrors . . . . . . . . . . . . . . . . . . . . . . . . 3-47
3-1
Page 116 of 580

2. Squeeze and pull down the latch levers (A),located near the upper corners of the rear glass, to
unlatch. Once unlatched, the glass-catch release
button (C) will catch the rear glass and prevent it
from falling forward.3. While holding the rear glass in place, press theglass-catch release button (C) and pull the top
of the rear glass toward you using the grab
handle(s) (B) located at the top of the rear glass.
3-14
Page 117 of 580

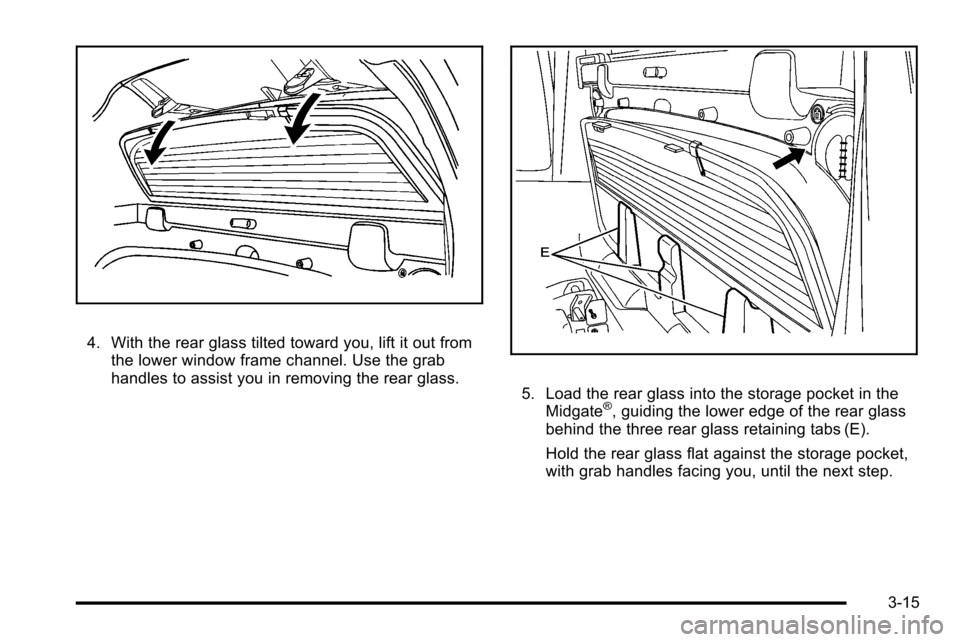
4. With the rear glass tilted toward you, lift it out fromthe lower window frame channel. Use the grab
handles to assist you in removing the rear glass.
5. Load the rear glass into the storage pocket in the
Midgate®, guiding the lower edge of the rear glass
behind the three rear glass retaining tabs (E).
Hold the rear glass flat against the storage pocket,
with grab handles facing you, until the next step.
3-15
Page 121 of 580

To lower the Midgate®, do the following:
1. Fold the rear seats. The front seats might have to be moved forward slightly to allow the rear seats to
fold. See Rear Seat Operation
on page 2‑9for
more information.
Rear Glass in Normal Position
2. Standing outside of the vehicle, hold the Midgate®
securely so it does not fall forward. Turn the
Midgate®handle clockwise and pull the Midgate®
toward you.
3. Lower the Midgate®until it is flat.
3-19
Page 123 of 580

Raising the Midgate®
To return the Midgate®to its normal position, raise the
Midgate®up with a firm swinging motion until it latches
into place securely. This will help to ensure that the
Midgate
®closes with enough force to engage the
latches.
If the rear glass is removed and you would like to put it
back, do so using the instructions given previously.
Tailgate
{WARNING:
It is extremely dangerous to ride on the tailgate,
even when the vehicle is operated at low speeds.
People riding on the tailgate can easily lose
their balance and fall in response to vehicle
maneuvers. Falling from a moving vehicle may
result in serious injuries or death. Do not allow
people to ride on the tailgate. Be sure everyone in
your vehicle is in a seat and using a safety belt
properly. Use the Remote Keyless Entry (RKE) transmitter or
power door lock switch to lock and unlock the tailgate.
Open the tailgate by lifting up on its handle while pulling
the tailgate toward you.
To shut the tailgate, push it firmly upward until it latches.
Push and pull on the tailgate to be sure it is latched
securely.
Tailgate Removal
The tailgate is not to be removed. This may cause
damage to electrical connector resulting in loss of
lock/unlock and rear vision camera function.
Power Assist Steps
Your vehicle may have power assist steps.
The power assist steps automatically extend from
beneath the vehicle on the side in which the door has
been opened. Once the door is closed, the assist steps
automatically move back under the vehicle after a brief
delay. The vehicle must not be moving for the assist
steps to extend or retract.
3-21
Page 132 of 580

Starting and Operating Your
Vehicle
New Vehicle Break-In
Notice:The vehicle does not need an elaborate
break-in. But it will perform better in the long run if
you follow these guidelines:
.Keep your speed at 55 mph (88 km/h) or less
for the first 500 miles (805 km).
.Do not drive at any one constant speed, fast
or slow, for the first 500 miles (805 km).
Do not make full-throttle starts. Avoid
downshifting to brake or slow the vehicle.
.Avoid making hard stops for the first
200 miles (322 km) or so. During this time the
new brake linings are not yet broken in. Hard
stops with new linings can mean premature
wear and earlier replacement. Follow this
breaking-in guideline every time you get new
brake linings.
.Do not tow a trailer during break-in.
See Towing a Trailer
on page 6‑42for the
trailer towing capabilities of the vehicle and
more information.
Following break‐in, engine speed and load can be
gradually increased.
3-30
Page 133 of 580

Ignition Positions
The ignition switch has
four different positions.
To shift out of P (Park), the ignition must be in ON/RUN
or ACC/ACCESSORY and the regular brake pedal must
be applied.
A (LOCK/OFF) : This position locks the ignition.
It may also lock the steering wheel and automatic
transmission. The key can be removed in LOCK/OFF.
On vehicles with an automatic transmission, the shift
lever must be in P (Park) to turn the ignition switch to
LOCK/OFF. The steering may bind with the wheels turned off center.
If this happens, move the steering wheel from right to
left while turning the key to ACC/ACCESSORY. If this
doesn't work, then the vehicle needs service.
Notice:
Using a tool to force the key to turn in the
ignition could cause damage to the switch or break
the key. Use the correct key, make sure it is all the
way in, and turn it only with your hand. If the key
cannot be turned by hand, see your dealer/retailer.
B (ACC/ACCESSORY) : This position lets things like
the radio and the windshield wipers operate while the
engine is off. Use this position if the vehicle must be
pushed or towed.
C (ON/RUN) : This position can be used to operate the
electrical accessories and to display some instrument
panel cluster warning and indicator lights. The switch
stays in this position when the engine is running. The
transmission is also unlocked in this position on
automatic transmission vehicles.
If you leave the key in the ACC/ACCESSORY or
ON/RUN position with the engine off, the battery could
be drained. You may not be able to start the vehicle if
the battery is allowed to drain for an extended period
of time.
3-31
Page 138 of 580

When parked on a hill, especially when the vehicle has
a heavy load, you may notice an increase in the effort
to shift out of P (Park). See Torque Lock (Automatic
Transmission) underShifting Into Park
on page 3‑41for more information.
{WARNING:
It is dangerous to get out of the vehicle if the shift
lever is not fully in P (Park) with the parking brake
firmly set. The vehicle can roll.
Do not leave the vehicle when the engine is
running unless you have to. If you have left the
engine running, the vehicle can move suddenly.
You or others could be injured. To be sure the
vehicle will not move, even when you are on fairly
level ground, always set the parking brake and
move the shift lever to P (Park). See Shifting Into
Park
on page 3‑41. If you are pulling a trailer,
see Towing a Trailer on page 6‑42.
R (Reverse) : Use this gear to back up.
Notice: Shifting to R (Reverse) while the vehicle is
moving forward could damage the transmission.
The repairs would not be covered by the vehicle
warranty. Shift to R (Reverse) only after the vehicle
is stopped. To rock the vehicle back and forth to get out of snow,
ice, or sand without damaging the transmission, see
If
Your Vehicle is Stuck in Sand, Mud, Ice, or Snow
on
page 6‑30.
N (Neutral) : In this position, the engine does not
connect with the wheels. To restart when you are
already moving, use N (Neutral) only. Also, use
N (Neutral) when the vehicle is being towed.
{WARNING:
Shifting into a drive gear while the engine is
running at high speed is dangerous. Unless your
foot is firmly on the brake pedal, the vehicle could
move very rapidly. You could lose control and hit
people or objects. Do not shift into a drive gear
while the engine is running at high speed.
Notice: Shifting out of P (Park) or N (Neutral) with
the engine running at high speed may damage the
transmission. The repairs would not be covered
by the vehicle warranty. Be sure the engine is not
running at high speed when shifting the vehicle.
3-36