tow CADILLAC ESCALADE EXT 2010 3.G Owners Manual
[x] Cancel search | Manufacturer: CADILLAC, Model Year: 2010, Model line: ESCALADE EXT, Model: CADILLAC ESCALADE EXT 2010 3.GPages: 580, PDF Size: 6.23 MB
Page 1 of 580
2010 Cadillac Escalade EXT Owner ManualM
In Brief. . . . . . . . . . . . . . . . . . . . . . . . . . . . . . . . . . . . . . . . . . . . 1-1
Instrument Panel . . . . . . . . . . . . . . . . . . . . . . . . . . . . . . . . . 1-2
Initial Drive Information . . . . . . . . . . . . . . . . . . . . . . . . . . . 1-4
Vehicle Features . . . . . . . . . . . . . . . . . . . . . . . . . . . . . . . . 1-17
Performance and Maintenance . . . . . . . . . . . . . . . . . . 1-23
Seats and Restraint System . . . . . . . . . . . . . . . . . . . . . . 2-1
Head Restraints . . . . . . . . . . . . . . . . . . . . . . . . . . . . . . . . . . 2-2
Front Seats . . . . . . . . . . . . . . . . . . . . . . . . . . . . . . . . . . . . . . . 2-3
Rear Seats . . . . . . . . . . . . . . . . . . . . . . . . . . . . . . . . . . . . . . . 2-9
Safety Belts . . . . . . . . . . . . . . . . . . . . . . . . . . . . . . . . . . . . . 2-10
Child Restraints . . . . . . . . . . . . . . . . . . . . . . . . . . . . . . . . . 2-30
Airbag System . . . . . . . . . . . . . . . . . . . . . . . . . . . . . . . . . . 2-51
Restraint System Check . . . . . . . . . . . . . . . . . . . . . . . . . 2-66
Features and Controls . . . . . . . . . . . . . . . . . . . . . . . . . . . . 3-1
Keys . . . . . . . . . . . . . . . . . . . . . . . . . . . . . . . . . . . . . . . . . . . . . 3-3
Doors and Locks . . . . . . . . . . . . . . . . . . . . . . . . . . . . . . . . . 3-9
Windows . . . . . . . . . . . . . . . . . . . . . . . . . . . . . . . . . . . . . . . . 3-22
Theft-Deterrent Systems . . . . . . . . . . . . . . . . . . . . . . . . 3-26
Starting and Operating Your Vehicle . . . . . . . . . . . . . 3-30 Mirrors . . . . . . . . . . . . . . . . . . . . . . . . . . . . . . . . . . . . . . . . . . 3-45
Object Detection Systems . . . . . . . . . . . . . . . . . . . . . . . 3-48
Universal Home Remote System . . . . . . . . . . . . . . . . 3-54
Storage Areas . . . . . . . . . . . . . . . . . . . . . . . . . . . . . . . . . . . 3-60
Sunroof . . . . . . . . . . . . . . . . . . . . . . . . . . . . . . . . . . . . . . . . . 3-77
Instrument Panel . . . . . . . . . . . . . . . . . . . . . . . . . . . . . . . . . 4-1
Instrument Panel Overview . . . . . . . . . . . . . . . . . . . . . . . 4-3
Climate Controls . . . . . . . . . . . . . . . . . . . . . . . . . . . . . . . . 4-20
Warning Lights, Gages, and Indicators . . . . . . . . . . 4-25
Driver Information Center (DIC) . . . . . . . . . . . . . . . . . 4-39
Audio System(s) . . . . . . . . . . . . . . . . . . . . . . . . . . . . . . . . 4-66
Navigation System . . . . . . . . . . . . . . . . . . . . . . . . . . . . . . . 5-1
Overview . . . . . . . . . . . . . . . . . . . . . . . . . . . . . . . . . . . . . . . . . 5-2
Features and Controls . . . . . . . . . . . . . . . . . . . . . . . . . . 5-12
Navigation Audio System . . . . . . . . . . . . . . . . . . . . . . . 5-59
Voice Recognition . . . . . . . . . . . . . . . . . . . . . . . . . . . . . . . 5-87
Driving Your Vehicle . . . . . . . . . . . . . . . . . . . . . . . . . . . . . . 6-1
Your Driving, the Road, and the Vehicle . . . . . . . . . . 6-2
Towing . . . . . . . . . . . . . . . . . . . . . . . . . . . . . . . . . . . . . . . . . . 6-39
Page 5 of 580
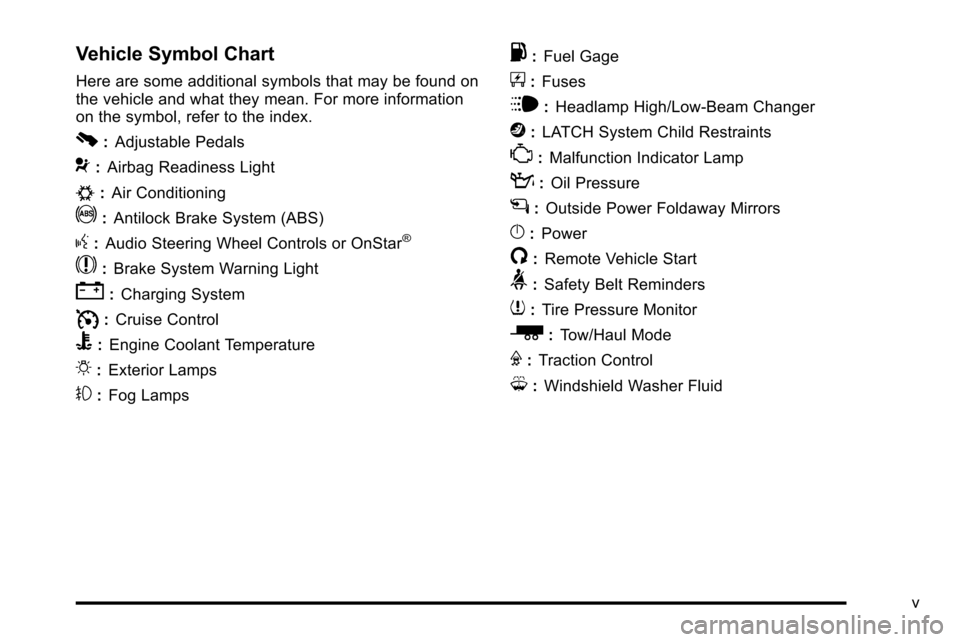
Vehicle Symbol Chart
Here are some additional symbols that may be found on
the vehicle and what they mean. For more information
on the symbol, refer to the index.
0:Adjustable Pedals
9:Airbag Readiness Light
#:Air Conditioning
!:Antilock Brake System (ABS)
g:Audio Steering Wheel Controls or OnStar®
$: Brake System Warning Light
":Charging System
I:Cruise Control
B: Engine Coolant Temperature
O:Exterior Lamps
#:Fog Lamps
.: Fuel Gage
+:Fuses
i: Headlamp High/Low-Beam Changer
j:LATCH System Child Restraints
*: Malfunction Indicator Lamp
::Oil Pressure
g:Outside Power Foldaway Mirrors
}:Power
/:Remote Vehicle Start
>:Safety Belt Reminders
7:Tire Pressure Monitor
_: Tow/Haul Mode
F:Traction Control
M:Windshield Washer Fluid
v
Page 9 of 580
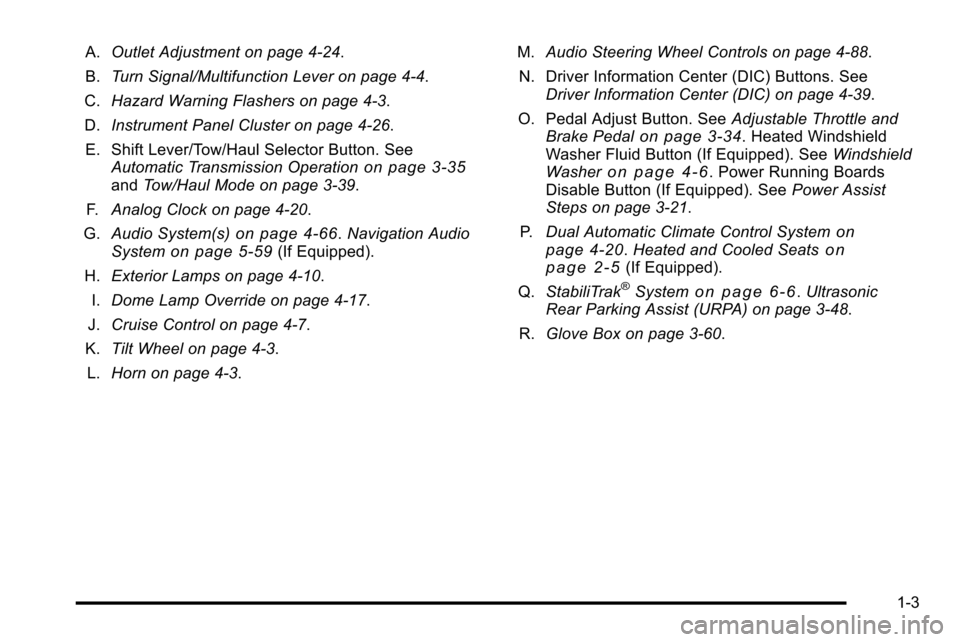
A.Outlet Adjustment on page 4‑24.
B. Turn Signal/Multifunction Lever on page 4‑4.
C. Hazard Warning Flashers on page 4‑3.
D. Instrument Panel Cluster on page 4‑26.
E. Shift Lever/Tow/Haul Selector Button. See Automatic Transmission Operation
on page 3‑35and Tow/Haul Mode on page 3‑39.
F. Analog Clock on page 4‑20.
G. Audio System(s)
on page 4‑66.Navigation Audio
Systemon page 5‑59(If Equipped).
H. Exterior Lamps on page 4‑10.
I. Dome Lamp Override on page 4‑17.
J. Cruise Control on page 4‑7.
K. Tilt Wheel on page 4‑3.
L. Horn on page 4‑3. M.
Audio Steering Wheel Controls on page 4‑88.
N. Driver Information Center (DIC) Buttons. See Driver Information Center (DIC) on page 4‑39.
O. Pedal Adjust Button. See Adjustable Throttle and
Brake Pedal
on page 3‑34. Heated Windshield
Washer Fluid Button (If Equipped). See Windshield
Washer
on page 4‑6. Power Running Boards
Disable Button (If Equipped). See Power Assist
Steps on page 3‑21.
P. Dual Automatic Climate Control System
on
page 4‑20. Heated and Cooled Seatson
page 2‑5(If Equipped).
Q. StabiliTrak®Systemon page 6‑6.Ultrasonic
Rear Parking Assist (URPA) on page 3‑48.
R. Glove Box on page 3‑60.
1-3
Page 12 of 580
Midgate®
This vehicle is equipped with a Midgate®and a
removable rear glass panel. The Midgate allows you to
extend the length of the vehicle's cargo area.
For more information see Midgate
®on page 3‑12.
Tailgate
Use the Remote Keyless Entry (RKE) transmitter or
power door lock switch to lock and unlock the tailgate.
Open the tailgate by lifting up on its handle while pulling
the tailgate toward you.
To close the tailgate, push it firmly upward until it
latches. Push and pull on the tailgate to be sure it is
latched securely.
Tailgate Removal
The tailgate is not to be removed. This may cause
damage to the electrical connector resulting in a loss of
lock/unlock and rear vision camera function.
SeeTailgate on page 3‑21.
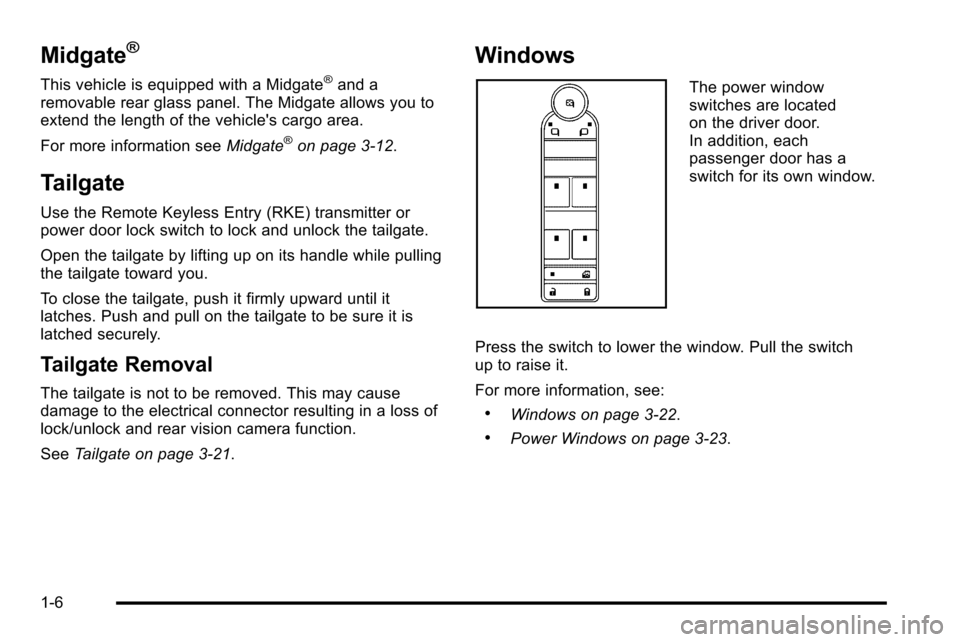
Windows
The power window
switches are located
on the driver door.
In addition, each
passenger door has a
switch for its own window.
Press the switch to lower the window. Pull the switch
up to raise it.
For more information, see:
.Windows on page 3‑22.
.Power Windows on page 3‑23.
1-6
Page 23 of 580
attainable range with all lower gears accessible.
As an example, when 4 (Fourth) gear is selected,
1 (First) through 4 (Fourth) gears are available.
Press the plus/minus buttons, located on the steering
column shift lever, to select the desired range of gears
for current driving conditions. SeeAutomatic
Transmission Operation
on page 3‑35.
While using DSC, cruise control and the tow/haul mode
can be used.
Grade Braking is not available when DSC is active.
See Tow/Haul Mode on page 3‑39.
Vehicle Features
Satellite Radio
XM is a satellite radio service that is based in the
48 contiguous United States and 10 Canadian
provinces. XM satellite radio has a wide variety of
programming and commercial-free music,
coast-to-coast, and in digital-quality sound. A fee is required to receive the XM service.
For more information, refer to:
.www.xmradio.com or call 1-800-929-2100 (U.S.)
.www.xmradio.ca or call 1-877-438-9677 (Canada)
Portable Audio Devices
This vehicle may have an auxilliary input, located on the
audio faceplate and a USB port located in the center
console. External devices such as iPod
®, laptop
computers, MP3 players, CD changers, USB storage
device, etc. can be connected to the auxiliary port using
a 3.5 mm (1/8 in.) input jack or the USB port depending
on the audio system.
See “Using the Auxiliary Input Jack” and“Using the
USB Port” underAuxiliary Devices on page 5‑86.
1-17
Page 43 of 580

Rear Seats
Rear Seat Operation
The rear seat is a 60/40 split bench seat that can be
folded to give you more cargo space and access to the
folding midgate. SeeMidgate
®on page 3‑12for more
information on operation of the folding midgate.
To fold either side of the seat do the following:
1. Push the rear seat head restraints all the way down.
2. Pull the seat looplocated where the
seatback and seat
cushion meet.
The seat cushion will
release and allow
you to tilt it toward the
front of the vehicle. Notice:
Folding a rear seat with the safety belts
still fastened may cause damage to the seat or the
safety belts. Always unbuckle the safety belts and
return them to their normal stowed position before
folding a rear seat.
3. Fold the seatback forward until it is flat. You may
have to move the front seats forward slightly to
do this.
4. Repeat the procedure for the other side.
2-9
Page 59 of 580

4. If equipped with a shoulder belt height adjuster,move it to the height that is right for you. See
“Shoulder Belt Height Adjustment” later in this
section for instructions on use and important safety
information.
5. To make the lap part tight, pull up on the shoulder belt.
It may be necessary to pull stitching on the safety
belt through the latch plate to fully tighten the lap
belt on smaller occupants.
To unlatch the belt, push the button on the buckle.
The belt should return to its stowed position.
Before a door is closed, be sure the safety belt is out of
the way. If a door is slammed against a safety belt,
damage can occur to both the belt and the vehicle.
2-25
Page 77 of 580

Notice:Do not let the LATCH attachments rub
against the vehicle’ s safety belts. This may damage
these parts. If necessary, move buckled safety belts
to avoid rubbing the LATCH attachments.
Do not fold the empty rear seat with a safety belt
buckled. This could damage the safety belt or the
seat. Unbuckle and return the safety belt to its
stowed position, before folding the seat.
1. If the child restraint manufacturer recommends that the top tether be attached, attach the top tether to
the top tether anchor, if there is one. Refer to the
child restraint instructions and the following steps:
1. 1. To access the top tether anchors, raise the seat cushion by pulling up on the strap loop
at the rear of the seat cushion and fold the
seat cushion forward. Then fold the seatback
forward until it is flat. See Rear Seat
Operation
on page 2‑9for additional
information.
1. 2. Place the child restraint in the vehicle, near the seating position that you are using. 1. 3. Route the top tether according to your child
restraint instructions and the following
instructions:
If the position you are
using does not have a
headrest or head restraint
and you are using a
single tether, route the
tether over the seatback.
If the position you are
using does not have a
headrest or head restraint
and you are using a dual
tether, route the tether
over the seatback.
2-43
Page 81 of 580
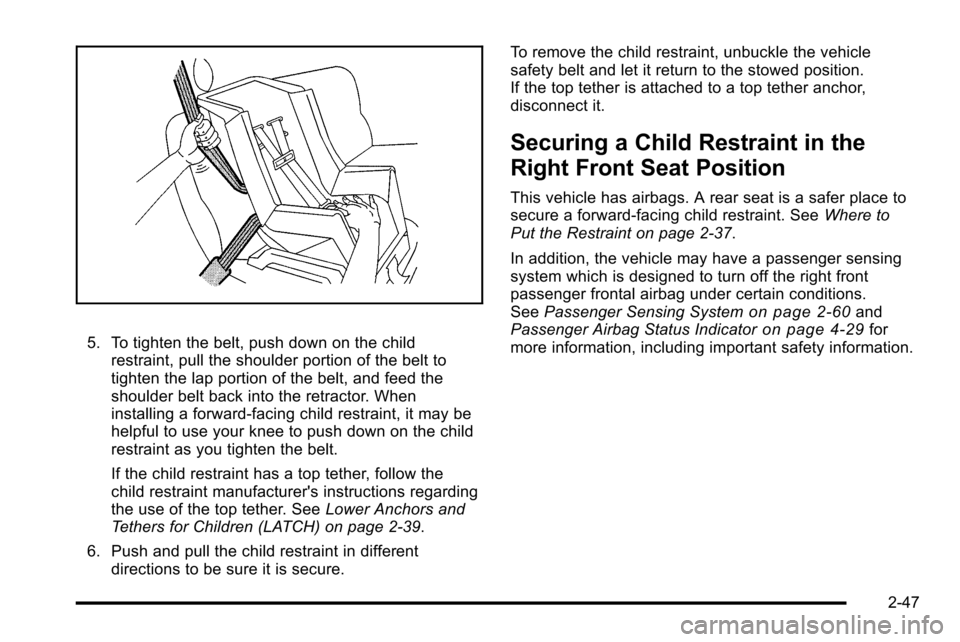
5. To tighten the belt, push down on the childrestraint, pull the shoulder portion of the belt to
tighten the lap portion of the belt, and feed the
shoulder belt back into the retractor. When
installing a forward-facing child restraint, it may be
helpful to use your knee to push down on the child
restraint as you tighten the belt.
If the child restraint has a top tether, follow the
child restraint manufacturer's instructions regarding
the use of the top tether. See Lower Anchors and
Tethers for Children (LATCH) on page 2‑39.
6. Push and pull the child restraint in different directions to be sure it is secure. To remove the child restraint, unbuckle the vehicle
safety belt and let it return to the stowed position.
If the top tether is attached to a top tether anchor,
disconnect it.
Securing a Child Restraint in the
Right Front Seat Position
This vehicle has airbags. A rear seat is a safer place to
secure a forward-facing child restraint. See
Where to
Put the Restraint on page 2‑37.
In addition, the vehicle may have a passenger sensing
system which is designed to turn off the right front
passenger frontal airbag under certain conditions.
See Passenger Sensing System
on page 2‑60and
Passenger Airbag Status Indicatoron page 4‑29for
more information, including important safety information.
2-47
Page 84 of 580

6. To tighten the belt, push down on the childrestraint, pull the shoulder portion of the belt to
tighten the lap portion of the belt and feed the
shoulder belt back into the retractor. When
installing a forward-facing child restraint, it may be
helpful to use your knee to push down on the child
restraint as you tighten the belt.
7. Push and pull the child restraint in different directions to be sure it is secure. If the vehicle is equipped with the passenger sensing
system, and when the passenger sensing system has
turned off the right front passenger frontal airbag, the off
indicator in the passenger airbag status indicator should
light and stay lit when you start the vehicle. See
Passenger Airbag Status Indicator on page 4‑29.
If a child restraint has been installed and the on
indicator is lit, see
“If the On Indicator is Lit for a
Child Restraint” underPassenger Sensing System
on
page 2‑60for more information.
To remove the child restraint, unbuckle the vehicle
safety belt and let it return to the stowed position.
2-50