steering wheel CADILLAC ESCALADE EXT 2010 3.G Owner's Manual
[x] Cancel search | Manufacturer: CADILLAC, Model Year: 2010, Model line: ESCALADE EXT, Model: CADILLAC ESCALADE EXT 2010 3.GPages: 580, PDF Size: 6.23 MB
Page 183 of 580

Instrument Panel Overview
Hazard Warning Flashers
|(Hazard Warning Flasher):Press this button
located on top of the steering column, to make the front
and rear turn signal lamps flash on and off. This warns
others that you are having trouble. Press again to turn
the flashers off.
When the hazard warning flashers are on, the vehicle's
turn signals will not work.
Horn
To sound the horn, press the center pad on the steering
wheel.
Tilt Wheel
The power tilt wheel control is located on the left side of
the steering column.
Push the control up or down to tilt the steering wheel up
or down.
Heated Steering Wheel
For vehicles with a heated steering wheel, the button for
this feature is located on the steering wheel.
(: Press to turn the heated steering wheel on or off.
A light on the button displays when the feature is
turned on.
The steering wheel takes about three minutes to start
heating.
4-3
Page 188 of 580

Cruise Control shown withHeated Steering WheelButton (If Equipped)
The cruise control buttons are located on left side of the
steering wheel.
T(On/Off): Turns the system on or off. The indicator
light is on when cruise control is on and turns off when
cruise control is off.
+ RES (Resume/Accelerate) : Press to make the
vehicle accelerate or resume to a previously set speed.
SET −(Set/Coast) : Press to set the speed or make the
vehicle decelerate.
[(Cancel): Press to cancel cruise control without
erasing the set speed from memory.
Setting Cruise Control
Cruise control will not work if the parking brake is set,
or if the master cylinder brake fluid level is low.
The cruise control light on the instrument panel cluster
comes on after the cruise control has been set to the
desired speed.
{WARNING:
If you leave your cruise control on when you are
not using cruise, you might hit a button and go
into cruise when you do not want to. You could be
startled and even lose control. Keep the cruise
control switch off until you want to use cruise
control.
1. Press the
Ibutton.
2. Get up to the desired speed.
3. Press the SET− button located on the steering
wheel and release it.
4. Take your foot off the accelerator.
4-8
Page 189 of 580
Resuming a Set Speed
If the cruise control is set at a desired speed and then
the brakes are applied, this shuts off the cruise control.
But it does not need to be reset.
Once the vehicle speed reaches about 40 km/h
(25 mph) or more, press the +RES button on the
steering wheel. The vehicle returns to the previously set
speed and stays there.
Increasing Speed While Using Cruise
Control
To increase the cruise speed while using cruise control:
.Press and hold the +RES button on the steering
wheel until the desired speed is reached, then
release it.
.To increase vehicle speed in small increments,
press the +RES button. Each time this is done,
the vehicle goes about 1.6 km/h (1 mph) faster.
Reducing Speed While Using Cruise
Control
To reduce the vehicle speed while using cruise control:
.Press and hold the SET–button on the steering
wheel until the desired lower speed is reached,
then release it.
.To slow down in very small amounts, press the
SET– button on the steering wheel briefly.
Each time this is done, the vehicle goes about
1.6 km/h (1 mph) slower.
Passing Another Vehicle While Using
Cruise Control
Use the accelerator pedal to increase the vehicle
speed. When you take your foot off the pedal, the
vehicle will slow down to the previous set cruise speed.
4-9
Page 190 of 580

Using Cruise Control on Hills
How well the cruise control will work on hills depends
upon the vehicle speed, load, and the steepness of the
hills. When going up steep hills, you might have to step
on the accelerator pedal to maintain the vehicle's
speed. When going downhill, you might have to brake
or shift to a lower gear to keep the vehicle's speed
down. When the brakes are applied the cruise control
turns off.
Ending Cruise Control
There are three ways to end cruise control:
.Step lightly on the brake pedal.
.Press the[button on the steering wheel.
.Press theIbutton on the steering wheel.
Erasing Speed Memory
The cruise control set speed memory is erased when
the cruise control or the ignition is turned off.
Exterior Lamps
The exterior lamps control
is located on the
instrument panel to the
left of the steering wheel.
It controls the following systems:
.Headlamps
.Taillamps
.Parking Lamps
.License Plate Lamps
.Instrument Panel Lights
The exterior lamps control has four positions:
9(Off): Turns off the automatic headlamps and
daytime running lamps (DRL). Turning the headlamp
control to the off position again will turn the automatic
headlamps or DRL back on.
For vehicles first sold in Canada, the off position only
works when the vehicle is shifted into the P (Park)
position.
4-10
Page 220 of 580
All messages will appear in the DIC display located in
the center of the instrument panel cluster.
The DIC comes on when the ignition is on. After a short
delay, the DIC will display the information that was last
displayed before the engine was turned off.
SeeDIC Operation and Displays
on page 4‑40and
DIC Vehicle Customizationon page 4‑56for the
displays available.
DIC Operation and Displays
The DIC has different displays which can be accessed
by pressing the DIC buttons located on the instrument
panel, next to the steering wheel.
The DIC displays trip, fuel, and vehicle system
information, and warning messages if a system problem
is detected. A digital speedometer also appears at the
bottom of the DIC display. The digital speedometer can
be enabled or disabled. See “DISPLAY DIGITAL
SPEED” underDIC Vehicle Customization
on
page 4‑56for more information.
DIC Buttons
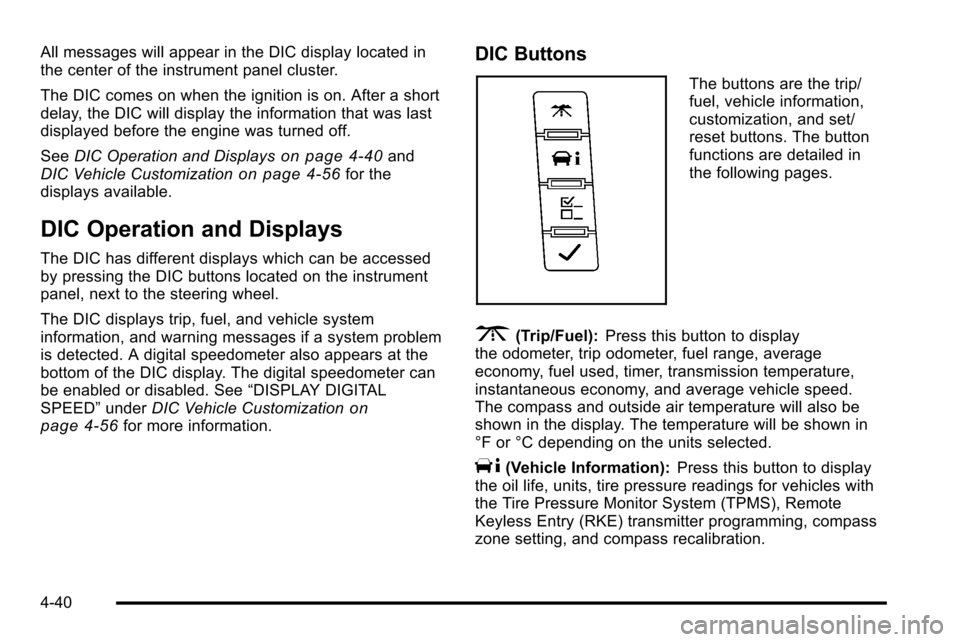
The buttons are the trip/
fuel, vehicle information,
customization, and set/
reset buttons. The button
functions are detailed in
the following pages.
3(Trip/Fuel): Press this button to display
the odometer, trip odometer, fuel range, average
economy, fuel used, timer, transmission temperature,
instantaneous economy, and average vehicle speed.
The compass and outside air temperature will also be
shown in the display. The temperature will be shown in
°F or °C depending on the units selected.
T(Vehicle Information): Press this button to display
the oil life, units, tire pressure readings for vehicles with
the Tire Pressure Monitor System (TPMS), Remote
Keyless Entry (RKE) transmitter programming, compass
zone setting, and compass recalibration.
4-40
Page 242 of 580

EASY EXIT RECALL
If your vehicle has this feature, it allows you to select
your preference for the automatic easy exit seat feature.
SeeMemory Features
on page 2‑6for more
information.
Press the customization button until EASY EXIT
RECALL appears on the DIC display. Press the
set/reset button once to access the settings for this
feature. Then press the customization button to scroll
through the following settings:
DOOR BUTTON ONLY : No automatic seat exit recall
will occur. The recall will only occur after pressing the
easy exit seat button.
BUTTON AND KEY OUT (default) : If the features are
enabled through the EASY EXIT SETUP menu, the
driver's seat will move back, and the power steering
column will move up when the key is removed from the
ignition or after pressing the easy exit seat button.
The automatic easy exit seat movement will only occur
one time after the key is removed from the ignition.
If the automatic movement has already occurred, and
you put the key back in the ignition and remove it again,
the seat and steering column will stay in the original exit
position, unless a memory recall took place prior to
removing the key again. NO CHANGE :
No change will be made to this feature.
The current setting will remain.
To select a setting, press the set/reset button while the
desired setting is displayed on the DIC.
EASY EXIT SETUP
If your vehicle has this feature, it allows you to select
which areas will recall with the automatic easy exit seat
feature. It also allows you to turn off the automatic easy
exit feature. See Memory Features
on page 2‑6and
“EASY EXIT RECALL” earlier for more information.
Press the customization button until EASY EXIT SETUP
appears on the DIC display. Press the set/reset button
once to access the settings for this feature. Then press
the menu up/down button to scroll through the following
settings:
OFF : No automatic seat exit will recall.
SEAT ONLY : The driver's seat will recall.
TILT ONLY : The steering wheel tilt feature will recall.
SEAT & TILT (default) : The driver's seat and the
steering wheel tilt will recall.
NO CHANGE : No change will be made to this feature.
The current setting will remain.
To select a setting, press the set/reset button while the
desired setting is displayed on the DIC.
4-62
Page 247 of 580
Voice Recognition
The Bluetooth system uses voice recognition to
interpret voice commands to dial phone numbers and
name tags.
Noise :Keep interior noise levels to a minimum. The
system may not recognize voice commands if there is
too much background noise.
When to Speak : A short tone sounds after the system
responds indicating when it is waiting for a voice
command. Wait until the tone and then speak.
How to Speak : Speak clearly in a calm and natural
voice.
Audio System
When using the in‐vehicle Bluetooth system, sound
comes through the vehicle's front audio system
speakers and overrides the audio system. Use the
audio system volume knob, during a call, to change the
volume level. The adjusted volume level remains in
memory for later calls. To prevent missed calls, a
minimum volume level is used if the volume is turned
down too low.
Bluetooth Controls
Use the buttons located on the steering wheel to
operate the in‐vehicle Bluetooth system. See Audio
Steering Wheel Controls
on page 4‑88for more
information.
b g(Push To Talk) : Press to answer incoming calls,
to confirm system information, and to start speech
recognition.
c x(Phone On Hook): Press to end a call, reject a
call, or to cancel an operation.
Pairing
A Bluetooth enabled cell phone must be paired to the
in‐vehicle Bluetooth system first and then connected to
the vehicle before it can be used. See the cell phone
manufacturers user guide for Bluetooth functions
before pairing the cell phone. If a Bluetooth phone
is not connected, calls will be made using OnStar
®
Hands‐Free Calling, if available. Refer to the OnStar
owner's guide for more information.
Pairing Information:
.Up to five cell phones can be paired to the
in‐vehicle Bluetooth system.
.The pairing process is disabled when the vehicle
is moving.
4-67
Page 268 of 580
Audio Steering Wheel Controls
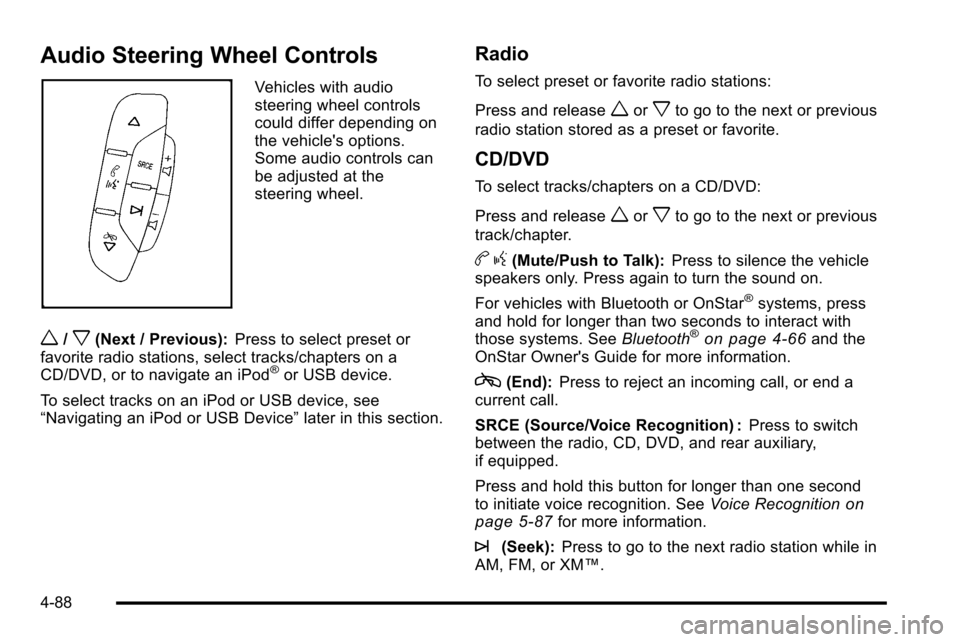
Vehicles with audio
steering wheel controls
could differ depending on
the vehicle's options.
Some audio controls can
be adjusted at the
steering wheel.
w/x(Next / Previous):Press to select preset or
favorite radio stations, select tracks/chapters on a
CD/DVD, or to navigate an iPod
®or USB device.
To select tracks on an iPod or USB device, see
“Navigating an iPod or USB Device” later in this section.
Radio
To select preset or favorite radio stations:
Press and release
worxto go to the next or previous
radio station stored as a preset or favorite.
CD/DVD
To select tracks/chapters on a CD/DVD:
Press and release
worxto go to the next or previous
track/chapter.
b g(Mute/Push to Talk): Press to silence the vehicle
speakers only. Press again to turn the sound on.
For vehicles with Bluetooth or OnStar
®systems, press
and hold for longer than two seconds to interact with
those systems. See Bluetooth
®on page 4‑66and the
OnStar Owner's Guide for more information.
c(End): Press to reject an incoming call, or end a
current call.
SRCE (Source/Voice Recognition) : Press to switch
between the radio, CD, DVD, and rear auxiliary,
if equipped.
Press and hold this button for longer than one second
to initiate voice recognition. See Voice Recognition
on
page 5‑87for more information.
¨(Seek): Press to go to the next radio station while in
AM, FM, or XM™.
4-88
Page 269 of 580
To scan available radio stations:1. Press and hold
¨until a beep is heard, to place
the radio into SCAN mode, a station will play for
five seconds before moving to the next station.
2. To stop the SCAN function, press
¨again.
While listening to a CD press and release
¨to select
the next disc.
+
e−e(Volume): Press to increase or to decrease
the volume.
Navigating an iPod or USB Device
Audio steering wheel controls can be used to navigate
an iPod or USB device while on the main audio screen
or the music navigator screen.
Main Audio Screen
Press and releaseworxto select the next or
previous track.
Press and hold
worxto select the next or previous
category/folder, if available.
Press and release
¨to enter the music
navigator menu.
Music Navigator Screen
To enter the music navigator screen, press and
release
¨while on the main audio screen. While
using the music navigator screen, the track currently
playing continues to play until the next track is selected.
To move up or down the list of tracks or folders:
.Press and releaseworxto highlight one track
or folder at a time.
.Press and holdworxto scroll through the list.
To select the highlighted track or folder press and
release
¨.
To move back to the previous folder, press and
hold
¨.
Radio Reception
Frequency interference and static can occur during
normal radio reception if items such as cell phone
chargers, vehicle convenience accessories, and
external electronic devices are plugged into the
accessory power outlet. If there is interference or static,
unplug the item from the accessory power outlet.
4-89
Page 352 of 580
USB Supported File and Folder Structure
The guidelines that must be met while using USB
supported files and folders are:
.Up to 700 folders.
.Up to 8 folders in depth.
.Up to 65,535 files.
.Folder and file names up to 64 bytes.
.Files with an .mp3 or .wma file extension.
.AAC files stored on an iPod.
.FAT16
.FAT32
Using the Navigation Audio System to
Control a USB Storage Device or iPod®
The navigation audio system can control a USB storage
device or an iPod by using the radio touch screens and
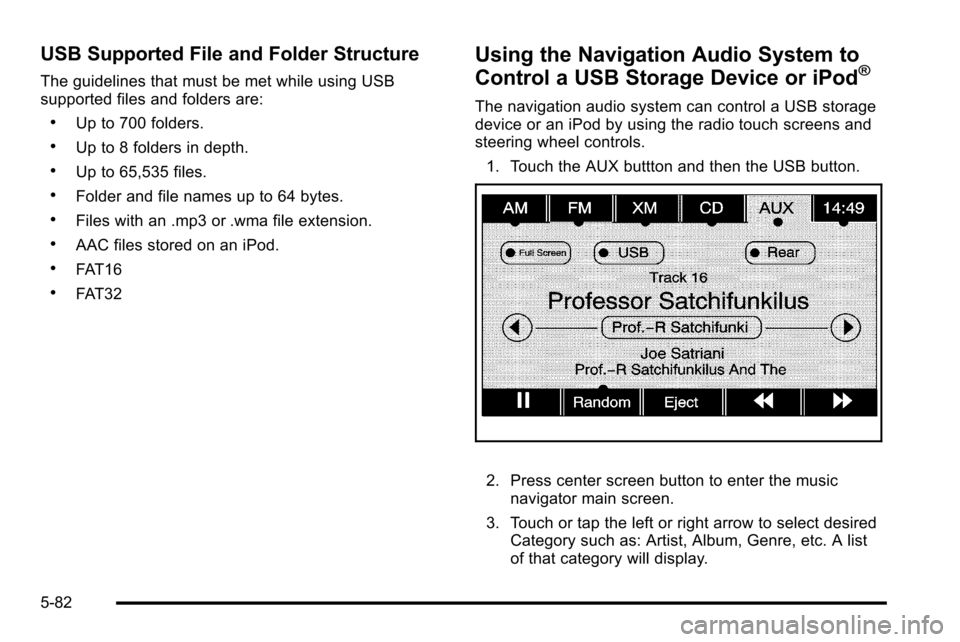
steering wheel controls.1. Touch the AUX buttton and then the USB button.
2. Press center screen button to enter the music navigator main screen.
3. Touch or tap the left or right arrow to select desired Category such as: Artist, Album, Genre, etc. A list
of that category will display.
5-82