steering wheel CADILLAC ESCALADE EXT 2010 3.G User Guide
[x] Cancel search | Manufacturer: CADILLAC, Model Year: 2010, Model line: ESCALADE EXT, Model: CADILLAC ESCALADE EXT 2010 3.GPages: 580, PDF Size: 6.23 MB
Page 33 of 580
The vehicle must have a working electrical system,
including adequate battery power, for the OnStar
equipment to operate. There are other problems OnStar
cannot control that may prevent OnStar from providing
OnStar service at any particular time or place. Some
examples are damage to important parts of the vehicle
in a crash, hills, tall buildings, tunnels, weather or
wireless phone network congestion.
OnStar Steering Wheel Controls
This vehicle may have a Talk/Mute button that can be
used to interact with OnStar hands-free calling. See
Audio Steering Wheel Controls
on page 4‑88for more
information.
On some vehicles, the mute button can be used to dial
numbers into voice mail systems, or to dial phone
extensions. See the OnStar Owner's Guide for more
information.
Your Responsibility
Increase the volume of the radio if the OnStar advisor
cannot be heard.
If the light next to the OnStar buttons is red, the system
may not be functioning properly. Press
Qand request a
vehicle diagnostic. If the light appears clear (no light is
appearing), your OnStar subscription has expired and
all services have been deactivated. Press
Qto confirm
that the OnStar equipment is active.
1-27
Page 40 of 580
Memory Features
Your vehicle has the memory package.
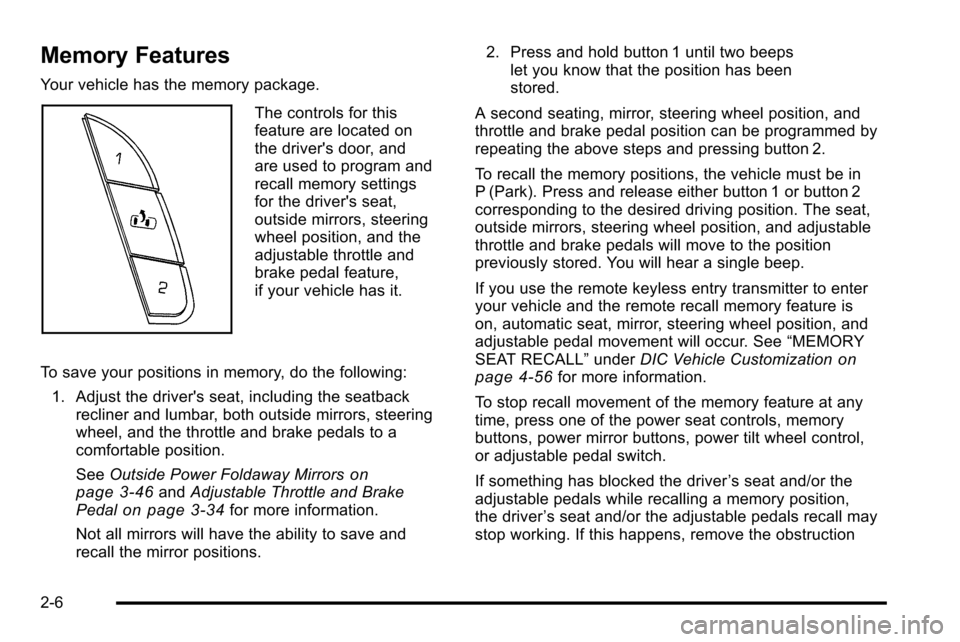
The controls for this
feature are located on
the driver's door, and
are used to program and
recall memory settings
for the driver's seat,
outside mirrors, steering
wheel position, and the
adjustable throttle and
brake pedal feature,
if your vehicle has it.
To save your positions in memory, do the following: 1. Adjust the driver's seat, including the seatback recliner and lumbar, both outside mirrors, steering
wheel, and the throttle and brake pedals to a
comfortable position.
See Outside Power Foldaway Mirrors
on
page 3‑46and Adjustable Throttle and Brake
Pedalon page 3‑34for more information.
Not all mirrors will have the ability to save and
recall the mirror positions. 2. Press and hold button 1 until two beeps
let you know that the position has been
stored.
A second seating, mirror, steering wheel position, and
throttle and brake pedal position can be programmed by
repeating the above steps and pressing button 2.
To recall the memory positions, the vehicle must be in
P (Park). Press and release either button 1 or button 2
corresponding to the desired driving position. The seat,
outside mirrors, steering wheel position, and adjustable
throttle and brake pedals will move to the position
previously stored. You will hear a single beep.
If you use the remote keyless entry transmitter to enter
your vehicle and the remote recall memory feature is
on, automatic seat, mirror, steering wheel position, and
adjustable pedal movement will occur. See “MEMORY
SEAT RECALL” underDIC Vehicle Customization
on
page 4‑56for more information.
To stop recall movement of the memory feature at any
time, press one of the power seat controls, memory
buttons, power mirror buttons, power tilt wheel control,
or adjustable pedal switch.
If something has blocked the driver ’s seat and/or the
adjustable pedals while recalling a memory position,
the driver ’s seat and/or the adjustable pedals recall may
stop working. If this happens, remove the obstruction
2-6
Page 85 of 580
Airbag System
The vehicle has the following airbags:
.A frontal airbag for the driver.
.A frontal airbag for the right front passenger.
.A seat‐mounted side impact airbag for the driver.
.A seat‐mounted side impact airbag for the right
front passenger.
.A roof-rail airbag for the driver and passenger
directly behind the driver.
.A roof-rail airbag for the right front passenger and
the person seated directly behind that passenger.
All of the airbags in the vehicle will have the word
AIRBAG embossed in the trim or on an attached label
near the deployment opening. For frontal airbags, the word AIRBAG will appear on the
middle part of the steering wheel for the driver and on
the instrument panel for the right front passenger.
With seat‐mounted side impact airbags, the word
AIRBAG will appear on the side of the seatback closest
to the door.
With roof-rail airbags, the word AIRBAG will appear
along the headliner or trim.
Airbags are designed to supplement the protection
provided by safety belts. Even though today's airbags
are also designed to help reduce the risk of injury from
the force of an inflating bag, all airbags must inflate very
quickly to do their job.
2-51
Page 87 of 580

{WARNING:
Children who are up against, or very close to, any
airbag when it inflates can be seriously injured or
killed. Airbags plus lap-shoulder belts offer
protection for adults and older children, but not for
young children and infants. Neither the vehicle's
safety belt system nor its airbag system is
designed for them. Young children and infants
need the protection that a child restraint system
can provide. Always secure children properly in
your vehicle. To read how, seeOlder Children
on
page 2‑30
or Infants and Young Childrenon
page 2‑32
.
There is an airbag
readiness light on the
instrument panel cluster,
which shows the airbag
symbol. The system checks the airbag electrical system for
malfunctions. The light tells you if there is an electrical
problem. See
Airbag Readiness Light
on page 4‑28for
more information.
Where Are the Airbags?
The driver frontal airbag is in the middle of the steering
wheel.
2-53
Page 89 of 580
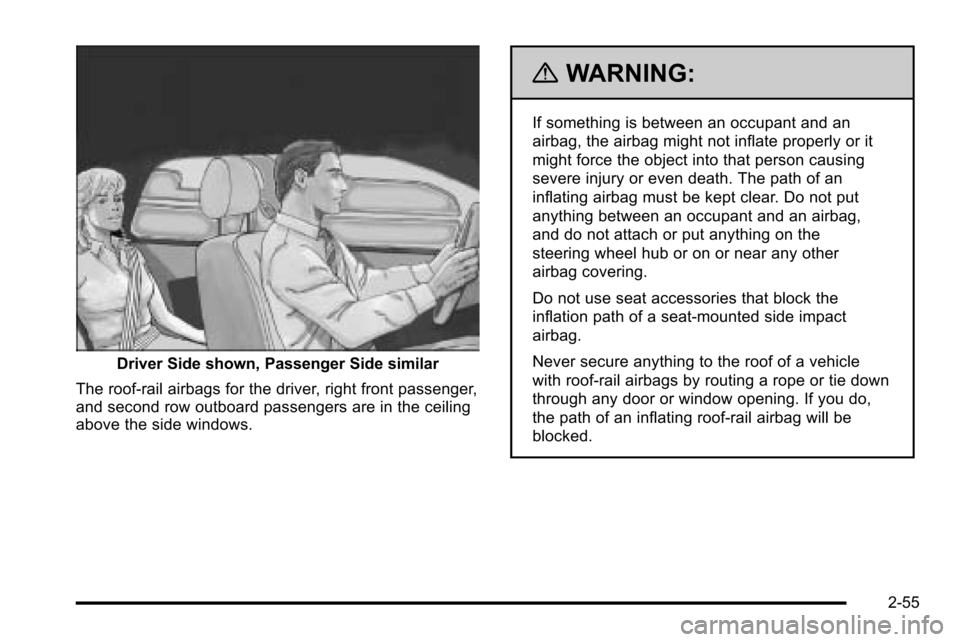
Driver Side shown, Passenger Side similar
The roof-rail airbags for the driver, right front passenger,
and second row outboard passengers are in the ceiling
above the side windows.
{WARNING:
If something is between an occupant and an
airbag, the airbag might not inflate properly or it
might force the object into that person causing
severe injury or even death. The path of an
inflating airbag must be kept clear. Do not put
anything between an occupant and an airbag,
and do not attach or put anything on the
steering wheel hub or on or near any other
airbag covering.
Do not use seat accessories that block the
inflation path of a seat-mounted side impact
airbag.
Never secure anything to the roof of a vehicle
with roof-rail airbags by routing a rope or tie down
through any door or window opening. If you do,
the path of an inflating roof-rail airbag will be
blocked.
2-55
Page 91 of 580
The vehicle has seat‐mounted side impact and
roof-rail airbags. SeeAirbag Systemon page 2‑51.
Seat‐mounted side impact and roof-rail airbags are
intended to inflate in moderate to severe side crashes.
In addition, these roof-rail airbags are intended to
inflate during a rollover or in a severe frontal impact.
Seat‐mounted side impact and roof-rail airbags will
inflate if the crash severity is above the system's
designed threshold level. The threshold level can
vary with specific vehicle design.
Roof-rail airbags are not intended to inflate in rear
impacts. A seat‐mounted side impact airbag is intended
to deploy on the side of the vehicle that is struck.
Both roof-rail airbags will deploy when either side of the
vehicle is struck or if the sensing system predicts that
the vehicle is about to roll over, or in a severe frontal
impact.
In any particular crash, no one can say whether an
airbag should have inflated simply because of the
damage to a vehicle or because of what the repair
costs were. For frontal airbags, inflation is determined
by what the vehicle hits, the angle of the impact, and
how quickly the vehicle slows down. For seat‐mounted
side impact and roof-rail airbags, deployment is
determined by the location and severity of the side
impact. In a rollover event, roof-rail airbag deployment
is determined by the direction of the roll.What Makes an Airbag Inflate?
In a deployment event, the sensing system sends an
electrical signal triggering a release of gas from the
inflator. Gas from the inflator fills the airbag causing the
bag to break out of the cover and deploy. The inflator,
the airbag, and related hardware are all part of the
airbag module.
Frontal airbag modules are located inside the
steering wheel and instrument panel. For vehicles with
seat‐mounted side impact airbags, there are airbags
modules in the side of the front seatbacks closest to the
door. For vehicles with roof-rail airbags, there are airbag
modules in the ceiling of the vehicle, near the side
windows that have occupant seating positions.
How Does an Airbag Restrain?
In moderate to severe frontal or near frontal collisions,
even belted occupants can contact the steering wheel
or the instrument panel. In moderate to severe side
collisions, even belted occupants can contact the inside
of the vehicle.
Airbags supplement the protection provided by safety
belts. Frontal airbags distribute the force of the impact
more evenly over the occupant's upper body, stopping
the occupant more gradually. Seat‐mounted side impact
and roof-rail airbags distribute the force of the impact
more evenly over the occupant's upper body.
2-57
Page 99 of 580
Adding Equipment to Your
Airbag-Equipped Vehicle
Q: Is there anything I might add to or change aboutthe vehicle that could keep the airbags from
working properly?
A: Yes. If you add things that change the vehicle's
frame, bumper system, height, front end or side
sheet metal, they may keep the airbag system from
working properly. Changing or moving any parts of
the front seats, safety belts, the airbag sensing and
diagnostic module, steering wheel, instrument panel,
roof-rail airbag modules, ceiling headliner or pillar
garnish trim, overhead console, front sensors, side
impact sensors, rollover sensor module, or airbag
wiring can affect the operation of the airbag system.
In addition, the vehicle may have a passenger
sensing system for the right front passenger
position, which includes sensors that are part of the
passenger seat. The passenger sensing system
may not operate properly if the original seat trim is
replaced with non-GM covers, upholstery or trim,
or with GM covers, upholstery or trim designed for a
different vehicle. Any object, such as an aftermarket
seat heater or a comfort enhancing pad or device,
installed under or on top of the seat fabric, could
also interfere with the operation of the passenger sensing system. This could either prevent proper
deployment of the passenger airbag(s) or prevent
the passenger sensing system from properly turning
off the passenger airbag(s). See
Passenger Sensing
System on page 2‑60.
If you have any questions, call Customer
Assistance. The phone numbers and addresses
for Customer Assistance are in Step Two of the
Customer Satisfaction Procedure in this manual.
See Customer Satisfaction Procedure on page 9‑2.
If the vehicle has rollover roof-rail airbags, see
Different Size Tires and Wheels
on page 7‑74for
additional important information.
Q: Because I have a disability, I have to get my vehicle modified. How can I find out whether
this will affect my airbag system?
A: If you have questions, call Customer Assistance.
The phone numbers and addresses for Customer
Assistance are in Step Two of the Customer
Satisfaction Procedure in this manual. See
Customer Satisfaction Procedure on page 9‑2.
In addition, your dealer/retailer and the service manual
have information about the location of the airbag
sensors, sensing and diagnostic module and airbag
wiring.
2-65
Page 133 of 580

Ignition Positions
The ignition switch has
four different positions.
To shift out of P (Park), the ignition must be in ON/RUN
or ACC/ACCESSORY and the regular brake pedal must
be applied.
A (LOCK/OFF) : This position locks the ignition.
It may also lock the steering wheel and automatic
transmission. The key can be removed in LOCK/OFF.
On vehicles with an automatic transmission, the shift
lever must be in P (Park) to turn the ignition switch to
LOCK/OFF. The steering may bind with the wheels turned off center.
If this happens, move the steering wheel from right to
left while turning the key to ACC/ACCESSORY. If this
doesn't work, then the vehicle needs service.
Notice:
Using a tool to force the key to turn in the
ignition could cause damage to the switch or break
the key. Use the correct key, make sure it is all the
way in, and turn it only with your hand. If the key
cannot be turned by hand, see your dealer/retailer.
B (ACC/ACCESSORY) : This position lets things like
the radio and the windshield wipers operate while the
engine is off. Use this position if the vehicle must be
pushed or towed.
C (ON/RUN) : This position can be used to operate the
electrical accessories and to display some instrument
panel cluster warning and indicator lights. The switch
stays in this position when the engine is running. The
transmission is also unlocked in this position on
automatic transmission vehicles.
If you leave the key in the ACC/ACCESSORY or
ON/RUN position with the engine off, the battery could
be drained. You may not be able to start the vehicle if
the battery is allowed to drain for an extended period
of time.
3-31
Page 181 of 580

Section 4 Instrument Panel
Instrument Panel Overview. . . . . . . . . . . . . . . . . . . . . . . .4-3
Hazard Warning Flashers . . . . . . . . . . . . . . . . . . . . . . . 4-3
Horn . . . . . . . . . . . . . . . . . . . . . . . . . . . . . . . . . . . . . . . . . . . . 4-3
Tilt Wheel . . . . . . . . . . . . . . . . . . . . . . . . . . . . . . . . . . . . . . . 4-3
Heated Steering Wheel . . . . . . . . . . . . . . . . . . . . . . . . . 4-3
Turn Signal/Multifunction Lever . . . . . . . . . . . . . . . . . . 4-4
Turn and Lane-Change Signals . . . . . . . . . . . . . . . . . 4-4
Headlamp High/Low-Beam Changer . . . . . . . . . . . . 4-5
Flash-to-Pass . . . . . . . . . . . . . . . . . . . . . . . . . . . . . . . . . . . 4-5
Windshield Wipers . . . . . . . . . . . . . . . . . . . . . . . . . . . . . . 4-6
Windshield Washer . . . . . . . . . . . . . . . . . . . . . . . . . . . . . 4-6
Cruise Control . . . . . . . . . . . . . . . . . . . . . . . . . . . . . . . . . . 4-7
Exterior Lamps . . . . . . . . . . . . . . . . . . . . . . . . . . . . . . . . 4-10
Headlamps on Reminder . . . . . . . . . . . . . . . . . . . . . . 4-14
Daytime Running Lamps (DRL) . . . . . . . . . . . . . . . . 4-14
Automatic Headlamp System . . . . . . . . . . . . . . . . . . 4-15
Fog Lamps . . . . . . . . . . . . . . . . . . . . . . . . . . . . . . . . . . . . 4-16
Exterior Cargo Lamps . . . . . . . . . . . . . . . . . . . . . . . . . 4-16
Instrument Panel Brightness . . . . . . . . . . . . . . . . . . . 4-16
Dome Lamps . . . . . . . . . . . . . . . . . . . . . . . . . . . . . . . . . . 4-17
Dome Lamp Override . . . . . . . . . . . . . . . . . . . . . . . . . . 4-17 Entry/Exit Lighting . . . . . . . . . . . . . . . . . . . . . . . . . . . . . 4-17
Reading Lamps . . . . . . . . . . . . . . . . . . . . . . . . . . . . . . . . 4-17
Electric Power Management . . . . . . . . . . . . . . . . . . . 4-17
Battery Run-Down Protection . . . . . . . . . . . . . . . . . . 4-18
Accessory Power Outlet(s) . . . . . . . . . . . . . . . . . . . . . 4-18
Ashtray(s) and Cigarette Lighter . . . . . . . . . . . . . . . 4-19
Analog Clock . . . . . . . . . . . . . . . . . . . . . . . . . . . . . . . . . . 4-20
Climate Controls . . . . . . . . . . . . . . . . . . . . . . . . . . . . . . . . . . 4-20
Dual Automatic Climate Control System . . . . . . . 4-20
Outlet Adjustment . . . . . . . . . . . . . . . . . . . . . . . . . . . . . . 4-24
Warning Lights, Gages, and Indicators . . . . . . . . . .4-25
Instrument Panel Cluster . . . . . . . . . . . . . . . . . . . . . . . 4-26
Speedometer and Odometer . . . . . . . . . . . . . . . . . . . 4-27
Trip Odometer . . . . . . . . . . . . . . . . . . . . . . . . . . . . . . . . . 4-27
Tachometer . . . . . . . . . . . . . . . . . . . . . . . . . . . . . . . . . . . . 4-27
Safety Belt Reminders . . . . . . . . . . . . . . . . . . . . . . . . . 4-27
Airbag Readiness Light . . . . . . . . . . . . . . . . . . . . . . . . 4-28
Passenger Airbag Status Indicator . . . . . . . . . . . . . 4-29
Charging System Light . . . . . . . . . . . . . . . . . . . . . . . . 4-30
Brake System Warning Light . . . . . . . . . . . . . . . . . . . 4-31
4-1
Page 182 of 580
Section 4 Instrument Panel
Antilock Brake System (ABS) Warning Light . . . 4-32
StabiliTrak®Indicator Light . . . . . . . . . . . . . . . . . . . . . 4-32
Engine Coolant Temperature Gage . . . . . . . . . . . . 4-33
Tire Pressure Light . . . . . . . . . . . . . . . . . . . . . . . . . . . . 4-33
Malfunction Indicator Lamp . . . . . . . . . . . . . . . . . . . . 4-34
Oil Pressure Light . . . . . . . . . . . . . . . . . . . . . . . . . . . . . 4-37
Security Light . . . . . . . . . . . . . . . . . . . . . . . . . . . . . . . . . . 4-37
Fog Lamp Light . . . . . . . . . . . . . . . . . . . . . . . . . . . . . . . . 4-38
Lights On Reminder . . . . . . . . . . . . . . . . . . . . . . . . . . . 4-38
Cruise Control Light . . . . . . . . . . . . . . . . . . . . . . . . . . . 4-38
Highbeam On Light . . . . . . . . . . . . . . . . . . . . . . . . . . . . 4-38
Tow/Haul Mode Light . . . . . . . . . . . . . . . . . . . . . . . . . . 4-39
Fuel Gage . . . . . . . . . . . . . . . . . . . . . . . . . . . . . . . . . . . . . 4-39 Driver Information Center (DIC)
. . . . . . . . . . . . . . . . . .4-39
DIC Operation and Displays . . . . . . . . . . . . . . . . . . . 4-40
DIC Compass . . . . . . . . . . . . . . . . . . . . . . . . . . . . . . . . . . 4-46
DIC Warnings and Messages . . . . . . . . . . . . . . . . . . 4-48
DIC Vehicle Customization . . . . . . . . . . . . . . . . . . . . 4-56
Audio System(s) . . . . . . . . . . . . . . . . . . . . . . . . . . . . . . . . . . 4-66
Bluetooth
®. . . . . . . . . . . . . . . . . . . . . . . . . . . . . . . . . . . . . 4-66
Rear Seat Entertainment (RSE) System . . . . . . . 4-77
Rear Seat Audio (RSA) . . . . . . . . . . . . . . . . . . . . . . . . 4-85
Theft-Deterrent Feature . . . . . . . . . . . . . . . . . . . . . . . . 4-87
Audio Steering Wheel Controls . . . . . . . . . . . . . . . . 4-88
Radio Reception . . . . . . . . . . . . . . . . . . . . . . . . . . . . . . . 4-89
Fixed Mast Antenna . . . . . . . . . . . . . . . . . . . . . . . . . . . 4-90
XM™ Satellite Radio Antenna System . . . . . . . . . 4-90
4-2