tow CADILLAC ESCALADE EXT 2012 3.G Manual PDF
[x] Cancel search | Manufacturer: CADILLAC, Model Year: 2012, Model line: ESCALADE EXT, Model: CADILLAC ESCALADE EXT 2012 3.GPages: 494, PDF Size: 7.71 MB
Page 411 of 494
Black plate (69,1)Cadillac Escalade EXT Owner Manual - 2012
Vehicle Care 10-69
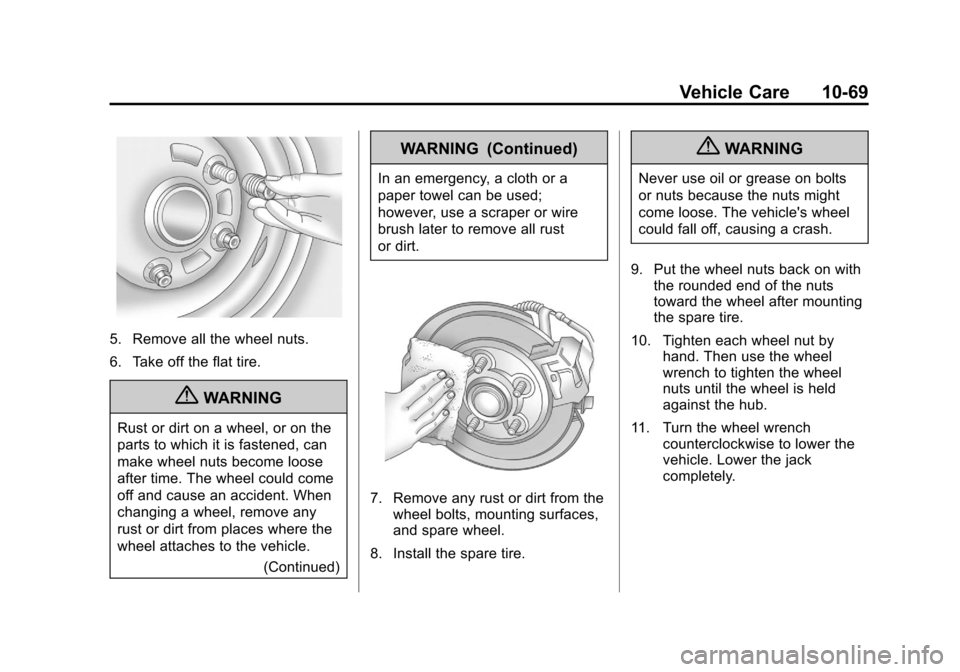
5. Remove all the wheel nuts.
6. Take off the flat tire.
{WARNING
Rust or dirt on a wheel, or on the
parts to which it is fastened, can
make wheel nuts become loose
after time. The wheel could come
off and cause an accident. When
changing a wheel, remove any
rust or dirt from places where the
wheel attaches to the vehicle.(Continued)
WARNING (Continued)
In an emergency, a cloth or a
paper towel can be used;
however, use a scraper or wire
brush later to remove all rust
or dirt.
7. Remove any rust or dirt from thewheel bolts, mounting surfaces,
and spare wheel.
8. Install the spare tire.
{WARNING
Never use oil or grease on bolts
or nuts because the nuts might
come loose. The vehicle's wheel
could fall off, causing a crash.
9. Put the wheel nuts back on with the rounded end of the nuts
toward the wheel after mounting
the spare tire.
10. Tighten each wheel nut by hand. Then use the wheel
wrench to tighten the wheel
nuts until the wheel is held
against the hub.
11. Turn the wheel wrench counterclockwise to lower the
vehicle. Lower the jack
completely.
Page 412 of 494
Black plate (70,1)Cadillac Escalade EXT Owner Manual - 2012
10-70 Vehicle Care
{WARNING
Wheel nuts that are improperly or
incorrectly tightened can cause
the wheels to become loose or
come off. The wheel nuts should
be tightened with a torque wrench
to the proper torque specification
after replacing. Follow the torque
specification supplied by the
aftermarket manufacturer when
using accessory locking wheel
nuts. SeeCapacities and
Specifications on page 12‑2 for
original equipment wheel nut
torque specifications.
Notice: Improperly tightened
wheel nuts can lead to brake
pulsation and rotor damage. To
avoid expensive brake repairs,
evenly tighten the wheel nuts in
the proper sequence and to the
proper torque specification. See
Capacities and Specifications on
page 12‑2 for the wheel nut
torque specification.
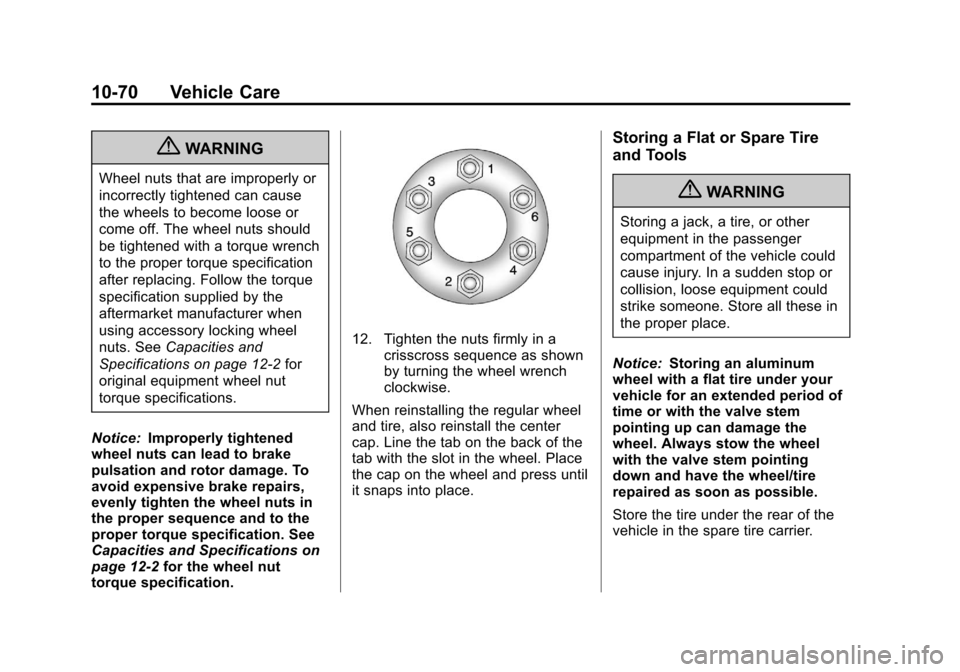
12. Tighten the nuts firmly in a crisscross sequence as shown
by turning the wheel wrench
clockwise.
When reinstalling the regular wheel
and tire, also reinstall the center
cap. Line the tab on the back of the
tab with the slot in the wheel. Place
the cap on the wheel and press until
it snaps into place.
Storing a Flat or Spare Tire
and Tools
{WARNING
Storing a jack, a tire, or other
equipment in the passenger
compartment of the vehicle could
cause injury. In a sudden stop or
collision, loose equipment could
strike someone. Store all these in
the proper place.
Notice: Storing an aluminum
wheel with a flat tire under your
vehicle for an extended period of
time or with the valve stem
pointing up can damage the
wheel. Always stow the wheel
with the valve stem pointing
down and have the wheel/tire
repaired as soon as possible.
Store the tire under the rear of the
vehicle in the spare tire carrier.
Page 416 of 494
Black plate (74,1)Cadillac Escalade EXT Owner Manual - 2012
10-74 Vehicle Care
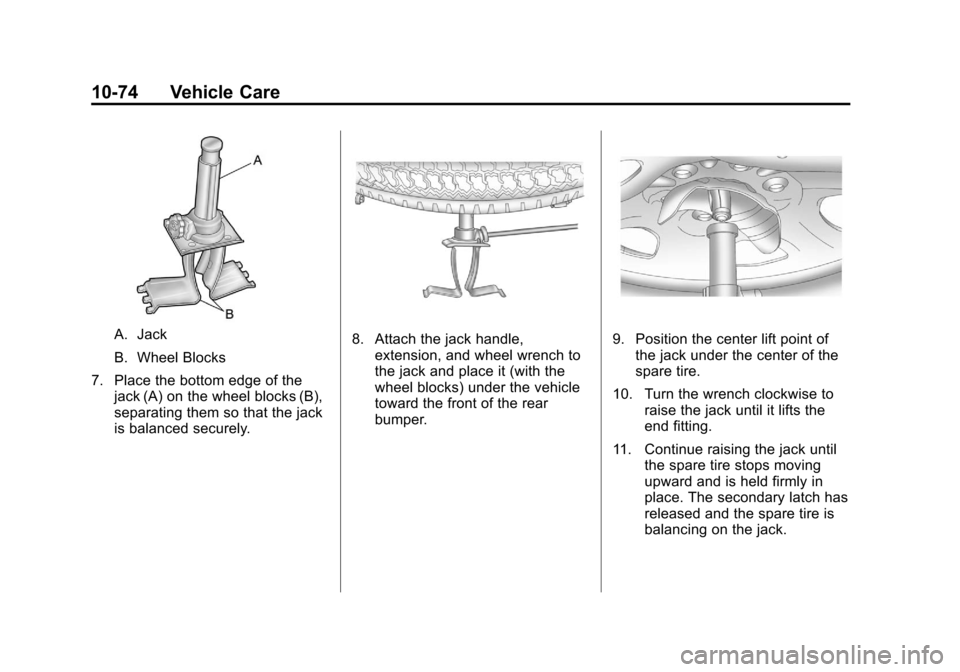
A. Jack
B. Wheel Blocks
7. Place the bottom edge of the jack (A) on the wheel blocks (B),
separating them so that the jack
is balanced securely.8. Attach the jack handle,extension, and wheel wrench to
the jack and place it (with the
wheel blocks) under the vehicle
toward the front of the rear
bumper.9. Position the center lift point ofthe jack under the center of the
spare tire.
10. Turn the wrench clockwise to raise the jack until it lifts the
end fitting.
11. Continue raising the jack until the spare tire stops moving
upward and is held firmly in
place. The secondary latch has
released and the spare tire is
balancing on the jack.
Page 422 of 494
Black plate (80,1)Cadillac Escalade EXT Owner Manual - 2012
10-80 Vehicle Care
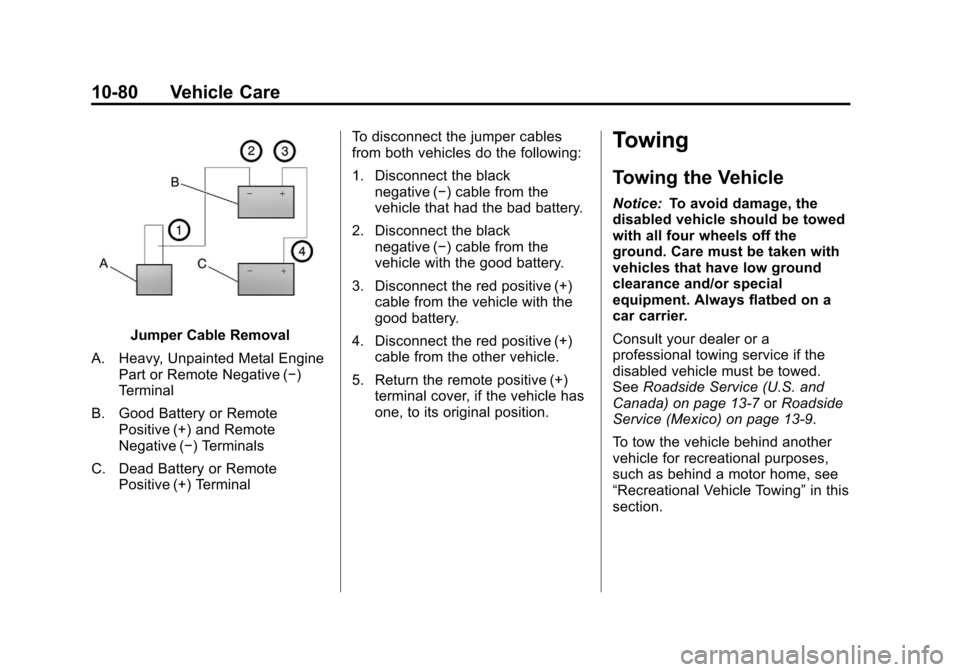
Jumper Cable Removal
A. Heavy, Unpainted Metal Engine Part or Remote Negative (−)
Terminal
B. Good Battery or Remote Positive (+) and Remote
Negative (−) Terminals
C. Dead Battery or Remote Positive (+) Terminal To disconnect the jumper cables
from both vehicles do the following:
1. Disconnect the black
negative (−) cable from the
vehicle that had the bad battery.
2. Disconnect the black negative (−) cable from the
vehicle with the good battery.
3. Disconnect the red positive (+) cable from the vehicle with the
good battery.
4. Disconnect the red positive (+) cable from the other vehicle.
5. Return the remote positive (+) terminal cover, if the vehicle has
one, to its original position.
Towing
Towing the Vehicle
Notice: To avoid damage, the
disabled vehicle should be towed
with all four wheels off the
ground. Care must be taken with
vehicles that have low ground
clearance and/or special
equipment. Always flatbed on a
car carrier.
Consult your dealer or a
professional towing service if the
disabled vehicle must be towed.
See Roadside Service (U.S. and
Canada) on page 13‑7 orRoadside
Service (Mexico) on page 13‑9.
To tow the vehicle behind another
vehicle for recreational purposes,
such as behind a motor home, see
“Recreational Vehicle Towing” in this
section.
Page 423 of 494
Black plate (81,1)Cadillac Escalade EXT Owner Manual - 2012
Vehicle Care 10-81
Recreational Vehicle
Towing
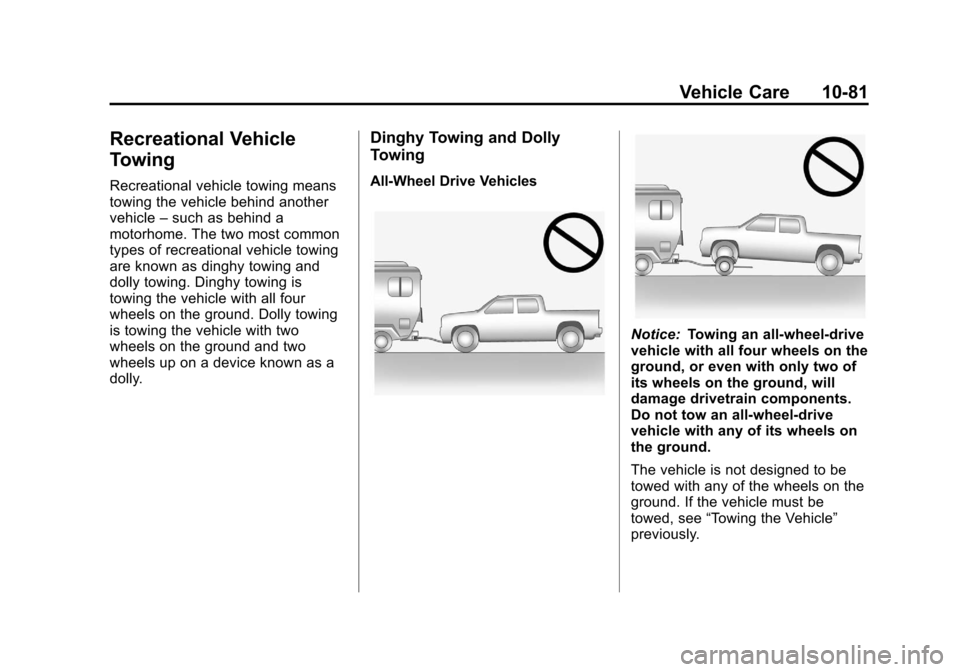
Recreational vehicle towing means
towing the vehicle behind another
vehicle–such as behind a
motorhome. The two most common
types of recreational vehicle towing
are known as dinghy towing and
dolly towing. Dinghy towing is
towing the vehicle with all four
wheels on the ground. Dolly towing
is towing the vehicle with two
wheels on the ground and two
wheels up on a device known as a
dolly.
Dinghy Towing and Dolly
Towing
All-Wheel Drive Vehicles
Notice: Towing an all-wheel-drive
vehicle with all four wheels on the
ground, or even with only two of
its wheels on the ground, will
damage drivetrain components.
Do not tow an all-wheel-drive
vehicle with any of its wheels on
the ground.
The vehicle is not designed to be
towed with any of the wheels on the
ground. If the vehicle must be
towed, see “Towing the Vehicle”
previously.
Page 424 of 494
Black plate (82,1)Cadillac Escalade EXT Owner Manual - 2012
10-82 Vehicle Care
Appearance Care
Exterior Care
Washing the Vehicle
To preserve the vehicle's finish,
wash it often and out of direct
sunlight.
Notice:Do not use petroleum
based, acidic, or abrasive
cleaning agents as they can
damage the vehicle's paint,
metal, or plastic parts. If damage
occurs, it would not be covered
by the vehicle's warranty.
Approved cleaning products can
be obtained from your dealer.
Follow all manufacturer
directions regarding correct
product usage, necessary safety
precautions, and appropriate
disposal of any vehicle care
product. Notice:
Avoid using high
pressure washes closer than
30 cm (12 in) to the surface of the
vehicle. Use of power washers
exceeding 8,274 kPa (1,200 psi)
can result in damage or removal
of paint and decals.
Rinse the vehicle well, before
washing and after, to remove all
cleaning agents completely. If they
are allowed to dry on the surface,
they could stain.
Dry the finish with a soft, clean
chamois or an all-cotton towel to
avoid surface scratches and water
spotting.
Finish Care
Application of aftermarket clearcoat
sealant/wax materials is not
recommended. If painted surfaces
are damaged, see your dealer to
have the damage assessed and
repaired. Foreign materials such as
calcium chloride and other salts, ice
melting agents, road oil and tar, tree sap, bird droppings, chemicals from
industrial chimneys, etc., can
damage the vehicle's finish if they
remain on painted surfaces. Wash
the vehicle as soon as possible.
If necessary, use non-abrasive
cleaners that are marked safe for
painted surfaces to remove foreign
matter.
Occasional hand waxing or mild
polishing should be done to remove
residue from the paint finish. See
your dealer for approved cleaning
products.
Notice:
Machine compounding or
aggressive polishing on a
basecoat/clearcoat paint finish
may damage it. Use only
non-abrasive waxes and polishes
that are made for a basecoat/
clearcoat paint finish on the
vehicle.
To keep the paint finish looking new,
keep the vehicle garaged or
covered whenever possible.
Page 425 of 494
Black plate (83,1)Cadillac Escalade EXT Owner Manual - 2012
Vehicle Care 10-83
Protecting Exterior Bright Metal
Parts
Regularly clean bright metal parts
with water or chrome polish on
chrome or stainless steel trim,
if necessary.
For aluminum, never use auto or
chrome polish, steam, or caustic
soap to clean. A coating of
wax, rubbed to high polish, is
recommended for all bright metal
parts.
Cleaning Exterior
Lamps/Lenses
Use only lukewarm or cold water, a
soft cloth, and a car washing soap
to clean exterior lamps and lenses.
Follow instructions under "Washing
the Vehicle" later in this section.
Windshield and Wiper Blades
Clean the outside of the windshield
with glass cleaner.
Clean rubber blades using lint-free
cloth or paper towel soaked with
windshield washer fluid or a mild
detergent. Wash the windshield
thoroughly when cleaning the
blades. Bugs, road grime, sap, and
a buildup of vehicle wash/wax
treatments may cause wiper
streaking.
Replace the wiper blades if they
are worn or damaged. Damage
can be caused by extreme dusty
conditions, sand, salt, heat, sun,
snow and ice.
Weatherstrips
Apply silicone grease on
weatherstrips to make them last
longer, seal better, and not stick or
squeak. SeeRecommended Fluids
and Lubricants on page 11‑12.
Tires
Use a stiff brush with tire cleaner to
clean the tires.
Notice: Using petroleum-based
tire dressing products on the
vehicle may damage the paint
finish and/or tires. When applying
a tire dressing, always wipe off
any overspray from all painted
surfaces on the vehicle.
Wheels and Trim —Aluminum
or Chrome
Use a soft, clean cloth with mild
soap and water to clean the wheels.
After rinsing thoroughly with clean
water, dry with a soft, clean towel.
A wax may then be applied.
Page 426 of 494

Black plate (84,1)Cadillac Escalade EXT Owner Manual - 2012
10-84 Vehicle Care
Keep the wheels clean using a soft,
clean cloth with mild soap and
water. Rinse with clean water. After
rinsing thoroughly, dry with a soft,
clean towel. A wax may then be
applied.
Notice:Chrome wheels and other
chrome trim may be damaged if
the vehicle is not washed after
driving on roads that have been
sprayed with magnesium,
calcium, or sodium chloride.
These chlorides are used on
roads for conditions such as ice
and dust. Always wash the
chrome with soap and water after
exposure.
Notice: To avoid surface damage,
do not use strong soaps,
chemicals, abrasive polishes,
cleaners, brushes, or cleaners
that contain acid on aluminum or
chrome-plated wheels. Use only
approved cleaners. Also, never
drive a vehicle with aluminum or
chrome-plated wheels through an automatic car wash that uses
silicone carbide tire cleaning
brushes. Damage could occur
and the repairs would not be
covered by the vehicle warranty.
Steering, Suspension, and
Chassis Components
Visually inspect front and rear
suspension and steering system for
damaged, loose, or missing parts or
signs of wear. Inspect power
steering lines and hoses for proper
hook-up, binding, leaks, cracks,
chafing, etc. Visually check constant
velocity joints, rubber boots, and
axle seals for leaks.
Body Component Lubrication
Lubricate all key lock cylinders,
hood hinges, liftgate hinges, and
steel fuel door hinge unless the
components are plastic. Applying
silicone grease on weatherstrips
with a clean cloth will make them
last longer, seal better, and not stick
or squeak.
Underbody Maintenance
Use plain water to flush dirt and
debris from the vehicle's underbody.
Your dealer or an underbody car
washing system can do this. If not
removed, rust and corrosion can
develop.
Sheet Metal Damage
If the vehicle is damaged and
requires sheet metal repair or
replacement, make sure the body
repair shop applies anti-corrosion
material to parts repaired or
replaced to restore corrosion
protection.
Original manufacturer replacement
parts will provide the corrosion
protection while maintaining the
vehicle warranty.
Page 428 of 494

Black plate (86,1)Cadillac Escalade EXT Owner Manual - 2012
10-86 Vehicle Care
Interior Glass
To clean, use a terry cloth fabric
dampened with water. Wipe droplets
left behind with a clean dry cloth.
Commercial glass cleaners may be
used, if necessary, after cleaning
the interior glass with plain water.
Notice:To prevent scratching,
never use abrasive cleaners on
automotive glass. Abrasive
cleaners or aggressive cleaning
may damage the rear window
defogger.
Fabric/Carpet
Start by vacuuming the surface
using a soft brush attachment. If a
rotating brush attachment is being
used during vacuuming, only use it
on the floor carpet. Before cleaning,
gently remove as much of the soil
as possible using one of the
following techniques:
.Gently blot liquids with a paper
towel. Continue blotting until no
more soil can be removed.
.For solid soils, remove as much
as possible prior to vacuuming.
To clean:
1. Saturate a clean lint-free colorfast cloth with water or club
soda. Microfiber cloth is
recommended to prevent lint
transfer to the fabric or carpet.
2. Remove excess moisture by gently wringing until water does
not drip from the cleaning cloth.
3. Start on the outside edge of the soil and gently rub toward the
center. Rotate the cleaning cloth
to a clean area frequently to
prevent forcing the soil in to the
fabric.
4. Continue gently rubbing the soiled area until there is no
longer any color transfer from
the soil to the cleaning cloth. 5. If the soil is not completely
removed, use a mild soap
solution followed only by club
soda or plain water.
If the soil is not completely
removed, it may be necessary to
use a commercial upholstery
cleaner or spot lifter. Test a small
hidden area for colorfastness before
using a commercial upholstery
cleaner or spot lifter. If ring
formation occurs, clean the entire
fabric or carpet.
Following the cleaning process, a
paper towel can be used to blot
excess moisture.
Page 432 of 494
Black plate (2,1)Cadillac Escalade EXT Owner Manual - 2012
11-2 Service and Maintenance
Your dealer recognizes the
importance of providing
competitively priced maintenance
and repair services. With trained
technicians, the dealer is the place
for routine maintenance such as oil
changes and tire rotations and
additional maintenance items like
tires, brakes, batteries, and wiper
blades.
Notice:Damage caused by
improper maintenance can lead to
costly repairs and may not be
covered by the vehicle warranty.
Maintenance intervals, checks,
inspections, recommended fluids,
and lubricants are important to
keep the vehicle in good working
condition.
The Tire Rotation and Required
Services are the responsibility of the
vehicle owner. It is recommended to
have your dealer perform these
services every 12 000 km/7,500 mi.
Proper vehicle maintenance helps to
keep the vehicle in good working
condition, improves fuel economy,
and reduces vehicle emissions. Because of the way people use
vehicles, maintenance needs vary.
There may need to be more
frequent checks and services.
The Additional Required
Services
‐Normal are for
vehicles that:
.Carry passengers and cargo
within recommended limits on
the Tire and Loading Information
label. See Vehicle Load Limits
on page 9‑16.
.Are driven on reasonable road
surfaces within legal driving
limits.
.Use the recommended fuel.
See Recommended Fuel on
page 9‑51.
Refer to the information in the
Maintenance Schedule Additional
Required Services ‐Normal chart. The Additional Required Services
‐
Severe are for vehicles that are:
.Mainly driven in hilly or
mountainous terrain.
.Frequently towing a trailer.
.Used for high speed or
competitive driving.
.Used for taxi, police, or delivery
service.
Refer to the information in the
Maintenance Schedule Additional
Required Services ‐Severe chart.
{WARNING
Performing maintenance
work can be dangerous and can
cause serious injury. Perform
maintenance work only if the
required information, proper tools,
and equipment are available.
If they are not, see your dealer to
have a trained technician do the
work. See Doing Your Own
Service Work on page 10‑3.