engine CADILLAC ESCALADE HYBRID 2012 Owner's Guide
[x] Cancel search | Manufacturer: CADILLAC, Model Year: 2012, Model line: ESCALADE HYBRID, Model: CADILLAC ESCALADE HYBRID 2012Pages: 90, PDF Size: 1.62 MB
Page 48 of 90
Black plate (6,1)Cadillac Escalade Hybrid - 2012
10-6 Vehicle Care How to Check Automatic
Transmission Fluid Notice: Too much or too
little fluid can damage the
transmission. Too much can
mean that some of the fluid could
come out and fall on hot engine
parts or exhaust system parts,
starting a fire. Too little fluid
could cause the transmission to
overheat. Be sure to get an
accurate reading if checking the
transmission fluid.
Before checking the fluid level,
prepare the vehicle as follows:
1. Start the engine and park the
vehicle on a level surface. Keep
the engine running.
2. Apply the parking brake and
place the shift lever in P (Park).
3. With your foot on the brake
pedal, move the shift lever
through each gear range,
pausing for about three seconds
in each range. Then, move the
shift lever back to P (Park). 4. Allow the engine to idle
(500 – 800 RPM) for at least
one minute. Slowly release the
brake pedal.
5. Keep the engine running and
press the Trip/Fuel button or
trip odometer reset stem until
TRANS TEMP (Transmission
Temperature) displays on the
Driver Information Center (DIC).
6. Using the TRANS TEMP
reading, determine and perform
the appropriate check
procedure. If the TRANS TEMP
reading is not within the required
temperature ranges, allow the
vehicle to cool, or operate the
vehicle until the appropriate
transmission fluid temperature is
reached. Cold Check Procedure
Use this procedure only as a
reference to determine if the
transmission has enough fluid
to be operated safely until a hot
check procedure can be made.
The hot check procedure is the
most accurate method to check the
fluid level. Perform the hot check
procedure at the first opportunity.
Use this cold check procedure
to check fluid level when the
transmission temperature is
between 24°C and 34°C
(75°F and 93°F).
1. Locate the transmission dipstick
at the rear of the engine
compartment, on the passenger
side of the vehicle.
Page 49 of 90
Black plate (7,1)Cadillac Escalade Hybrid - 2012
Vehicle Care 10-7See Engine Compartment
Overview on page 10 ‑ 4 for more
information.
2. Pull out the dipstick and wipe it
with a clean rag or paper towel.
3. Install the dipstick by pushing
it back in all the way, wait
three seconds, and then pull it
back out again.
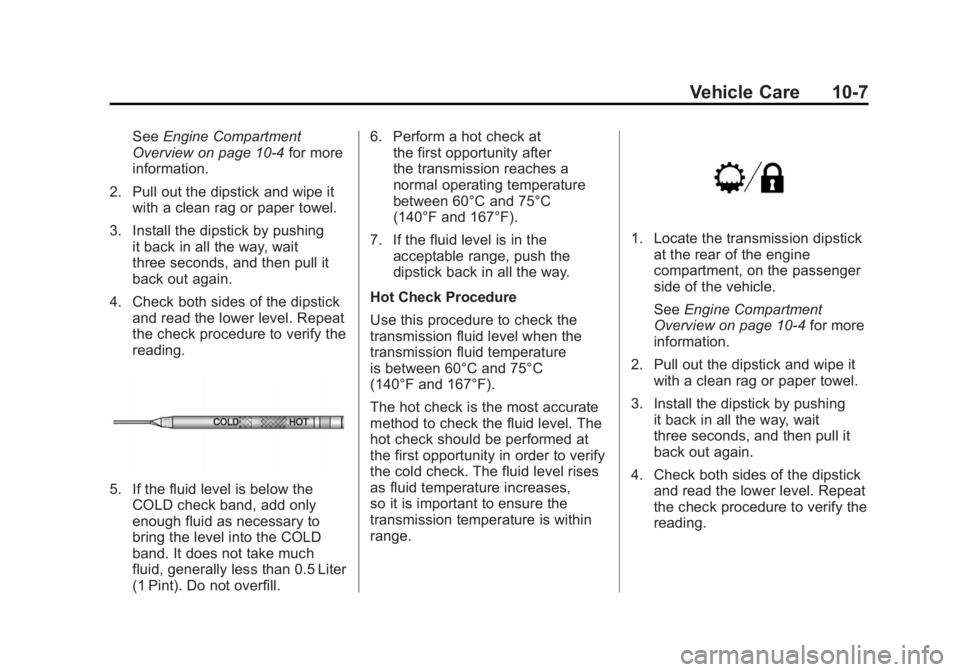
4. Check both sides of the dipstick
and read the lower level. Repeat
the check procedure to verify the
reading.
5. If the fluid level is below the
COLD check band, add only
enough fluid as necessary to
bring the level into the COLD
band. It does not take much
fluid, generally less than 0.5 Liter
(1 Pint). Do not overfill. 6. Perform a hot check at
the first opportunity after
the transmission reaches a
normal operating temperature
between 60°C and 75°C
(140°F and 167°F).
7. If the fluid level is in the
acceptable range, push the
dipstick back in all the way.
Hot Check Procedure
Use this procedure to check the
transmission fluid level when the
transmission fluid temperature
is between 60°C and 75°C
(140°F and 167°F).
The hot check is the most accurate
method to check the fluid level. The
hot check should be performed at
the first opportunity in order to verify
the cold check. The fluid level rises
as fluid temperature increases,
so it is important to ensure the
transmission temperature is within
range. 1. Locate the transmission dipstick
at the rear of the engine
compartment, on the passenger
side of the vehicle.
See Engine Compartment
Overview on page 10 ‑ 4 for more
information.
2. Pull out the dipstick and wipe it
with a clean rag or paper towel.
3. Install the dipstick by pushing
it back in all the way, wait
three seconds, and then pull it
back out again.
4. Check both sides of the dipstick
and read the lower level. Repeat
the check procedure to verify the
reading.
Page 50 of 90
Black plate (8,1)Cadillac Escalade Hybrid - 2012
10-8 Vehicle Care
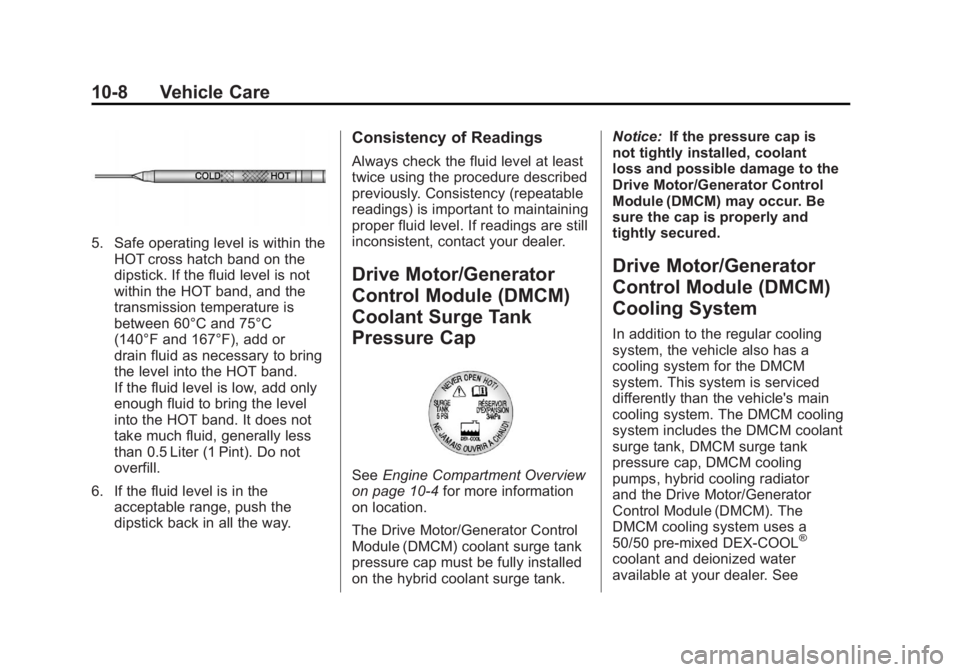
5. Safe operating level is within the
HOT cross hatch band on the
dipstick. If the fluid level is not
within the HOT band, and the
transmission temperature is
between 60°C and 75°C
(140°F and 167°F), add or
drain fluid as necessary to bring
the level into the HOT band.
If the fluid level is low, add only
enough fluid to bring the level
into the HOT band. It does not
take much fluid, generally less
than 0.5 Liter (1 Pint). Do not
overfill.
6. If the fluid level is in the
acceptable range, push the
dipstick back in all the way. Consistency of Readings Always check the fluid level at least
twice using the procedure described
previously. Consistency (repeatable
readings) is important to maintaining
proper fluid level. If readings are still
inconsistent, contact your dealer.
Drive Motor/Generator
Control Module (DMCM)
Coolant Surge Tank
Pressure Cap
See Engine Compartment Overview
on page 10 ‑ 4 for more information
on location.
The Drive Motor/Generator Control
Module (DMCM) coolant surge tank
pressure cap must be fully installed
on the hybrid coolant surge tank. Notice: If the pressure cap is
not tightly installed, coolant
loss and possible damage to the
Drive Motor/Generator Control
Module (DMCM) may occur. Be
sure the cap is properly and
tightly secured.
Drive Motor/Generator
Control Module (DMCM)
Cooling System In addition to the regular cooling
system, the vehicle also has a
cooling system for the DMCM
system. This system is serviced
differently than the vehicle's main
cooling system. The DMCM cooling
system includes the DMCM coolant
surge tank, DMCM surge tank
pressure cap, DMCM cooling
pumps, hybrid cooling radiator
and the Drive Motor/Generator
Control Module (DMCM). The
DMCM cooling system uses a
50/50 pre-mixed DEX-COOL ®
coolant and deionized water
available at your dealer. See
Page 51 of 90
Black plate (9,1)Cadillac Escalade Hybrid - 2012
Vehicle Care 10-9“ Engine Coolant ” and “ Cooling
System ” in the owner manual for
more information.
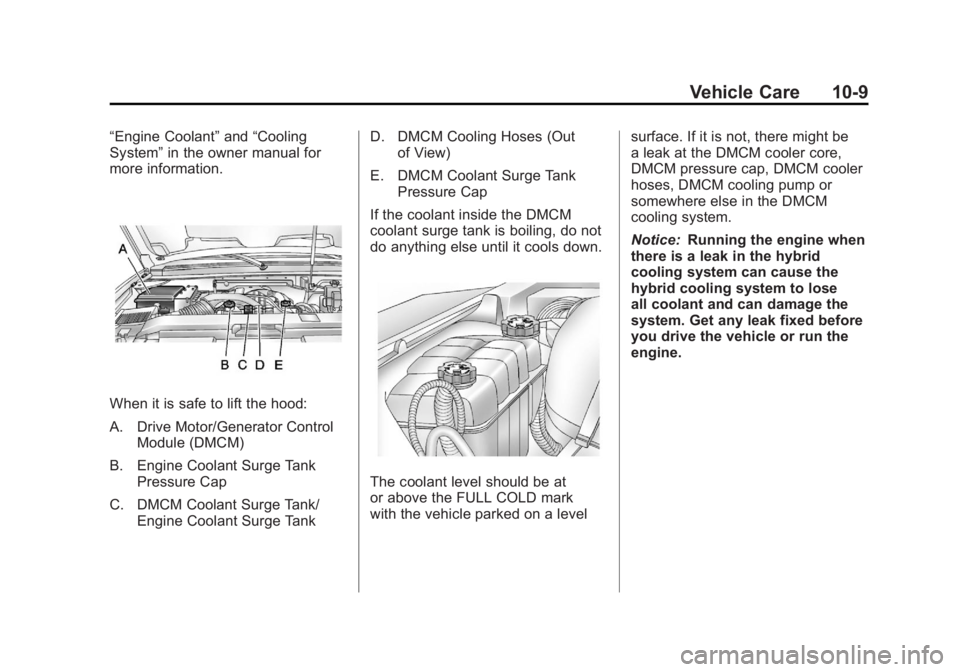
When it is safe to lift the hood:
A. Drive Motor/Generator Control
Module (DMCM)
B. Engine Coolant Surge Tank
Pressure Cap
C. DMCM Coolant Surge Tank/
Engine Coolant Surge Tank D. DMCM Cooling Hoses (Out
of View)
E. DMCM Coolant Surge Tank
Pressure Cap
If the coolant inside the DMCM
coolant surge tank is boiling, do not
do anything else until it cools down.
The coolant level should be at
or above the FULL COLD mark
with the vehicle parked on a level surface. If it is not, there might be
a leak at the DMCM cooler core,
DMCM pressure cap, DMCM cooler
hoses, DMCM cooling pump or
somewhere else in the DMCM
cooling system.
Notice: Running the engine when
there is a leak in the hybrid
cooling system can cause the
hybrid cooling system to lose
all coolant and can damage the
system. Get any leak fixed before
you drive the vehicle or run the
engine.
Page 52 of 90

Black plate (10,1)Cadillac Escalade Hybrid - 2012
10-10 Vehicle Care How to Add Coolant to the
DMCM Coolant Surge Tank If no problem has been found yet,
check to see if coolant is visible in
the DMCM coolant surge tank.
If coolant is visible, add pre ‐ mixed
DEX-COOL coolant, available at
your dealer, at the DMCM coolant
surge tank, but be sure the DMCM
cooling system, including the DMCM
coolant surge tank pressure cap, is
cool before you do it. Use the
procedure following.
{ WARNING
Steam and scalding liquids from a
hot cooling system can blow out
and burn you badly. They are
under pressure, and if you turn
the coolant surge tank pressure
cap — even a little — they can
come out at high speed. Never
turn the cap when the cooling
system, including the coolant
surge tank pressure cap, is hot.
(Continued) WARNING (Continued) Wait for the cooling system and
coolant surge tank pressure cap
to cool if you ever have to turn
the pressure cap.
Notice: Using coolant other than
a pre ‐ mixed DEX-COOL, available
at your dealer, may damage your
vehicle. Any repairs would not be
covered by your warranty. Always
use a pre ‐ mixed DEX-COOL
(silicate-free) coolant in your
vehicle.
{ WARNING
You can be burned if you spill
coolant on hot engine parts.
Coolant contains ethylene glycol
and it will burn if the engine parts
are hot enough. Do not spill
coolant on a hot engine. If the DMCM coolant is empty, the
vehicle must be serviced by your
dealer and a special fill procedure
must be followed.
Notice: Attempting to fill the
DMCM cooling surge tank
yourself when the fluid level is
empty can damage your vehicle.
Your vehicle must be serviced.
1. Park the vehicle on a level
surface and turn the vehicle off.
Remove the DMCM coolant
surge tank pressure cap when
the DMCM cooling system,
including the DMCM coolant
Page 53 of 90
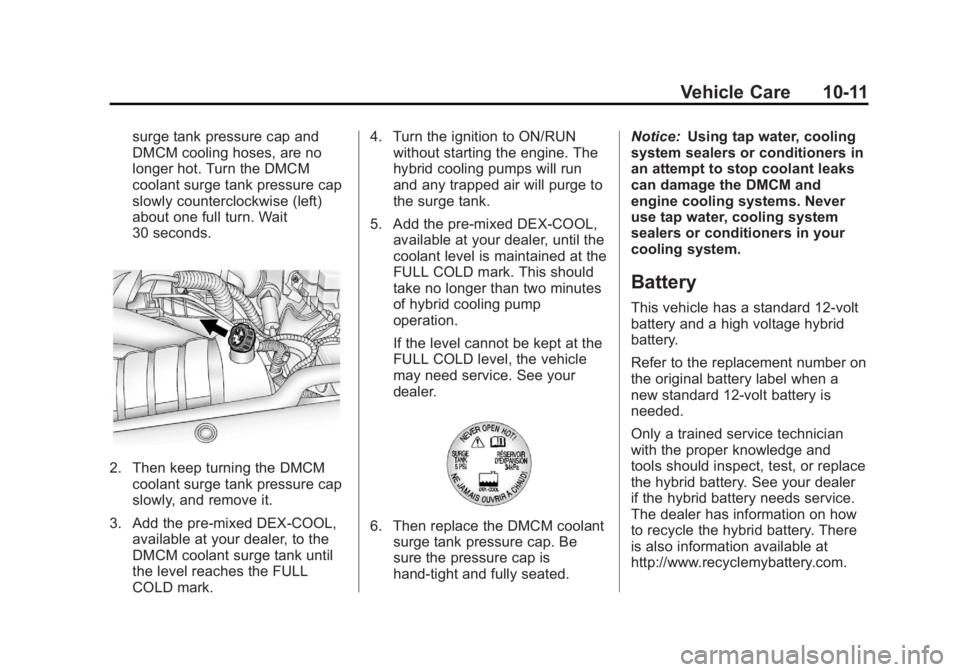
Black plate (11,1)Cadillac Escalade Hybrid - 2012
Vehicle Care 10-11surge tank pressure cap and
DMCM cooling hoses, are no
longer hot. Turn the DMCM
coolant surge tank pressure cap
slowly counterclockwise (left)
about one full turn. Wait
30 seconds.
2. Then keep turning the DMCM
coolant surge tank pressure cap
slowly, and remove it.
3. Add the pre ‐ mixed DEX ‐ COOL,
available at your dealer, to the
DMCM coolant surge tank until
the level reaches the FULL
COLD mark. 4. Turn the ignition to ON/RUN
without starting the engine. The
hybrid cooling pumps will run
and any trapped air will purge to
the surge tank.
5. Add the pre ‐ mixed DEX ‐ COOL,
available at your dealer, until the
coolant level is maintained at the
FULL COLD mark. This should
take no longer than two minutes
of hybrid cooling pump
operation.
If the level cannot be kept at the
FULL COLD level, the vehicle
may need service. See your
dealer.
6. Then replace the DMCM coolant
surge tank pressure cap. Be
sure the pressure cap is
hand-tight and fully seated. Notice: Using tap water, cooling
system sealers or conditioners in
an attempt to stop coolant leaks
can damage the DMCM and
engine cooling systems. Never
use tap water, cooling system
sealers or conditioners in your
cooling system.
Battery This vehicle has a standard 12 ‐ volt
battery and a high voltage hybrid
battery.
Refer to the replacement number on
the original battery label when a
new standard 12 ‐ volt battery is
needed.
Only a trained service technician
with the proper knowledge and
tools should inspect, test, or replace
the hybrid battery. See your dealer
if the hybrid battery needs service.
The dealer has information on how
to recycle the hybrid battery. There
is also information available at
http://www.recyclemybattery.com.
Page 56 of 90

Black plate (14,1)Cadillac Escalade Hybrid - 2012
10-14 Vehicle Care The vehicle also has a special fuse
in the battery box for the 300-volt
batteries. If this fuse has failed and
needs to be replaced, the vehicle
will be disabled and you will need
to have the vehicle repaired by
your dealer. Do not attempt to
self-service this fuse.
Engine Compartment
Fuse Block Hybrid Auxiliary Engine
Compartment Fuse Block The hybrid auxiliary engine
compartment fuse block is located
in the engine compartment near the
front of the vehicle. Lift the cover for
access to the fuse/relay block. See
Engine Compartment Overview on
page 10 ‑ 4 for more information on
its location. For more information on
the main underhood fuse block, see
“ Engine Compartment Fuse Block ”
in the owner manual. Fuses Usage
1 ACPO (SUV Only)
2 BECM FAN
3 ACCM
4 CAB HTR PMP Fuses Usage
5 EMPTY
6 COOL PUMP
7 EPS
Page 61 of 90

Black plate (19,1)Cadillac Escalade Hybrid - 2012
Vehicle Care 10-19TPMS Sensor Matching
Process Each TPMS sensor has a unique
identification code. The identification
code needs to be matched to a new
tire/wheel position after rotating the
vehicle ’ s tires or replacing one or
more of the TPMS sensors. Also,
the TPMS sensor matching process
should be performed after replacing
a spare tire with a road tire
containing the TPMS sensor. The
malfunction light and the DIC
message should go off at the next
ignition cycle. The sensors are
matched to the tire/wheel positions,
using a TPMS relearn tool, in the
following order: driver side front tire,
passenger side front tire, passenger
side rear tire, and driver side rear.
See your dealer for service or to
purchase a relearn tool.
There are two minutes to match
the first tire/wheel position, and
five minutes overall to match all
four tire/wheel positions. If it takes
longer, the matching process stops
and must be restarted. The TPMS sensor matching
process is:
1. Set the parking brake.
2. Turn the ignition to ON/RUN with
the engine off.
3. Press
Q and
K on the
Remote Keyless Entry (RKE)
transmitter at the same time for
approximately five seconds. The
horn sounds twice to signal the
receiver is in relearn mode and
TIRE LEARNING ACTIVE
message displays on the DIC
screen.
4. Start with the driver side
front tire.
5. Place the relearn tool against
the tire sidewall, near the valve
stem. Then press the button to
activate the TPMS sensor.
A horn chirp confirms that the
sensor identification code has
been matched to this tire and
wheel position. 6. Proceed to the passenger
side front tire, and repeat the
procedure in Step 5.
7. Proceed to the passenger side
rear tire, and repeat the
procedure in Step 5.
8. Proceed to the driver side rear
tire, and repeat the procedure
in Step 5. The horn sounds
two times to indicate the sensor
identification code has been
matched to the driver side rear
tire, and the TPMS sensor
matching process is no longer
active. The TIRE LEARNING
ACTIVE message on the DIC
display screen goes off.
9. Turn the ignition to LOCK/OFF.
10. Set all four tires to the
recommended air pressure
level as indicated on the Tire
and Loading Information label.
Page 63 of 90
Black plate (21,1)Cadillac Escalade Hybrid - 2012
Vehicle Care 10-21It is unusual for a tire to blowout
while driving, especially if the tires
are maintained properly. If air goes
out of a tire, it is much more likely to
leak out slowly. But if there ever is a
blowout, here are a few tips about
what to expect and what to do:
If a front tire fails, the flat tire
creates a drag that pulls the vehicle
toward that side. Take your foot off
the accelerator pedal and grip the
steering wheel firmly. Steer to
maintain lane position, and then
gently brake to a stop, well off the
road, if possible.
A rear blowout, particularly on a
curve, acts much like a skid and
may require the same correction as
used in a skid. Stop pressing the
accelerator pedal and steer to
straighten the vehicle. It may be
very bumpy and noisy. Gently
brake to a stop, well off the road,
if possible. { WARNINGDriving on a flat tire will cause
permanent damage to the tire.
Re-inflating a tire after it has
been driven on while severely
underinflated or flat may cause
a blowout and a serious crash.
Never attempt to re-inflate a tire
that has been driven on while
severely underinflated or flat.
Have your dealer or an authorized
tire service center repair or
replace the flat tire as soon as
possible.
If a tire goes flat, avoid further tire
and wheel damage by driving slowly
to a level place and stopping, well
off the road, if possible. Then
do this:
1. Turn on the hazard warning
flashers.
2. Park the vehicle. Set the parking
brake firmly and put the shift
lever in P (Park). 3. Turn off the engine.
4. Inspect the flat tire.
If the tire has been separated from
the wheel or has damaged sidewalls
or large tears that allow rapid air
loss, call a tire repair facility. See
“ Roadside Assistance Program ” or
“ Roadside Service ” in the owner
manual.
If the flat tire is due to a slow leak
caused by a nail or other similar
road hazard, the tire inflator kit may
be used to repair the damaged tire
temporarily. The kit uses a liquid tire
sealant to seal small punctures in
the tread area of the tire.
After repairing a tire with the tire
inflator kit, take the vehicle to an
authorized dealer to have the tire
inspected and repaired as soon
as possible. The tire sealant is a
temporary repair only. See Tire
Sealant and Compressor Kit on
page 10 ‑ 22 .
Page 64 of 90
Black plate (22,1)Cadillac Escalade Hybrid - 2012
10-22 Vehicle Care
Tire Sealant and
Compressor Kit
{ WARNINGIdling a vehicle in an enclosed
area with poor ventilation is
dangerous. Engine exhaust may
enter the vehicle. Engine exhaust
contains Carbon Monoxide (CO)
which cannot be seen or smelled.
It can cause unconsciousness
and even death. Never run the
engine in an enclosed area that
has no fresh air ventilation. For
more information, see ” Engine
Exhaust ” in the owner manual. { WARNINGOverinflating a tire could cause
the tire to rupture and you or
others could be injured. Be
sure to read and follow the tire
sealant and compressor kit
instructions and inflate the tire to
its recommended pressure. Do
not exceed the recommended
pressure.
{ WARNINGStoring the tire sealant and
compressor kit or other
equipment in the passenger
compartment of the vehicle could
cause injury. In a sudden stop or
collision, loose equipment could
strike someone. Store the tire
sealant and compressor kit in its
original location. If this vehicle has a tire sealant and
compressor kit, there may not be a
spare tire, tire changing equipment,
and on some vehicles there may not
be a place to store a tire.
The tire sealant and compressor
can be used to temporarily seal
punctures up to 6 mm (¼ inch) in
the tread area of the tire. It can
also be used to inflate an under
inflated tire.
If the tire has been separated from
the wheel, has damaged sidewalls,
or has a large puncture, the tire is
too severely damaged for the tire
sealant and compressor kit to be
effective. See “ Roadside Assistance
Program ” or “ Roadside Service ” in
the owner manual.