sunroof CADILLAC SEVILLE 2003 5.G Owners Manual
[x] Cancel search | Manufacturer: CADILLAC, Model Year: 2003, Model line: SEVILLE, Model: CADILLAC SEVILLE 2003 5.GPages: 408, PDF Size: 2.72 MB
Page 1 of 408

Seats and Restraint Systems........................... 1-1
Front Seats
............................................... 1-2
Safety Belts
.............................................. 1-6
Child Restraints
.......................................1-24
Supplemental In¯atable Restraint (SIR)
........1-44
Restraint System Check
............................1-52
Features and Controls..................................... 2-1
Keys
........................................................ 2-3
Doors and Locks
....................................... 2-9
Windows
.................................................2-15
Theft-Deterrent Systems
............................2-19
Starting and Operating Your Vehicle
...........2-23
Mirrors
....................................................2-37
OnStar
žSystem
......................................2-42
HomeLinkžTransmitter
.............................2-44
Storage Areas
.........................................2-48
Sunroof
..................................................2-50
Vehicle Personalization
.............................2-51
Instrument Panel............................................. 3-1
Instrument Panel Overview
.......................... 3-4
Climate Controls
......................................3-28
Warning Lights, Gages and Indicators
.........3-37
Driver Information Center (DIC)
..................3-53Trip Computer
.........................................3-77
Audio System(s)
.......................................3-78
Driving Your Vehicle....................................... 4-1
Your Driving, the Road, and Your Vehicle
..... 4-2
Towing
...................................................4-31
Service and Appearance Care.......................... 5-1
Service
..................................................... 5-3
Fuel
......................................................... 5-4
Checking Things Under the Hood
...............5-10
Headlamp Aiming
.....................................5-51
Bulb Replacement
....................................5-55
Windshield Wiper Blade Replacement
.........5-62
Tires
......................................................5-63
Appearance Care
.....................................5-83
Vehicle Identi®cation
.................................5-91
Electrical System
......................................5-92
Capacities and Speci®cations
...................5-100
Normal Maintenance Replacement Parts
....5-101
Maintenance Schedule..................................... 6-1
Maintenance Schedule
................................ 6-2
Customer Assistance Information.................... 7-1
Customer Assistance Information
.................. 7-2
Reporting Safety Defects
............................ 7-9
Index................................................................ 1
2003 Cadillac Seville Owner ManualM
Page 62 of 408

OnStaržSystem.............................................2-42
HomeLinkžTransmitter...................................2-44
Programming the HomeLinkžTransmitter.........2-45
Storage Areas................................................2-48
Glove Box...................................................2-48
Cellular Telephone........................................2-48
Center Console Storage Area.........................2-49
Map Pocket.................................................2-49Assist Handles.............................................2-49
Garment Hooks............................................2-49
Umbrella Holder...........................................2-49
Floor Mats...................................................2-49
Convenience Net..........................................2-49
Sunroof.........................................................2-50
Vehicle Personalization...................................2-51
Memory Seat, Mirrors and Steering Wheel.......2-51
Section 2 Features and Controls
2-2
Page 73 of 408

Trunk Lid Tie Down
{CAUTION:
Driving with the trunk lid open can allow
dangerous CO (carbon monoxide) gas to come
into your vehicle. You can't see or smell CO. It
can cause unconsciousness and even death. If
you ever need to drive with your trunk lid
open, then:
·Make sure all windows, the rear seat
pass-through and sunroof are closed.
·Turn the fan on your heating and cooling
system to its highest speed, with the
setting on AUTO and temperature between
65ÉF (18ÉC) and 85ÉF (29ÉC). This forces
fresh outside air into your vehicle.
·Open all air ducts on the instrument panel.
Don't use the trunk lid tie down if you are
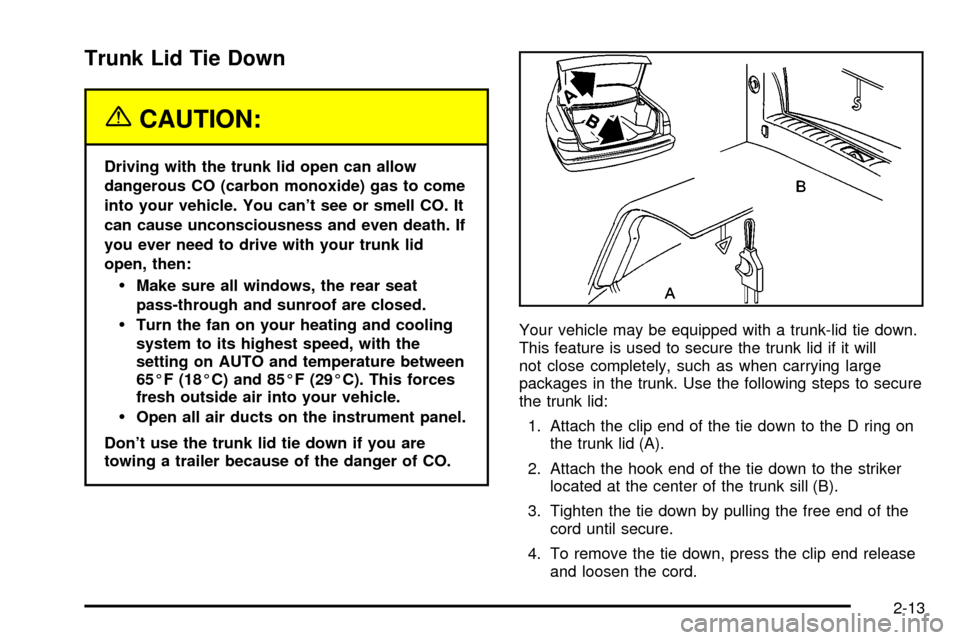
towing a trailer because of the danger of CO.Your vehicle may be equipped with a trunk-lid tie down.
This feature is used to secure the trunk lid if it will
not close completely, such as when carrying large
packages in the trunk. Use the following steps to secure
the trunk lid:
1. Attach the clip end of the tie down to the D ring on
the trunk lid (A).
2. Attach the hook end of the tie down to the striker
located at the center of the trunk sill (B).
3. Tighten the tie down by pulling the free end of the
cord until secure.
4. To remove the tie down, press the clip end release
and loosen the cord.
2-13
Page 84 of 408

Ignition Positions
With the key in the ignition
switch, located on the
instrument panel, you can
turn the key to four
different positions:
Notice:If your key seems stuck in OFF and you
can't turn it, be sure you are using the correct key;
if so, is it all the way in? Turn the key only with
your hand. Using a tool to force it could break the
key or the ignition switch. If none of this works, then
your vehicle needs service.OFF:This is the only position in which you can insert
or remove the key. This position also locks the transaxle.
It's a theft-deterrent feature.
ACC (Accessory):This position lets you use things
like the radio, windshield wipers, power windows
and optional sunroof when the engine is off. Use ACC if
you must have your vehicle in motion while the engine
is off (for example, if your vehicle is being pushed
or towed).
ON:This is the position for driving.
START:This position starts the engine.
2-24
Page 85 of 408

Retained Accessory Power (RAP)
The following accessories on your vehicle may be used
for up to 10 minutes after the ignition key is turned
from ON to OFF:
·Cellular Phone (If Equipped)
·Radio
·Power Windows
·Audio Steering Wheel Controls
·Sunroof (Option)
Power to these accessories stops after 10 minutes or if
a door is opened. If you want power for another
10 minutes, close all the doors and turn the ignition key
to ON and then back to OFF. If the cellular phone is
being used while retained accessory power is active, the
timer is suspended to avoid interruption of the call.
The timer resets to 10 minutes at the end of the call.
Starting Your Engine
Move your shift lever to PARK (P) or NEUTRAL (N).
Your engine won't start in any other position ± that's a
safety feature. To restart when you're already moving,
use NEUTRAL (N) only.
Notice:Do not try to shift to PARK (P) if your
vehicle is moving. If you do, you could damage the
transaxle. Shift to PARK (P) only when your
vehicle is stopped.
1. With your foot off the accelerator pedal, turn your
ignition key to START. When the engine starts, let
go of the key. The idle speed will go down as
your engine gets warm.
Notice:Holding your key in START for longer than
15 seconds at a time will cause your battery to
be drained much sooner. And the excessive heat
can damage your starter motor. Wait about
15 seconds between each try to help avoid draining
your battery or damaging your starter.
2-25
Page 110 of 408

Sunroof
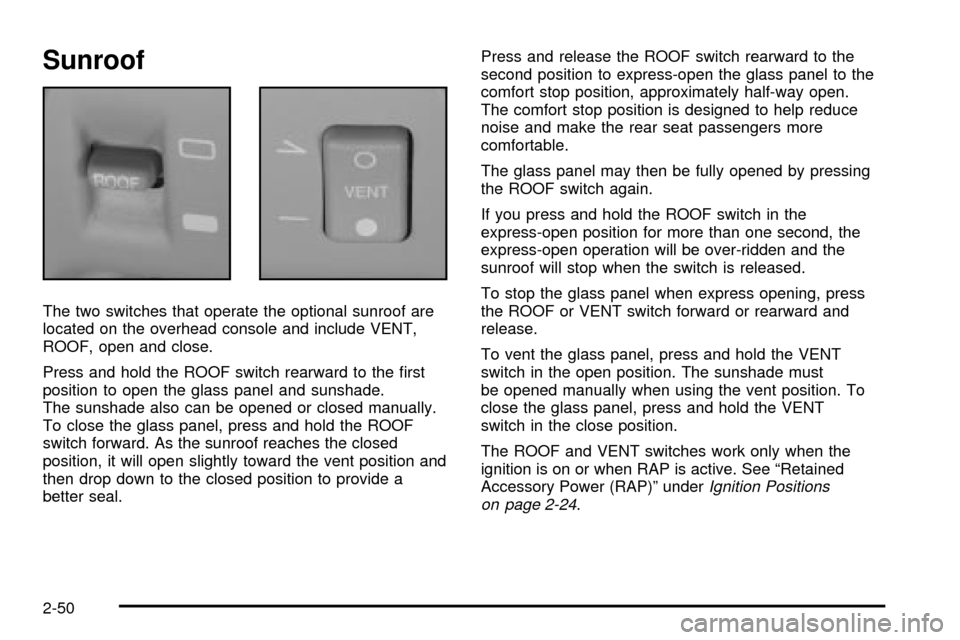
The two switches that operate the optional sunroof are
located on the overhead console and include VENT,
ROOF, open and close.
Press and hold the ROOF switch rearward to the ®rst
position to open the glass panel and sunshade.
The sunshade also can be opened or closed manually.
To close the glass panel, press and hold the ROOF
switch forward. As the sunroof reaches the closed
position, it will open slightly toward the vent position and
then drop down to the closed position to provide a
better seal.Press and release the ROOF switch rearward to the
second position to express-open the glass panel to the
comfort stop position, approximately half-way open.
The comfort stop position is designed to help reduce
noise and make the rear seat passengers more
comfortable.
The glass panel may then be fully opened by pressing
the ROOF switch again.
If you press and hold the ROOF switch in the
express-open position for more than one second, the
express-open operation will be over-ridden and the
sunroof will stop when the switch is released.
To stop the glass panel when express opening, press
the ROOF or VENT switch forward or rearward and
release.
To vent the glass panel, press and hold the VENT
switch in the open position. The sunshade must
be opened manually when using the vent position. To
close the glass panel, press and hold the VENT
switch in the close position.
The ROOF and VENT switches work only when the
ignition is on or when RAP is active. See ªRetained
Accessory Power (RAP)º under
Ignition Positions
on page 2-24.
2-50
Page 358 of 408

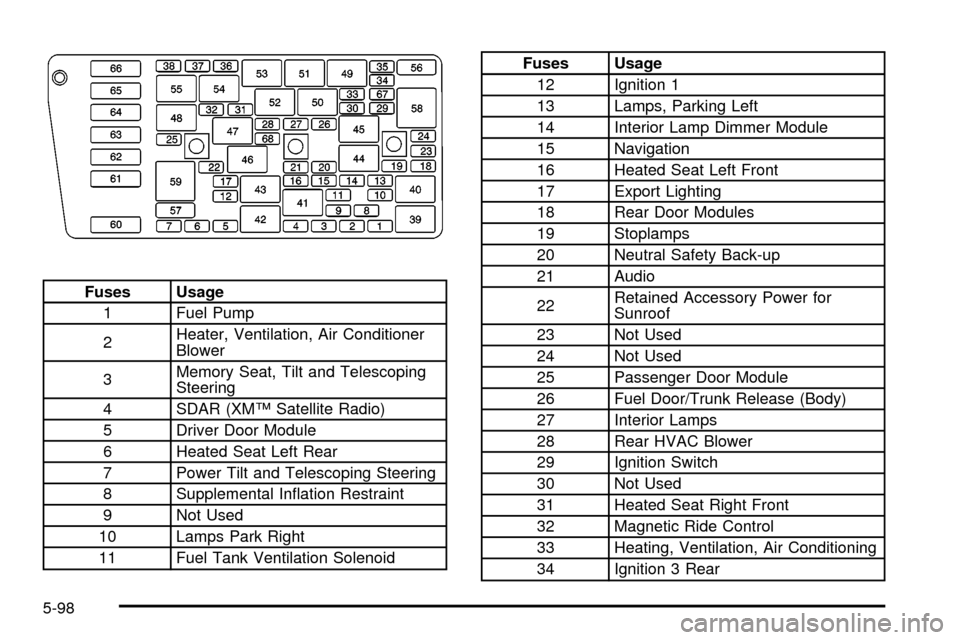
Fuses Usage
1 Fuel Pump
2Heater, Ventilation, Air Conditioner
Blower
3Memory Seat, Tilt and Telescoping
Steering
4 SDAR (XMŸ Satellite Radio)
5 Driver Door Module
6 Heated Seat Left Rear
7 Power Tilt and Telescoping Steering
8 Supplemental In¯ation Restraint
9 Not Used
10 Lamps Park Right
11 Fuel Tank Ventilation Solenoid
Fuses Usage
12 Ignition 1
13 Lamps, Parking Left
14 Interior Lamp Dimmer Module
15 Navigation
16 Heated Seat Left Front
17 Export Lighting
18 Rear Door Modules
19 Stoplamps
20 Neutral Safety Back-up
21 Audio
22Retained Accessory Power for
Sunroof
23 Not Used
24 Not Used
25 Passenger Door Module
26 Fuel Door/Trunk Release (Body)
27 Interior Lamps
28 Rear HVAC Blower
29 Ignition Switch
30 Not Used
31 Heated Seat Right Front
32 Magnetic Ride Control
33 Heating, Ventilation, Air Conditioning
34 Ignition 3 Rear
5-98
Page 359 of 408

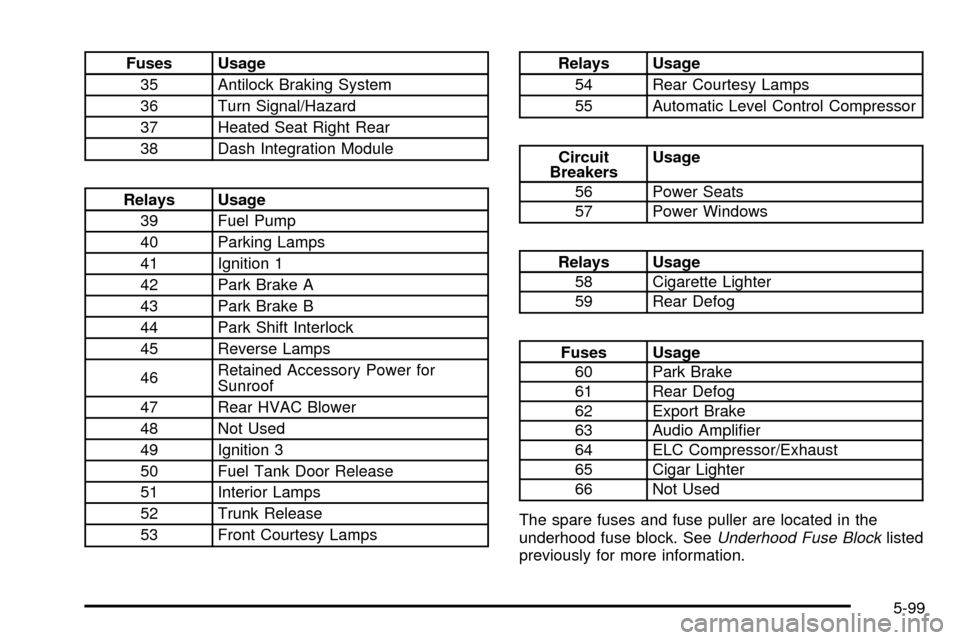
Fuses Usage
35 Antilock Braking System
36 Turn Signal/Hazard
37 Heated Seat Right Rear
38 Dash Integration Module
Relays Usage
39 Fuel Pump
40 Parking Lamps
41 Ignition 1
42 Park Brake A
43 Park Brake B
44 Park Shift Interlock
45 Reverse Lamps
46Retained Accessory Power for
Sunroof
47 Rear HVAC Blower
48 Not Used
49 Ignition 3
50 Fuel Tank Door Release
51 Interior Lamps
52 Trunk Release
53 Front Courtesy Lamps
Relays Usage
54 Rear Courtesy Lamps
55 Automatic Level Control Compressor
Circuit
BreakersUsage
56 Power Seats
57 Power Windows
Relays Usage
58 Cigarette Lighter
59 Rear Defog
Fuses Usage
60 Park Brake
61 Rear Defog
62 Export Brake
63 Audio Ampli®er
64 ELC Compressor/Exhaust
65 Cigar Lighter
66 Not Used
The spare fuses and fuse puller are located in the
underhood fuse block. See
Underhood Fuse Blocklisted
previously for more information.
5-99
Page 406 of 408

Steering Wheel Controls, Memory.....................2-51
Steering........................................................4-11
Storage Areas................................................2-48
Cellular Telephone.......................................2-48
Center Console Storage Area........................2-49
Convenience Net.........................................2-49
Glove Box..................................................2-48
Map Pocket................................................2-49
Umbrella Holder..........................................2-49
Storage.........................................................2-49
Garment Hooks...........................................2-49
Storing the Flat Tire and Tools..........................5-81
Storing the Spare Tire and Tools.......................5-82
Stuck in Sand, Mud, Ice or Snow......................4-30
Sun Visors.....................................................2-18
Sunroof.........................................................2-50
Supplemental In¯atable Restraints (SIR).............1-44
How Does an Air Bag Restrain?....................1-50
Servicing Your Air Bag-Equipped Vehicle.........1-52
What Makes an Air Bag In¯ate?....................1-49
What Will You See After an Air Bag In¯ates?....1-50
When Should an Air Bag In¯ate?...................1-49
Where Are the Air Bags?..............................1-46
T
Tachometer....................................................3-41
Taillamps.......................................................5-60
Turn Signal Lamps......................................5-60Taillamps (cont.)
TCS Warning Light..........................................3-45
Testing the Alarm............................................2-20
Theft-Deterrent, Radio....................................3-102
Theft-Deterrent Systems...................................2-19
PASS-Key
žIII Operation..............................2-21
PASS-KeyžIII .............................................2-21
Throttle System Inspection...............................6-14
Tilt Wheel........................................................ 3-7
Tire In¯ation Check........................................... 6-9
Tire Pressure Display......................................3-75
Tires.............................................................5-63
Buying New Tires........................................5-68
Chains.......................................................5-72
Changing a Flat Tire....................................5-74
Compact Spare Tire.....................................5-83
If a Tire Goes Flat.......................................5-73
In¯ation -- Tire Pressure...............................5-64
Inspection and Rotation................................5-67
Pressure Monitor System..............................5-65
Uniform Tire Quality Grading.........................5-69
Wheel Alignment and Tire Balance.................5-71
Wheel Replacement.....................................5-71
When It Is Time for New Tires......................5-68
To Use the Engine Coolant Heater....................2-27
Top Strap Anchor Location...............................1-35
Top Strap......................................................1-33
Torque Lock...................................................2-34
Total Weight on Your Vehicle's Tires..................4-38
14