headlamp CADILLAC SRX 2004 1.G Owner's Manual
[x] Cancel search | Manufacturer: CADILLAC, Model Year: 2004, Model line: SRX, Model: CADILLAC SRX 2004 1.GPages: 468, PDF Size: 2.92 MB
Page 309 of 468

Service............................................................5-3
Doing Your Own Service Work.........................5-4
Adding Equipment to the Outside of Your
Vehicle......................................................5-5
Fuel................................................................5-5
Gasoline Octane............................................5-5
Gasoline Speci�cations....................................5-6
California Fuel...............................................5-6
Additives.......................................................5-7
Fuels in Foreign Countries...............................5-7
Filling Your Tank............................................5-8
Filling a Portable Fuel Container.....................5-10
Checking Things Under the Hood....................5-10
Hood Release..............................................5-11
Engine Compartment Overview.......................5-12
Engine Oil...................................................5-15
Engine Air Cleaner/Filter................................5-22
Automatic Transmission Fluid.........................5-24
Engine Coolant.............................................5-25
Coolant Surge Tank Pressure Cap..................5-28
Engine Overheating.......................................5-28
Cooling System............................................5-31
Power Steering Fluid.....................................5-37
Windshield Washer Fluid................................5-38Brakes........................................................5-40
Battery........................................................5-43
Jump Starting...............................................5-44
All-Wheel Drive..............................................5-51
Rear Axle.......................................................5-52
Front Axle......................................................5-53
Bulb Replacement..........................................5-54
High Intensity Discharge (HID) Lighting............5-54
Halogen Bulbs..............................................5-54
Headlamps, Sidemarker, and Parking Lamps......5-55
Front Turn Signal and Fog Lamps...................5-56
Sidemarker Lamps........................................5-57
Center High-Mounted Stoplamp (CHMSL).........5-57
Taillamps, Turn Signal, Stoplamps and
Sidemarker Lamps.....................................5-57
Back-Up and License Plate Lamps..................5-57
Replacement Bulbs.......................................5-58
Windshield Wiper Blade Replacement..............5-59
Tires..............................................................5-61
In�ation - Tire Pressure.................................5-68
Tire Pressure Monitor System.........................5-69
Tire Inspection and Rotation...........................5-71
When It Is Time for New Tires.......................5-72
Section 5 Service and Appearance Care
5-1
Page 362 of 468
Bulb Replacement
For the proper type of replacement bulb, see
Replacement Bulbs on page 5-58.
For any bulb changing procedure not listed in this
section, contact your dealer.
High Intensity Discharge (HID)
Lighting
{CAUTION:
The low beam high intensity discharge lighting
system operates at a very high voltage. If you
try to service any of the system components,
you could be seriously injured. Have your
dealer or a quali�ed technician service them.
Your vehicle may have HID headlamps. After your
vehicle’s HID headlamp bulb has been replaced, you
may notice that the beam is a slightly different
shade than it was originally. This is normal.
Halogen Bulbs
{CAUTION:
Halogen bulbs have pressurized gas inside
and can burst if you drop or scratch the bulb.
You or others could be injured. Be sure to read
and follow the instructions on the bulb
package.
5-54
Page 363 of 468
Headlamps, Sidemarker, and
Parking Lamps
If your vehicle has halogen headlamps, you can replace
the bulbs using the following procedure. Use this
procedure to replace the front sidemarker and parking
lamp bulbs also.
If you only need to change the sidemarker bulb, there is
an alternate procedure. SeeSidemarker Lamps on
page 5-57.
To remove the headlamp assembly from the vehicle and
access the bulbs, follow these steps:
1. Open the hood. SeeHood Release on page 5-11
for more information.
2. Use a tool to remove all of the fasteners along the
top surface of the front fascia.
3. Use a tool to remove the one screw and
one retainer on top of the headlamp assembly.
4. Gently pull the front fascia away from the headlamp
assembly and remove the screw attached to the
bracket located at the lower inboard side of
the headlamp assembly.5. Pull the headlamp assembly straight out to
disengage the snap in the retainer at the lower
outboard back surface of the assembly and then
turn the lamp so that the inboard corner clears the
front fascia and pull the lamp out
6. Remove the electrical harness connector from the
back side of the headlamp assembly access cap.
To replace the headlamp high and/or low beam bulb(s),
do the following:
1. Remove the three Torx
®screws on the back of the
access cap.
2. You can now access the low and high beam bulbs.
Turn the low beam (upper) bulb socket
one-eighth turn counterclockwise to remove it from
the assembly. Turn the high beam (lower) bulb
socket one-eighth turn clockwise to remove it from
the assembly.
3. Replace the bulb. SeeReplacement Bulbs on
page 5-58for the proper bulb number.
4. Reinstall the three Torx
®screws while making sure
the access cap seal gasket is located in the access
cap seal channel.
5-55
Page 364 of 468
5. Replace the lower outboard plastic snap-in retainer
in the fender bracket, if needed.
6. Reconnect the electrical harness at the back side of
the headlamp assembly.
7. Push the headlamp assembly straight into the
vehicle engaging the headlamp pin into the
snap-in retainer and adjusting the lamp inboard side
to clear past the front fascia.
8. Reinstall the two fasteners on top of the headlamp
assembly.
9. Reinstall the screw at the lower inboard side of the
headlamp assembly through the hole in the bracket
into the headlamp.
10. Reinstall the fasteners along the top surface of the
front fascia.
To replace the sidemarker and/or parking lamp bulb(s),
do the following:
1. Turn the bulb socket counterclockwise to remove it
from the assembly.
2. Replace the bulb. SeeReplacement Bulbs on
page 5-58for the proper bulb number.
3. To reinstall the headlamp assembly, reverse
Steps 5 through 10 of the procedure listed
previously.Front Turn Signal and Fog Lamps
To replace the front turn signal and/or fog lamp bulb(s),
do the following:
1. Remove the protection shield located on the
underside of the front of the vehicle by pulling
out the push-pins located on the underside of the
shield. If you are replacing a bulb on the
passenger’s side, also use a tool to remove the
fasteners that attach the front fascia extension panel
in the wheelhouse.
2. Remove the two screws located on the inboard side
and bottom of the lamp assembly that attach the
lamp assembly to the front fascia.
3. Remove the lamp assembly from the front fascia by
rotating the lamp assembly rearward to disengage
the outboard hooks of the lamp from the slots
in the front fascia.
4. Disconnect the electrical harness connector from
the back side of the lamp assembly.
5. Remove the six Torx
®screws located on the
access cap.
6. If you are replacing the fog lamp bulb, disconnect
the electrical connector from the back of the bulb
socket.
5-56
Page 365 of 468
7. Turn the bulb socket one-quarter turn
counterclockwise to remove it from the assembly.
8. Replace the bulb. SeeReplacement Bulbs on
page 5-58for the proper bulb number.
9. Reverse Steps 1 through 7 to reinstall the bulb
socket and access cap.
Sidemarker Lamps
This procedure is for replacing the sidemarker bulb only.
If you need to replace the parking lamp bulb or
halogen headlamp as well, seeHeadlamps, Sidemarker,
and Parking Lamps on page 5-55.
1. Use a tool to remove the fasteners that attach the
front fascia extension panel in the wheelhouse.
2. Reach forward past the wheelhouse to the front
sidemarker socket in the outboard side of the
headlamp assembly.
3. Rotate the front sidemarker socket one-eighth turn
counterclockwise to remove it.
4. Replace the bulb. SeeReplacement Bulbs on
page 5-58for the proper bulb number.
5. Reinstall the socket to the headlamp assembly.
6. Replace the fasteners that attach the front fascia
extension panel in the wheelhouse.
Center High-Mounted Stoplamp
(CHMSL)
It is recommended that this component be replaced as
a unit. See your dealer.
Taillamps, Turn Signal, Stoplamps
and Sidemarker Lamps
It is recommended that this component be replaced as
a unit. See your dealer.
Back-Up and License Plate Lamps
To replace the back-up and/or license plate lamps, use
the following procedure:
1. Open the liftgate.
2. Remove the liftgate trim panel on the interior of the
liftgate by pulling the trim panel snap-in fasteners
out of the retainers and also by using a tool to
remove the screw on the bottom right side of the
trim panel.
3. Disconnect the courtesy lamp electrical connector
on the trim panel.
4. Use a tool to remove the �ve nuts on the back of
the license plate applique assembly.
5-57
Page 366 of 468
5. Remove the license plate applique assembly from
the liftgate by pulling the assembly rearward to
disengage the two snap-in retainer clips at the back
of the license plate applique assembly near the
liftgate panel.
6. For the back-up lamp, turn the bulb socket
one-quarter turn counterclockwise to remove.
For the license lamp, slide the license lamp
assembly out of the license plate applique
assembly, and turn the bulb socket one-quarter turn
counterclockwise to remove.
7. Replace the bulb. SeeReplacement Bulbs on
page 5-58for the proper bulb number.
8. Reverse Steps 1 through 6 to reinstall the license
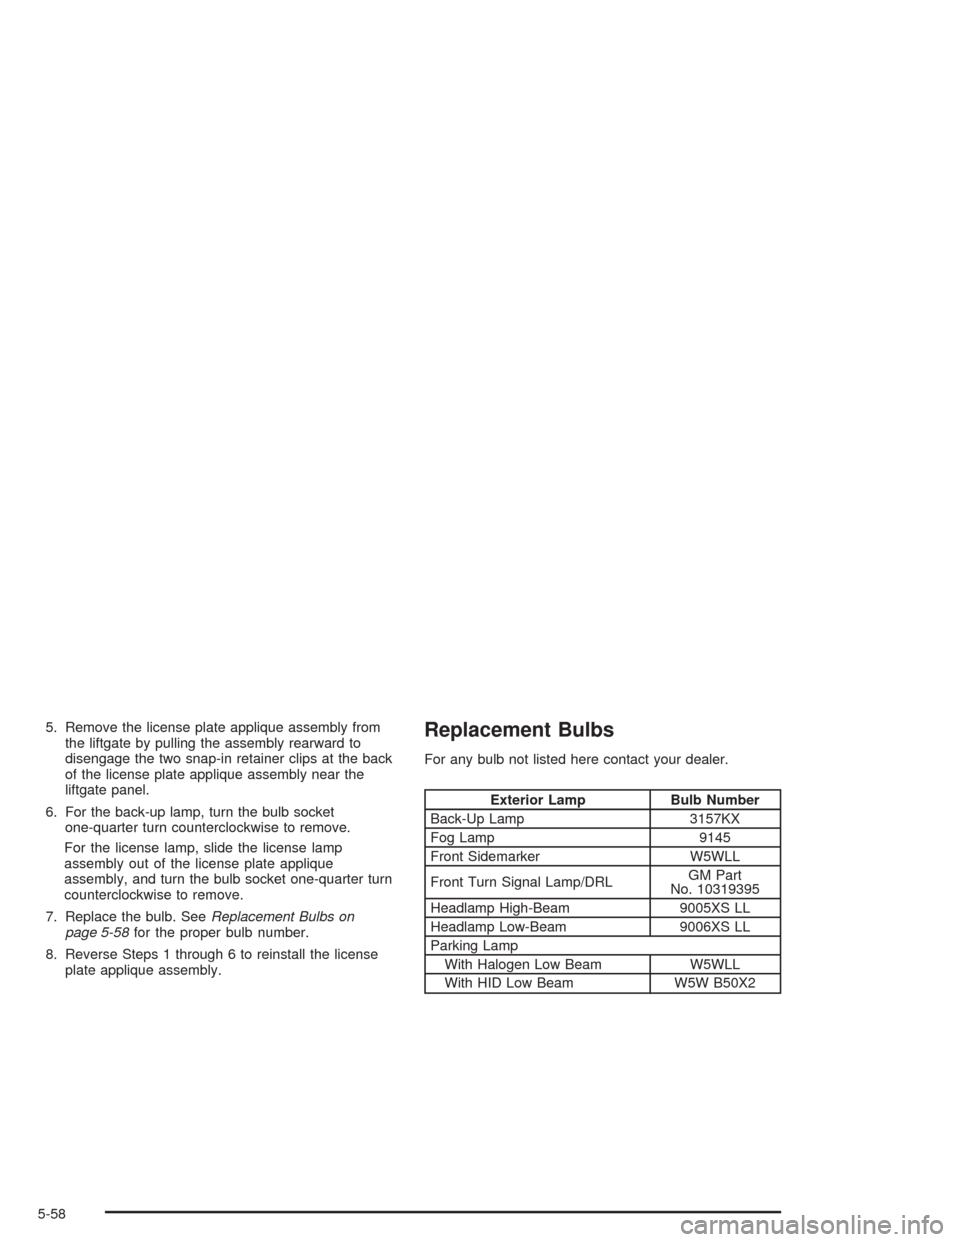
plate applique assembly.Replacement Bulbs
For any bulb not listed here contact your dealer.
Exterior Lamp Bulb Number
Back-Up Lamp 3157KX
Fog Lamp 9145
Front Sidemarker W5WLL
Front Turn Signal Lamp/DRLGM Part
No. 10319395
Headlamp High-Beam 9005XS LL
Headlamp Low-Beam 9006XS LL
Parking Lamp
With Halogen Low Beam W5WLL
With HID Low Beam W5W B50X2
5-58
Page 384 of 468
Wheel Replacement
Replace any wheel that is bent, cracked or badly rusted
or corroded. If wheel nuts keep coming loose, the
wheel, wheel bolts and wheel nuts should be replaced.
If the wheel leaks air, replace it (except some
aluminum wheels, which can sometimes be repaired).
See your dealer if any of these conditions exist.
Your dealer will know the kind of wheel you need.
Each new wheel should have the same load-carrying
capacity, diameter, width, offset and be mounted
the same way as the one it replaces.
If you need to replace any of your wheels, wheel bolts
or wheel nuts, replace them only with new GM
original equipment parts. This way, you will be sure to
have the right wheel, wheel bolts and wheel nuts
for your vehicle.{CAUTION:
Using the wrong replacement wheels, wheel
bolts or wheel nuts on your vehicle can be
dangerous. It could affect the braking and
handling of your vehicle, make your tires lose
air and make you lose control. You could have
a collision in which you or others could be
injured. Always use the correct wheel, wheel
bolts and wheel nuts for replacement.
Notice:The wrong wheel can also cause problems
with bearing life, brake cooling, speedometer or
odometer calibration, headlamp aim, bumper height,
vehicle ground clearance and tire or tire chain
clearance to the body and chassis.
SeeChanging a Flat Tire on page 5-79for more
information.
5-76
Page 412 of 468
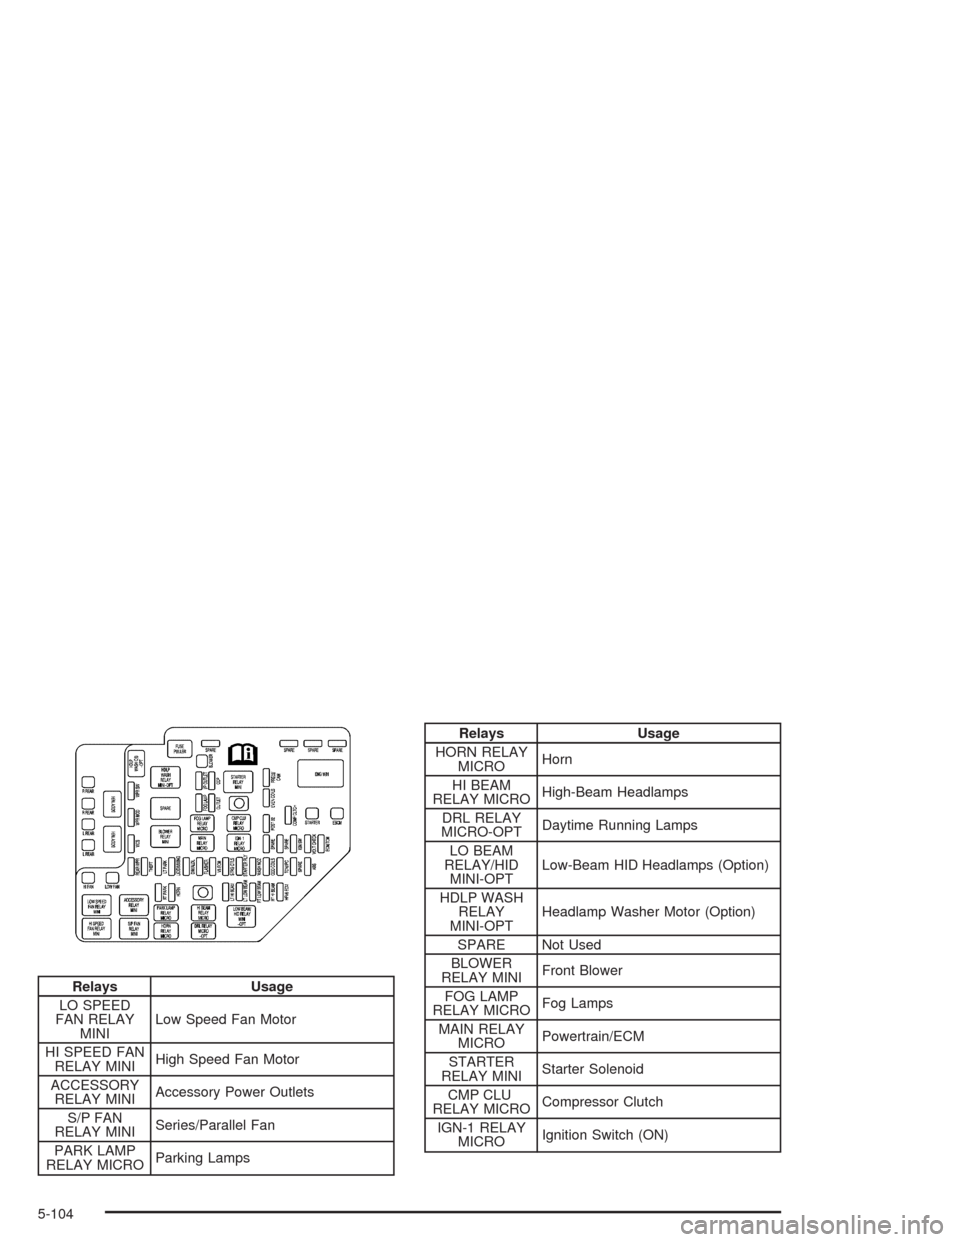
Relays Usage
LO SPEED
FAN RELAY
MINILow Speed Fan Motor
HI SPEED FAN
RELAY MINIHigh Speed Fan Motor
ACCESSORY
RELAY MINIAccessory Power Outlets
S/P FAN
RELAY MINISeries/Parallel Fan
PARK LAMP
RELAY MICROParking Lamps
Relays Usage
HORN RELAY
MICROHorn
HI BEAM
RELAY MICROHigh-Beam Headlamps
DRL RELAY
MICRO-OPTDaytime Running Lamps
LO BEAM
RELAY/HID
MINI-OPTLow-Beam HID Headlamps (Option)
HDLP WASH
RELAY
MINI-OPTHeadlamp Washer Motor (Option)
SPARE Not Used
BLOWER
RELAY MINIFront Blower
FOG LAMP
RELAY MICROFog Lamps
MAIN RELAY
MICROPowertrain/ECM
STARTER
RELAY MINIStarter Solenoid
CMP CLU
RELAY MICROCompressor Clutch
IGN-1 RELAY
MICROIgnition Switch (ON)
5-104
Page 413 of 468
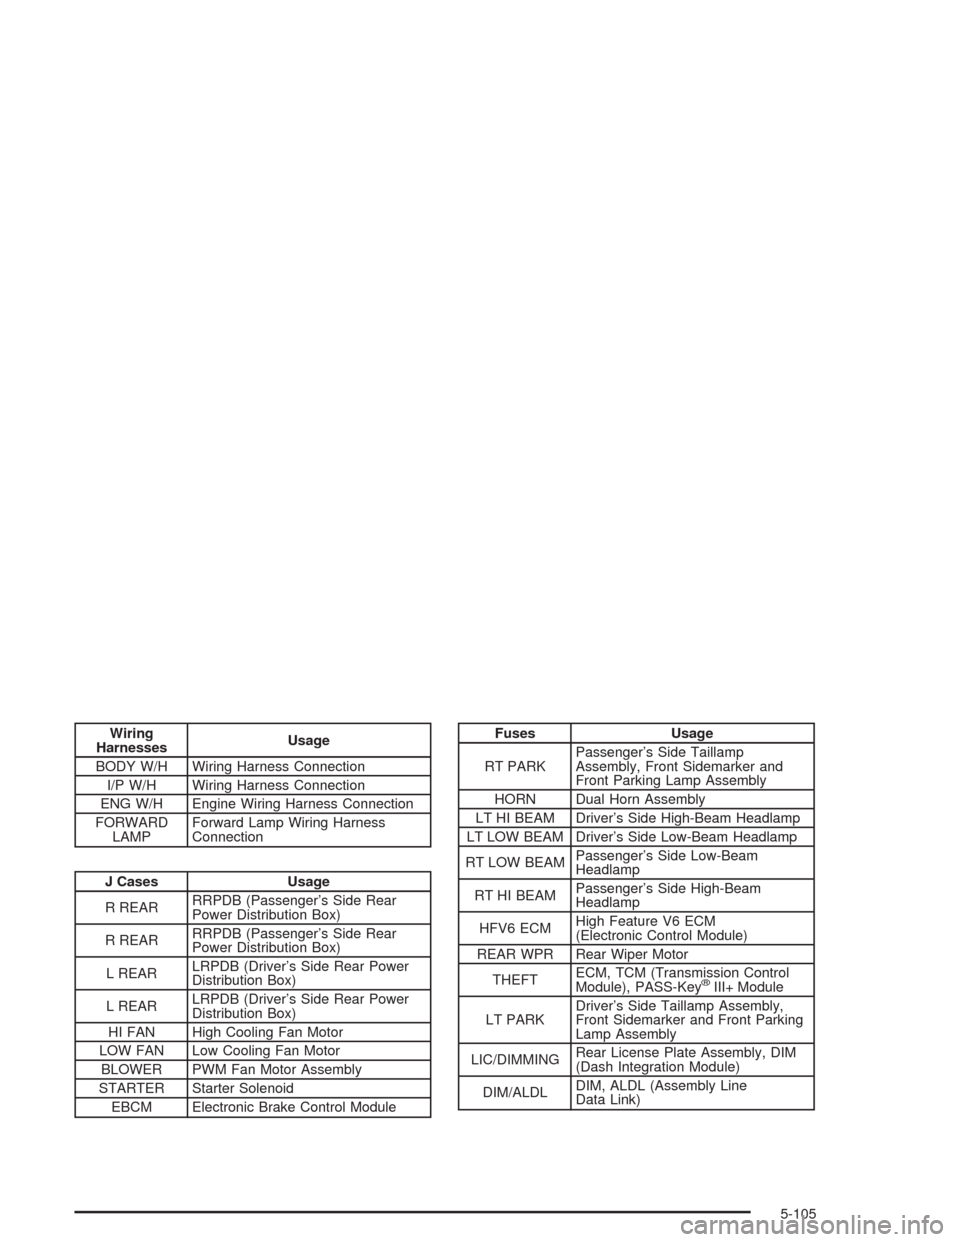
Wiring
HarnessesUsage
BODY W/H Wiring Harness Connection
I/P W/H Wiring Harness Connection
ENG W/H Engine Wiring Harness Connection
FORWARD
LAMPForward Lamp Wiring Harness
Connection
J Cases Usage
R REARRRPDB (Passenger’s Side Rear
Power Distribution Box)
R REARRRPDB (Passenger’s Side Rear
Power Distribution Box)
L REARLRPDB (Driver’s Side Rear Power
Distribution Box)
L REARLRPDB (Driver’s Side Rear Power
Distribution Box)
HI FAN High Cooling Fan Motor
LOW FAN Low Cooling Fan Motor
BLOWER PWM Fan Motor Assembly
STARTER Starter Solenoid
EBCM Electronic Brake Control Module
Fuses Usage
RT PARKPassenger’s Side Taillamp
Assembly, Front Sidemarker and
Front Parking Lamp Assembly
HORN Dual Horn Assembly
LT HI BEAM Driver’s Side High-Beam Headlamp
LT LOW BEAM Driver’s Side Low-Beam Headlamp
RT LOW BEAMPassenger’s Side Low-Beam
Headlamp
RT HI BEAMPassenger’s Side High-Beam
Headlamp
HFV6 ECMHigh Feature V6 ECM
(Electronic Control Module)
REAR WPR Rear Wiper Motor
THEFTECM, TCM (Transmission Control
Module), PASS-Key
®III+ Module
LT PARKDriver’s Side Taillamp Assembly,
Front Sidemarker and Front Parking
Lamp Assembly
LIC/DIMMINGRear License Plate Assembly, DIM
(Dash Integration Module)
DIM/ALDLDIM, ALDL (Assembly Line
Data Link)
5-105
Page 414 of 468
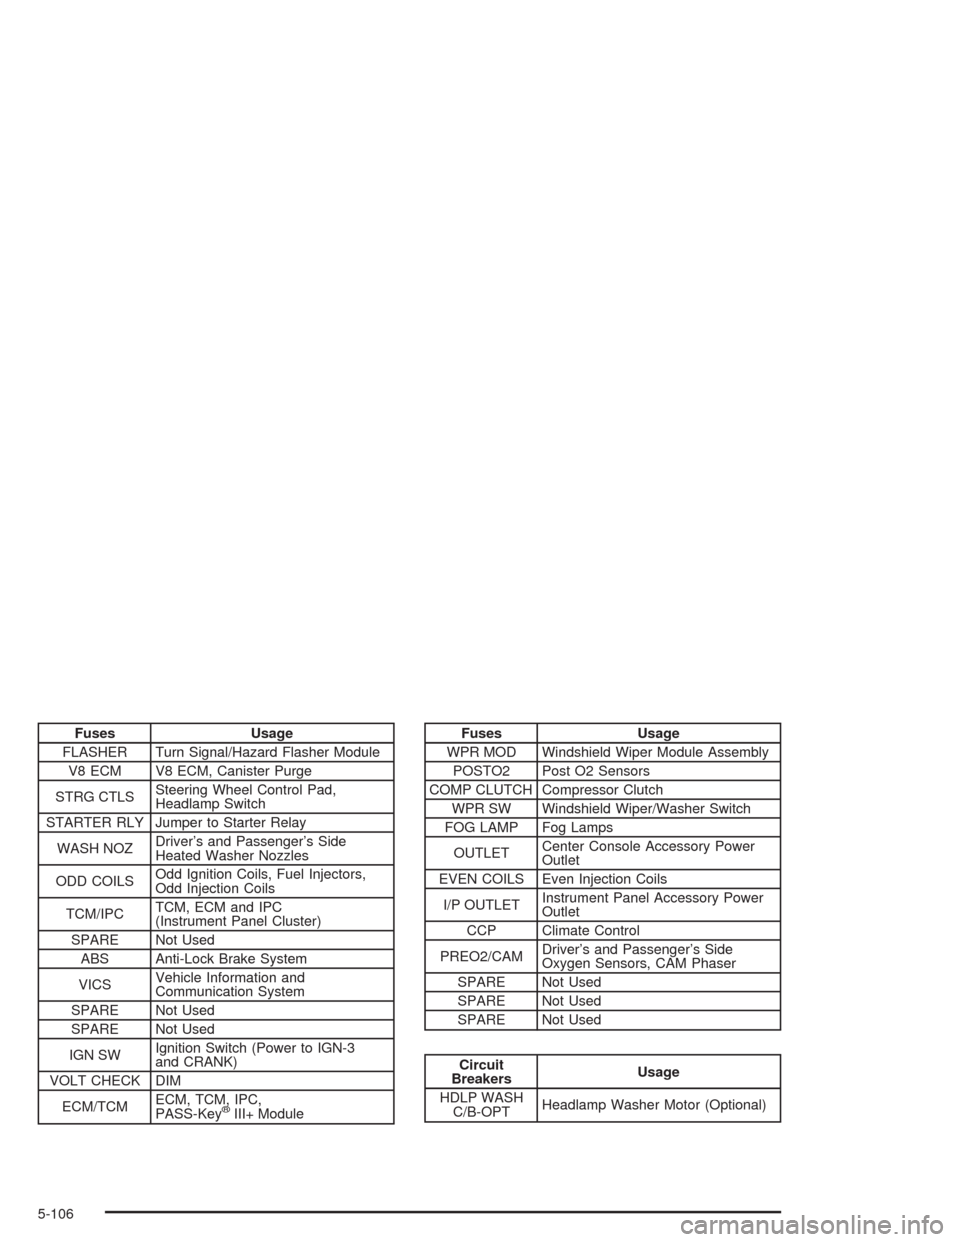
Fuses Usage
FLASHER Turn Signal/Hazard Flasher Module
V8 ECM V8 ECM, Canister Purge
STRG CTLSSteering Wheel Control Pad,
Headlamp Switch
STARTER RLY Jumper to Starter Relay
WASH NOZDriver’s and Passenger’s Side
Heated Washer Nozzles
ODD COILSOdd Ignition Coils, Fuel Injectors,
Odd Injection Coils
TCM/IPCTCM, ECM and IPC
(Instrument Panel Cluster)
SPARE Not Used
ABS Anti-Lock Brake System
VICSVehicle Information and
Communication System
SPARE Not Used
SPARE Not Used
IGN SWIgnition Switch (Power to IGN-3
and CRANK)
VOLT CHECK DIM
ECM/TCMECM, TCM, IPC,
PASS-Key
®III+ Module
Fuses Usage
WPR MOD Windshield Wiper Module Assembly
POSTO2 Post O2 Sensors
COMP CLUTCH Compressor Clutch
WPR SW Windshield Wiper/Washer Switch
FOG LAMP Fog Lamps
OUTLETCenter Console Accessory Power
Outlet
EVEN COILS Even Injection Coils
I/P OUTLETInstrument Panel Accessory Power
Outlet
CCP Climate Control
PREO2/CAMDriver’s and Passenger’s Side
Oxygen Sensors, CAM Phaser
SPARE Not Used
SPARE Not Used
SPARE Not Used
Circuit
BreakersUsage
HDLP WASH
C/B-OPTHeadlamp Washer Motor (Optional)
5-106